WoodCentral Forums

Est. 1998 — 27 years of woodworking knowledge

Search query: «"david ellsworth"»

Posts

Turning » David Ellsworth (born June 25, 1944 died 16 June 2025) »

Edited #1

David Ellsworth (born June 25, 1944 died 16 June 2025) was an American woodturner known for his tools and techniques for creating thin-walled hollow wood vessels. He began woodturning in 1958 and later earned both BFA and MFA degrees in sculpture from the University of Colorado, Boulder. His work is in the collections of over 40 museums, including the Metropolitan Museum of Art and the Smithsonian American Art Museum. In recognition of his contributions to the field, he received the Smithsonian Visionary Award in 2021.

https://en.wikipedia.org/wiki/David_Ellsworth
https://ellsworthstudios.com/about-david
https://www.woodcentral.com/forums/search/simple/%22david%20ellsworth%22
https://www.woodcentral.com/gallery/?q=item/1409-david-ellsworth#top
https://www.woodcentral.com/?p=Archive  | Select all categories and enter David Ellsworth as search term

Turning » Re: Glaser sharpening system »

#2

I've never tried Jerry's sharpening stand (or whatever it is called), so I can't testify about how well or easily it works, but it's really huge. For the past 30 years I've been using versions of David Ellsworth's bowl gouge sharpening jig and it works great for my Glaser gouges as well. I believe the two jigs work similarly, with a pivoting tool holder suspended/supported at a particular height and relationship to the grinding wheel and that allows the tool to be swung the full 180° against the wheel. Here's how David's jig does it. I don't know how he arrived at the exact geometry, but I've never been able to duplicate the grind using a One-Way jig.

glaser2.jpg
glaser1.jpg

General Woodworking » Re: Biggest influence »

#3

After growing up in a minimalist decor environment and a degree in Art History, my design vocabulary was always tilted to the Bauhaus movement.  Asian design concepts (China & Japan) have been a favored style even when imported into the West as did the Arts & Crafts makers.  George Nakashima has been a major influence for me in his reverence for what he found in any given piece of wood.    This same approach made me a member of the Round-and-Brown school of woodturning exemplified by David Ellsworth.

Hand Tools » Re: homemade tools »

#4

To pick up on what Ellis posted , I've made numerous hollowing tools following David Ellsworth. It's not just gluing in(yes glue) the carbide bits. You have to heat the shank with a torch and bend the tool to the shape you need for the particular hollowing design you're doing. After a while, you'll have enough curved hollowing shapes to hollow most anything. But It the beginning you will have to shape a half dozen or so.

Hand Tools » Re: homemade tools »

#5

Been making them for decades, Ray. I think my first few were from old files, back in the early 60s. Then, when David Ellsworth moved to our neck of the woods in 1980, I learned how he makes his hollow turning tools and I've made my own ever since, including the ones with the cobalt steel insert tips. I've also modified cheapo turning tools for specific work like beads, grooves, box lids, chatterwork, etc. Currently my lathe and tools are almost 4,000 miles away, or I would show you some pix. Do you have pix of your lathe tools?

Ellis

Turning » Re: A question for turners....... »

#6

Some good points here....

If you are going to do more turning, getting a mentor and/or joining a turning club is a good idea.  My son an I took a class from David Ellsworth and he improved my technique with the bowl gouge in a matter of seconds.  That minute or two was worth the whole class.

Sharp tools are important.  Learn to sharpen and get set up to do it.  They cut much better and easier if they are sharp with less tear out and fewer splinters.  (This is also part of why turning is a slippery slope,  Got a lathe? now you NEED a grinder and a chainsaw and more tools, and ...)

And, I made this point on the flat work forum,  I use the jointer to take the corners off if I remove them at all.  If you have a center marked you can set a compass in the hole and draw a circle on the end of the blank, and set the jointer fence to 45* and joint off the corners down to the circle.  If the blank is too big to start with, you can joint all eight sides down close to the circle.  (You can even taper the blank, but I digress...) 


Turning » Re: Hunter Mini Hercules clean cut »

#8

Re: tricks for hollowing *LINK*

john lucas

Sorry about that. The Hunter #1 comes in two styles and can be mounted in other peoples tools such as John Jordans or Lyle Jameison's, maybe David Ellsworths. Mike would be glad to answer your questions concerning if it will work in your tool shafts.


http://huntertoolsystems.com/

Turning » Re: earliest bowls »

#9

Amazing work, John

Ellis Walentine

You've had the knack ever since day one it seems. That segmented work is very clean and graceful, and your creativity with hand mirrors was in full bloom even then.

I wish I had some evidence of my first pieces, but I know for a fact that they weren't anywhere near your level of accomplishment. I got my first lathe -- a little Delta Rockwell 12 x 36 benchtop model -- and my first set of turning tools (Craftsman) for my 10th birthday, and I learned to turn from a couple Delta books and some old Deltagrams that had been passed down from my grandfather. It wasn't until David Ellsworth moved into our neighborhood, around 1980, that I started to turn seriously and learned to use bowl gouges. As much as I love turning, I regret that I have been too preoccupied over the years to spend more time exploring and mastering the craft. Maybe in my dotage...

Turning » make it your own »

#10

make it your own

GaryG in MD

Haven't posted for a while, so I thought I'd throw this out there for some C&C...

This is the first "large" (8") bowl I ever turned, over 13 years ago. Red oak from a neighbor. I had no clue what I was doing with gouges and scrapers -- I learned as I went. I roughed it and set it aside for a few... (years) to dry and oval. Boy, did it oval. But there was still plenty of round left in it thanks to the "10% rule". So I turned the final form. Not particularly attractive -- full of worm holes of various sizes. Now what? Augmentation! Yeah, that's it. So I bleached it. Then I had an ugly, bleached red oak bowl full of wormholes. Showed it to David Ellsworth... he said "burn it". Well, you know... I had already cracked a piece with a torch and didn't want to do that again, so I tried painting the inside white. Didn't work. Set it aside for many more years. Finally couldn't take it laughing at me every time I went by. Decided to paint the inside a nice burgundy color. Now we're getting somewhere... But it still has this big, ugly worm hole! Didn't want to fill it. Didn't want to carve it into some other shape (although I will do that in the future when I get another such 'opportunity'). So I had to make it mine. Think. It suddenly struck me that from a worms-eye view, the outside looked kind of like a cave dwelling in a cliff. How did they get into those caves anyway? Well, a ladder, of course. So I turned a trembleur, chopped it up, glued it together, wrapped the joints, and stuck it in the hole. To continue the story and make it a proper home or kiva, I added a stone fire pit. Voila. It took a lot of years, but this piece is now really mine! C&C requested. ...GG


Turning » Re: Can you describe open flute vs.closed flute »

#11

Re: Can you describe open flute vs.closed flute

Barry Irby

I have not read the other responses and I am somewhat dyslexic.

About 18 years ago my son and I took a class from David Ellsworth at Arrowmont. I bought my Bowl gouge there and had zero experience with it. David said "Point the flute in the direction you want it to go...." As is often the case, I completely misunderstood and struggled mightily. Somehow I thought that meant to point it like a finger and gave no consideration to position of the flute. I was hanging on as if my life were at stake and it may have been. David came over and took the tool from me and with just the tips of his fingers on one hand on the end of the handle made the cut. It was a revelation. It's still my favorite tool.

Some of us don't get the message verbally.

Turning » Re: What are your woodturning lessons learned? »

#12

Re: What are your woodturning lessons learned?

Jerry Maske

If you always do what you've always done, you'll always get what you always got. And for some folks, that's okay. I like to move on into different things. How many Maple bowls do I need catching dust?

Basic skills, are a necessity, but David Ellsworth is quick to tell you that there's more than one way to do anything, and MANY people will tell you not to do it that way. Their reasoning is that isn't the way they were taught. I learned a long time ago that there are ways to do things that will break the windows in the front of the shop, but there's usually three or four other ways that are safe, sane and produce good results.

The sharpening thing is a good point too. If your tools aren't sharp, you aren't going to cut and turn with them. I think we make too much of bevel angles, for example, and it comes down to the old axiom; if it works, don't fix it . Why get anal on the bevel angle of a scraper? When was the last time that bevel actually touched the wood? Different bevel angles will give you sharper edges, but they may need to be polished more often, so learn what's really going on so you understand the process and can make it work.

David says he didn't know you weren't supposed to use this tool or that one to do a specific process. So he kept trying different ways and found that the more ways he could find to do a job, the better chance he had of getting it done. I agree.

Turning » Re: bowl turning »

#13

Jeffrey.....

Barry Irby

You have gotten some wonderful and helpful advice and also overwhelming. Among the best of it is to find a mentor or club to attend and get some hands on experience and guidance. An hour or two with a good instructor will save you weeks of frustration.

About 16 years ago my son and I went to Arrowmont and took a class from David Ellsworth. I was using one his gouges completely wrong. Had a death grip on it. David came over, took it from me, reoriented it, held it with just finger tips and made a beautiful cut. It was like the difference between a tractor and a sports car. That minute was worth the whole class.

All the tools recommended re good ones, but they all have some sort of learning curve. Learn to enjoy them.

Turning » Re: [AD] BIG Lathe for Sale »

#14

I was there James, and remember your lathe...

JamieDonaldson

...on wheels that served as the trailer! I believe it was painted red, and somewhere in my old color 35mm slides I have photos of that event. Years after Thompson (the first) left turning I found him in his machine shop in Greenville SC restoring classic Jaguars(autos). I still have one of his 8' boring bars that I bought from David Ellsworth in 1990. Good to see you here posting!

Turning » [AD] BIG Lathe for Sale »

#15

[AD] BIG Lathe for Sale

Ellis Walentine

Hi folks,

My old friend David Ellsworth has decided to sell a truly iconic piece of equipment, his Jim Thompson lathe. Here's what David has to say about this lathe, along with a few tasty pictures and some details...


The Big Lathe

Reluctantly, I’m putting my Thompson lathe up for sale. Jim Thompson was a brilliant designer, engineer and machinist. He made probably only four custom-built lathes, this one for me in 1985. I used it for all my large pieces until about 2007 when the market began to drop for my large pieces.

This lathe is perfect for large work of any shape or style from logs to burls, accommodating workpieces up to 60" long x 37" diameter maximum. And it's the only lathe I know of where you actually stand inside the ways when hollowing a large bowl or hollow form...they're 18" apart.

The lathe comes with the first four-prong, independent-blade spur drive, plus a unique square-shafted drilling bar with interchangeable bits for deep drilling.

The feeling of putting a gouge to a piece of wood knowing that you're NEVER going to stop the lathe is more than rewarding; it brings a massive smile.

Details:

Overall Length: 96"

Overall Width: 36"

Spindle Height: 44"

Weight: 4,000 lbs. (Sides may also be filled with sand for add’l. mass.)

Workpiece weight limit: Unknown, possibly unlimited :)

Motor: 5 HP, single-phase

Speed Range: 110 - 1,100 rpm

Capacity: 37"diameter x 60" long

Quill extension from tailstock: 7"

Headstock spindle: 2"Φ x 8-tpi, #3 Morse taper

Tailstock: #3 Morse taper; may be offset to be out of the way of long handled tools.

Faceplates (2): 6" x 1" thick; 9" x 1" thick (May be bolted to a 16" x 3/8" faceplate for larger diameter work.)

Auxiliary faceplate for chucking bottom of bowls

Cam locks on all moving parts, tailstock and tool rest/banjo

Steady Rest: Fully equipped, 16" diameter capacity

Drilling Bar:30" long, 1 1/2" square drilling bar with 2 3/4" bit

Gantry with 2-ton chain hoist included. This is essential for picking up large chunks of wood and bringing them effortlessly and with subtle precision to the headstock.

Price: $5,500

Pickup by customer, Quakertown, PA [double-axle trailer with winch or rollback truck required]

Contact:

David Ellsworth

1378 Cobbler Rd.

Quakertown, PA 18951

215-536-5298 H

215-527-7928 Cell

[email protected]


Turning » Re: Number 1 »

#16

Re: Number 1

Josh Bowman

It's just a number. It does say he's the best, it just says he has lots of youtube time. I wish I could be a spokesman for Robust though, maybe get a nice lathe out it.......but it wouldn't be worth the time he spent making page after page of video's.

Carl Jacobson 120,536 subscribers • 20,738,696 views

Cindy Drozda 4,813 subscribers • 476,343 views

Captain Eddie 29,023 subscribers • 5,153,404 views

David Ellsworth 0 subscribers • 0 views To be fair he does have Craftsupply, Luguna and other not produced by him video's

Turning » Re: Tailstock sliding, engineering design ? »

#17

Re: Tailstock sliding, engineering design ?

Brad Vietje

Just throwing one in from the cheap seats here...

David Ellsworth used to encourage all new lathe owners/users to turn some wet oak, and pile the shavings on the bed and leave them overnight. Come back the next morning and sweep them away to reveal a rusty bed. Spray with WD-40 and clean up with wet-dry paper to get rid of the new tool shine and replace it that old tool gun metal grey -- almost silver. Grip improved.

Now, these days, the better made lathes don't have the same problems the mostly spindle lathes of the 60's and 70's had when used for bowl work, but apparently some of the castings don't have enough surface area, and some lower-priced gear is not well machined, leading to poor contact and grip.

My lathe (PM 3520B) grips pretty well as far as moving headstock, tailstock and tool rest banjo go, but the single screw holding the tool rest post is inadequate, and the design is just not up to the same standard. I'd like to see them make an improvement there. And since I turn a lot of wet wood, and I often have condensation issues as the weather changes, the bed has been oxidized and cleaned up a number of times and I'm perfectly fine with that. WD-40 and Scotch Bright pads are kept handy.

Safe spinning,

Brad Vietje

Newbury, VT

Turning » Re: sharpening a detail chisel »

#18

Re: sharpening a detail chisel

Jerry Maske

Hi Folks,

And I totally agree. I took a course with David Ellsworth and thought for sure I'd slipped into a time warp. He doesn't do much of anything like anyone else. And his response to all that is that when he was learning, well, there wasn't anyone around to teach him. So he figured stuff out himself and didn't know it wasn't supposed to work that way. David is a master but clearly marches to his own drummer and doesn't care if it doesn't please someone else.

That's good advice too. If you don't know better, and you can make it work, why do it any other way? My advice to anyone starting out would be to take a class if you can. If you can't, there's lots online to help you and plenty of books that will guide you. But when the sun passes under the yard arm, you're on your own, and a lot of us are.

I live in a pretty rural area up the coast and don't recall EVER seeing another wood turner near her. I do get up to Bangor to the club meetings when I can. But mostly, I figure things out on my own and do it that way until someone teaches me a better way.

And I guess that's the final word. If you ask a dozen turners how to do something, you'll likely end up with thirteen answers that might not resemble each other. My advice, if you don't know how to do something, give it a try and don't ever be afraid to fail. When that happens, it's the best teacher you can have. NEVER FEAR A FAILURE. However, LEARN from it. You'll be a better wood turner if you do.

Stonington? Do you know it's original name? Used to be called "Clam City." My father in law was born there when it had that name. Has some interesting tales to tell too.

Jerry

Turning » Re: using gouge upside down »

#19

Re: using gouge upside down

Keith Tompkins

Hi John, When I took David Ellsworth's class years ago, he showed the same technique inside a bowl to clean up ripples. 
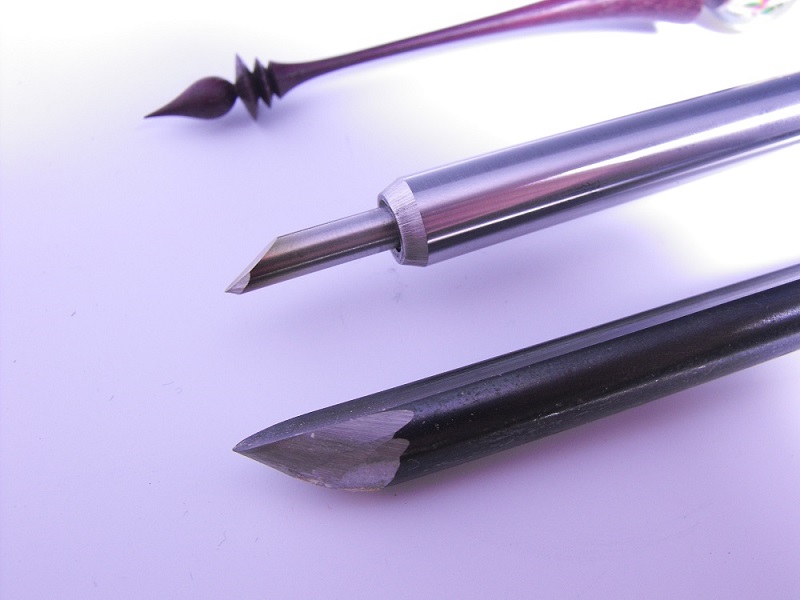
When you flip the tool over, the cutting edge is at the bottom, with little or no tendency to catch and flip over. (Similar to a negative rake scraper, less tendency to dig in) I have studied why catches occur, and have tried to make tools to overcome it. Here is my latest mini-gouge. No flute, so less tendency for the wings to catch. The cutting edge (like your inverted gouge) is far below center, and the bevel is very short, which gives me no interference from metal under the bevel. Notice my Thompson detail gouge; I have three bevels in an attempt to remove metal under the bevel, which can act as a fulcrum point, lifting the cutting edge out of the cut. Look how high up the cutting edge is....a good catch will flip the tool over. My mini tool will not easily catch, and won't tend to flip over, you can perform the same operation you describe with the flute straight up, and it cuts rather than scrapes. I also used a 3/8" stainless steel shaft to hold the 3/16" M2 cutter. I can reach over the tool rest a good distance with no chatter at all. Vibration is your enemy especially when turning small. We must think alike, The ornaments I posted recently were all done with my new mini-gouge. I also have a 1/16" mini-gouge that was prone to unexpected catches at just the wrong time until I reground the tip as shown here. Problem solved. I do market a "catchless" skew through Packard.

Turning » Re: using gouge upside down »

#21

Re: using gouge upside down

Barry Irby

Abut 16 years ago my son and I took a class from David Ellsworth at Arrowmont. He said there were eleven different cut you could make with his signature gouge. I never did learn all eleven.

I have made those cuts you describe. The Ellsworth gouge is my go to tool. I must have drunk the Koolaid.

Turning » Re: what carbide tool for woodturning rough turning »

#22

Re: UnEasyWood

Jerry Maske

The EWT line has it's plus sides but it's not meant to replace your regular tools. I use the rounded tool, the finisher, a lot and it is a sweetheart. The detail tool, likewise, gets a lot of use. Never tried the square one yet. David Ellsworth taught me how to rough wood and I've never looked back.

Don't throw those EWT away until you've spent a little more time with them.

Turning » Re: Chris Ramsey demo in Knoxville »

#23

Re: There's a lot of water under that bridge

Barry Irby

Many years ago, when my son was fifteen (I had to lie about his age), I took him to Arrowmont for a class with David Ellsworth. David commented that they hated it when two people came together, because one was always better than the other. He thought I would be upset by the fact that my son was better than I. I told him I had taught my son all I could and now it was up to David to teach him more. He seemed slightly surprised I was not put off, and I told him it is a proud moment when the student surpasses the master.

Turning » Gouge breaks in half. This happen to anyone? »

#25

Gouge breaks in half.  This happen to anyone?   

david

Fellow club member has a gouge that broke near the middle of its length after falling off the lathe bed (36" ht.?) on to a concrete floor. The gouge that broke is a David Ellsworth 1/2" (5/8" dia.) signature bowl gouge, the cheaper one of the two that he offers. Per the catalog description, it is M2 HSS, and says designed with Crown Tools of Sheffield, England. He did not see the tool impact the floor, only saw the result.


👍 This page answered my questions

Your vote helps other woodworkers quickly find the answers and techniques that actually work in the shop.