WoodCentral Forums

Est. 1998 — 27 years of woodworking knowledge

Search query: «richard raffan»

Posts

Turning » Wooden Bowl Art Exhibit 2004 - It's over! »

#376

Wooden Bowl Art Exhibit 2004 - It's over!

David Hammond, in Powder Springs GA

>This post is rather long winded, so, you've been warned!

Wow... It's been almost a week since I had my first big show, but I'm still smiling to look back on the day. A quick update for those of you who don't know me: I started turning three years ago, the summer I was sixteen - I started with a Grizzly lathe, and now a relatively short time later, I'm turning on a VB36 with a huge shop and personal gallery in my back yard. That little lathe became our new company My Dad & Me, Inc. This is far more than a simply hobby now - this new business and company is something I pray can be a serious avenue for me to make a living through. Please know I don't come just to gloat - but to count my blessings! I am overwhelmed at what the Lord has done for me. This whole woodturning thing has been a big snowball, and has really evolved into a much bigger deal than I could have hoped for, in such a short time. I never realized what that three hundred dollars would come to in three years!

The whole event last Saturday was just going to be a day for some of my Dad's remodeling customers to come and see my bowls... Well, that snowball rolled on down the slippery slope of turning wood, and the event got much bigger than originally planned. This past Saturday the 17th we ended up having 169 people at our farm, had a friend come and cook barbeque for the whole crowd, had the bluegrass band I play in come and play for us, and I had my bowls displayed in a gallery my family and I built beside my shop behind our house.

We started the day with a ceremony to honor thirteen people who had helped us in various ways - some helped by supporting our remodeling business, some with this new woodturning vernture, and some people who had simple given of their own personal time to help us without expecting anything in return. I gave each person a bowl I had turned, along with much thanks for their care and support.

All told I had 57 bowls in the gallery this past weekend (that was a lot of sanding! - but I'd do it all again in a heartbeat). My whole family worked with me in setting up the gallery: we had a name, story, Scripture verse, and individual display for each bowl, or group of bowls, and this all went over really well. I had a machinest make me some brackets for displaying the bowls, and we had a two glass shelves that also housed a few bowls.

After the ceremony we broke for lunch, the gallery, and the band. It was a little hectic trying to say Hello to so many people, but the afternoon settled down and went really smoothly.

As an aside: I emailed the Marrieta Daily Journal to see if they would be interested in the event, and they were. So, they came Friday and took some pictures and put a few pictures in the paper - they're planning for an article and more pictures tomorrow. It was a lot of fun to cover the camera guy in shavings as I roughed out a bowl for him to see. :o)

At the end of the day, the first day I had ever had any of my peices for sale, I found I had sold ten peices! I was ecstatic! And really, I sold eleven, as an older gentleman and his wife came back the next day to walk through the gallery again, without all the people there, and he purchased a bowl then. Also, I had a decorator talk with me about showing a bowl she purchased to several galleries around, and about making a few bowls for some of her clients.

So, all in all, I think it was a huge success, and I'm thoroughly excited. I learned so much in planning for this show, and from the show itself. One important thing: I learned that Waterlox has to cure for longer than a week before it can be rubbed out... :o) Also, people weren't as impressed with the high, hard gloss of Waterlox straight off the lathe - the peices I left with the matte finish of simply sanding with oil were very well taken. I did sell a pretty wide variety of peices, and having "only" sold eleven peices, I can't make a lot of judgements about what is going to sell, and what is not, just yet.

The only negative to all this: we had to get back to remodeling this week. :o) I'm anxious to get back into the shop!

Thanks for listening to my ramblings, and thanks to all the support and help from WoodCentral - as Richard Raffan once said: woodturning has been very good to me. This is indeed true for me! The Lord has blessed me very much through all the people I've met in this business venture. What more incredible opportunity could I have laid in my lap than the chance to be an artist, turning wood for a living?

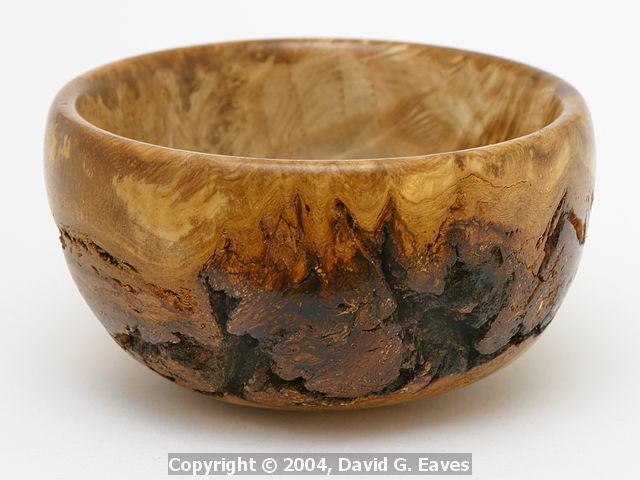
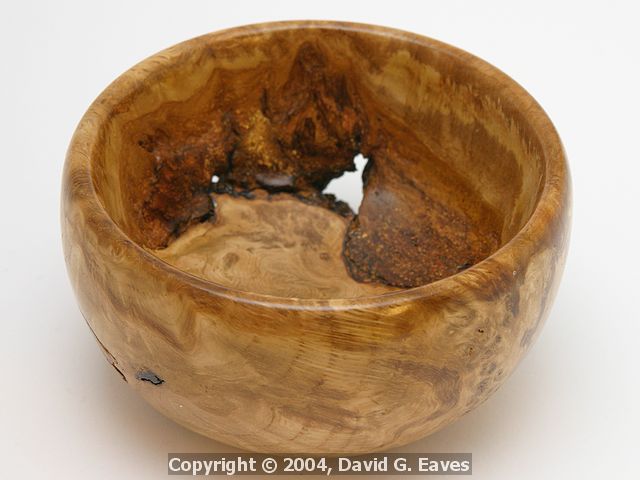
I'll post a few pictures of the bowls that sold - hopefully these shots will show of the bowl clear enough, but I do realize I have much to learn about lighting, etc. We shot digitals of all the bowls, as well as slides - I haven't gone through the slides in detail, but it looks as if the slides came out even better than the digitals.

Thanks,

David Hammond

My Dad & Me, Inc.

Here's the first peice I sold - it was entitled Liberty Bell, was displayed on one of the hangers I had made, along with a minature replica of the Liberty Bell, a commemorative plate of the real Liberty Bell, and a story about the real Bell's origin. The finish is about 12 coats of Waterlox, rubbed out through rottenstone, and waxed:


img

Turning » Richard Raffan »

#379

Richard Raffan

Doug Reynolds

>I just picked up Richard Raffan's three-book series (really good reading for a beginner like me)and borrowed a video from the Club. Just out of simple curiosity, where is he from? I thought he was English, but his books made me think Austrailian. Can anyone advise?

Turning » Re: production turning »

#380

Re: production turning

David Hammond, in Powder Springs GA

>Thanks for the post Fred - this whole thread is very interesting to me: all my time and energy right now is being spent pursuing woodturning, to hopefully do much more than just pay for itself as a past-time hobby. Your comments from your interview with Richard Raffan were very intersting; thanks for posting them.

David

Turning » Re: production turning »

#381

Re: production turning *LINK*

Fred Holder

>Most woodturners never attempt to make a living from their hobby or craft, they may sell a few pieces to help support the hobby, but let a full time job put food on the table and pay the rent. When I interviewed Richard Raffan in 2001, I asked him how he got started as a professional woodturner. He said it helps to have a partner with a good job. He also stated how he works:

"Like most full time turners, Richard had a bread and butter product that helped pay the bills and provide food for the table in those early years. In his case it was the little wooden scoop. He said that he has made over 45,000 of these little scoops and for several years they provided a major part of his income. Interestingly enough, none of Richard�s little projects were pens. In fact, he firmly says, �let it be known that Richard Raffan desires never to make a pen.�

"In the early days, Richard said, he made a lot of salad sets. This was sort of the lead in to his sale of one-off pieces. Each time he made a salad set, there were a few singles left over; i.e., to make a set of six matching bowls he might have to make two or three extras that didn�t match. He started selling these as singles. From this came his one-off market.

"Richard also noted that he used to do a lot of work for a cooperative in England. The orders were nice but they came in two or three times a year and maybe two or more orders in an envelope

for say: 60 six inch bowls, twenty 12 to 14 inch bowls, maybe sixteen 18� x 4� and they would ask for delivery in four weeks. Then, he said, you have to begin negotiations.

"Richard�s new book is an extensive upgrade of his first book and carries the same title, �Turning

Wood with Richard Raffan.� Richard has written five books, the fifth one is just coming out and is a completely revised and updated version of his

first book Turning Wood. He has made five or so videos on woodturning, and makes several teaching excursions like this one at Puget Sound Woodworking Center each year He does demonstrations at events like the Utah Woodturning Symposium. I asked him how he managed to still find time to turn wood. He says that these really take up a small part of his total year (about 6 to 8 weeks) and that he still makes a very good living from turning wood. He said that he turns about 600 hours a year. He gives an example of how he works. He might go to the mill and pick up a trailer load of wood, say enough for 200 salad bowls, plus the additional small bowls that come from coring the larger bowls. He will rough these out in about 2-1/2 days. Today, however, his bread and butter product is bowls, bowls from about 8 inches to 14 inch. He says that he likes to keep around 1500 rough turned bowls on hand to meet the incoming orders."

How many of us can rough turn 200 salad bowls in 2-1/2 days, plus the cores from those 200 salad bowls?


Fred Holders Domain Site

Turning » Re: Woodturning Design Magazine »

#382

Re: Good or bad is in the eye of the beholder

Brad Vietje

>I'm with John here -- a good magazine for beginner to intermediate projects, but I am hoping a lot more emphasis is placed on design considerations in the future. It is a very young publication, so there is every reason to expect an evolution in style and editing, especially over the first year or so. I'll be a regular subscriber if the design component is cranked up, but perhaps not if its just fun projects.

I read Richard's comments, and I don't think a magazine focusing on design considerations would necessarilly cost more than the current version, but would have to be somewhat different in format. An example would be a still photo essay like the video sequence in Raffan's box making video, showing different steps and ideas en route to the finished design, with comments from the turner on why a given form was discarded, etc ...

This is easier to achieve in video format, but still do-able in the still photo world.

Safe Spinning,

Brad Vietje

Thetford, VT

Turning » Re: Bees Wax »

#383

Re: Bees Wax

Ray Taylor

>Richard Raffan recommends bees wax and mineral oil. I've used this for cereal and ice cream bowls and it provides a nice finish. I wrap a small chunk in a cotton cloth, apply pressure to the piece and lubricate the cloth with mineral oil. After drying, I buff while still on the lathe.

As John mentioned, it does not provide much protection and must be re-applied if used often.

Turning » Re: Band Saw Blade Sharpening »

#384

Re: Band Saw Blade Sharpening

Wally Dickerman at Green Valley, Az.

>Jerry, you can easily sharpen band saw blades yourself. Mark your starting point with a piece of masking tape. Then, using your grinder, just touch the top of each tooth on the wheel. Make sure that the corners on the wheel aren't rounded over. Doesn't take as long as you might think. I haven't done this for quite a while, but I can remember that the blade was sharper than when new. I learned this from Richard Raffan.

Wally

Turning » Re: Subject for demo LONG »

#385

Approaches to the craft

Bob Hackett

>I don`t think it`s safe to say that all successful turners approach the craft in the same manner.While you have a preconcieved plan when you approach the lathe,others have been successful starting with nothing but a lump of wood,and they too have been consistantly successful.I may be wrong but isn`t that how the Lindquist`s and others who use natural edges/voids to advantage work?

From what I`ve read and seen Richard Raffan also approaches much of his work this way.He has enough confidence in his abilities to know that whatever the material throws his way he can either adapt or recover from it.He makes radical departures in mid piece as defects show up or grain needs to be re-oriented.This sort of thing is near impossible when you`re tied to a set plan.

I don`t do segmented turning but I can see where what you say holds true for this type of turning.It would be an invitation to disaster to start glueing up without a plan,I would think.I also work from a sketch or plan when using rather homogenous blanks to explore form.Other than that,I rarely am tied to a plan till I`ve trued up the blank,removed the defects,surveyed the possibilities and I`ve seen what the wood has to offer.From there I develope a good form out of what remains.

I have enough faith in my abilities and skills to roll with it and buyers seem to enjoy what I do.I think we need to keep an open mind and not be tied to the idea that there is only one way to successfully approach the craft.Just my opinion.

Mainely,Bob

Turning » Draft review of P&N tools »

#386

Draft review of P&N tools

Lyn J. Mangiameli

>As usual, this is a near final draft of a review that will appear in the next issue of More Woodturning. The published version will have photos and a table, but otherwise be pretty similar.

A Sampling of P&N Woodturning Tools

P&N woodturning tools come from the Australian company of Patience & Nicholson. I first learned of these tools from Richard Raffan, who mentioned he regularly used them. I never gave much thought to them after that, as they have never been available in the U.S. from any of the big woodturning suppliers. That changed recently, when first Lee Valley, and more recently Craft Supplies, decided to pick up a moderate selection of unhandled P&N tools (there are also a few small suppliers such as Rich Johnson in California).

I was particularly pleased to see the tools offered without handles. The larger my tool collection grows, the more I appreciate how unhandled tools can be stored compactly. More importantly, I find that matching unhandled tools to a through-bored steel handle allows for greater control of unsupported shaft length, and allows for greater consistency of working characteristics over the tool�s life. This consistency is achieved as one initially can seat the long shaft more deeply in the handle, then later seat it more shallowly as the tool shortens with sharpening, thus maintaining a single exposed shaft length over a greater portion of the tool�s life. Finally, purchasing an unhandled tool allows the turner to choose handle length, weight and even handle material (steel, aluminum or wood) to suit individual preference.

The only downside I find is that many of the P&N round tool shafts are 12 mm in diameter, which is sufficiently undersized from 1/2 inch (which is approximately 12.7 mm), to make these tools fit rather loosely in steel handles of 1/2 inch bore (e.g., Kelton, Oneway & Jordan). They will work, as the set screws of these handles will take up the slack, but a tighter fit would be desirable. This is also a warning for those who would drill out a store bought or custom wooden handle. Don�t use a 1/2 inch drill bit, but instead use a smaller fractional size or obtain a metric 12 mm bit.

Unfortunately, many of the larger diameter tools, such as the 32mm roughing gouge, 16 mm Bowl gouge and 22mm Supa gouge have the last 2 or more inches of their shafts turned down to 12 mm. It would be great if the North American importers could specify these shafts to be necked down to a 1/2 inch or 13 mm size instead. [After viewing a draft copy of this article, P&N now intends to change to a 1/2 inch shank size to better fit the commercial handles commonly available in North America. These should become available when present stock is depleted.] Indeed, with the 16 mm bowl gouge (which very closely approximates 5/8 of an inch), it would be highly desirable to have this gouge maintain a uniform length throughout its shaft, which would allow it to fit quite well in steel handles of 5/8 inch bore (again, the Kelton, Oneway and Jordan, for example, as well as the Hamlet) and offer greater choice over how deeply the tool could be seated in a steel handle. I would really like to see this happen, but I have less confidence this change will take place, as the 12mm (and future 1/2 inch) diameter will be preferred by some making their own wooden handles.

All of P&N offerings are credible M2 HSS tools, most being a comparable alternative to the standard M2 Crown, Hamlet, Henry Taylor and Sorby fare. P&N follows the North American convention of sizing all gouges according to the external diameter of the tool shaft, regardless of flute style. The detail gouges have very shallow flutes, the spindle gouges are slightly deeper, and the bowl gouges have deep flutes which to my eye appear slightly parabolic in shape, though P&N calls them U shaped. The flutes are adequately finished, about the same as a Glaser, though not as polished as a Sorby. Of course, any flute will soon become polished if you regularly maintain it with a slipstone. Hardness varies from 58 to 65 Rockwell depending on intended use. Some of the older P&N tools have a sandblasted finish (much like you�d find on a Glaser), but most recent production goes though a final �straw tempering� process and comes with a black oxide finish.

Of the several tools I have from the P&N line, three strike me as exemplary in design and performance. The first of these is the roughing gouge. To my knowledge, P&N is unique in offering roughing gouges milled from round bar stock, rather than the usual practice of forging from flat stock. This allows for a much heavier than average roughing gouge (relative to others of the same size) and a very sturdy transition from side walls to tang. The round tang is far stronger than the narrow flat tangs of other roughing gouges, and allows the gouge to fit into the round bores of steel handles. Milling from round stock also allows for side walls of a constant radius, unlike most roughing gouges where the upper portion of the flute is flared. The potential down side of this approach is that with the deep flute ground below center, the upper section of the side walls curve in slightly. I have not found this to be a problem, as I don�t tend to cut in that area of my roughing gouges. For those that are concerned, one can lightly grind down the upper corners until the front profile is exactly a hemisphere. You can also try a tip from Michael Hosaluk (one of the first North American P&N importers) who notches the upper corners (going back about 3/8 of an inch) of the gouge (see attached photo). Michael does this so that he can get a clean cut on the side of details (such as square shoulders on tenons) with this side bevel when the gouge is held with the flute parallel to the tool rest.

The second is the 22mm Supa Gouge. This is a very ruggedly designed tool with a deep U shaped flute and thick sidewalls. Mine is almost 7/8 inches in outside diameter. One could also get by with using this gouge as a small spindle roughing gouge, and several turners have reported preferring it over a traditional roughing gouge. Most will choose it for initial roughing out of bowls, or use its diameter (and thus strength) to get by with long extensions over the tool rest when working with very deep bowls. For those of you who just can�t justify the expense of a 3/4 inch V-15 Glaser, but would like a large rugged bowl gouge, the P&N Supa is very affordably priced. I keep mine with a traditional straight across grind, which works very well with the large deep U shape of the flute.

The third is their skew. Many are familiar with the excellent video prepared by Alan Lacer where he demonstrates the use of the skew, and recommends how to form the edges of the skew for optimal use with either the long or short point. Lacer describes how to round the edges of the short point side, and leave the long point side with a flat edge with lightly radiused corners. Fans of this configuration will be pleased to know that the P&N skew comes from the factory in this configuration, and apparently has always been provided this way. I find it a very effective configuration (all the reasons for which I won�t go into here, but instead refer you to the Lacer tape available from most major woodworking suppliers), and appreciate that little of my time was required to make the P&N skew ready for some serious use. I must have near a dozen skews, including five different Glasers, but this P&N skew has instantly become one of my favorites. For me, it has just the right combination of width (30 mm), length, and bevel angle to make it an excellent general purpose skew. Its width makes it a particularly good choice for both beginning and experienced skew users. It is also a significantly thicker skew than most others (8 mm compared to a more usual 6 mm), which adds to its weight and stability. P&N also offers a narrower 24 mm skew from the same thick 8mm steel.

Finally, I should comment a bit more on their Detail Gouges. Many gouge manufacturers offer one or two sizes of detail gouge, but P&N offers four, ranging from 8 mm to 16 mm (roughly 5/16 to 5/8 inches). The gouge normally comes delivered with a blunt fingernail shape which is functional, but not my preferred. I was fortunate in that the North American P&N rep, Greg Jensen, sent me an 8 mm detail gouge he had personally ground based on some ideas of Stewart Batty that both Greg and Mike Mahoney have adopted. (see photo). Basically Greg freehand sharpened the gouge with a spindle gouge fingernail profile, putting a 40 degree bevel all around the tool, then ground off the bevel to give a convex shape. Stuart Batty contends you prevent bruising the wood with this grind, and Greg also has found it is easier to control the tool when the bevel is short (and thus provides less leverage to come out of the cut). Greg notes that Batty actually grinds the bevel off all his Spindle, Detail and Bowl gouges, making his cuts with the gouge flute as close to a 12 o�clock position as possible, contacting the wood with the left side of the gouge. I have had only limited experience with this grind, but have found it effective. However, I have a lot more trouble maintaining the geometry (most know I am not fond of freehand grinding) and so for me find it best saved for a single, special use tool. In this context, I found the 8mm P&N Detail Gouge to have been a good platform for this grind, as also would be the 10 mm.

What follows is a chart showing the characteristics and handle recommendations for the P&N tools I have used:

Turning » Oak Burr Bowl »

#387

Oak Burr Bowl

David Eaves

>Hi there,

Finally got back in my shop today after a 9 week drought. Turned two Bowls one in Beech and the other in Burr Oak.

Heres's some shots of the Burr Oak, its around 4" diameter by 2" tall. Was sanded to 320 grit, sealed with cellulose sanding sealer. Then sanded up to 600 grit and cleaned off with an airline. Finally, two coats of Acrylic lacquer.

My turnings today were the first after reading Richard Raffan's turned bowl design book which I found very helpful. Any feedback on the form or anything else is much appreciated.

Side on


Showing the bark inclusion


Looking in showing the hole


Thanks for looking

David

Turning » Re: I may be in trouble here »

#389

Re: I may be in trouble here *LINK*

Don Orr

>Hi Matt, welcome to the obsession. You can get a decent set of high speed steel turning tools from Harbor Freight for about $30 for 8 pieces. Not the greatest but fine for learning to turn and sharpen. There are too many videos out there to recomend only one or two. Consensus usually leans toward the Richard Raffan videos as excellant. Check out the AAW website for a local turning club in your area. There is nothing like real live instruction with an experienced turner. Many will offer to have you come to their shop and play.

Best of luck and let us see what you "turn" out, Don


American Association of Woodturners

Turning » Re: Basic Turning Book »

#390

Re: Basic Turning Book *LINK*

Brad Vietje

>Hi Mark,

I'm betting that's the 1442 ?

Good beginner books: I strongly recommend Richard Raffan's turning wood series, which includes 3 books:

- Turning Wood With Richard Raffan

- Turning Boxes With Richard Raffan

- Turning bowls With Richard Raffan

These are available separately, or as a boxed set. If you want a single volume, get the first. I believe there is a video to accompany each book, and both the books and videos are very well done, with excellent photography. I have all 3 books, but only have the box video.

Many people will recommend Woodturning: A Foundation Course, by Keith Rowley, which I bought to use with beginners -- I haven't gotten too excited about it, but many like it a lot. It does cover the basic information, but leans toward spindle turning (while, to be fair, Raffan leans toward faceplate turning of bowls and boxes).

Don't omit videos, which add the dimensions of motion and sound -- your ears are an important tool in turning, too. Not all videos are created equally -- if you search on this site under videos (at top), you'll find plenty, as this issue was raised about a month ago.

Books and videos will only go so far -- one on one learning at the lathe is by a long, long way the best way to learn. Do look up whatever local turning clubs (especially AAW affiliates -- see link, below) in your area, and make the effort to get involved. There you will find the knowledge you seek.

Safe Spinning,

Brad Vietje

Thetford, VT


American Association of Woodturners

Turning » Re: Critiques welcome »

#391

Re: Critiques welcome

David Eaves

>Hi there,

I'm a new turner myself, I like your pieces a lot and agree with the comments made by some of the accomplised turners about keeping the curves going longer.

I just got the Richard Raffan book on turned bowl design. I think it is a very useful book. as Bob mentioned. The ISBN number if your interested is 0-918804-82-5

David

Turning » Re: Critiques welcome »

#392

A helpful book

Bob Hackett

>One of the best books for developing an eye for form is Richard Raffan`s "Turned bowl Design".I`d give you then ISBN but mine is out on loan right now.

Mike Darlow`s design book is also a good source but not as easy a read as Raffan`s,far more technical and takes in alot more than bowls.

Mainely,Bob

Turning » Re: Norm and His Turning..... »

#393

Re: Norm and His Turning.....

Bill Howatt

>You are right. Richard Raffan and others use tools in ways that nobody thought they could be used.

Norm is a target for turners because his turning skills are basic and don't come close to the skill level required to build his flat projects (in spite of the brad gun). I don't think that condones making fun of him but once somebody is "an authority" it makes them a target regardless of the occupation.

Bill

Turning » Re: My son and a lathe (borders on long). »

#394

Re: My son and a lathe (borders on long).

Brad Vietje

>Hey Joe,

Excellent ! You're on an exciting adventure together. Here's my 3 cents:

I'd grab some green limb wood, and practice away first, and get the feel of the tools for a while. I strongly recommend turning between centers for a while, as it is safer. Green wood is a lot of fun, especially for kids & teens. Waste a few limbs, then make something to show Mom out of dry wood.

Get a dead cup center, and use it as a drive center, instead of the usual spur center. This adds a TREMENDOUS safety factor, and is a real good way to learn how to use the tools correctly. If you get a catch, the wood simply stops spinning -- no explosions or broken fingers or windows ! If you can make the shape you want without stopping the spinning wood, you're doing it right. If you don't have one, you can get one at Sears for $ 9.95. If you suspect you will want to make lamps someday, you can get a higher quality hollow center for drilling through the tailstock for about 25 dollars, and use this as a drive center as well.

You could glue up a bowl blank, but I'd be inclined to practice on some small green half-log sections (billets) about 6-8" in diameter first. Green wood is easier to turn (good practice), usually free, (no dust !) and a lot more fun with long shavings telling you're doing it right, and sap flying around the shop -- kids love this part. There is a lot to learn, like cutting in the right direction, dealing with glue joints, orienting the figure, handling a bowl gouge, chucking and re-chucking, etc... If you rush into it, you'll have a lot of fun, but safety is found in mastering the basics. I saw a turner break a tool rest (fortunately not his fingers !) with a mighty catch that many people in the room could see coming -- he was hurrying, and breaking a few of the fundamental rules of turning.

You might also progress to bowls by making a plate or two out of single pieces of dry wood. You'd probably want to attach a glue block for a faceplate, but remember, you'll want to attach to the front and the back to make a plate or bowl. Short screws that go into the depression in the plate, and a glue block on the bottom -- turn the bottom of the plate or bowl first, sand & finish, then reverse to do the top (inside), and part off.

Find a local club, and consider joining it. There are people who have a wealth of knowledge to share about gouges, chucks, techniques, etc... If they have a video collection available to borrow, or if you want to invest a little, get the bowl videos by Del Stubbs and Richard Raffan, and the Bonnie Klien series is good for small lathes, too.

Have Fun !

Safe Spinning,

Brad Vietje

Thetford, VT

Turning » Re: Some thoughts on internal chucking (long) »

#395

Re: Some thoughts on internal chucking (long)

David Eaves

>Hi Rodney,

Thanks for your comments.

I must be doing okay if I can agree with Richard Raffan without trying :o)

I complety agree with all your points and should have added the comment about the forces increasing as the depth gets larger. The further out you are the greater the leverage, and reaction the wood has to support.

I like the internal grip too, and like you say you can never be certain. One of the great joys of wood is the variation and unknown :o)

Thanks again

David

Turning » Re: Oval or Radius Skew? »

#396

Re: Oval or Radius Skew?

Keith Tompkins

>Hi John, I agree with you....I round off the bottom of my skew, but I stop short of the cutting edge. I also hone top and bottom, as well as the two sides. Having the two points sharp is useful to me.

I think most problems people (generally speaking) have with the skew are: 1. Inexperience at sharpening. The tool must be sharp, honing isn't optional, it's a requirement. 2. It's difficult to hold the tool in one hand and sharpen it with a pocket stone or diamond card. I prefer to use a secured bench stone, moving the tool while keeping the bevel flat on the stone. One side, then the other in long even passes. This avoids rounding over the bevels, which makes the tool unpredictable during use. You KNOW the tool is getting sharp enough when a "wire"edge is formed. A finer stone, and then a buffing wheel with compound will easily remove it.

I use a skew with the cutting action right AT the centerline of the piece. The bevel is rubbing at all times, and the handle is braced against my hip. With my style, I never have to raise or lower the handle to finish a cut, I use my whole body for control. I turn spheres this way, starting at the center and cutting in either direction to form the sphere. As I cut, I roll the tool to prevent the "long "edge from contacting the piece.

This method is unconventional, and according to many turners, all wrong. I am at times cutting directly into end grain, a practice warned against by Richard Raffan, and others. However, I am not limited by the height of my toolrest, I can create any shape I want, I don't think about catches; they are rare.

If you are thinking of attempting this, try it with the lathe off, rotating the piece by hand to see the effect. If your skew won't peel off shavings, you aren't sharp enough.

A final thought.. I have read and seem demo's with claims that a shear scraper can produce a finish as fine as a skew. It can't. Not even close.

Turning » Re: Richard Raffan »

#398

Re: Richard Raffan

Dave Peebles Lyons,Ohio

>Hello Dennis,

If you are a member of the AAW it is listed in the resource directory. If not, send me an email and I'll send it to you.

I was once scolded by a member of the rec. for publicly posting an email address on a public forum. And he was right, can you imagine the amount of spam that Richard would get. I don't believe that it happens here, but I still follow that rule.

I'll gladly send it to you privately,

Dave

👍 This page answered my questions

Your vote helps other woodworkers quickly find the answers and techniques that actually work in the shop.