WoodCentral Forums

Est. 1998 — 27 years of woodworking knowledge

Help from flatboard workers

Posts

Help from flatboard workers

#1

Help from flatboard workers

John O'Connell

I am a turner who is struggling with flatboard work (ie precision). I watched a show on PBS the wood workers said that if the joints are tight dry, they will be impossible when you add glue as the wood will immediately swell and you are screwed. I am building a tool / machinist chest and the bottom and sides are joined with box joints that require a mallet to fit even when dry. I bought slow driving glue as a hedge but I need to ask, am I screwed. I can cut off the work and start over and all it sill do is shrink the box.

Re: Help from flatboard workers

#2

Re: Help from flatboard workers

Derek Cohen (in Perth, Australia)

Hi John

Joinery should not be so tight that it needs to be connected with force. Fine tolerance often do require some pressure, but not to the level you describe.

Generally, Titebond liquid hide glue would add a little lubrication, making it easier to bring tighter parts together. This also has the advantage of a longer open time.

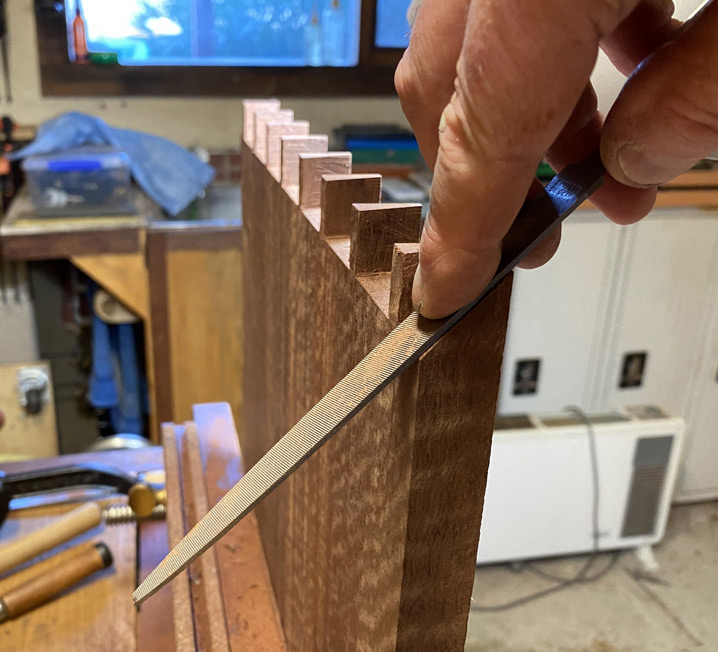
Before you decide to cut off parts, first try reducing the mating parts a smidgeon. I would use a file to do so. In the picture, this is fine tuning a mitre ...


Regards from Perth

Derek

Re: Help from flatboard workers

#3

Re: Help from flatboard workers

John O'Connell

Thanks, I will give the joints a git of a rasp.

Re: Help from flatboard workers

#4

Re: Help from flatboard workers

roger lance

John......you aren't screwed......but, you will have to slow down and spend some time adjusting those individual fingers......just like in turning when you have made a dowel that is too tight for it's opening, you have to remove some more material; but, not too much as then things become loose.

A rasp might be too aggressive.....I'd use some 100 grit sand paper wrapped around a stick and I'd lightly sand each mating face and then try to assemble the joint. You definitely don't want the joint to go together with a mallet.....it should come together by hand. If it's still tight.....repeat with another session of light sanding.

Don't cut off the parts and then compromise the size of you tool chest. Just resolve yourself to slowing down and gradually making this correction.

Box joint jigs should be adjustable and running some test pieces prior to working on the good stuff should be done to avoid this situation.

Not a big deal.....just take your time.

Re: Help from flatboard workers

#5

Re: Help from flatboard workers

Bill Tindall, E.Tn.

If you have successfully assembled the box dry you can assemble it with liquid hide glue. This glue wets the wood slowly and provides grease like lubrication. I guarantee success if you work quickly. A helper is useful.

Now a tip.....none of the wood glues have much shear strength until fully cured. If you can not tap the joint together pull it together with clamps. You will be astonished how easily a joint slides together with clamp force where it will not budge with bashing (it is a fundamental property of polymers and most wood glues are polymers)

Re: Help from flatboard workers

#6

About the file used ...

Derek Cohen (in Perth, Australia)

John, a rile is less aggressive that even a fine rasp. Plus - and importantly - the sides of the file pictures have been ground flat and smooth (done on a belt sander). This creates two "safe" edges, which will protect the adjacent shoulders.

Regards from Perth

Derek

Re: Help from flatboard workers

#7

Re: Help from flatboard workers

Charlie

If it requires more than light taps you might very well have trouble come glue-up time.

Warm liquid hide glue (the version of hide glue with a longer open time than "regular" hot hide glue) will act as a lubricant as long as it is warm and the wood to be joined is warm. Decant enough for the glue-up from a larger bottle into a smaller bottle and put it in a saucepan of scalding water from your tap.

This characteristic isn't a license to tarry, however. Have everything at the ready.

Re: Help from flatboard workers

#8

Not at all my experience

Bill Tindall, E.Tn.

To begin, the recommendation is flawed. The huge heat capacity of the wood will, withing milliseconds, equilibrate the glue to the wood temperature. I would advocate a cool shop(cool wood) for a lengthy glue up to slow down the tack time.

Second, I have assembled hundreds of dovetail joints and smaller M&T joints where the dry fit required more than light taps, even with quick to tack yellow glue. This situation would describe every drawer I have made in the last many years.

These are my most recent example of a successful assembly that would not go more than 50% seated with light taps.


That said, for something like a long sliding dovetail, or a large M&T, a fit that can be done with hand pressure can be a must.

Bottom line, if it went together dry it will go together with liquid hide glue. Clamping to pull it tight probably will be necessary. If you don't own clamps for the task then a loose hand fit could be essential.

Re: Help from flatboard workers

#9

Suggestion

Bill Tindall, E.Tn.

Box joints are quick to make. Make a practice joint and glue it to have some hands on experience in the process.

Re: Help from flatboard workers

#10

Re: Not at all my experience

Charlie

I like warm boards and warm glue. I don't think I'm alone in this.

If you like cold boards and cold glue, I couldn't be more thrilled for you.

Re: Help from flatboard workers

#11

Re: Not at all my experience

Charlie

Skip to around the 4:20 mark in the video and later -- both tapping in by fist, and later by light mallet. That's about as hard as they should need to be hit IMO. I strive for lighter.

I always knew I'd screwed up when the folks in my house could hear me assembling a joint - either wailing on them with a mallet, or cussing a mortise and tenon joint with white knuckles to go with.

I trust glue and the additive nature of the joints in a woodworking project taken as a whole.

I can spot the wavy pin/tail arrises on a crush to fit joint from across the room. Anybody can cut them rich and pound them in, especially in poplar.

Re: Help from flatboard workers

#12

glue viscosity

Bill Tindall, E.Tn.

You said, "If you like cold boards and cold glue, I couldn't be more thrilled for you." However, those that read what I said will see that I never advocated "cold" glue or boards. Curious why you misquoted what I wrote. BTW, in your answer to the person with the joint problem you advised warming the glue with no mention of warming the broads.

Your focus on glue temperatures overlooks the most important factor, water concentration. The issue is glue viscosity. The more viscous the glue the more difficult will it be to force a glued joint together. Temperature affects glue viscosity, a piddly amount compared to the water concentration.

As soon as any of these water based glues are applied to wood, water leaves the glue and enters the wood. The case of liquid hide glue is special because in this case the polymer (glue protein) is in solution. In polymer solutions viscosity is a power function of concentration, as high as the 5th power for some polymers. I do not know the exact relationship for this glue protein but an estimate that viscosity of liquid hide glue is proportional to the concentration raised to the 3rd power is conservative. When enough water leaves the glue and diffuses into the wood to double the glue concentration the viscosity climbs 8 fold, and maybe more.

Higher temperature lowers viscosity but increases the rate of diffusion of water into the wood. Higher temperature also hastens evaporation rate before the joint is closed, again raising viscosity.

Some kinds of glue will not cure properly below a minimum temperature. Know this temperature and don't go there!

Re: Help from flatboard workers

#13

Re: glue viscosity

Charlie

In your haste to disagree, you failed to read my post which in part read:

"Warm liquid hide glue (the version of hide glue with a longer open time than "regular" hot hide glue) will act as a lubricant as long as it is warm and the wood to be joined is warm..."

Re: Help from flatboard workers

#14

Re: glue viscosity

Bruce, a MN Galoot

Brand makes a difference, too. I’ve found that Old Brown Blue tacks quite a bit faster than the Titebond version. I use Titebond for sliding dovetails, Patrick’s for pretty much everything else.

Re: Help from flatboard workers

#15

Re: glue viscosity

Charlie

Franklin LHG seems slicker between thumb and forefinger than OBG. It suits me fine.

Warm boards, warm glue, warm shop -- all three when possible.

I don't use PVA that often but I warm it up in hot water too, unless it's summertime.

Re: Help from flatboard workers

#16

Re: Not at all my experience

Charlie

Forgot the link:

https://www.youtube.com/watch?v=7qDWkbyZEZQ&t=280s

Re: Help from flatboard workers

#17

Re: Not at all my experience

Derek Cohen (in Perth, Australia)

Charles, what strikes me about this video by Christian Becksvoort is that he uses methods I would never teach a beginner. It works for him, but only because he makes it work with extra fussing. Specifically, he does not saw the pins to the line. He saws away from the line, and then has to pare away the remaining waste. And then he has to fine tune every side of each socket to get a good fit. By contrast, I will saw to the line and get a fit off the saw 95+% of the time. He has more practice time than I (ever will have). I am surprised.

The use of a belt sander to flush the dovetails leaves me aghast. What happens to the tolerances of the drawer-space fit?

Regards from Perth

Derek

Re: Help from flatboard workers

#18

Phil Lowe - excellent video and teacher ... + more

Derek Cohen (in Perth, Australia)

Phil Lowe. What a wonderful teacher. I gather that he was also a wonderful person.

https://www.youtube.com/watch?v=74dVRDlAuwg&ab_channel=BeverlyCommunityAccessMedia

Here Phil is dovetailing a half-blind joint and doing so pin-first, but his execution and methodology is first class.

I prefer tails-first, however his chopping of the waste is pretty much as I do it. I add the use of a kerfing chisel, which aids in splitting out the waste, and a fishtail chisel to aid in clearing the corners of the sockets. Phil demonstrates that neither of these tools is necessary but, if you follow what he is doing, and you understand what I do differently here, it is evident that even Phil's process can be improved upon.

Here is a video I made (please ignore my bumbling - having several senior moments). This is a lipped half-blind drawer (I stumbled over saying that the first time!). It contains several of the points raised.

https://www.youtube.com/watch?v=X0Ic08ERaf0&ab_channel=TheWoodWhisperer

Jump to 16'0" for the kerfing chisel

Jump to 23'0" for the start of clearing the socket waste.

25'0" for undercutting the baselines.

Fishtail chisel at 31'0".

35'0" fitting the parts together.

I notice that here I chop the waste progressively rather than splitting out. The wood is Jarrah and an especially hard example, and it was less damaging to the blade edge to take fine sections (Phil appears to be working with Maple, but it looks a lot softer than the Jarrah ... perhaps Pine?). I used a 3/4" PM HSS Japanese chisel which is incredibly durable. Phil would use a 1/2" O1 chisel to save his edge. The mallet I am using weighs 20oz.

This is a real-time video, so you get an idea how long it really takes (deduct a little time for the explanations to the camera). 39 minutes in all (probably could have been done in 25).

Regards from Perth

Derek
Re: Help from flatboard workers

#19

Re: Not at all my experience

Charlie

Don't really know other than he ends up with a fit that just requires a modest persuasion by hand or light mallet. That's all I was referring to.

He is not, nor has he ever been, a hand tool only woodworker -- at least as far as I know.

I don't think he builds drawer for a total piston fit. I seem to recall him saying in some article that he didn't want the headache of callbacks for stuck drawers. Of course, that's also why God created overlay drawer fronts. I'm cool with it. I'm pretty sure if he wanted to dial in a sixteenth or less clearance he has that in his bag of tricks.

Re: Help from flatboard workers

#20

Re: Phil Lowe - excellent video and teacher ... +

Charlie

That's a good video too.

Re: Help from flatboard workers

#21

Re: Phil Lowe - excellent video and teacher ... +

Charlie

I don't register my chisel in the lap line, which I strike very lightly in the first place. I put it just in front of it to make sure I don't move the line and get a gap.

Re: Help from flatboard workers

#22

Re: Not at all my experience

Charlie

Don't know Derek. I think there's a FW article of him explaining his methods which might answer your questions.

Some of his pieces that have been featured in FW do show a rather generous fit in the drawer openings. I assume that's by design. Getting a callback for a stuck drawer from a customer 2,000 miles away could have something to do with it. About all you can lend at that point is moral support. I'm not prepared to state that making piston-fit drawer fronts is beyond his capability. Customers have been known to drop a piece while moving it (always fully loaded of course!), and just shucking the carcase enough to throw off a super close drawer opening, or two, or three. The old Samsonite luggage commercial featuring gorillas comes to mind.

Re: Help from flatboard workers

#23

Re: Not at all my experience

roger lance

There are a number of unique things that Christian Becksvoort does in making his drawer......some good.....some a little shocking like the use of the belt sander (which is a fairly heavy tool; but, he moves it around with agility like a man who uses it this way every day). His method of aligning the boards for marking by using the bottom slots is interesting.

At about 5:30, he puts a plywood "comb" on his bench to hold the drawer for the operation of sanding the sides of his drawer flush. What is the name of this aid?......and what are your thoughts on how necessary this aid is......or how well it works at performing this function.

Re: Help from flatboard workers

#24

Re: Not at all my experience

Charlie

While Becksvoort sort of looks the type, he doesn't walk around the shop with a posey in one hand and a sonnet (or Moxon?) in the other.

If he spent eight seconds per side I'd be shocked. Not sure what the big deal is. He's never been a hand tool only guy.

Re: Help from flatboard workers

#25

Re: Not at all my experience

Charlie

The aid you're referring to is the same thing as clamping two boards across your bench so you can hand plane the side of a drawer that's already been glued up. The different spacing obviously accommodates different size drawers.

It's brilliant quite frankly.

👍 This page answered my questions

Your vote helps other woodworkers quickly find the answers and techniques that actually work in the shop.