New WoodChat!
Home Articles Forums Gallery Marketplace Videos

WoodCentral Forums

Knowledge You Can Build On — Est. 1998

Good Hope Hardwoods - Walnut Slabs & Specialty Hardwood Lumber

An ordered approach to fitting tenons?

Posts

Re: An ordered approach to fitting tenons?

#26

Re: missing the point

Warren in Lancaster, PA

I am having trouble seeing how a combination square setting up machinery could be as precise as a mortise gauge laying out both mortise and tenon. If you have experience making joints by hand I will defer to your judgement on this.

Re: An ordered approach to fitting tenons?

#27

Re: Example?

roger lance

Who was it around here who said they didn't like the if you don't post a picture, it didn't happen routine ??

Probably, someone in denial.

Re: An ordered approach to fitting tenons?

#28

ditto

Bill Tindall, E.Tn.

Scribed mortise lines on a leg just this morning. Cut it with a hollow chisel mortiser. Tidied it up with a chisel. Fit to sawed tenon was good so I was "good to go" to the next step of the demilune.

Re: An ordered approach to fitting tenons?

#29

Re: missing the point

Bob Lang

If the numbers would disappear from my machinist's squares they would still be incredibly useful as I usually set the blade from something existing, or if doing layout work I use the same setting to mark both parts. Same principle as a marking gauge but I'm using a pencil against the end of the blade to draw layout marks. The machine set up is then made directly to the pencil lines. In the case of mortises using the hollow chisel machine I lay out the actual mortise then use the same setting to mark the end of the board that is to be mortised. That board is put on the machine table and the chisel lowered (power off of course). I set the fence by observing where the marks meet the chisel from the end. Same thing to set the tenon jig on the table saw to cut the cheeks; make the lines accurately then set the fence so that the tooth of the blade meets the pencil line (or falls just outside it).

The square is also used directly in some situations; set the blade to one part of the joint, or the thickness of a part, then put the end of the blade on the fence of the machine and move the fence until top dead center, or the end of the cutter or blade kisses the bottom of the stock.

Numbers are never involved in this, it's a matter of knowing exactly where the cutter will be when the cut is made and setting the machine so that tool meets wood where I want it to. The adjustable square is used to gauge the necessary distance.

I've been around long enough that I can work entirely by hand or entirely by machine. My preference is to use a mix of techniques and the mix depends on a lot of variables. There are a bunch of ways to accomplish the same task and I try not to think that my preferences are somehow superior to anyone's. In the end most of what we do is cutting to a line. Where we put the line and how we get the tool to meet it is pretty much the same with both hand and power tools.

Bob Lang

Re: An ordered approach to fitting tenons?

#30

example

Bill Tindall, E.Tn.

To repeat what I said, "As part time woodworkers making stuff we are wise to consider the process most assured of success and not necessarily the fastest or most Period Correct." I presumed most readers took note of the qualifiers "consider" and "not necessarily". Also I did not use the words part time "hobbiest". I am sure that Fred Stanley, recent SAPFM Cartouche winner, considers himself a part time woodworker. In fact most everyone I met at the recent meeting would feel comfortable with that description, as I do. At one time I built some stuff for sale but now I build for family. But the claim that I once sold some pieces offers little insight of what I or anyone else can make successfully.

But on to illustrate my point. Most everything us part timers build we build one of. Some unit operations carry forward from piece to piece, for example drawers, and some do not. Some needs crop up that we have never faced before. In my case I am building a demilune with the added complexity of a drawer. Never built one before and probably will never build another. And there is little help out there with the details of building one.


As this curved skirt developed I had an ever increasing amount of labor and materials invested in it. The more I invest in it the more risk adverse I become doing the next operation. At this point I am not going to use the skirt as a learning exercise, where as I was adventurous at its start when the cost of starting over was minimal. This example illustrates what the opening sentence was meant to convey.

Re: An ordered approach to fitting tenons?

#31

Re: Example?  Photos

TomD

Had to wait until SWMBO went to work and I could move machinery in the shop without getting a surgeon generals warning about my bypass.

This is the machine I use for most of my machine mortising. It is a "Delta" Though it was made in the UK. Head is as nice as anything available in this size. Speed is faster than I like for an auger, the fence is a nasty piece of angle iron. And most workpieces lift with every cut.


This is my big machine, but it isn't any better and is normally under a lot of stuff. No legacy iron in this shop, more is the pity. I have tried...


Here is a pic of a 1/4 inch mortise just as it came off the setting it was sitting at, no special prep. Stock is hand held


Ok this last one is different. I am all for folks using say goofed machined mortises as an opportunity to practices hand tool techniques, as far as practising goes, though it is a bit like the Flintstones running in their car. But if one would rather not take the time, why not just pare them in the machine. Just run say your 6mm chisel, and then pare it with the 1/4" or 5/16", no drill bit. That is what this is, I think it is 3/8" over 1/4". I can't read the etchings on tools any more.

Another interesting thing is I just slapped this tool into the machine, eyeballed it against the mortise, and this is the kind of result I got, not perfect, but OK. You can see what is left of the quarter inch on the left side. But if that is too magical a process, since you have a fence on your machine, you could just indicate the chisel in with a dial indicator.


Re: An ordered approach to fitting tenons?

#32

Re: missing the point

TomD

+1 Bob, and the advantage in using machines efficiency wise is you only have to layout the set-up pieces, the machines will cut to the lines after that whether they are there or not, though there can be advantages to having lines if it is a part of a look, or reduces tear-out, etc...

There are no impossibilities, just abilities.

Re: An ordered approach to fitting tenons?

#33

Re: missing the point

TomD

Probably not, someone is going to have to produce pictures and probably be a star before they get a genuflection around here. Since you can't do it why would we care what you believe. Ignorance will still be your bliss.

Re: An ordered approach to fitting tenons?

#34

Re: missing the point

TomD

And the bottom line is despite the patience of that response there are techniques from dial indicators to flipping pieces to see how the double error lines up to verify cuts.

The reality is, and this is true, the hand tools are generally made by machines, and the machines only exist because of hand tools. There is no more-accurate-than method. There are just people who know what they are doing and people who don't.

The final say may be hand tools, and certainly was in the past, but that is at in a whole other order of magnitude of measurement.

Re: An ordered approach to fitting tenons?

#35

the point

Warren in Lancaster, PA

So you are suggesting that a line drawn with a pencil held against the end of a combination square is as precise as a mortise gauge line? Strains credulity.

Re: An ordered approach to fitting tenons?

#36

questions

Bill Tindall, E.Tn.

Interesting approach I must try (paring with the oversized chisel that is). Certainly cleans up the sides that are otherwise a bit ragged from the single bit and chisel pass. What does the back side look like? I would think splintering out the back would be a risk without the drill removing most of the waste?

Of course on a stopped mortise there is the bottom to clean up with a chisel, but that operation is easily accomplished. And splintering the exit is irrelevant concern.

Re: An ordered approach to fitting tenons?

#37

Recent examples with pictures

Derek Cohen (in Perth, Australia)

No photos from anyone so I will post mine and risk the critique .... :)

The following link is to my curent project, the Lingerie Chest. This involved fitting 32 mortice and tenon joints.

Link: http://www.inthewoodshop.com/Furniture/LingerieChestMorticeTenons.html

Example of picture tuning the fit:


It is all about working to the line.

Regards from Perth

Derek

Re: An ordered approach to fitting tenons?

#38

maybe not

Bill Tindall, E.Tn.

"Strains credulity. " Maybe not. I have seen people execute dovetails with pencil lines only. These need to be as accurate as a M&T joint .

Re: An ordered approach to fitting tenons?

#39

question

Bill Tindall, E.Tn.

If the fit is too tight do you work (with what?) on the tenon or mortise.... or does it depend (one what?) ?

I think these details are the heart of the original question.

Re: An ordered approach to fitting tenons?

#40

So long as . . .

CJ in MPLS

no one starts using the word 'heretic' its all good I think.

Re: An ordered approach to fitting tenons?

#41

Answer

Derek Cohen (in Perth, Australia)

If the fit is too tight do you work (with what?) on the tenon or mortise.... or does it depend (one what?) ?

I think these details are the heart of the original question.

Hi Bill

I saw as closely to the lines as possible, but there will always be a tad of deviation, even though I can fit most tenons off my saw.

I work on the premise that the mortice is chopped/cut/whatever to the gauge scribed lines. They is my reference.

I will place the tenon over this, and check where the cheeks are over the line ..


Mark the excess, and remove this. Use a chisel/plane/router plane/what ever floats your boat. I used a joinery float here since it was just a smidgeon to go.


Regards from Perth

Derek

Re: An ordered approach to fitting tenons?

#42

Photos of mortise and tenons

Brian Holcombe

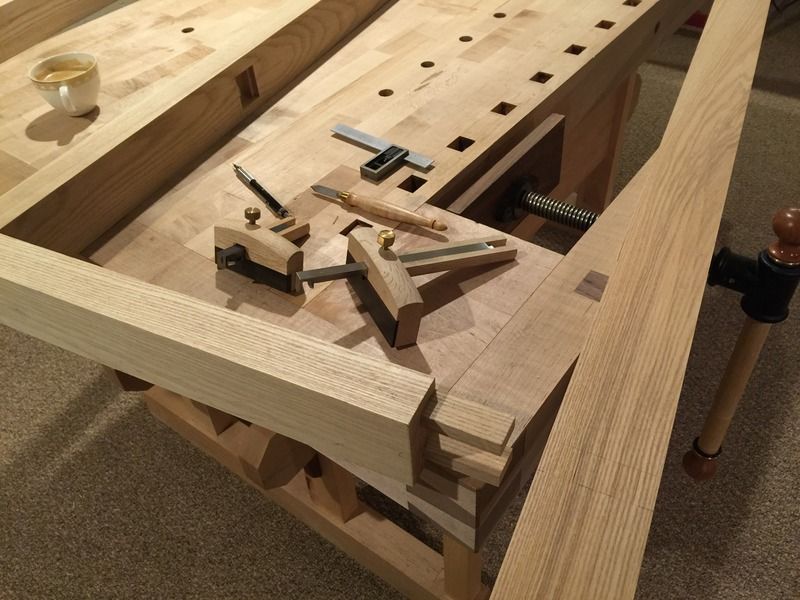
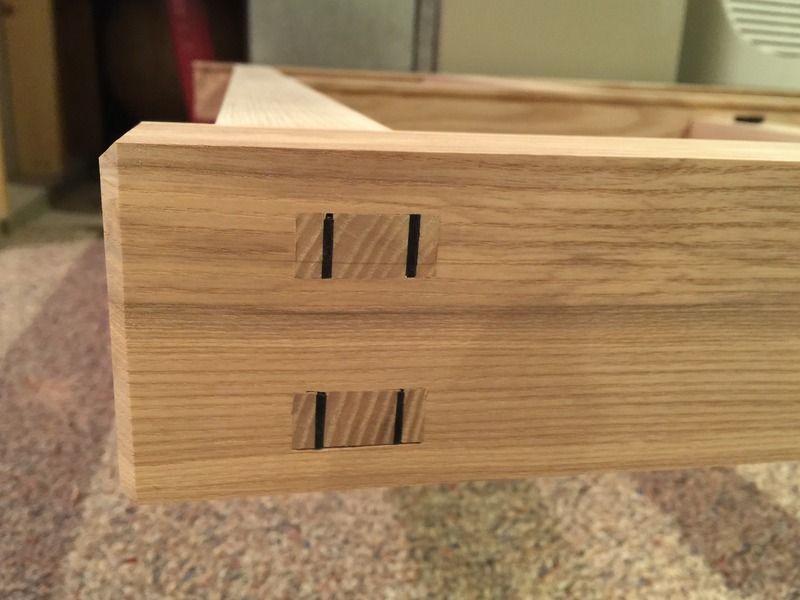
Fitting double through tenons here, Important to hit the line and trim to the line.

I make the lines with two mortise gauges, working from the same reference face. The cup of espresso is key to the process


Made that gap disappear in finishing.

Re: An ordered approach to fitting tenons?

#43

Works for me


Re: An ordered approach to fitting tenons?

#44

Estimating the width of a pencil line

Bill Tindall, E.Tn.

Curious about the success of many that use just pencil lines I measured a pencil line width. I drew a line on poplar(for high contrast) with a Pilot P205 0.5 mm pencil. Using feeler gauges and a hand lens I estimated its width at an amazing (to me) 0.002". Someone skilled that can split a line would be able to locate a cut with a precision of 0.001" using this pencil line as a boundary of the cut. I doubt a scribe line is significantly different in width or more accurate. It is no wonder some can use pencil lines to make dovetails.

I had a class in my shop a while back and an engineer (of course!) used some sort of mechanical pencil to mark cuts. (the pencil looked expensive, but then have you priced Blue Spruce marking knives) It made even thinner crisper lines than the P 205.

Based on these observations I need to revisit pencils for marking. They are certainly easier to sharpen, like not necessary.

This forum is grand . It stimulates innovative thinking.

Re: An ordered approach to fitting tenons?

#45

Tell me more

Bill Tindall, E.Tn.

Joinery float? There are times that something that removes wood faster than a file or my inexpensive rasps but more controlled than a plane would be dandy. It this dream a joinery float, what ever that is? If I pay an astonishing sum for a rasp with a foreign sounding name will it work for this task so well it will overcome my frugal inclinations and not get dull quickly? What is the recommendation between nothing and a plane shaving away the fat tenon?

Re: An ordered approach to fitting tenons?

#46

in oak no less

Bill Tindall, E.Tn.

Everything about oak makes it hard to mark, hard to chop. Impressive joinery. I'm inspired to do better. .

Re: An ordered approach to fitting tenons?

#47

Re: in oak no less

Brian Holcombe

Thanks Bill! That's actually white ash, but similar to work (oak is slightly worse ).

Re: An ordered approach to fitting tenons?

#48

Re: Tell me more

Derek Cohen (in Perth, Australia)

Joinery float? There are times that something that removes wood faster than a file or my inexpensive rasps but more controlled than a plane would be dandy. It this dream a joinery float, what ever that is? If I pay an astonishing sum for a rasp with a foreign sounding name will it work for this task so well it will overcome my frugal inclinations and not get dull quickly? What is the recommendation between nothing and a plane shaving away the fat tenon

Bill, the joinery float comes from Lie-Nielsen ...


I wrote up a comparison with a coarse Auriou rasp and a Stanley #140 skew block plane several years ago. The article is here: http://www.inthewoodshop.com/ToolReviews/The%20Lie%20Nielsen%20Face%20Joinery%20Float.html

Regards from Perth

Derek

Re: An ordered approach to fitting tenons?

#49

Ooops

Bill Tindall, E.Tn.

clearly ash on second look. As you said, somewhat better than oak to deal with. I like ash and don't understand why it has fallen from favor the past many years. Forty years ago it commanded the same price as cherry. Now it is cheaper than most anything. And soon it may be extinct. The ash borer has reached our farm here in E. TN.

Re: An ordered approach to fitting tenons?

#50

Re: Estimating the width of a pencil line

Steve Elliott

My most accurate method of cutting to a pencil line is to use a chisel point on the pencil, that is, a very sharp point that leaves graphite clear up to the square or workpiece I'm marking against. The line is wide and sloppy on one side but straight and accurate on the other. In some cases a marking gauge might be more convenient but it could hardly be more accurate.