Home Articles Forums Gallery Marketplace Videos

WoodCentral Forums

Knowledge You Can Build On — Est. 1998

Fast and affordable laser cutting – so you can make the parts you can’t find anywhere else

help w frame&panel curved in depth and profile

Posts

help w frame&panel curved in depth and profile

#1

Adam of Oakland

help w frame&panel curved in depth and profile

Adam of Oakland

Hello Friends -

I've got a build challenge I've set for myself here, and would very much appreciate some pointers on how you might have a go at this sort of problem. I've posted an extract from 'ketchup below. This is a drawing of a sort of "headboard" for a trundle bed in my guest room. It's built into the corner of the room. Dimensions are roughly 72" in length, 42" width and about 22" high

What makes this piece such a stretch for me is that I really want to have the back curve both in depth, and in profile along the outer "stiles" of the frame.

My current plan is to build this in a frame-and-panel maner. The panel would need to be coopered along some curve. The material I have for the panel is some gorgeous 1" thick redwood that I got from a salvaged water tower here in Northern CA. I think I could reduce the coopering to perhaps 4 facets, and then shape the outer surface with my bench planes. The panel would then be rabbeted into grooves around the frame.

The hard part is how do I build a frame about this panel?

I then thought It might be better to build the frame first, and then try to fit the panel to it. Trouble is it will be hard to cooper the panel exactly to the curved groove made into the stiles along the depth.

I then thought I could do a partial approach where I build the frame and apply a groove to the rails. I'd shape the profile curve along the inside of the stiles, but leave them unshaped in depth, and without a groove. I'd then build the panel to fit within the vertical dimension between the rails. Then, I'd use scribing techniques to fit the curved profile of the stile onto the panel so that it butts up against the inside edge of the stile. Then, I could mark the coopered curve of the panel into the stile, and thereby define where the groove in the stile goes.


Rereading this, I'm almost certain it does not make any sense. If you have any wisdom to share, I'd very much appreciate it. If nothing else, wish me luck :-)

Adam of Oakland, CA

Re: help w frame&panel curved in depth and profile

#2

Re: help w frame&panel curved in depth and profile

Jesse Cloud

I would make the panels from bending ply (available at a good lumberyard). Make the stiles and rails first, then cut and bend to fit. When you have the fit right, apply veneer to both sides, then glue up.

If the curve is gentle and continuous, the veneer should bend with it nicely, even after its glued on. Use titebond on the veneer, it has a little flexibility.

Coopering would be very difficult.

Re: help w frame&panel curved in depth and profile

#3

Re: help w frame&panel curved in depth and profile

roger lance

Adam.....you might like to follow a build that is on-going on the Hand Tool side with Derek Cohen who is making a curved frame and panel chest......maybe some ideas there for you.

Re: help w frame&panel curved in depth and profile

#4

Clint Searl

Re: help w frame&panel curved in depth and profile

Clint Searl

Make the panel(s) first. Then scribe the panel edges to the frame. I did that on a door, on a much smaller scale, for which the panel was a thin slab that was twisted both vertically and horizontally. A picture of it is in the WC Gallery.

Re: help w frame&panel curved in depth and profile

#5

Adam of Oakland

Re: help w frame&panel curved in depth and profile

Adam of Oakland

Hey there Jesse - Good point on the plywood approach.

You're absolutely right that coopering a long length like this would be really difficult. Plus it seems a shame to use up so much of this nice redwood. Veneer seems appropriate.

Matt Kenny wrote an article in FWW recently where he does a bent lamination front door for a cabinet that I like. In this, he builds a form underneath out of MDF ribs that the plys for his substrate are formed over. I'd try something like this.

The good thing about my application is that there is only one show side: The back of this frame/panel is built into the wall, so it never sees daylight once installed. Because of this, I could probably just make my rib structure as a permanent part of the headboard.

I'd glue down sheets of bendy plywood to the ribs and fit these to the interior of the frame. It would kind of look like a model airplane wing construction :-)

I could then adhere my veneer to this substrate, and then I could glue/screw the substrate right into the rails/stiles of the headboard once done.

Lemme run with that idea for a bit

I like the idea of veneering

Re: help w frame&panel curved in depth and profile

#6

Adam of Oakland

Re: help w frame&panel curved in depth and profile

Adam of Oakland

Holy Cow, that is awesome! I forgot Derek was working on this curved front dresser piece. I'll stay tuned, thanks for the tip sir.

Re: help w frame&panel curved in depth and profile

#7

Adam of Oakland

Re: help w frame&panel curved in depth and profile *LINK*

Adam of Oakland

Clint, that jewelry case is stunning! I linked it below (i think).

I think I'm gonna try using a bent lamination approach with veneer to be frugal with this redwood that I have. We'll see how it goes...


Clint's Live-Edged Beech Door Jewelry case

Re: help w frame&panel curved in depth and profile

#8

Adam of Oakland

Re: help w frame&panel curved in depth and profile

Adam of Oakland

Hi Folks, I thought I'd check in with you all on my progress with this construction. I took advice and went with a curved substrate for veneer approach as opposed to my original plan of coopering the panel into place. This was facilitated on my discovery of something called "wiggle wood" ply, which bends along one dim really nicely. So my schedule was to

1) first build the frame components. I used large chunks of reclaimed redwood from a salvaged water tower in Northern CA, USA. gorgeous stuff. Finger joints were applied, using a bandsaw, as well as hand saws.

2) Shape the interior curves of the stiles to final dimension

3) glue up the curved stiles, leaving the vertical ones free (for reasons that i hope will be evident in photos below)

4) then fit a plywood subframe inside

5) attach 2 layers of 1/4" wiggle wood ply and scribe in situ.

6) Once satisfied with the fit, I could then apply the veneer to the plywood.

7) shape, shape, shape

I will attach photos in replies below.

Re: help w frame&panel curved in depth and profile

#9

Adam of Oakland

** frame&panel curved in depth and profil

Adam of Oakland

I begin by making an "L" shaped plywood base that I will in turn veneer with some of the redwood.


The profile and plan view curves are drawn to full scale on my new bench. I will lay out the frame components directly on top of the drawing.


I then focus on the frame components, which are oversized finger jointed pieces made from laminated redwood. I will glue the slanted stiles into place once the interior curve has been cut and faired. but I'll leave the vertical stiles unglued. I did it this way because I want to build the interior panels by scribing them into the inside of the slanted/curved stiles. I will need room to place these curved interior panels inside the frame in order to get the curve just so.

I'm sure this doesn't make any sense. gluing up the finger joints at angles was a colossal pita. The glue grabbed and I couldn't recover on one of them. I used a bunch of hot-glue gun affixed wedges to allow for clamping, but the hot-glue wasn't durable enough and I probably should have gone with regular wood glue, allowing to cure overnight. This sort of thing should never have been hurried.


With the frames more or less shaped on the interior, I set out making a plywood rib-cage that will then receive 2 layers of 1/4" wiggle wood bendable ply. These skins will then be scribed as best I can into the inside edge of the frame, and then veneered with redwood

Re: help w frame&panel curved in depth and profile

#10

Adam of Oakland

w frame&panel curved in depth and profile

Adam of Oakland

I continue with the headboard panel structure, leaving off here today


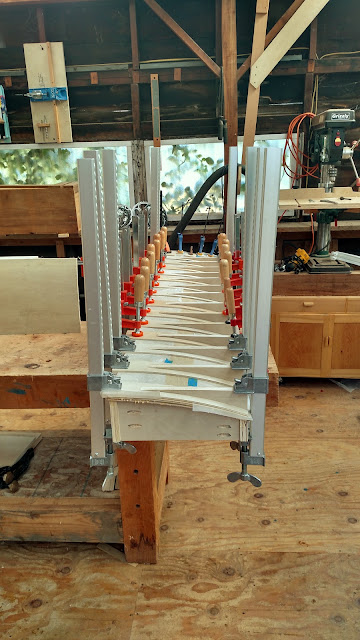
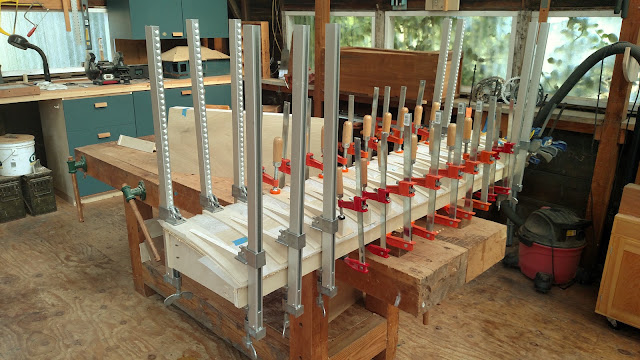
I began the weekend by adding a second layer of 1/4" wiggle-wood ply. This time I use glue alone to attach the wood to the substrate below (which was in turn attached to the plywood ribs/longerons via screws and glue). I elected to do this instead of skrews because i wanted to test how I'd apply veneer to the substrate using clamps and cauls, as opposed to some other means, like vacuum bagging. I just don't want to deal with that kind of regalia in my shop right now.

nearly every available short range clamp was recruited for the long panel


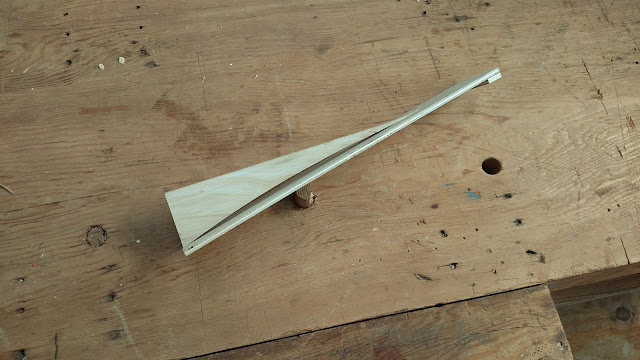
Here's a closeup of the cauls used, assembled from 1/4 birch ply scraps, and the offcuts to the rib cross sections


I didn't glue the vertical stiles for the frame/panel assembly so that I could scribe the curved part of the stile in the same plane as where it would finally be attached. Here I get a rough outline traced from my pattern, and then once within an inch of final dimension, I measure the offset into a long strip of thin plywood for a hole that a sharpie marker can fit into. I run this along the inside edge to get the actual location of where I want to make the cut with my dreadful sabre saw. blue tape helps with the line definition.


After some careful trimming, the panel sits close enough to the inside edge of the stile. It's not perfect, but I'm thinking since the panel will be nested inside the frame by 1/16" or so, small gaps like this won't matter so much.


Dry fit with the vertical stile now in place, seems OK


after practice, the other side was closer


Now the fun part, shaping! I"d been looking forward to this for a while! nothing like whipping out the spokeshave for some hot tapering action, baby.

Re: help w frame&panel curved in depth and profile

#11

Re:  w frame&panel curved in depth and profil

Jesse Cloud

Wow! That is an amazing project. Very ambitious, and well executed.

Great shop, too.

Can't imagine doing that without a vacuum bag!

And yes, there's something magical about shaping a curve with a spokeshave. :D

Re: help w frame&panel curved in depth and profile

#12

Impressive work

Bill Tindall, E.Tn.

......have you considered making another from oak :)

How will you finish the red wood?

Re: help w frame&panel curved in depth and profile

#13

Adam of Oakland

Re: w frame&panel curved in depth and profil

Adam of Oakland

thanks jesse - some day i might have to go the vac-bag approach, especially if i end up veneering more larger projects like this one!

I'm a bit worried about when i lay down the veneer...i noticed i wasn't getting enough pressure while laying down the second layer of plywood in the middle.

Re: help w frame&panel curved in depth and profile

#14

Adam of Oakland

thanks!

Adam of Oakland

live oak, you bet!

actually if i had done this in a harder wood, i probably would have used thinner, lower profile frame pieces...maybe 1" thick or so. This would have also made for more pleasing overall design. The large scale finger joints were kind of a pain to do here. I also would have used bent lamination for the curved stiles.

For finish, I'd been planning on building up a few coats of Watco. I realize this doesn't offer much protection...maybe you or someone else has another idea?

Thanks

Re: help w frame&panel curved in depth and profile

#15

finish

Bill Tindall, E.Tn.

Redwood glows under a layer of some bright finish. I would lacquer it but there are equivalent options if you don't spray- wipe on varnish, shellac, for example or even brushed coats of brushing varnish that has been thinned so it doesn't build to a thick "plastic" looking accumulation.

In any case test the proposed finish on a test piece.

Re: help w frame&panel curved in depth and profile

#16

Ellis Walentine

What an undertaking!

Ellis Walentine

I think you may have just won our award for most photos in a single post with this one, Adam. Thanks for the major share. I could lay a ton of suggestions out there as to how I'd have done some things differently, but they'd only be different, not necessarily better, except possibly in time saved.

As for the finish, I would not use Watco or any "Danish" oil product, as it doesn't ever really build enough to offer protection from liquids and dirt and abrasion. If you have a lacquer setup, I think I'd spray a few coats of lacquer on your bed frame. Or brush on a few thin coats of an oil-based varnish. The toughness and abrasion resistance will come in handy on a project like this that is likely to get handled and possibly beat up a lot.

Oddly, this asymmetrical design might be perfect for a day bed I'm designing to go into a spare room. I might not be quite as ambitious as you.

Can't wait to see that thing done. It's looking great.

Ellis

Re: help w frame&panel curved in depth and profile

#17

Adam of Oakland

Re: What an undertaking!

Adam of Oakland

Thanks Ellis!

yeah it's been a fairly ambitious project that I squeeze into the time margins around my day job. It might be moot for now, but i am always curious about how a pro would have done this sort of thing.

a lot of this is improvised in the shop and I have a way of making things hard for myself!

Thanks for the finishing advice, I will be returning to this thread when i get there.

my last major obstacle is to lay down the veneer (shopsawn, 3/32"). I plan on using cauls and clamps in the application as shown above, with yellow glue. the main worry right now is that there's not enough pressure being applied along the middle. here, i might use a lengthwise batten that can then have wedges shoved in towards the middle of its span to counteract any flexing. not sure that makes sense. the veneer might be bendy enough that just the 1/4" ply "strap" cauls that I used above might be good 'nuff.

I also missed the point mentioned earlier in this thread and in other places on the web about the necessity of applying veneer to both sides of the substrate. yeah this is different. The rib substructure is heavily influenced by aeromodeling in my past :-)

Re: help w frame&panel curved in depth and profile

#18

Re: What an undertaking!

Jesse Cloud

3/32 veneer bends pretty well, but the pressure from cauls doesn't transfer to the veneer thats not right under the caul, as it would be thicker wood.

If nothing else will work, I have had success with taking half a dozen plastic bags, inside each other and filling them with sand. Its heavy and will flex to whatever shape its on top of.

You can also soften up veneer to make it more pliable by treating it with glycerin or other solutions. Check out joewoodworker.com for some good info.

Re: help w frame&panel curved in depth and profile

#19

Re: What an undertaking!

Keith Newton

Adam, before you veneer it that way, please think about vacuum bagging it. It is a lot easier than you probably imagine, and will provide all the pressure you need, and it is perfectly even around 2000 pounds per square foot.

I didn't catch what veneer species you were planning.

I really like your sense of design.

Re: help w frame&panel curved in depth and profile

#20

Adam of Oakland

Re: What an undertaking!

Adam of Oakland

Hi Keith - Thank you so much for the affirmation on my design choices here...i spend a lot of time hand wringing and doubting and it's always good to hear from another woodworker like so!

as for species, it's gonna be ancient redwood reclaimed from a northern CA, USA water tower. it's very very ring dense. the piece i have set aside is flat-sawn, so i hope it is not as prone to splitting as quartersawn might be. Still i might need to pre-treat it with some chemical soften it a bit. I'll have to test.

Finally, I think you're right about the vacuum bagging. i might have painted myself into a corner with the rib substructure on the other side of the substrate. there's too much open air space underneath in all those cells to do this right, no?

Re: help w frame&panel curved in depth and profile

#21

Re: help w frame&panel curved in depth and profile

don stephan

On your next project, if you have a source in your area try 1/8" poplar bending plywood - a few years ago I found it at DSI Inc. My experience years ago was that wiggle wood would not always bend smoothly - sometimes it was faceted. And it has a very coarse surface, okay if used as a substrate but unpleasant if painting.

I admire your perseverance and pluck, and I love my vacuum bags.

Re: help w frame&panel curved in depth and profile

#22

Adam of Oakland

thanks don

Adam of Oakland

Thanks Don - yes! wiggle wood is quite furry esp. on one side. I'll look for the poplar next time. Hadn't noticed facets with the sheet that I got but I'll beware if i have to use this stuff again.

I think i might be coming back at you guys for some guidance on how to rig up a vacuum bag setup.

I have some flashbacks to my fiberglass days where there were leaks in the bag and overhangs in molds complicating my motorcycle's fuel tank assy. fastly curing epoxy is every bit as scary as PVA locking up, baby!


Re: help w frame&panel curved in depth and profile

#23

Ellis Walentine

Veneering options

Ellis Walentine

If you don't want to gear up for vacuum bagging, or if you don't think you'll need it often enough to justify the expense, you can still do it along the lines of the way you're headed. Keep in mind that in all glue-ups, you want to (nominally) be able to draw 45º lines from the clamps to the gluelines and have all the gluelines covered. I wasn't seeing that in your earlier photo.

When I made curved veneered pieces without vacuum bags, I made up male and female forms that were the same contour as the finish piece. The contours varied slightly according to the thickness of the veneer and substrate sandwich.

In your case, you have the male forms already made, although I don't know how stiff your bender board substrate is. I suspect the ribs may be too far apart to distribute clamping pressure to all points of your veneer glueline. This is yet another reason to urge you to consider vacuum bagging. The bag will exert pressure everywhere equally, no matter what's under the substrate. That might mean it will bow inward somewhat while you're pulling a vacuum, but the pressure will be constant across the surface. You won't get that with your complimentary cutoff cauls.

If you still want to clamp the veneer, consider using your cutoffs to trace novaply or MDF ribs, and glue several layers of plywood to them to create the female part of your form. Remember to subtract the combined thickness of the veneer and substrate, plus the thickness of the plywood skins, plus an allowance for a sheet of cork. The cork takes out small gaps, although with thick veneers like yours, it may not be necessary. Instead in this case you will want to use a gap filling adhesive like yellow glue.

Veneering is best done on the panel prior to assembly. Then, tongues would be created all around to fit into grooves in your framework. In this case, your best bet might be to use your rib clamps, but interject several layers of 1/8" masonite between the cauls and the veneer surface. Don't forget to liberally wax the cauls to keep them from sticking. You'll have to adjust the curves of your cauls to reflect the thickness of the masonite layers and give you perfect contact at the veneer surface. This is a very common laminating trick used to distribute the clamping pressure more diffusely over the surfaces.

Ellis

Re: help w frame&panel curved in depth and profile

#24

Ellis Walentine

PS

Ellis Walentine

If it were me, I'd edge-glue your veneers to each other prior to applying them to your substrate. You have no way to apply lateral pressure while you're gluing them to the bender board. The best tip I know to edge glue thin stock is to use brads or somewhat flexible strips nailed to a sheet of scrap ply. Space them just slightly too close together for the panel you're trying to edge-glue. Apply glue to the edges and press the veneer sheet (or pieces if you like) down to the ply. The nails will push against the edges with enough force to clamp the edge joints.

Ellis

Re: help w frame&panel curved in depth and profile

#25

Adam of Oakland

Re: PS

Adam of Oakland

THanks! I'll give this a try.

I was going to use masking tape pulled tightly across the edge joint, but my experience with tape that isn't wrapped around an edge (as in edge banding), doesn't hold very well...