Home Articles Forums Gallery Marketplace Videos

WoodCentral Forums

Knowledge You Can Build On — Est. 1998

This is the most versatile work station you will ever use

help w frame&panel curved in depth and profile

Posts

Re: help w frame&panel curved in depth and profile

#26

Adam of Oakland

I think i'm sold on vacuum bagging :-)

Adam of Oakland

THank you soo much fellas for the help on this. I think ultimately you all are right that i'm not going to have optimal clamping pressure distribution given the size of the project, and that the underlying ribs are 9" apart from one another.

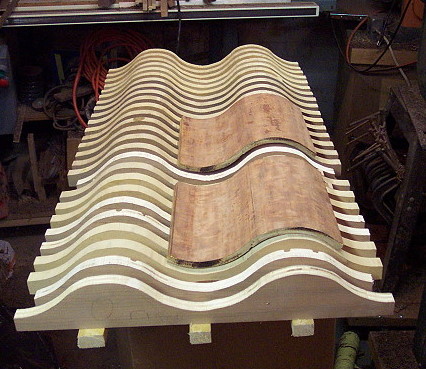
Is it possible to vacuum bag an assy like this? I ask because it's the underlying rib/longeron structure is glued/screwed to the substrate, and can't be removed. Should I attach a plywood back to the ribcage and close off the cells here so that the vacuum bag doesn't have to articulate around all those nooks and crannies?


Re: help w frame&panel curved in depth and profile

#27

Ellis Walentine

No back required.

Ellis Walentine

The way a bag system works is that you have a grooved platen inside the bag that you place your workpiece on.

Ellis

Re: help w frame&panel curved in depth and profile

#28

Where did 45 degrees come from?

Bill Tindall, E.Tn.

How far apart the clamps are to be located depends on the stiffness(modulus) of what they are clamping. I don't know where this 45 degree concept came from or even if it has any validity as a guide.

To illustrate the concept consider the two extremes, clamping something of infinite stiffness and no stiffness. If a caul, for example, was infinitely stiff a clamp on each end of a caul of any length would be sufficient to clamp with uniform pressure anything in between. On the other hand if the caul has no stiffness, the clamp force would not propagate beyond the clamp face. Maybe since 45 degrees is half way in between this value is a good estimate for something fairly stiff?

Does anyone else think 3/32" is too thick for this veneer?

I would find a shop with a vacuum bag and hire the shop to do the gluing.

Or, thinner veneer and contact cement.

Re: help w frame&panel curved in depth and profile

#29

Bending plywood, readily available

Bill Tindall, E.Tn.

A friend is doing arched doors and was contemplating how to do the arch for the door jam. I suggested bending plywood. He call the manufacturer and they told him to simply order it through Lowes or Home Depot (can't remember which he got it from).

It is used so widely that any large city will have a source stocking it.

Re: help w frame&panel curved in depth and profile

#30

Making that panel the easy way. *LINK*

Keith Newton

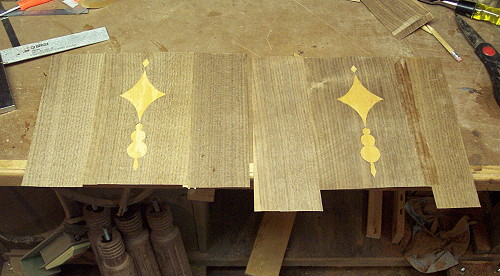
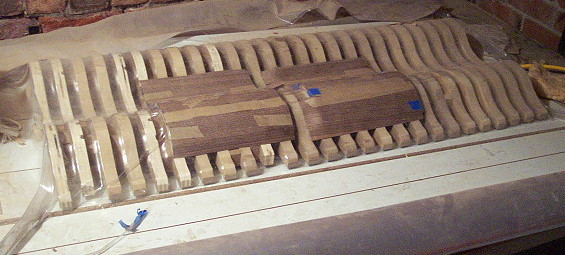
Adam, If I had been making this, I would have made the frame to the shape like you show in images 2 - 3 out of scrap material, only using maybe 4 cross ribs. This frame is thrown away after the panel is made, and doesn't add any weight to the finished piece.

I'm fond of using epoxy for my curved vacuum bagged panels. I can get bending ply in several thicknesses, so i'd probably get 3/8" for this, and veneer both sides, ending up 1/2" thick.

If the grain is running the long way, once you start inducing the bend on all these parts, they tend to want to be straight on the other axis, thus not needing very many ribs in the form. I find it much easier to just put the veneers and substrate in the bag, leaving the form outside, where it only needs to be sturdy enough to support against the springback of the plys, which isn't much.

When I lay the bag of glued up parts on the form, I would only need one of your curved cauls on both ends, then a straight caul down each of the long sides with just a few clamps on them. The vacuum inside the bag then allows the full weight of the atmosphere to push against the bag, providing the pressure to for the glue-up. You can break up and discard the frame when it is all done.

I didn't catch where you are in the world, but surly you have a woodworking friend that has a vacuum pump that you could borrow. If not, I can talk you through how to make one out of an old compressor.

Unless you have some special attachment to that particular redwood, but want to keep it all one species, I think using the veneer would look great.


http://www.certainlywood.com/images_menu.php?item=REDWD%20BRL%201301-2

Re: help w frame&panel curved in depth and profile

#31

Re: help w frame&panel curved in depth and profile

don stephan

If memory serves, in the video Working in a Vacuum Darryl Keil shows how to vacuum press a curve, including spacing of ribs. My copy is a VCR tape, you'd have to call Vacuum Pressing Systems to see if it is still available. A public library system in your area may have a circulating copy.

Again if memory serves, I think generally it is recommended that veneer be no thicker than 1/8" - beyond that, it starts to have enough strength to act like a board when undergoing seasonal expansion and contraction.

My introduction to veneering many years ago was the videos by Darryl Keil and Paul Schurch. There is some overlap between their works but I found that helpful repetition rather than unnecessary duplication. I consider their works extremely valuable still today, and occasionally watch portions to refresh my memory.

Re: help w frame&panel curved in depth and profile

#32

Alan Young

Get a bag and you'll find new ways of using it

Alan Young

Cool Project-A vacuum bag will expand your wwking vocabulary...

These panels are made from 6 plys of 1/16th poplar then the face veneer. I glued them up in a form placed inside a vacuum press.


As Ellis mentioned the forms and veneered pieces are placed on grooved platens inside the bag


Bags come in different sizes but the whole unit can be taken apart so it doesn't take up a full footprint in your shop on a constant basis

Re: help w frame&panel curved in depth and profile

#33

Adam of Oakland

Re: Get a bag and you'll find new ways of using it

Adam of Oakland

Thanks Alan - yep i am gonna go for it. Also, thanks for posting that pic of your veneer in progress (handsome project by the way!). I think can salvage the project as I've got it and just place the whole thing into the bag.

now to investigate sources for the vacuum bagging kit...

Re: help w frame&panel curved in depth and profile

#34

Suggest you visit Joewoodworker... *LINK*

Grant in Iowa

Adam,

I lept in to vacuum bagging for the purpose of making water skis about 6 years or so ago. The length of the skis, the need for flawless (safe) joints, and the desire for repeatability were primary in my decision. I read up on the subject at www.joewoodworker.com, and it's sister site www.veneersupplies.com

Since I had an air compressor, I built a venturi pump that works quite well. I used the component kit for the project V2 version at Veneersupplies.com (link below). The design and components allow the user to vary vacuum pressure depending on the need. Since the unit is self regulating, one can walk away while the adhesive dries--so long as you trust the reliability of your air compressor and fittings.

I have made a few projects, all with nearly invisible glue joints akin to those on good grade Baltic Birch Plywood. I did a bent lamination side table, several test pieces playing with the limits, and six water skis. I have also done some veneer gluing with the system, though I neglected to take photos.

The skis are used constantly by a local waterski show team as "around the boat" skis. They take quite a beating, but are holding up nicely. I am fond of DAP Weldwood acrylic resin glue for all weather laminations. I think most common woodworking glues allow too much creep for this application.


Regards,

Grant in Iowa


veneersupplies.com

Re: help w frame&panel curved in depth and profile

#35

On the bag...

Grant in Iowa

veneersupplies has bags for sale. I bought the 4'x8' bag. I figured out that one can roll up the unneeded portion of the bag to save room, and you never know what you might decide to make. So I bought the better grade in the big size and it hasn't been a problem for me at all.

FWIW,

Grant in Iowa

Re: help w frame&panel curved in depth and profile

#36

Adam of Oakland

Re: Where did 45 degrees come from?

Adam of Oakland

Hi Bill - good points all around...i think I've read the 45deg rule elsewhere when clamping but if I recall correctly, that context was just during glueup of a flat panel from some boards, edge jointed.

you're right to question 3/32 being too thick. I plan on pulling my veneers, milling them down and just seeing if they'll play nice. the curve that I'm asking them to bend to is pretty gentle, so maybe it'll work.

I'd also thought about contact cement; I have irrational fears about longevity with that glue.

Re: help w frame&panel curved in depth and profile

#37

Adam of Oakland

Re: On the bag...

Adam of Oakland

Grant thank you, this is invaluable help!

Re: help w frame&panel curved in depth and profile

#38

Adam of Oakland

Re: Making that panel the easy way.

Adam of Oakland

Thank you Keith - that redwood burl in the link is *gorgeous*. It might be too big a contrast for what I want to achieve in this project. I'm hoping that i can use what I've got here. It won't be as refined as the burl wood for sure.

You mentioned epoxy. I'll have to check and see if I can realistically get enough epoxy mixed and applied and bagged before it fires. I usually refridgerate the 2 separate parts first so that it doesn't go early.

there might be a longer cure time glue out there to investigate...

Re: help w frame&panel curved in depth and profile

#39

Re: Where did 45 degrees come from?

Jesse Cloud

A few comments,,,

The 45 degree rule doesn't work for veneer, only for wood thick enough not to deform with pressure.

Contact cement is not a good idea for veneer. Regular yellow glue, titebond cold press, plastic resin or epoxy all work.

Your project is very large, before you buy a huge bag you might not need in the future, call around to a few local cabinet/kitchen shops. Many have large vacuum setups for kitchen counters and would probably sell you some time on one...

Best cauls in my experience are simply extra pieces of veneer (maybe from a cheaper wood) with wax between the first caul and the show face, and -of course - no glue. That will cover every little bit of your veneer surface.

Re: help w frame&panel curved in depth and profile

#40

Ellis Walentine

Rule of thumb

Ellis Walentine

Bill, I first heard of the 45º rule back in the mid 70s when I was just learning the ropes of high-end woodworking. I spent a lot of time up at RIT in those days, hanging out with a lot of cutting edge woodworkers and instructors. I was doing quite a bit of laminating for my customers back then -- chairs, railings, etc. -- and I found some pretty interesting evidence for the 45º rule in my trials and mockups of laminations.


To wit, while laminating white ash strips around a form, I controlled the pressure distribution by adding strips of masonite between the clamps and the bundle of ash laminates. I spaced the clamps at roughly fixed intervals of about 3" and observed the compression on the stack with different numbers of "caul" strips of masonite. Consistently, I had to use enough caul layers to effectively halve the distance between clamps in order to completely close the gluelines between the laminates. With fewer caul layers, the curves would no longer be fair; there would be lumps in the spaces between the clamps. This wasn't just my imagination; I absolutely needed that extra caul thickness to distribute the pressure evenly.

The important thing is whether our methods actually work, and there are always variables involved, so hard-and-fast rules are always suspect. To illustrate my agreement with your hypothetical about stiffness, I found that thicker veneers (being stiffer) required fewer cauls than thin (~1/32") conventional veneers to lay down fairly without lumps. The thinner, weaker veneers required significantly increased distribution of clamping pressure to come out fair. That means the 45º rule is possibly too lenient for these situations and the pressure distribution angle could be more on the order of 60º. So distribution is a function of laminate thickness and stiffness. Different species have different stiffness at the same thickness.

All this helps to illustrate why the vacuum bag, with its absolutely even distribution of pressure is the favored method for veneering and laminating of curved items.

And, regarding your question about the 3/32" veneer being too thick, that question too has been used as a rule of thumb by generations of craftspeople, not least of whom was James Krenov. He and his students and followers routinely resawed veneers to approximately 1/8" thickness and then planed them down to around 1/10" for veneering. In my own experience, depending on the species in question and its wood movement characteristics, I found that veneers thicker than this were borderline candidates for shrinking and opening the edge joints, but I never had trouble with 1/10" veneers. Once I built an entire executive office using 1/8" Brazilian rosewood veneer that had originally been sawn for guitar backs and sides. It has hung together very well for over 35 years. (It breaks my heart to think what all that rosewood would be worth in the tonewood market today.)

Thick, sawn veneers have lots of advantages for high-end work, particularly surfaces where they can be expected to receive significant wear or abuse. Thin veneers have several intrinsic disadvantages, notably that, since they are peeled, they invariably have a loose face and a tight face. In most species (also depending on how well the cants are prepared for peeling), the loose face is littered with tiny cracks that inexorably open up over time and present a rough surface. Another disadvantage is that they can't take a beating like heavier veneers can. With heavier veneers, you can often fix dents by conventional steaming methods like you would with solid wood, but with the thin stuff, you might have to patch, putty and/or shellac-stick and touch-up-paint the ding. The dangers of sand-through are also greatly increased.

Oddly, when typical veneers were 1/28" (which was the standard for decades), I found them quite acceptable. When the standards thinned out to 1/32" or less, I really had to be more careful in handling and sanding them. Frank Pollaro uses primarily 1/28" veneers for his Ruhlmann repros and his Steinway art pianos.

Anyhow, there are some personal anecdotes that may be useful. Sorry for the nosebleed.

Ellis

Re: help w frame&panel curved in depth and profile

#41

Adam of Oakland

Re: Suggest you visit Joewoodworker...

Adam of Oakland

Hey Grant I've been checking out the venturi based system you mention...it looks like i'd need to commit to a pretty big air compressor in order to handle the size of this project (18"x72").

http://www.joewoodworker.com/docs/vacuumpresschart.pdf

The question I have is how hard a limit their small venturi system is with larger projects...given that it won't pull air out as fast, but if i have slow setting adhesive, maybe it would work..shrugs...

Re: help w frame&panel curved in depth and profile

#42

Re: Where did 45 degrees come from?

don stephan

Contact cement, more than most adhesives, softens even in the heat generated by direct sunlight - once I saw a large piece of veneer on vertical surface with a HUGE bubble where morning sun hit it. Contact cement also easily softened when too much solvent finish thinner soaks into the veneer. These shortcomings aren't a problem when contact cement used with Formica and similar laminates. Just be aware of the potential shortcomings when using contact cement with thin veneer. For those who use it without problems, congrats.

Re: help w frame&panel curved in depth and profile

#43

Adam of Oakland

NO NOSEBLEED AT ALL!

Adam of Oakland

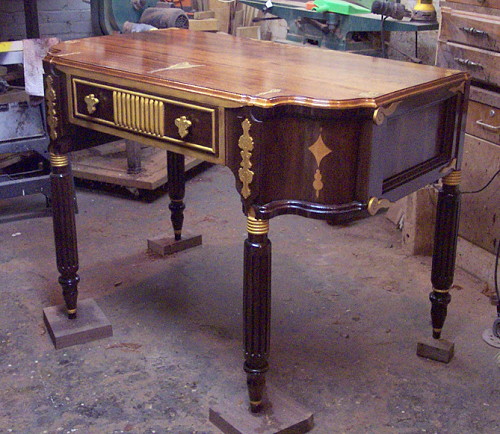
Wow, thank you so much Ellis for this account. Love the photo, by the way!

Your account about adding layers of masonite to double up the caul forces seem to gel with what I was observing while trying different methods of clamping the second layer of bendy plywood to this shape. I like the idea of layering up masonite sheaths under the cauls, I could imagine this helping.

probably the best bet for success right now is to keep going with the vacuum bagging approach. I'm *this* close to ordering a constantly running setup from the joe-woodworker site. I know there are probably lots of ways to do this by fiddling about with air compressors harvested from dead refrigerators, and trash bags, but i want to get going.

I am starting to like the idea of being able to veneer, especially as the really spectacular wood is scarcer to find. I still am kind of haunted by the vg fir that I see at the local hardwood supply. it looks first growth and with so little of it left, i don't feel right just using it indiscriminately.

I do this all the hard way becuase i don't konw any better. i wish i could figure out a way to get apprenticed in some shop. i am tired of being an information worker after 20 hard years. I want to make things that are real!

Re: help w frame&panel curved in depth and profile

#44

vacuum pump

Bill Tindall, E.Tn.

they are a ubiquitous lab item. Ebay will have stacks of lab vacuum pumps. A small diaphragm pump will do fine. They run and last forever.

Re: help w frame&panel curved in depth and profile

#45

I don't agree

Bill Tindall, E.Tn.

Add me to the list for someone that has used Formica brand solvent based cement for veneer. I have heard problems with water based contact cement. The solvent based stuff will most certainly not soften in the sun and no solvent is going to penetrate 3/32 veneer to any meaningful extent. No solvent other than lacquer solvent is going to affect its strength. The adhesive is immune to mineral spirits and alcohols. There is zero chance of the rapidly evaporating lacquer solvent to affect the cement even under modern veneer. Anyone trying to remove a sheet of old Formica knows the tenaciousness of the cement. It softens at a temperature just shy of burning the Formica.

I glued a boat together with a slight variation in the formulation of this adhesive and it did dandy.

Re: help w frame&panel curved in depth and profile

#46

There are lots of speed of cure for epoxy

Keith Newton

The stuff I use, may take up to 6 hours to kick. I can mix and spread LOTS, without any worries. Temperature is an important factor for curing rates with all epoxy, but most suppliers have slower and faster for the seasons.

If you mix smaller batches that can be spread out quickly, will take a lot of worry out of it. If you mix larger batches, which has any depth to the volume, the heat can build rapidly. I like most people, used to mix it and pour it into a roller pan, or other container where it can spread out will keep the heat from building. However, now,,, I usually mix in about 16 oz Solo cups, then pour it onto the work ahead of the roller as I walk down the length, then come back and roll across the panel to even it out. Then I do another mix, and spread it, then another. It will stay liquid for a long time once it has been spread this thin.

This redwood is really soft, and may need a second coat, if the first soaks in too much to leave a starved joint. However, I keep silica on hand to thicken it, which also helps keep it in the joint better, so I would probably roll on a coat which I thickened to about latex paint consistency, then see if the earliest applied was soaking too much, then mix something closer to catsup for a second coat.

Re: help w frame&panel curved in depth and profile

#47

vacuum pump Wiki *LINK*

Grant in Iowa

Adam,

I have not had an issue with my air compressor, which is rated to produce 7.3 cfm. It is a second hand 1.5HP contractor "wheelbarrow" style compressor with about a nine gallon tank that lives beneath my grinder bench. I have linked to what the newer version looks like below for your reference.

When I do a water ski, the part sits on a form with a strong back (see my previous photos). The water ski is about five and a half or so feet long and maybe 11 inches wide. As I used foamular rigid styrofoam for the forms I have made, I don't end up with a huge amount of free air in the bag once it is zipped closed. There is some, though.

Now some background on how the vacuum hose works. The JoeWoodworker design calls for a regular schrader valve (tire stem), without a valve core to be mounted to the bag. This schrader valve is then connected to a locking fitting that is on the end of a hose, which runs to the vacuum reservoir on the venturi pump.

Further, when I built my pump, I installed a ball valve in line between the vacuum reservoir and the hose. This allows me to "pre-charge" the vacuum reservoir before I do the glue up. Doing this means the initial draw down will go much faster, and it allows me to get my vacuum pressure level where I want it before applying it to the part. I am not near my notes, but I think I use something like 25" of mercury on the skis. So before the glue up, I close the ball valve to prevent vacuum from flowing to the bag, turn on the pump and let it fill the reservoir. The compressor cycles once when I do this. I probably have about a cubic foot or so of vacuum reservoir (my estimate). It would be smart to use this approach as a confirmation that everything is working before you even apply glue to your parts.

Given my 4' x 8' bag, and the height of the forms I have used, there is still a good deal of air in the bag after you seal the end closed. My pump will draw this down, but after doing a few water skis, I grew impatient with waiting the 3-5 minutes it was taking. The air compressor kept up without running continuously, but I wanted to tweak my method so I tried first using my shop vac just placed over the open schrader valve to pull most of the air from the bag. This worked very well, and quickly too. Maybe 20 seconds or so. At this point, removed the vac hose and applied the locking fitting from my vacuum reservoir, and open the valve to draw the vacuum. This is the method I prefer on items that have a bunch of free air space surrounding them.

Once the bag is drawn down, I find that there aren't any significant leaks, and the venturi pump only cycles maybe hourly, if that. When it cycles, it causes the compressor to run one cycle usually.

I recall thinking about the size of the vacuum reservoir being critical to the success of the project. I erred on the small side for the following reason: If I made the vacuum reservoir too large, I would risk the compressor not being able to keep up, and if that happened, the venturi wouldn't work, and that could mean a failed glue up and possibly a failed compressor pump at a time when I wasn't in the shop.

The sound and air flow of the venturi is about like bleeding air from an automotive tire. Not too loud, but be sure not to point it in the direction of a dust pile!

I also have a five gallon portable air tank that I can use with my compressor if I want more air volume. I plumbed it up so air can move in and out freely with a regular air hose that is removable, but turns out I don't really really need it. I actually do use it when I run an impact wrench when working on cars though, so it wasn't wasted effort.

If you use a ball valve on the vacuum hose, it will also allow you to control the rate at which vacuum flows from the bag to the tank. All you need is enough to stay ahead of that which is lost, which isn't very much with JoeWoodworkers middle grade bag 4'x8'.

I should also note that I keep the unused portion of the bag rolled up fairly tightly, so it stays out of the way.

If I were doing this the first time, I'd definitely do a dry run without glue to make sure everything works right, before committing to a glue up.

Hope that helps!

Grant in Iowa


Rolair compressor

Re: help w frame&panel curved in depth and profile

#48

Re: vacuum pump Wiki followup

Grant in Iowa

I only answered your last question partially. Let me expound:

I said "If you use a ball valve on the vacuum hose, it will also allow you to control the rate at which vacuum flows from the bag to the tank. All you need is enough to stay ahead of that which is lost, which isn't very much with JoeWoodworkers middle grade bag 4'x8'." I think his chart, while useful, is assuming air is not evacuated via a shop vac first, and probably assumes some degree of leaks, which is largely controllable by the builder/ user.

I would add that, so long as you install a ball valve to control vacuum volume usage, you should be fine to use a bit larger venturi than you might think. You can also control the size of your vacuum reservoir. If you use PVC as a reservoir*, you can even reduce the size of the reservoir later if your compressor can't keep up. All of this really is only necessary during the initial draw down of the glue up. Once that is done, so long as you have been diligent about sealing everything up and so long as your bag has a fairly tight seal, the smallest pump will probably keep the part under proper vacuum.

I think I only paid around $200 for my compressor used from craigslist. I don't know how I ever lived without it now.

Remember, you can also add air storage to a smaller compressor such as a pancake compressor. I used a portable air tank I had and maybe $15 worth of plumbing parts and air fittings.

I bet there are engineers on this board who could likely calculate rather easily what volume of air it would take to generate a given volume of vacuum. That information would go a long way towards giving you a definitive answer.

Regards,

Grant in Iowa

Re: help w frame&panel curved in depth and profile

#49

vacuum pumps

Bill Tindall, E.Tn.

There seems to be a lot of confusion about using vacuum pumps from those that are not familiar using them regularly in a lab environment.

1. I had a friend build an astonishing complicated arrangement to turn his surplus pump off and on to maintain vacuum in the bag. The pump he was using would happily run for days and probably suffered from the on-off cycles. Vacuum distillations or drying often takes many more hours than it takes for glue to set. If using a pump designed for lab use leave it run for as long as you wish.

2. Pumping rate is largely irrelevant unless you can't figure out how to avoid leaks. Once pumped down, and I see no reason to worry whether it takes 5 or 15 min to pump down, the tiniest capacity will maintain vacuum sufficient to put 15 psi on the bag surface. The difference between 29 and 30 inches of vacuum is an irrelevant difference in bag pressure.

3, Used or even new diaphragm vacuum pumps are small, cheap, and quiet. I can't imagine why generating vacuum with an air compressor makes any sense. The pumps that involve oil are large, can be noisy and expensive unless you find a deal (I got a near new one for $50).

4. I would recommend Ebay for a source of used diaphragm pumps. Last time I looked, a year ago, there were lots available. Buy a name brand and anything that wears out( personally I have never see a pump fail) can be fixed. I suppose that eventually the diaphragm will fail.

Re: help w frame&panel curved in depth and profile

#50

Air line storage capacity, extension cords

John K Jordan

>Remember, you can also add air storage to a smaller compressor such

>as a pancake compressor. I used a portable air tank I had and maybe

>$15 worth of plumbing parts and air fittings

Completely off topic, but this reminded me of the time I was building a horse shelter at the end of the field and wanted to use a pneumatic nail gun over 500' from a power outlet.

Rather than run extension cords the whole way and risk damage to the compressor motor from the electrical voltage drop, I ran a 100' of 12ga extension cord and 400' of air line. This worked very well, inadvertently adding a lot of volume in the air line to the pancake compressor! We ran two nailers at the same time on that little compressor.

JKJ