Bedding Hardware
by Bob Smalser, Seabeck, WA
I believe repair and restoration work to be the best training for woodworkers, regardless of what you are making out of wood. You get to see which practices work, which don't, and which won't over the long haul. Besides learning which joinery lasts and which doesn't, fixing other peoples' poor practices helps in preventing your own and usually puts the future repairability of your own work high on your priority list where it belongs. Sorry folks, but if your work isn't easily repairable, you are merely doing expensive preparation and storage of fuel for the next generation's marshmallow roast. That may not bother you if it holds up long enough for your purposes, but who knows? It may break your granddaughter's heart some day, if that's the only family piece she has.
For boatbuilders, just wandering the yards to study derelicts is useful. Picture your boat at that age and state of neglect…because dollars to donuts it will be both of those some day…paint gone, sheathings perforated, and rainwater coming in unhindered. Will it hold up even as well? What level of neglect will cause it to become uneconomically repairable, and how quickly? Most importantly, what's the difference in man-hours and materials between a job good for a few years and a job good indefinitely? In these days of better glues and sealants, that difference isn't much.
The first step on the path towards that marshmallow roast, whether the boat is wood, glass or metal is usually where metal meets wood in a hole…how the hardware is bedded. Drilling, threading, and the attendant torque, even when done by the best workman, damage the wood fibers slightly, and damaged fibers are where rot begins. Rainwater is the big killer because mold and fungus love it…that hole has to be sealed, and ideally, that sealant will remain effective even when the fasteners loosen a bit over time with seasonal wood movement and that condition goes uncorrected.

Basic hardware bedding involves protecting and sealing the hole. Here, the screws were driven and the hardware installed without any bedding, and then removed for the holes to be coated generously with a paint poisonous to mold and fungus…shown is red lead…and the paint allowed to dry. Then the hardware is removed, the faying surfaces coated with a marine sealant, and reinstalled.
Also critical, but a separate subject, is sizing and driving screws and fasteners…for here I'll just mention that the more damage to the threads, the quicker the rot, and that while power drivers are great for running fasteners up close, torqueing them down is a job best done by hand. No machine clutch has the sensitivity of a brace or a Yankee driver.
Escalating up the scale of effectiveness, screw holes are easily bedded in epoxy…and in exceptionally soft wood like this old-growth cedar, it is necessary for longevity. My forebears wouldn't have used cedar here because it won't take a hinge…but with epoxy, I get to enjoy cedar's better longevity.
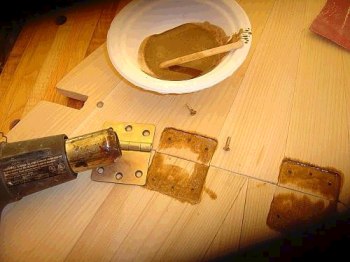
Here, the hinges and screws were installed, then removed and the faying surfaces coated lightly with epoxy…the heat gun thins the epoxy to the consistency of thin cyanoacrylate glue and it seeps deep. The epoxy was applied sufficiently thin so that coating the hardware with wax and curing the epoxy with the hardware bedded in it wasn't required.

In the worst-case, hard-use applications like this tiller yoke, I bed the entire hardware mortise thickly in epoxy, to include the screw holes. Paste wax was used as a release agent on the metal, and the epoxy cured beneath the installed hardware.
When reinstalled with marine sealant in addition to the epoxy, you have belt-and-suspenders effectiveness should the epoxy bedding crack in use and abuse. You can also use stronger machine screws in place of wood screws by either casting the waxed screws into their holes or drilling and tapping the cured epoxy in an oversize hole.

When fastening hardware to plywood or fiberglass, I double drill all the holes using epoxy…then use a bedding compound, too. I believe it a mistake to rely on mild putty like common bedding compounds alone to seal something as critical as those absorbent and fragile lams…or the encapsulated wood core of most fiberglass boats.

The hole is drilled a 16th oversize and filled with thickened epoxy….

…followed by a correctly-sized hole. Here I use a pilot hole to insure I center the final hole in the epoxy…

…followed by bedding compound.
When I was a kid, we used white lead as bedding, and many still use it or a more modern mild equivalent today. I never thought much of white lead and other linseed-based putties for this…it dries out and cracks, and the bedding needs to be checked and renewed with every paint job. The problem is, in my experience few folks do that, and I believe in building for abuse. So I use an industrial poly sealant similar to 4200. It's adhesive, but not as aggressive as the 3M varieties, yet it lasts forever and doesn't leak. It's also a small fraction of the 3M price. When applied between two painted surfaces it comes off with a length of guitar string and no damage can occur beyond your layer of paint. Followup with a heat gun and a scraper and it comes right off with the paint. Of course you have to repaint…but if I have to remove the hardware, I was probably going to do that anyway. For typical annual paint jobs, I just mask off the hardware.

I insure I get even bedding squeezeout…

…on both sides of the application.

Ditto for bedding backing plates.

Special applications like this center board pin get both a neoprene gasket and a tad of poly sealant.

And nail and drift holes should be swabbed with red lead paste before driving.

Acts as a good lube, too, for those tight bronze drifts.

Finally, some hardware I simply glue on in addition its fasteners using epoxy, if the installation is fragile and I want max strength. Heating the part up with a large soldering iron or torch easily releases the epoxy. Ever had a stem too sharp to make a brass nose strip for? Simply rasp a small flat and install narrow bronze flat stock using bronze fasteners and epoxy.

The final result?
Comments (0)
No comments yet. Be the first!
Leave a Comment