Here's a quick and simple spindle project, hair sticks, nice gifts for friends with long hair. Very quick and easy to make.
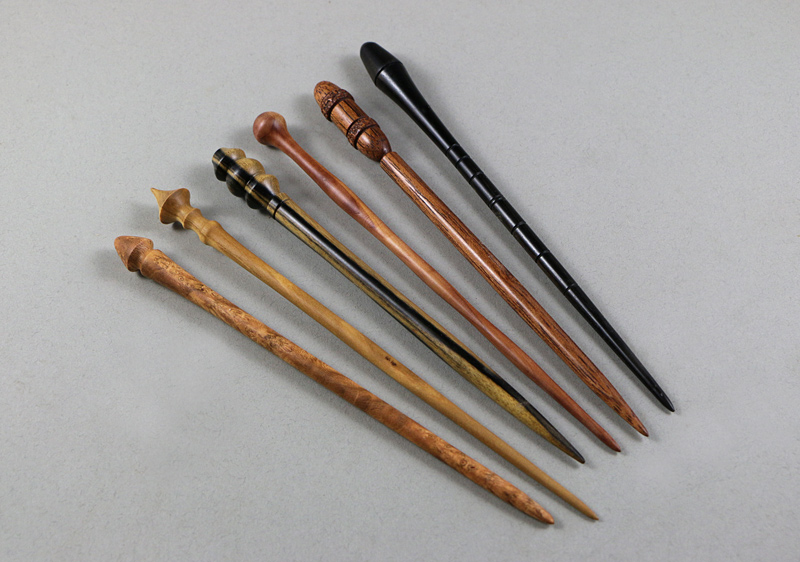
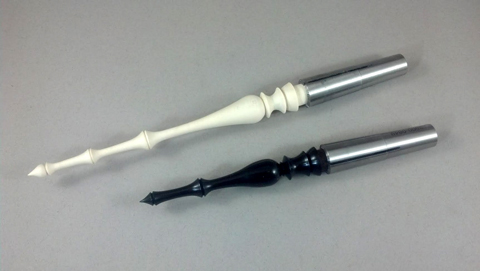
Cherry burl, olive, b&w ebony, eastern red cedar, mahogany, and gabon ebony.
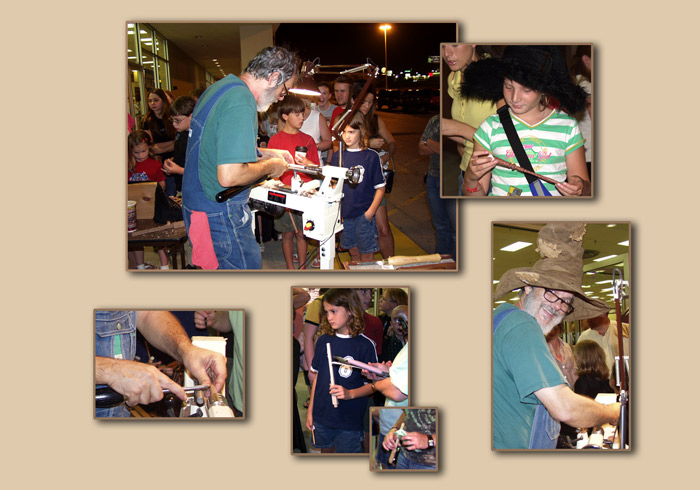
We have several friends who like to use sticks to hold long hair out of the way so I've made a bunch. I made these to give to a good friend in Italy.
While she was trying them I shot a short video of her teaching her 4-second double twist-and-stab method of securing. A veterinarian friend said she puts her hair up with a stick when wrangling a horse or alpaca. Both prefer the sticks to those stretchy hair things.
A few frames from the video clip:
I make hair sticks from almost any species, sometimes textured a bit or made with some variation in diameter (a bit of swelling near the pointed end) for better holding.
In the photo of the sticks the wild figure in the one made from cherry burl provide enough natural unevenness down the length (hand sanding, lathe off) which keeps it from slipping.
I made the rest with some variation in diameter down the length, thicker towards the pointed end by about 10-20% - it doesn't take much. Even the black ebony one has some slight swelling plus the little grooves which help keep it in place. The diameter variation may be difficult to see in the posted photo but it's easier to see by zooming into one of the higher resolution original photos.
BTW it's quite easy to feel and control the diameter variation while shaping with the skew. I support the tip of the skew while turning using the "left hand steady rest" method, moving the fingers of the left hand down the wood with the cut. This makes it easy to feel the relative diameter between my fingers and thumb. I just continue to shape down the length until it "feels right".
I generally start with a 7" to 9" blank maybe 5/8" square. Some people like them longer or shorter - I’ve learned to ask for length preference ahead of time if possible. Otherwise I get feedback when I ask if they want more!
These can be made with an endless variety of decorative ends. Some wild ideas (which I haven't tried): how about a little snowmen, a carved kitten's head, tiny tennis or golf ball, bowling pin, rattlesnake head (with snake shaft), an embedded jewel, turned colored acrylic, two contrasting woods, a strong wood shaft and a sharp pointed end for self defense, polished brass end - hey I think I'll try that next!
>>> You say longer or shorter: How long are the sticks in the photo? Is this the most popular length?
I think those were about 6-7”. Before I made the first I searched the internet, looked at Etsy, etc, asked around. Length seems to be a personal preference, perhaps related to hair length, type, tightness of the twisted hair bun. A friend who’s making them now for herself and friends asked for blanks 8-9” in length. Assuming up to an inch is wasted at the chuck and tailstocks, I’m guessing she’s making them from 7” to a little over 8”.
I see a Wikipedia article on hair sticks https://en.wikipedia.org/wiki/Hair_stickindicates they are “usually” 5” to 9” long. I’ve heard of some who like them shorter. Unless requested otherwise it’s prob safe to make them 7-8”. Even those who requested longer sticks didn’t have trouble making shorter ones work. If someone prefers one shorter it would be simple to shorten a longer one.
JKJ
PS, Any wood is good; since they are thin spindles straight grain is easier. I made some from offcuts from an incredible slab of olivewood I got from a friend.
When turning something long and thin like these things is the tail stock end of the piece being turned supported in any way by the tail stock?
Things like these sticks show up here from time to time and I think, that would be interesting to make. But the thought passes for lack of knowing how to start.
Turning thin spindles can be difficult at first, especially if they are long. (I've made some over 2' long, tapering from 1/2" down to 1/16" inch.) The problem is usually vibration from flexing which gets worse as the tool presses on the wood, leading often to breakage. The "trick" is how to prevent the vibration. I don't use a steady rest. I'd like to make a set of instructions with photos but not today so I'll just describe it.
I hold longer thin spindles like "magic" wands a different (better) way but for these shorter hair sticks and for similar things like finials for ornaments, I usually hold one end firmly in small jaws in a scroll chuck and hold the other end with the tailstock. I do not turn them between centers which would allow more flexing. By holding the driven end tight at least the first third of the spindle is well supported and flexing and vibration is minimized.
You can turn the entire blank round and hold the one end in the chuck jaws or easier, simply grip the square wood with the jaws.
EQUIPMENT:
- Scroll chuck, small jaws like pin jaws, or my favorite, Technatool's mini spigot jaws.
- Live center. There are several distinct advantages to using the Sorby Steb live centers, the 1/2" size for small spindles.
- Typical spindle turning tools: 1/2" skew, 3/8" spindle gouge, detail gouge. Tools should be SHARP. I sharpen skews with 600 grit CBN wheel then polish and hone on a thin piece of MDF with some polishing compound rubbed on one side. I sharpen my spindle gouges on a 1200 grit CBN wheel on a Tormek.
- If not comfortable with the skew these can be turned with a smallish roughing gouge and a spindle gouge. (BTW my short skew lesson has made the skew a functional favorite for more than a handful of people.) Be warned that a very small radius cutting tip ground on a spindle or detail gouge can dig into a thin spindle and destroy it in a single revolution. Spindle gouges are great for shaping the end detail.
SETUP:
- Prepare a square blank, perhaps 5/8" or so square and 8-9" long. Any species. Straight grain helps. Defects like cracks or knots or wild grain can create challenges.
- Mark the center of what will be the pointed end and make a small dimple in the wood. I use a gimlet to drill a shallow hole but an awl should work. With the point of the live center firmly in the dimple tighten the other end securely with a chuck. The headstock end will be the decorative end, the tailstock end will be the point of the stick.
- Turn the square blank round. With the skew I make a shallow v-groove on each end to define the length, maybe 1/4" from the right end, and enough space at the headstock end to keep the tools clear the ends of the jaws during shaping (maybe 1/4"-3/8").
- With a decorative design in mind I might make some pencil marks to lay out the space and the position of some key features. Rather than let the wood "speak" to me and see what kind of shape happens, I prefer to think about the design first and even make sketches.
TURNING:
- I usually turn thin spindles at high speed, maybe 3000 rpm.
- Starting just past the decorative end I begin to reduce the diameter of the shaft with the skew chisel.
- Reduce the diameter at the top of the shaft then turn a shallow taper all the way to the end stop.
- It's best to make some "swelling" towards the tip, a slightly larger diameter, so the stick will hold better in the hair. It doesn't have to be much.
- I turn the shaft with the 1/2" skew chisel. Since cutting in the center of the shaft can introduce vibration and spoil the work I use the "left hand steady rest" technique: Hold the tool in the right hand only, fairly close to the cutting end. Support the end of the tool handle by pressing it into the underside of my forearm. (This is easier if the tool handle is not too long.)
- Wrap the fingers of the left hand around the back of the spindle and steady the cutting tip with the left thumb. Move the fingers down the shaft with the tool, always supporting the wood right at the cut. This makes it so easy to cut thin spindles of any length without destructive flexing.
- This method of supporting the work also makes it so easy to get the shape just the way you want it. As you travel down the shaft removing wood you can easily feel the diameter by gently squeezing the wood between the fingers and thumb. It's easy to know when you have just the right amount thinning and flare where you want them.
- Another way to keep the stick from slipping in the hair is to add texturing to the shaft, perhaps some distressing, coarse sand paper, a texturing tool, or a series of small grooves or smooth bumps.
- After thinning and shaping the shaft I might sand before working on the end decoration. With a smooth cut starting with 400 grit sandpaper is usually coarse enough, maybe even 600 grit. I always follow any rotational sanding with sanding by hand with the grain.
- Turn any decorations on the end, beads, coves and such, using the skew and gouges. I shape the end but be careful not to accidentally cut it off, leaving enough wood to support the tools.
- Sand and carve the end decoration as desired. If carving, I usually do it while the piece is still in the lathe.
- I sometimes cut the ends off (tailstock end first) with the point of the skew chisel but usually use a tiny saw which can be cleaner. Reduce compression by backing off on the tailstock and saw through the tailstock end then the headstock end. Clean up the ends with the skew and sand paper.
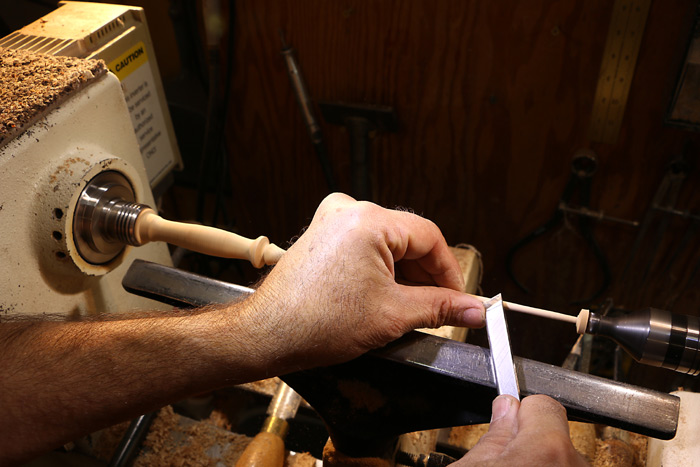
I don't have photos of turning hair sticks, but here are a couple of old photos from my ancient "magic" wand document, the first showing supporting the thinning spindle with the left hand while cutting from left to right with the skew.
The next picture is cutting in reverse, from right to left. I also use a crossover support method on occasion but this should not be needed for spindles as short as hair sticks.
The left hand is also resting and sliding along the tool rest for a little extra support. Notice my right fingers or nuckles are usually also sliding along in contact with the tool rest for more support.
This method works amazingly well. I almost never break one unless I run into a hidden defect in the wood.
Note the longer thin spindles are not held in chuck jaws but directly in the #2 morse taper socket of the headstock. For these I turn a short morse taper on the driving end. This method of holding has several distinct advantages for long thin spindles. For several reasons I do NOT use the taper method for hair sticks or finials.
Thoughts on a finish? I would expect the point end over time would pick up oil and dirt from the hair. A slick finish might make them come out too easily. Thin coat of mineral oil, wiped dry?
hold the other end with the tailstock. I do not turn them between centers which would allow more flexing.
Unsure how turning between centers differs from what you are doing. Maybe I do not understand the term "centers". I have what I need at the head stock end. Unsure what device is supporting the stick at the tail stock end. Your description seemed clear to me and I shall try it shortly, starting with shorter practice pieces.
I have a skew that was not factory made and I think it is too "pointy" but I do not have anything to compare it to. I do know it is touchy to control. What is a typical total included angle for a skew?
I can fill in about centers later. On another computer I have pictures of what I have found to be the most useful.
Some pro turners say they like 20-25 deg included angle but that’s getting toward the small side for me. I prefer around 30-deg or a bit more, I’d have to measure. � (I made a jig to set the angle when I sharpen and don’t remember the numbers.) The smaller the angle, of course, the easier it slices fibers but the more “touchy” it can tend to be. � A skew that is “touchier” than the user’s ability to control can be counterproductive!
What included angle is yours? And what is the skew angle or shape of the cutting edge viewed from the wide side - straight or curved? There are advantages to both. � And curious, how wide is it, 1/2”, 3/4”, wider?
I ground an old 1” wide skew to about 45-degs which doesn’t cut as fast but it’s more forgiving for a beginner.
Bill, I think you have a chuck or two...I have not turned a hair stick but have turned dozens of finials. I was going to point out you can drive them directly into the No. 2 Morse taper, but John beat me to it and then said he does not do it on hair sticks. (John, please explain) I like driving the stick without the chuck, gets it out of the way and avoids the possibility of touching it while it's spinning. As a bowl turner, used to turning at less than a 1000 rpm, I find turning small sticks fast to be good, something like 2500 or more rpm. Not sure, but I think some chucks are not supposed to be spun that fast.
On longer spindles where support is needed on the tail stock, using what I have, I use a live center with a little cup and needle. I drive it in as hard as I dare and then back off until it is SLIGHTLY loose. This does two things, seats the taper in the shaft and then takes the compression off the spindle, hopefully lessening the flexing while still supporting the tail end.
I have Nova chucks and have not bought a set of tiny jaws. If I want to drive a stick this size with the chuck I remove the jaws and use the sliders the jaws mount on. This makes the chuck less intrusive. The wrong jaws left in place are capable of removing some flesh.
Just for fun I turned a 9' long stick on a bowl lathe with a 2' bed by passing the stick through the headstock, gripping it with the chuck and then passing it through the tail stock.
>>>I was going to point out you can drive them directly into the No. 2 Morse taper, but John beat me to it and then said he does not do it on hair sticks. (John, please explain)
I usually don't use the MT method on finials and other spindles that can be very thin or pointed at the tailstock end. The reason is the MT method, at least the way I use it by turning a short #2 taper on the end of the wood, needs some pressure from the tailstock to keep it firmly in the headstock. (I know that some people drive a square blank firmly into the headstock with a hammer, using it like an old-fashioned cup center. I don't use force to "drive" anything into the headstock since I don't want to chance compromising the lathe bearings. BTW, the recommended use of a cup center is to hammer the wood into place on the bench then affix it to the headstock.)
The need for tailstock pressure to keep the taper securely in the headstock is one reason I usually cut wands loose with a small saw instead of parting them off when ready to be removed from the lathe.
If the tailstock pressure fails, the turned #2MT will loosen in the tailstock ending any additional turning or sanding unless you can hold it tight by hand or some other method. Something I've used in this case - drill a hole in the wood of the MT end and thread a 1/4" drawbar to hold the work tight in the headstock. I used this method on the long walnut test spindle that tapered from 1/2" to 1/16" over 2' or so when the tailstock end got too thin. It worked well. (I turned the other long taper from pine shelving board from Home Depot)
As long as there is tailstock support, the MT method has some advantages. 1: it provides more clearance at the headstock end, 2: it eliminates the whirling chuck jaws, as mentioned, 3: it eliminates the extra thickness of the chuck which lets me turn longer spindles on a small lathe (my Jet mini), and 4: it allows removing the work and remounting it later with perfect registration, something difficult or impossible with a chuck.
For the hairsticks, finials, finger tops, and a lot of other spindle work I prefer to hold the wood firmly in a chuck. No problem with the work coming loose. Even more important for thin spindles, it adds stiffness to the left end of the spindle for less flexing and much easier turning. From experiments with thin strips of wood I think the stiffening is effective for at least 1/4 or 1/3 of the length of a 14" "magic" wand or conductor's baton. A chuck makes it easy to turn an 8" 2x2 blank with no tailstock support.
There's another holding method that works well for finials or other thin spindles that are unsupported on the tailstock end: the MT collet. The 1/2" collet holds extremely well. It requires turning a 1/2" tenon on one end of the blank. The collet is pulled tightly into the headstock with a 3/8" drawbar and not only grips unsupported wood well but has the advantage of remounting with perfect registration. Using a chuck is quicker, though. In the picture a holly and an ebony finial are held in MT collets.
As for the question about turning between centers, that's basically done with a conical point pressing into both ends. The drive center often has 2 or 4 spurs to dig into the wood and prevent slipping. The revolving/live center in the tailstock usually has a conical point surrounded by a cup which presses into the wood (in the case of the popular Oneway live center and clones).
It is difficult to turn thin spindles between centers since the wood is much more likely to flex as the spindle gets thinner and the flex is harder to control.
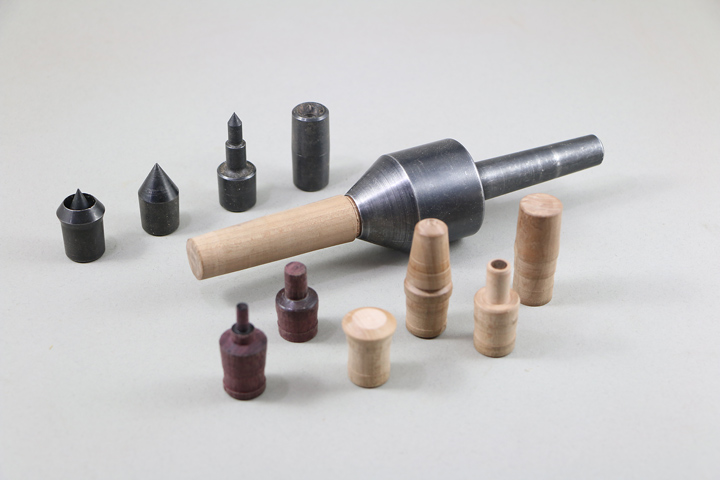
Another problem with these centers on thin spindles: if the wood is thin, hard, and perhaps a bit brittle the conical point can actually split the wood from the pressure as it gets thin. For this and other reasons, my favorite drive and live centers are the Sorby Steb centers. The picture is of two sizes of drive centers. The live centers are similar but have bearings so they will spin.
One thing I like about the Steb centers is the conical point is spring loaded. If I apply additional pressure to the tailstock the point will collapse enough so the "teeth" shown bite into the wood. These teeth have some other advantages as well, for example for better holding for multi-axis spindle turning.
I start nearly all spindles between Steb centers to round the wood and perhaps turn tenons on the ends of lidded box blanks so they can be held in a chuck.
BTW, if you get a catch when holding by a Steb drive center it just slips instead of chewing up the wood or drilling a hole into the blank, likely with a small spur center.
Speaking of centers, my other favorite live center is the Nova. The Nova has more features and flexibility than any others I've had. I especially like the ease of making wooden attachments for special holding. The Nova has a small #2MT socket for this.
Barry, I also use the jaw slides on occasion instead of small pin jaws. The diameter of the holding end is limited, though. I most use this method when turning brass or aluminum rod with a diameter just a tiny bit too small for the jaws.
This subject takes a lot of written words, things that could be described and demonstrated in person in a few minutes!
Back when magic wands were all the rage, I met a turner making them in a set-up outside a book store (buy a book, then a wand to go with it). Working on a JET Mini he used a pair of collet chucks. Starting with 3/4" round blanks, he had a collet chuck screwed on the headstock spindle and then a draw bar MT version in the tail stock to put some "pull" on the workpiece to negate the flex in the wood shaft. Seemed a pretty cool system and he was obviously going flat out hi-speed work, as his customers could stand and both watch and choose details as he went.
John, One thing you didn't mention (or I don't think you did after a quick read through) is the Beall collet chuck. That's my 'go to'. You mentioned a collet chuck with a drawbar, but the Beall just screws onto the spindle. Very quick and solid and efficient. The standard set comes with five collets at 1/4", 3/8", 1/2", 5/8", and 3/4". I love it and use it a lot for small things.
I discussed the same thing with the added use of a tail stock MT collet on a draw bar. I remember watching the guy and even on thin wood, he got no flex in the shaft but also used a light touch with his left hand as John described. I had the experience tucked away in case I wanted to turn tooth picks. Thanks for reminding me.
>>>John,� One thing you didn't mention (or I don't think you did after a quick read through) is the Beall collet chuck.� That's my 'go to'.� You mentioned a collet chuck with a drawbar, but the Beall just screws onto the spindle.� Very quick and solid and efficient.� The standard set comes with five collets at 1/4", 3/8", 1/2", 5/8", and 3/4".� I love it and use it a lot for small things.�
I didn't mention the Beall since I don't have one and never used one although I think it would be great. (I use collets a with my milling machine.) I believe the Beall uses a std ER32 collet.
I didn't get a Beall since it is rather long which made it less useful on a small lathe. I should say I normally use a large lathe but sometimes sometimes carry a Jet Mini around to do demonstrations and such. By turning the 2MT on the blank I can handle a longer spindle than with any other holding method I know AND turn it on any lathe. I set a Jet Mini up at out in front of a bookstore for a Harry Potter book release and made wands while people watched, then sold those and a bunch I brought. The wands brought in over $500 an hour!
I understand each ER collet has a nice range compared to an 2MT collet so your tenon can be less precise. And the Beall comes with collets to fit a wide range of tenon sizes! (The MT collet only goes up to 1/2" dia.) However, I understand you have to buy a collet threaded for a particular lathe. The MT collet will fit any lathe with the standard 2MT headstock spindle.
John - your in depth illustrated reply took a lot of time away from mucking out stables, gathering eggs, and so many other "to-do's" - on behalf of all of us thank you for taking so much time and thought from your busy days!


")


")