Home Articles Forums Gallery Marketplace Videos

WoodCentral Forums

Knowledge You Can Build On — Est. 1998

Creating a mini-ura with buffing wheel?

Posts

Re: Creating a mini-ura with buffing wheel?

#26

in plane iron testing, I found two options..

David Weaver

...one, chase the wear out with the ruler trick and a half mm stainless rule and the back bevel grew trying to meet the microscope "all wear removed" standard. One of the reasons that test was a pain was that each iteration, I would have to do the ruler trick on the edges twice to remove all vertical lines from planing wood (vertical meaning in the direction of iron length).

The other option would be to do the ruler trick and keep the wear bevel the same size and ignore the insignificant wear left at the edge And that option would've been fine - the wear scratches are less significant than most sharpening stone scratches.

In the clearance wars, the assertion was that this doesn't happen or it's uncontrollable. The answer is somewhere in the middle. I never had an issue removing functional wear from a bu plane with 30 seconds or so on a slurried 8k stone. But when the long back wear was pointed out and then I wanted to remove all cosmetic scratches of any kind all the way into the back, then that took a lot more work. The important part of it being that the few deep scratches that leave spider webbing don't need to be removed each time as they weren't noticeable when using the plane (none deep enough to split shavings).

If an iron is taken to dullness (complete lack of clearance), though, and the ruler trick is used on a bevel down plane with a cap iron, it's not true that with a 0.5mm rule that it can be used to remove all wear without growing. I didn't try other rules and probably wouldn't have ever even thought that keeping it the same size didn't suffice in removing all everything (which means that what's left behind may not be that significant).

applied pressure at the tip on a faster stone is a lot more practical than the ruler trick, though. And faster.

Re: Creating a mini-ura with buffing wheel?

#27

Re: in plane iron testing, I found two options..

Derek Cohen (in Perth, Australia)

David, as you know i do not use the Ruler Trick. But some will swear by it .. as no doubt some swear at it :)

Many years ago I, when I was using BU planes as my primary choice, there was a heated discussion on this forum (for a change :) ) about the wear bevel. I recall mentioning to Larry that I did not experience the effects, and probably because I stropped the back of the blade on leather.

One might suggest doing the same with a buff. I am not sure that the results would be equivalent. A leather strop will create a more predictable result.

The variability of the buffing angles (in the absence of checking with a microscope, which is the situation for most users) is what I am missing with the unicorn buffing in preparing BU plane blades. There is a very real difference in performance on interlocked grain when a BU plane is cutting at 55- and 62 degrees. I described this earlier: very thin shavings and straight grain will not reveal how well you are faring with BU blades. You really need to be testing this out on interlocked grain, and using your standard thickness shavings.

In my mind this is a lot like learning to set up the chipbreaker. Trial-and-error gets you closer to the ideal distance/angle. No doubt that we will look back in the months to come and wonder why it was so difficult back then.

Regards from Perth

Derek

Re: Creating a mini-ura with buffing wheel?

#28

testing high angles..

David Weaver

...actually, i may have done folks a disservice by not posting a video of using the 18 with 45 degrees plus buff (which is similar in tearout control to 50-55 degrees.

The 18 will punish you in something like ribboned bubinga -and here's how:

* you take a thin shaving - minor tearout, OK

* you start planing different directions - OK, still tearout, now chasing tail

* you attempt to increase shaving thickness and the plane dives into the wood, disaster

That's what was on that bubinga board in a missing video between cap iron plane (which will go as thick as you can stand to push it, even on the bubinga or the water+ SG cocobolo), and then I went 55 degrees + buff and then the video. The shavings in the video are 3 or 4 thousandth, and those will induce bad tearout.

The nuance in the video is that i eyeballed 55 degrees before buffing (plane bed 20, eyeballed 35, then buffed).

As we've discussed before, if you want to match tearout control with the cap iron, this is the level of effective angle that's needed (60-65) as 55 wants nothing to do with either of those boards.

My epiphany with the cap iron (other than faster dimensioning) was getting a $12 millers falls #9 (stanley 4 equivalent) to handle the cocobolo better than my very carefully made infill smoother - that was at 55.

Needless to say, in the ribboned bubinga, that 18 was dull quite quickly. But, it did what it needed to do with the cheese blade.

My buffing on that iron is also aided by using yellowcake - to get the step up in angle efficiently, the speed of the yellowcake is needed. If it were V11 or even A2, the time on the buff would have to be double (and I am doing it only on the bevel side aside from edge stropping the back at the most).

As to the wear bevel on BU planes, when you're doing something (as you and I both were) and it works and someone supposes it doesn't, it falls into the category of one person doing something and the other supposing that it doesn't work. That usually leads to the latter person either continuing or disappearing when they figure out how to join the former.

In the clearance wars (which will never get its due in a mini-series on TV), the discussion went from what you and I were doing to asserting that people using back bevels were adding 5 degrees because that's the "ruler trick".

My statement about choosing in this new case, to remove all wear to microscope perfection vs. keeping the back bevel the same size is much like I found with the bottom of my BU planes. Once Larry linked to Konrad's page and I saw the spider webbing on the back of my iron (probably each "injury" from some past contamination), then it became arduous to keep aesthetic perfection all the time. That was bad.

In the case of the (Back side) wear bevel now, if I were using the ruler trick and manged to keep the edge damaged no deeper than the amount of bevel work each time (Which isn't that difficult most of the time), or at least close (let's say half), then leaving a tiny amount of only cosmetic (can't feel it planing, can't see it on the board, then what's the harm?) wear in the chosen ruler trick sized back bevel is preferable.

My move over to the washita has more to do with how fast it works on the back. This sounds foreign to people because it should be slower for as fine as it can go - but my directed pressure is pretty much as hard as I can push without losing control (a factor of laziness).

LN is shipping me a BU plane (or has). When it gets here, I won't ruler trick it, and I expect no problems using it or maintaining clearance now when I didn't (I used the green kitayama type stone in the omnibus below - the one in the omnibus is only unused because (I should be ashamed) I sold the first one and then bought another one when I found it new from japan with free shipping for $55. Japan woodworker sold it for $104 at the time. Highway robbery.

The point of the thin shavings with the planes wasn't to avoid tearout - there is some cross talk here. In fact, if that's what it takes to avoid tearout, I'm out - one can't work the way I do with thin shavings - it results in pulling the stakes of the tent up and taking the wagon elsewhere. The two discussions of thin shavings were (three):

* you mentioned that it may not be as easy to get thin shavings on terrible wood (the bubinga is as bad as anything I've ever seen, it's worse than the cocobolo) - I figured if I could see through bubinga or cocobolo, with their respective higher density and darkness, that'd be pretty good. I could just see through some

* I mentioned separately that if this unicorn thing gets picked up, I would be willing to test BU planes for a magazine as I will be able to use them. Magazine readers will probably be interested mostly in thin shavings, which leads me to conclude that if they have a problem with tearout, it's more likely to be the accidental heavier set or trying a deep set to remove some machine-created damage. Not sure of the likelihood here, but going back to the magazine readers - they won't necessarily understand a nuanced discussion that involves heavier planing, and at the same time, a BU plane at 62 is far and away not the machine for that in the first place (2" wide hardwood shavings measuring 6-8 thousandth)

* when it came to actually planing that bubinga in the video, I planed heavier shavings - about 80% of what I would be able to physically do - and I didn't show the segment of video where the block plane tore up the bubinga, because it wouldn't have served a purpose

The bubinga is separate from the brief tests that I did on curly maple at various angles - solely because it will remain rough even with a 2 thousandth shaving. The wood between the rings is dusty and weak, and it's a challenge to get a smooth surface. Maple, curly included and baked or not, is far better at keeping its shaving together.

In the "old days" heavier work, or wood that moved overnight is what drove me to the cap iron, not thin shavings. I felt well prepared for a group of four large chest panels - bu planes, check - muji hss 63 º smoother, check - veritas large scraper plane, check.

Actually using them when a wide panel cupped over night and I wanted clean it up and make it flat finish scrape and sand it. Total failure.

After learning the cap iron, I sized the entire cocobolo plane blank (sizing, squaring and then planing off the turning saw marks from the side of the plane afterwards) and did all but the very last planing with a single stanley iron and the cap iron set. What a difference.

Re: Creating a mini-ura with buffing wheel?

#29

side comment about planing in general..

David Weaver

I don't know what people find useful, and I'm sure the depth that I'm taking and demonstrating in is confusing for some.

That is, if I say - if I can show a tiny thin shaving then the iron will be well set for heavy work (that's true in a plane with a cap iron), it probably doesn't register with most folks. The point in that case is to show sharpness and clearance at the same time. Both are more forgiving with a larger shaving.

If I start talking about generation of tearout, and planing to a mark with a try plane, I really have no clue how many people really find such a thing useful. On the australian forum, the cap iron discussion doesn't get too much traction, and I wonder if that's because if you're using something like interlocked jarrah, you'll get to know your planer well. If the planer does a good job, then the depths where folks are fighting tearout...

....well, will they ever be experienced?

I have no idea. I've stopped telling people they should learn to use the cap iron if they like using steep pitched planes and rarely use them other than to smooth plane. Once the block plane was set really steep, it wasn't unpleasant to use on the bubinga as long as the shaving didn't get thick enough to be hard to bend. dullness appears soon, but it's easy enough to refresh and get past it.

Re: Creating a mini-ura with buffing wheel?

#30

I'll demonstrate thick sometime ..

David Weaver

..in the next few days. I took both in that video, but not all on video.

The reason that I made thin shavings on rosewood, cococobolo and bubinga was because you mentioned this on the blue forum (I'm data mining that thread to see whether or not people are having luck with the methods - I think most people have forgotten that this is really a method for chisels and they're getting stuck in the mud on bevel down planes. It'll work better on BU planes for most than BD, because no touch is needed). At any rate, you posted this:

The problem here is that BU bench planes require a somewhat OCD approach when you work with interlocked grain. Lesser woods do not test this issue. Just as a case in point, I love the streamers that David and Rob Cosman can produce. On the wood - Hard Maple - it just requires a sharp edge. I can replicate this with ease in my workshop. It is fun However, try the same set up on a wood like Jarrah, and it will be patchy, the shavings will struggle to straighten, and you will think that the plane blade is dull. Back to the Maple, and the streamers fly.

So, I posted pictures and a video taking thin shavings in dense woods, quartered, some interlocking grain (and chose khaya quartered as the medium hardwood in a separate post because the ribboning is interlocked and runs opposite directions on the face of the guitar body blank that I used). I haven't planed much maple ,rather since clearance was a potential issue on BD, i planed pine (Which would have clearance issues faster). The reason I planed pine is also because I'm dimensioning it. I posted a copious amount of planing yellow pine and white pine with knots (because I"m using it, not to pick favorable woods - Yellow pine isn't really the most favorable thing for thin shavings because the hardness is differential).

So, I was addressing the first post.

I'll address this, then, too - I made shavings as thick as I could reasonably push out of ribboned bubinga and with the BD plane, the cocobolo stick.

What should be easy to show is that on those sticks:

* 55 degrees and a heavy cut will generate tearout (I haven't tried this with the block plane, so maybe it won't - we'll see)

* 55 degrees buffed (further steepening the angle) on the bevel side only (I can't see a good reason to buff the back when it's easy to keep it crisp with a stone) will not generate tearout

* I have an iron set up at something like 62 degrees flat bevel

I'm supposing that the heavily buffed bevel side will behave like 5-10 degrees more and get through the cut more easily. At lower angles (not relevant here), it'll prevent edge damage due to impact (dirt, etc).

I suspected some folks would have clearance angles on plane irons on common pitch (BD) planes. It's pretty easy to work past once one gets success (but not without trimming the bevel angle way back - a bevel thicker than low 20s isn't needed if the edge is buffed, and can be set to a microbevel if someone hates the buffer and nothing will be lost.

LN is supposedly sending me a BD plane - they informed me that my plane had shipped last week. However, their tracking number shows "pre-shipment". I suspect they've done one of the cheap ebay tricks of preventing you from canceling an order by changing the status to shipped (which informs you that it can no longer be canceled), but haven't shipped it yet. I hope I'm wrong about that. Until then, the stanley 18 will do fine with this testing, one just can only crank so hard on it on a deep shaving (realistically, nobody is taking a hundredth shaving full width off of interlocked jarrah or bubinga with a 62 degree blade, though, so getting half of that is a pretty good demonstration of a heavy shaving for the type. I measured the heaviest cocobolo shavings that I took around 4 thousandths with the #4 and those were plenty heavy, and the center of the heavy shavings on the block plane were somewhere around there.

Re: Creating a mini-ura with buffing wheel?

#31

Re: I'll demonstrate thick sometime ..

Derek Cohen (in Perth, Australia)

David, one area I am interested to hear about from you is a comparison of the #18 and the #62 in regard to effort to push a high cutting angle.

My expectation is that you will find the #62 much easier to push than the #18 ... because the centre of effort will change quite significantly.

The #18 requires that you push down as much as you push forward. The #62 allows one to push from low on the handle, and the force vector is parallel to the bench top and forward.

What I have written about quite extensively in the past is the low centre of effort possible with BU bench planes. This does not include BU block planes since they lack a handle. The issue here is the effort requires to push a BU plane with a high cutting angle. Compared with the same cutting angle in a BD plane, and the same thickness shaving, I think that the BU plane will surprise you :)

http://www.inthewoodshop.com/Commentary/CentreOfEffortPart2.html

Regards from Perth

Derek

Re: Creating a mini-ura with buffing wheel?

#32

Re: I'll demonstrate thick sometime ..

David Weaver

I think the block plane will comfortably take the same thickness of shaving because it's less wide. It effectively cuts about 2/3rds of the width (the iron is 1 5/8 vs. 2", but some area at the corners of the iron is unused).

Once the block plane is in the cut, it's a combination of downforce and forward just the way you have to use it to avoid popping the cap off, so it's much like a bevel down plane.

I don't agree that the bevel up plane allows for better working conditions, though - the force vector on a try plane makes for about 4-12 pounds of extra downforce while pushing forward. As long as the sole is treated with wax, this is productive downforce and I think it's probably comfortable and more efficient practically to have the downforce and verticality of the plane. Where this runs awry is when the sole of a plane isn't waxed, but that's a problem on BU planes, too (I learned to cut endgrain in the vise with a smoother rather than the BU jack because the BU jack plane had far more friction at the tips of the straws and the downforce created by the stanley plane orientation makes for more success keeping the plane in the cut).

The rotational force and higher feel with the bevel down stanley types are both essential to me, and the feel of the bevel up planes is not preferable, though it may be for someone just starting. I think once the sole of the plane is waxed, the effort spent on rotational force is minimal (but its function is valuable) and if it seems like extra energy is expended, I can say with certainty that in doing something like sizing a plane blank, one can work about 50% faster with a wooden plane than with any metal plane, no matter the orientation -despite the handle being even higher vs. the cutting surface. That was so clear that it caused me to misjudge edge life on v11 (e.g, if I can take 7 or 8 thosuandths of beech off of a billet with a tall wooden try plane vs. what I could with the veritas custom plane or a BU plane - perhaps 5 thousandths feels the same), the former gets the work done much faster and the amount of plane billet work that I can do with a sharpening cycle is much greater, despite an iron that probably wouldn't even match O1 in a test.

That's separate from all of this - I suspect it will be difficult to take a thicker shaving with the LN 62, but not to plane a greater volume with it. 4 thousandths of 1.05 SG cocobolo with a high angle is hauling. I have measured what I do with the try plane before, and it looks like the following (now I can add pine since I just did a bunch of it).

Trying work with a 2 1/2 inch wide iron:

* Cherry - 7-8 thousandths, typically

* Pine - about a hundredth, sometimes a little more, depending on agreeability of the wood

* ash and beech on the flatsawn face - about 5-6 thousandths, a little more on the quartered face (it planes more easily).

Those are all equal effort. With the veritas custom plane, it was a challenge to get a narrower shaving to be as deep as the wooden plane and a much harder push. If the goal is effort efficiency, the plane has to be wood, not bevel up metal.

Re: Creating a mini-ura with buffing wheel?

#33

One other case for effort...

David Weaver

Once in a while, I get enamored with something and use it for a while. I have two superb metal jointers (an old almost unused record 8, and an I. Sorby 7). When the whole plane test thing went down, I made XHP irons for them, and then used them to do jointing and trying work for a little bit. When the wood gets really really hard (like macassar ebony), that kind of wood can knock the set out of a wooden plane. I was making a couple of guitars at the time, so they worked great.

When I went back to the cherry cabinet, I was still using them (and noticed that they got beat up in rough work - the XHP irons - more than they did in what is essentially lots of jointing and truing on guitar parts, but little rough lumber). The shaving size issue metal vs. wood became apparent again - I could not physically get the same thickness of shaving out of the metal jointers as I can with the wooden planes - as long as the wood is agreeable enough to be pleasant with wooden planes (ash/beech and below is kind of the cutoff for this, but they work rosewood fine - rosewood is sort of a special case - it planes more easily than its janka hardness would suggest, just as heavy planing in hard maple is more difficult than its rating would suggest).

No matter how often I wax a metal plane, I cannot get the same amount of work done in the pre-smoother shavings as I can with a wooden plane that isn't really getting waxed at all (unless the work is sticky pine - then waxing is periodic).

I do think that if there was an efficiency to be gained by moving the weight to the bottom of planes, it would've been done long ago by trimming the unneeded wood from the top of a wooden plane and setting the handle in lower. I've used razee planes - they leave a lot to be desired vs. a typical beech smoother.

I'll test bevel up vs. bevel down plane on the high SG cocobolo to see which results in the thickest practical shaving that I can take (high angle vs close set cap iron and no tearout).

my 4-12 pound comment above comes from butting an infill panel plane against a stop and putting it on a postal scale and then pushing the plane with one hand into the stop after taring the scale. It's not a perfect test, but the harder you push forward (without pushing down), the higher the rotational force and the higher the reading on the scale.

Certainly welcome to other peoples' opinions about whether or not planes should have the bulk of their weight set low - I don't think it makes a practical difference - the rotation can be kept the same just by putting the same type of handle on a BU plane - doing heavier work without that rotational force is a no go, and taking away the centered feeling of the plane makes the plane feel less nimble to me, and harder to sense vertical (a big deal if you're dimensioning by hand or jointing edges). I can't feel vertical well with japanese planes, either.

Re: Creating a mini-ura with buffing wheel?

#34

Patience ...

Derek Cohen (in Perth, Australia)

I think the block plane will comfortably take the same thickness of shaving because it's less wide. It effectively cuts about 2/3rds of the width (the iron is 1 5/8 vs. 2", but some area at the corners of the iron is unused).

Once the block plane is in the cut, it's a combination of downforce and forward just the way you have to use it to avoid popping the cap off, so it's much like a bevel down plane.

I don't agree that the bevel up plane allows for better working conditions, though - the force vector on a try plane makes for about 4-12 pounds of extra downforce while pushing forward.

David, I think that you need to wait until you have used the #62 for a while before making pronouncements.

Further, this is what I wrote earlier ...

"The issue here is the effort requires to push a BU plane with a high cutting angle. Compared with the same cutting angle in a BD plane, and the same thickness shaving, I think that the BU plane will surprise you :)"

It is not whether the block plane can take an equivalent shaving; it is about the difference in handling when taking shavings. Further, I am only referring to smoothing shavings, not jack shavings. Thicker shaving can be done with the #62, but cutting angles change. Because the BU planes rely for effect on different cutting angles, it is horses for courses and rarely apples vs apples.

Regards from Perth

Derek

Re: Creating a mini-ura with buffing wheel?

#35

I re-read the articles on COE

David Weaver

I do intend to see what the 62 will do in various woods (same plane size as the 5) vs. a BD plane with a different orientation.

I agree with your assessment in your article that if you can "Get under and behind" the plane, you can push it forward instead of pushing down. In fact, for anyone using a stanley plane, it's important to not get tired and start learning on the plane more.

But dimensioning on a high bench height is absolutely terrible and unworkable, and the handle orientation on old wooden planes (the rake of the handle and where it is in relation to the mouth) is extremely important. Your troubles with a wooden plane were due to a combination of things - an unsuitably high angle iron for a wooden bench plane, but more importantly, the bed angle allowed you to move the handle very close to the mouth and thus the mouth is far back (it needed to be further forward) and the only accommodation for it is to either remake the plane or try to change things.

All of these concessions make for a bad plane for heavy work because you're losing the supplemental downforce (which is what keeps the plane in the cut especially in early and middle work before the plane is in continuous wood - and this is where dullness shows up first - if the plane goes through a cut that's interrupted 6 times, then it has to enter the cut 6 times. If you lose the downforce, you've shortened the sharpening interval).

This moves us on to handle angle. I agree with your assessment in separate discussions where you show people who think their arm is at an angle with their arm nearly parallel or parallel to the bench. They're not doing what they think they're doing. It's a lot like golf - what you feel like you're doing and what you're doing are often different, so you can't rely on verbal instruction from someone about what they're doing without video evidence. But the top rotation of the handle keeps you from having to bear down with your front hand to dimension. Moving the mouth of a plane back (e.g., the veritas custom plane) spoils the feel of the plane, especially for dimensioning work or planing end grain panels, as does eliminating a rake of around 65 degrees or so. The rake is made that way on all of the older planes for a reason - it initiates contact with the web of the hand first (downward rotation) and the hold when the handle gets in the palm should be a little loose. In dimensioning, if you try to emphasize pressure on the low side of the handle, you will end up with a bruised palm. If you make the handle upright instead, and the bench isn't really high, then the wrist position is really unnatural and only if the plane is used for very light work will someone not walk away hurting. The option then goes back to modifying the handle, but all of the sudden, the center of gravity is low, and effort is high.

The body mechanics of a bench around 35 degrees vs. 42 are important - the latter is completely unsuitable for dimensioning where extension and upper bodyweight are used to push the plane at the end of the stroke. This can't be improved by removing the core force of leaning down into the stroke and replacing it with pushing forward. That's not how we generate power, and we're tippy if we think we'll ignore the core and just push the plane standing straight up. Boxers are a lot the same - when they are generating a power punch and not just a jab, the power comes from the shoulder and extension. punching with the shoulder requires a different stance, one that's lower and leaned forward. I saw mike tyson once explaining to people that you don't throw a punch with your fist, you throw it with your shoulder.

What I came to learn making planes is that the orientation of the wooden planes is optimal (the euro type) and straying form their layout causes efficiency problems. The LV setup with a high bench is OK for smoothing and if you handicap yourself from being able to lean forward and down, then it will seem more efficient to push the plane from a lower point, but the dilemma is created for no reason. If such a plane is used for anything other than light work and on a high bench, it fails to work well and leaves the plane pusher in pain (that's my personal experience from using the BU jack with a low cutting angle to trim a maple countertop - your hand wants to be on a handle around 65 degrees, but the handle is more upright, so the wrist resists....

if the work gets heavy, then the high bench is unsuitable, and this turns out to be not just heavy work, but also productive early smoothing work where you're taking 5 thousandths instead of 2. I don't think your case is made for most of the work we do, but it may be made in a situation where someone is using a high bench and that's what they want (because they don't do heavy work).

I tried both. I had an infill panel plane with a more upright handle at one point, too - intentionally. I thought if I could get behind it and push it forward, it would work better, but it lost its focus at the front of the plane without rotation and it felt like it always needed to be at the end of the hands to stay behind it - it just didn't work well for heavy work, which is what I wanted it for.

If there was some recoverable gain from the BU planes, I'd still have them.

The point about the stanley block plane is that if it weren't oriented the way it is, you wouldn't be able to keep it in the cut. The round cap is shaped to be half in the cut, half pushing forward. If body orientation is right, you can get a huge cut without issue. If you try to get behind it or past it, then the lever cap comes off.

I'm open to seeing what the LN is capable of - I know what typical thicknesses I get in various woods just from measuring them once in a great while (it's not part of regular work- you set the plane to feel and just go with it when dimensioning). Part of the response above is that with a range of shavings already taken (some in the pile on the video that I posted), I've covered about 1-4 thousandth. It's unlikely that tearout free planing of any kind will occur much thicker with any plane - the wood is just too dense, even before considering the handicap of the 62 degree effective bevel (which quickly exacerbates problems as soon as the shaving has appreciable bending strength).

Re: Creating a mini-ura with buffing wheel?

#36

on the last bit...

David Weaver

..yes on the smoother shavings, by the way. All of this is done with "nearly flat" shavings, only enough camber to do final smoothing. There aren't enough people doing heavy work to look at try plane or jack plane work. The goal is to have smoother shavings and then "heavy" smoother shavings, and no tearout, or at least no appreciable tearout.

Heavy smoother shavings in cherry would be 5 thousandths. I'm kind of expecting that in the worst of woods, the BU plane at high angle may be somewhere in the ballpark of the cap set on the 5. In less demanding woods, the higher angle will punish the user.

If i were going to dimension 500 feet of cocobolo, it would be with electricity.

All these little dynamics (and discussing things like plane design) are so highly dependent on what one is doing that attempts to generalize just don't work.

Re: Creating a mini-ura with buffing wheel?

#37

High benches and low benches

Derek Cohen (in Perth, Australia)

David, the talk of high- and low benches is as much a fallacy and the belief that many woodworkers have that they push with their shoulders (when they actually need to learn to use their hips).

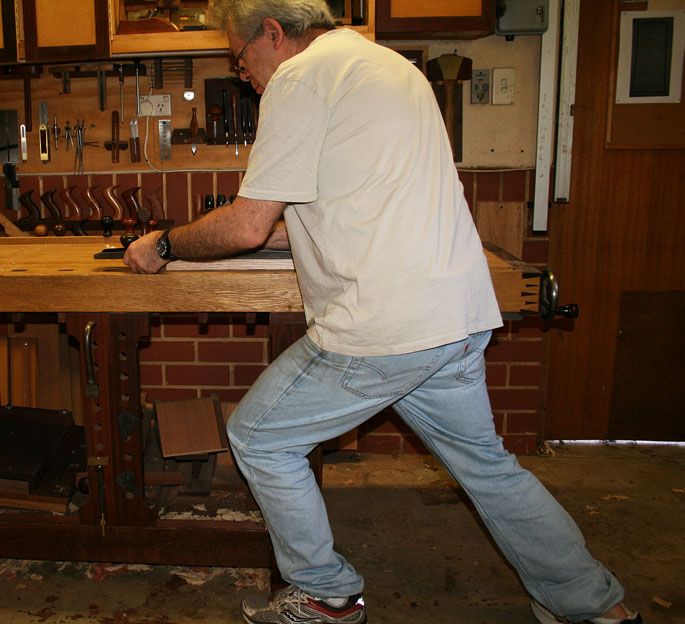
What I see occurring, both in videos and observing myself and others, is that one adapts to the bench. What you see as a low bench (my bench is 32" high and I am about 5'10") becomes a high bench when we plane.

To use your hips, and push with the forearm parallel to the bench top, on a low bench, you must bend your knees and drop your height ....

This is taken from my review of the Veritas Custom Planes ....

"by squatting low, the effective height of the bench is being raised. What I discovered I was doing was simply compensating for the lowered bench, dropping down lower and pushing the plane forward … as if I was working at a higher bench and standing more upright. This meant that the “advantage” of a forward leaning Bailey handle was lost."

"In the sequence below note that the hem has dropped below the skirt of the bench (about 5”), and it does not move in height as I shift my weight forward. The hips are the source of the forward drive and transfer force into the lowered forearms."

At rest ...


Look how low I drop when planing ...


Reference: http://www.inthewoodshop.com/ToolReviews/VeritasCustomPlanes3.html

The point is, all benches end up being higher than one believes. This changes the way we view we use planes.

Regards from Perth

Derek

Re: Creating a mini-ura with buffing wheel?

#38

Re: High benches and low benches

David Weaver

watch my hips in this video.

https://youtu.be/D9gkJQE7Bpk?t=1219

They change an inch or two. What changes in the stroke is leaning forward and pushing through the end of the stroke.

I have no clue what people are doing when they drop their hips 8 inches, but they wouldn't be able to do it for two or three hours. This is easy planing wood. If much productivity is to be had, it's not to bear down further when less favorable wood is used, it's to set the plane to make the effort about the same as here.

If someone doesn't dimension wood by hand (and thus get much better at smoothing wood in the penultimate step, which leads to better smoothing), I can't really rely on pictures of what they're doing to understand why planes weren't designed with the handle set in low and upright 150 years ago...or even 75 years ago).

I am 5'9" and my bench top is between 34 and 35 inches.

Re: Creating a mini-ura with buffing wheel?

#39

This isn't a snarky response, by the way

David Weaver

the previous response, that is. I don't read historical books about sawing or planing, and came to my conclusions on tools, handle orientation, etc, by using them and making them to use (ability to dimension is essential for me - it clears my brain and without it, I wouldn't be woodworking).

The planing position that you mention has a lot to do with explaining a straight up handle. I would never get low enough to do it. When I first started sawing and planing (more than just joints, breaking down boards), I felt like I would have 15 or 20 minutes of planing in me and then have to take a break. Over time, I worked into what I'm doing now because it allows me not only to work just as fast (control of the plane and planing, I actually work much faster) - I can do it for several hours in a given day, and then do it again the next day and feel not a whole lot, and as you can see - i'm kind of fat (a little under 210).

My first planing video was from david charlesworth. He talked about old timers swishing planes around on boards and ruining flatness, then seized most of his body like a statue and walked with the plane. Over time, I've worked on trying to make planing more of a natural motion, like a brisk walk, and correcting personal habits at the near and far end of a long jointed board. Whatever people are doing when they hunch down and get really low isn't sustainable, just as the idea of someone demonstrating a saw and leaning almost chest to waist parallel to the floor isn't sustainable. They're holding their whole body up on one arm to try to do something that isn't that physically involved with another.

When anyone starts to put a couple of hours a week in in earnest dimensioning, things change and a lot of what's taught or demonstrated now makes no sense. 2 or 3 hours of planing and sawing in a given day and I've had enough. If I could do 2 hours of it every day, i'd bet I wouldn't be so fat. But if I lowered 6 or 8 inches every time I started a planing stroke, I would soon run out of legs to do the work, just as my arms would be spent in 10 minutes if I laid out horizontal to rip wood.

Once this experience is accumulated and you start counting how much volume you get done in a period of time vs. how you'll feel after it, it becomes pretty clear why everything is made the way it's made. It's a brisk walk, and not bracing for a rugby scrum. We lean over planing for enough bracing to keep us from getting stuck straight up if we run into a tough spot. I like a stanley plane much better than a coffin smoother for finer work, which leads to a question as to why that may be - I think they'd have sold well in 1775 if they existed, but not for much other than smoothing and trimming.

Re: Creating a mini-ura with buffing wheel?

#40

Others who do ..

Derek Cohen (in Perth, Australia)

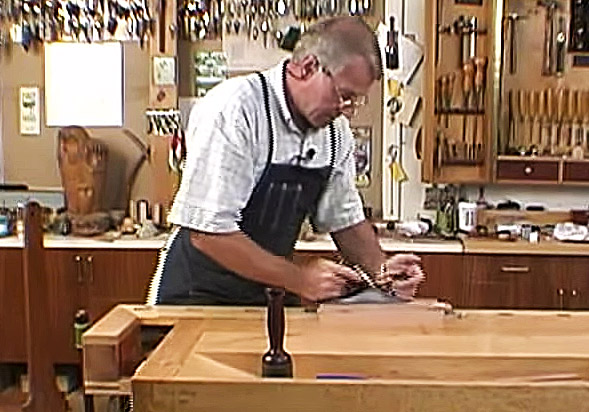
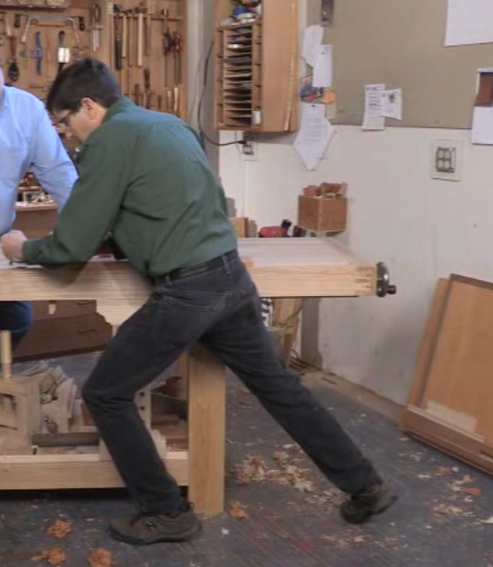
.. the dropping include Garrett Hack, Paul Sellers ...


Frank Klausz ...


Konrad Sauer ...


.. and Jeff Miller ...


I watched videos by all the above, and these photos are taken from the videos.

Link: http://www.inthewoodshop.com/ToolReviews/VeritasCustomPlanes3.html

Regards from Perth

Derek

Re: Creating a mini-ura with buffing wheel?

#41

Re: Others who do ..

Warren in Lancaster, PA

They all run home to their thickness planers when the camera is off.

Re: Creating a mini-ura with buffing wheel?

#42

Re: Others who do ..

David Weaver

Klausz looks to be standing legs straight. I have no clue what the others are doing but I've seen sellers try to demonstrate squaring a billet before and it's clear he's never done much of it.

The guy in the black pants is headed toward replacement joints.

These types of mechanics remind me of watching older farmers work when I was a kid. They were always working, subtle, and I never saw them straining like that unless an animal forced them to rush.

Re: Creating a mini-ura with buffing wheel?

#43

Re: Others who do ..

Steve Voigt

Derek, you've shown these pics before, and we've had this debate before. Some of those gentleman are very fine woodworkers, but none of them do the kind of dimensioning work that Dave is talking about. Konrad does do a lot of dimensioning by hand, but he's working on a small scale (infill-sized pieces) and with very hard woods; it's a completely different thing.

Bottom line is, Dave is right. If you can plane for half a day and come back and do it the next day, your technique will not look like any of these guys. Your legs will bend but not that much. Your forearm will not be horizontal because you are using your whole body and gravity, not just your legs.

Same thing for ripping, by the way. I see videos all the time of people huffing and puffing one-handed through a 90-second cut, and you can tell their dominant arm feels like spaghetti. And that's fine if that's all you're doing. But if you're going to spend the whole morning ripping a stack of boards, and you want to finish with a mildly elevated heart rate and not have a sore arm, then your technique will not look anything like what one sees on the yoo toob. But that's a topic for another time.

This isn't something that can be resolved with theoretical speculation. I offer this as a sincere suggestion, not a snotty remark: I know you like to experiment. So unplug your jointer/planer for six months and do all your stock prep by hand. And do as much as you can, using pre-war planes (wood or metal), not planes with broomstick handles. I am confident you will change your mind.

Re: Creating a mini-ura with buffing wheel?

#44

Success with applying extra pressure near the edge

Winston

I took David's advice and just concentrated pressure near the edge (on the Sigma 6000) when working the back of the blade. I then lightly worked the bevel and back again.

This wasn't enough to completely remove the convexity from the wear bevel, but it apparently did a good enough job at thinning the burr. I sharpened three bevel-down plane blades this way, and was able to give each of them a minimal buff and get very good results. In the past when I've sharpened these bevel-down plane blades and buffed them minimally to avoid clearance issues, I would often end up with an edge that was wavy when viewed in the microscope, and that would translate into not as good a surface.

So, for anyone who's having problems with buffing bevel-down blades: when you work the back of the blade on your fine stone to remove the burr, focus pressure near the edge! And lightly working the bevel and back one more time won't hurt. Then buff the blade lightly.

******

Time for some microscope shots. This is what the back of the blade looked like before I sharpened it. The dark area is the part that had been abraded by wood shavings.


This is after the stones. There's still a bit of burr hanging on.


This is after the buffing it. The burr is gone, and there's a straight, uniform edge.


I should mention that despite the convexity, I always see consistent scratches all the way to the edge, even before I did the technique of applying extra pressure near the edge. I think that, even without the extra pressure, the slurry is enough to make the scratches there, but not necessarily enough to get the burr to a point where it will come off quickly and cleanly with the buffer.

Finally, here's a picture of the back of the blade after all the sharpening steps. It was hard to to get the light just right, but you can see here that it's reflecting off of the tiny convex portion near the edge.


A bit of convexity on the back remains, but it didn't seem to be a problem. The blade was able to make an extremely smooth surface on some western red cedar I have, and that's a tricky wood to make a consistently smooth surface with -- the soft parts are very, very soft and get crushed easily.

Re: Creating a mini-ura with buffing wheel?

#45

Mini-ura on a new Veritas blade

Winston

This is a Veritas blade that is meant to replace the blade in my Veritas custom smooth plane. The original one kept chipping and leaving tracks, and eventually I asked them to replace it, which they did without a fuss.

This showed up at just the right time -- when I sharpened it, this is what the back looked like:


It has a mini-ura, just like what I was trying to make! I haven't yet worked it on the stone long enough to get a shiny line all the way along the edge, but it'll get there soon.

I'm really surprised that the blade is shaped like this, since Veritas blades have a reputation of being very, very flat.

(And yes, I'm sure that it's the blade, not my stones -- I checked with multiple good straightedges, and the blade definitely has a hollow.)

Re: Creating a mini-ura with buffing wheel?

#46

Re: Mini-ura on a new Veritas blade

David Weaver

When I make or get a plane iron like that, I cheer a little...

..maybe not out loud.

but i cheer a little.

Re: Creating a mini-ura with buffing wheel?

#47

Directed pressure and progressive work

David Weaver

Directed pressure on back flattening is key - the bias of pressure everywhere is what makes freehand sharpening and ...what would you call it, self ownership? I don't know what the right word is - the sharpening methods are taught as a method. We take the methods, follow them and separate our specific influence out because the dogma suggests that if we start applying bias anywhere, we'll create an error that we will soon not be able to chase out.

with directed pressure, I set up the LN iron that came with the 62 on a washita in about two minutes. The next time I sharpen, it will get better, and better and better each time (but there is already nothing going to the edge other than washita scratches - the mill marks are close behind, but rather than go bonkers on the plane iron, I'll apply the same pressure each sharpening and they'll soon be long gone from the view field of the scope.

directed pressure also allows us to focus on high spots on a stone, shorter strokes and back off a little bit on constantly flattening stones.

Re: Creating a mini-ura with buffing wheel?

#48

Re: Success with applying extra pressure near the

Robert Hazelwood

That's some excellent camera work, Winston. That last shot of the back looks like what I see remaining after sharpening. Most of the wear is gone but if you get the lighting right you can still see a little shiny strip, often only in the center like that.

Going to try using a bit more pressure.

Re: Creating a mini-ura with buffing wheel?

#49

Re: Others who do ..

Derek Cohen (in Perth, Australia)

Klausz looks to be standing legs straight. I have no clue what the others are doing but I've seen sellers try to demonstrate squaring a billet before and it's clear he's never done much of it.

The guy in the black pants is headed toward replacement joints.

The guy in the black pants is Jeff Miller.

Whether it is the use of power tool jointing ...

https://www.youtube.com/watch?v=phlKxVhf_Kw

... or hand tool work ...

https://videos.popularwoodworking.com/courses/the-foundations-of-better-woodworking-pt-1-general-principles

.. ergonomics and body stance go together. (Jeff's video came 3 years after my article).

My first planing video was from david charlesworth. He talked about old timers swishing planes around on boards and ruining flatness, then seized most of his body like a statue and walked with the plane. Over time, I've worked on trying to make planing more of a natural motion, like a brisk walk, and correcting personal habits at the near and far end of a long jointed board. Whatever people are doing when they hunch down and get really low isn't sustainable, just as the idea of someone demonstrating a saw and leaning almost chest to waist parallel to the floor isn't sustainable. They're holding their whole body up on one arm to try to do something that isn't that physically involved with another.

Interesting that. David C was one of the woodworkers I offered as an example ...


To get low, he bends down at the knees ...


These phots were taken from a video, "Furniture Making Techniques". He certainly was not standing upright and walking like a statue.

David, we are talking at crossed purposes here. You are wanting to describe jointing long boards - I have seen David C plane in exactly the way you describe. However, I am referring to the planing of the more common, shorter boards found in furniture I build.

Look at this video of David C. He is using his hips by bending his knees to retain his height as he planes the board ...

https://www.youtube.com/watch?v=y1ztIO6RAYU

Regards from Perth

Derek

Re: Creating a mini-ura with buffing wheel?

#50

Wear bevel

Winston

Thanks, Robert. When you mentioned the wear bevel earlier, that reminded me of these pictures from Kato and Kawai.


The worn part is the upper side of the blade, which, on a bevel-down plane is the back of the blade. To fully remove that wear so that the surface becomes two intersecting planes, it would require either removing a large thickness of material from the bevel side, or a very large area (and less, but still significant thickness) of material from the back.

But it looks like completely removing the wear isn't necessary. You just need to get the abrasive to work the edge to weaken the burr, and pressing harder at the edge seems to do it. (The slight convexity at the edge isn't a problem in and of itself in terms of the plane's performance -- it's just that it makes sharpening a bit more difficult.)