Home Articles Forums Gallery Marketplace Videos

WoodCentral Forums

Knowledge You Can Build On — Est. 1998

Entry hall table for a niece: Part 12

Posts

Re: Entry hall table for a niece: Part 12

#26

maybe I don't understand how it is used

Bill Tindall, E.Tn.

Is this statement correct....After employing the kerfing chisel the result is the equivalent of having extended the saw kerf to the back of the socket. One still has to chisel the waste between this "kerf" and what was left from chopping the center waste out?

Carrying on.....after "kerfing" the waste described above is chiseled out by some means (vertical pareing cuts I suppose).

Alternatively, one starts with pareing and when one gets to the saw kerf there is a saw kerf width of waste yet to be removed in the back of the socket where the saw didn't reach. It takes one thrust to remove this waster and done. The saw kerf that has been established is the guide for this thrust.

Frid preached taking labor out of making stuff. I am a disciple of this philosophy. But I am not getting where the savings are in this case.

Given that the vertical wall of the socket becomes the only meaningful gluing surface I am wondering if the act of establishing this surface with the kerfing chisel damages the fibers of this surface. Where does that waste beneath the chisel edge go?

Re: Entry hall table for a niece: Part 12

#27

Re: Kerfing

Les Groeller

From Bill Tindall..."Given that the vertical wall of the socket becomes the only meaningful gluing surface I am wondering if the act of establishing this surface with the kerfing chisel damages the fibers of this surface. Where does that waste beneath the chisel edge go?"

That was my concern in softer woods vs. hard, brittle ones, in an earlier post.

Re: Entry hall table for a niece: Part 12

#28

Re: maybe I don't understand how it is used

Warren in Lancaster, PA

You are seeing clearly.

Re: Entry hall table for a niece: Part 12

#29

Re: alternative "corner waste" removal

Wiley Horne

Hi Bill,

If you machine rout the center waste, leaving only the corner waste to the chisel, you’re right, it’s a simple matter to make cuts on the side, back, and bottom of the corner waste—how you make the side cut doesn’t matter. But if you’re going to chop out all of the waste, you have to do something about the corner waste early on.

At least the way I do it....which is, chop down vertically 1/8” or 3/16” all along the baseline from pin to pin; then tap your chisel horizontally into the end grain and lift out a wall to wall slice of waste, 1/8-3/16” thick. Repeat. But. That wall to wall slice, and all others, will hang up on each side because you’ve got intact grain in the corners. If that kerf grain is sheared by a kerf tool, then you can get clean wall-to-wall slices out til you get to the bottom. Then some paring on bottom and back walls is necessary. This is how I intend to do it going forward.

Clearly, Warren has some other, likely more efficient way than I have described, but I don’t know what he does.

Wiley

Re: Entry hall table for a niece: Part 12

#30

I trust you get this ....

Derek Cohen (in Perth, Australia)

Is this statement correct....After employing the kerfing chisel the result is the equivalent of having extended the saw kerf to the back of the socket. One still has to chisel the waste between this "kerf" and what was left from chopping the center waste out?

Bill, you are partly correct, but you miss the point.

The kerfing chisel creates a kerf. In the lipped drawer, it creates a kerf that was not there to begin with. The result of sawing the socket for a standard half-blind dovetail is to create a diagonally-deep kerf across each the side of the socket. The result of sawing the socket for a lipped half-blind dovetail is less than half that for the standard type.

In other words, there is very little of the socket sawn. So, how are you going to pare this away? You could follow the marked line at the top, but essentially you are guess where the side wall is.

The kerfing chisel does two tasks: firstly, it creates a kerf to the same extent as a through dovetail ... which means the kerf extends the full side wall. Secondly, in doing so, it creates a release cut, which make clearing the waste so much easier.

What you see in my video (on the lipped drawer) is that the chopping of waste took place with the board held in the horizontal position. You might prefer to use a router. I preferred to use a chisel. However, you would still need to pare away an undefined side wall (and guess where it should be). I was able to split the waste away from a defined side wall. No guessing here.
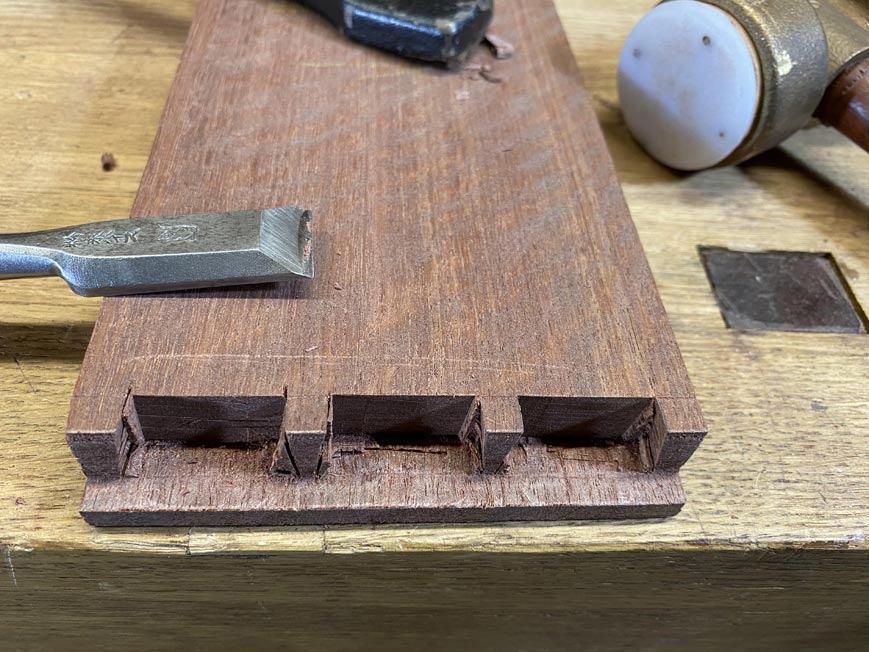

If I was removing waste from a standard half-blind dovetail, I stand the board up. The article describing that is here: http://www.inthewoodshop.com/Furniture/PowerRemovingWaste.html

This is the result before I take a chisel to the router-excavated socket ...


What you see is minimal waste to remove. No paring of side walls needed. All that is to be done is to split away the little waste. Then done.

Here is your socket for contrast ...


You have no defined sides, and must also still release the side waste.

I suggest that you do this joint your way, and then let us know how you get on to remove waste without deepening the kerf. Even Frank Klausz uses a card scraper to do so for this joint ...

https://www.youtube.com/watch?v=vKuy3NdLhlE&app=desktop

Regards from Perth

Derek

Re: Entry hall table for a niece: Part 12

#31

Re: I trust you get this ....

Bill Tindall, E.Tn.

The kerfing chisel may well offer some advantage on a lipped dovetail. I have never made one so I don't know. I expect I would pare to the scribe line.

But you advocated using this device on half blinds long before your need to make a lipped dovetail. My comments are confined to the typical half blind ubiquitous to traditional dovetailed case pieces with drawers. There are dozes of these dovetails even in the small dressers I am building. It is worth considering how to make them efficiently. It got my attention that Frid apparently advocated establishing a full kerf with some variant of what you are doing. Hence, my wish to understand it.

The difference in time it would take me to remove the waste in my picture vs your equivalent picture is the time it takes to do 4+/- vertical paring cuts. (I have more waste to remove by chisel because I have routed with a much faster 1/4 bit. ) This removal goes quickly for me and perhaps not so quickly for others. But in the end, without the chisel kerf I am left with one paring cut to remove this kerf thickness of waste- not long with the chisel already in position.

Re: Entry hall table for a niece: Part 12

#32

Where does this waste go

Bill Tindall, E.Tn.

The wood that was to become a kerf went somewhere. Is the tool angled so that it is chiseled out the saw kerf? Or is it compressed into the sides of the resulting kerf? Other? Is the resulting gluing surface left with damaged fibers?

Re: Entry hall table for a niece: Part 12

#33

I think the method that bill employs is..

David Weaver

faster and it doesn't have us grabbing other tools, etc.

You can pare into (or across) the end grain of the remaining wood after the straight wasting cuts and thin the remaining wood into slices that break off easily without threatening anything else. They don't damage a chisel, but that's been the learning part - how much and how fast can you go before you're getting a bit stiff with the corners of a chisel. The chisel will suffer before the quality of the work does.

All that's left is a tiny bit of waste in the very back corner - the slices don't have enough conviction to break off in big shards that stick out, they just leave some fibers broken off at the surface which are easily removed (and may be so small as to crush in place when fitting).

They can be snipped off with a plain bevel edge narrow chisel if necessary. or even a marking knife.

Re: Entry hall table for a niece: Part 12

#34

Re: Where does this waste go

Derek Cohen (in Perth, Australia)

Bill, the kerfing chisel has much in common with a light sabre .. anything it touches simply disintegrates and vaporises.

This is true. No other explanation is possible - there is no evidence of compressed waste, no evidence of waste pushed aside, and yet the blade keeps descending and leaving a clean kerf in its wake.

In all sincerity, I have no clue. It just does. :)

Regards from Perth

Derek

Re: Entry hall table for a niece: Part 12

#35

the skill part, which isn't that hard to master..

David Weaver

..is paring off the side wall in a plane that matches the cut that you made with the saw (even though the cut is only about half of the side wall).

this is easier than you'd think. You have to be able to get to the side wall, but you do that by thinning off of the waste wood paring either into it or across it and just breaking it off. It's very quick, you can do it vertically or horizontally, and it eliminates the kerfing too.

The other key to this is even if halfway into the socket, you overdo the paring just a little bit, the joint will never really suffer for it and it'll never be seen.

I'm guessing that the time savings exists for people who haven't developed the skill to pare off the fibers and break them off (but it flips to a time loss for someone who does). There's no reason to sever the end grain of those remaining fibers in the corner instead of cutting across the grain and breaking them off. The latter is less work and easier work.

Re: Entry hall table for a niece: Part 12

#36

The larger (thicker stock) the socket...

David Weaver

...the more advantageous it is to avoid the kerfing tool.

Re: Entry hall table for a niece: Part 12

#37

Why do you want it to be a competition, David?

Derek Cohen (in Perth, Australia)

I really do not care a whit whether Bill is faster, or Joe Shmoe wins the race. I am not in a race. In reality, there cannot be more than a minute either way anyway.

What is more important than ultimate speed is accuracy and the quality of the finished article. In the years to come, no one will look at a drawer and say, "Hey, isn't that the drawer that Dave completed in 38.5 seconds?".

I discovered my fastest method for clearing half-blind sockets in 2011. I also decided that it was not my favourite way.

At that time I was build a pair of campaign chests for our living room. This involved a total of 12 Jarrah-fronted drawers ...


I had a little fun at the time trying different methods for the pins/sockets, timing how long each took, and posted the results here. There was a lot of interesting discussion.

The methods included using powered routers as well. The fastest method used one, but not to clear the waste as shown by either Bill or myself in this thread. The successful method simply routed the baseline, and deepened the kerf with the kerfing chisel. Then split out the waste in a couple of chops ...


Just do what works for you. Do the best you can do.

Regards from Perth

Derek

Re: Entry hall table for a niece: Part 12

#39

There is a group of us who...

David Weaver

...does things the hard way (with hand tools) and is really lazy about it.

It feels good. I kind of employ this throughout life - and recognize that others don't.

The cap iron use came out of this. Mortising plane bodies by hand instead of drilling came out of this. Building guitar pockets different than what is done industrially and doing it in a shop level faster than copying the industrial (as in, accepted as proper to guitar builders) process springs out of this.

If I can find a lazier way to do it, I will. The marking and sawing has to be done accurately, and not overcutting if possible on the exposed part of the joint (inside the case is fair game to me as it was historically, but I don't always do it) is important, but a lot of the rest is just manipulating wood.

Does the speed matter? Is it a competition? I think no in both cases if you're not interested in speed. For me, HBDT ends up being the top of the case pieces that I make as a matter of function, not aesthetics. I want the joint to be sound and look handsome and not have a bunch of visible gaps, but I guess it wouldn't really matter too much if it did. Someone else wrapping a moulding around a piece may just pin the case with dowels instead, or who knows what else. I'm just looking to make the HBDTs faster so that I can do them quickly in rhythm, use the joint, and if the opportunity arises that it shows, do it neatly enough that it shows without defects.

The other unspoken/undescribed part of this is I like the work to feel good, too. I may be wired differently than the average person - hypersensitive about certain things (easily annoyed by something I don't enjoy). Bill (and you?) do some of the releasing of material with a router. I can't really do it any faster with a router, though the idea seems attractive to me - in practice, I don't physically enjoy the process and wanting the results only creeps in instead of enjoying making them. I jump to the future instead of the present, and start to wonder why I'm doing something where I don't enjoy the present when i'm not doing it for pay.

The method that I described though is very physically satisfying. The kerf chisel feels more like splitting kindling with my teeth if you gather what i mean by that. Other's may enjoy that licensed bashing.

If someone likes your method better, then I wouldn't wade into telling them that they're wrong for liking something different. if they feel like they have a set of bench chisels and don't want skews and fishtails and kerf chisels, though, it's nice to know that you can get the same results without spending any more time, just using one wider standard bench chisel and one narrow one.

Re: Entry hall table for a niece: Part 12

#40

Re: You are saying this ...

David Weaver

that's correct. Both ways. The kerfing chisel/card scraper discussion was in style when I cut my first half blinds. So, that's the way I've done it. Half blinds in drawers may be something like 3/8ths or half an inch deep. I've cut them in case tops deeper than that by a considerable amount. The bigger the area you're smashing, the rougher the kerf chisel gets (to my recollection). paring further across the grain on the triangle of waste left doesn't change much.

Each time someone asks if I've done something, I'm always reminded of charlie, who would sometimes question if I'd bought all of the sharpening stones I claimed to have used. Actually, he started with "there's no way you...". :b

Maybe some of the difference for my preference is that I rarely cut half blinds in drawers, but they are practically the only joint that i cut in the tops of cases so that I can hide the joint with moulding. My cases are always about 7/8ths thick.

Re: Entry hall table for a niece: Part 12

#41

My curiosity is perked

Bill Tindall, E.Tn.

I do not expect where it goes likely has any practical implication. My curiosity is perked not to find some flaw with the technique but rather to confirm what I learned in elementary physics- matter is neither created nor destroyed- or later- turned into energy (Einstein). We can likely rule out magic(have small kerfs of Jarrah mysteriously turned up in unanticipated locations in your shop?), vaporization and nuclear energy as an explanation. Some experiments are in order.

If it simply compacts into the density of a neutron star at the bottom of the kerf there will be a limit on how deep one can drive this chisel without getting nuclear fusion or more likely running out of bashing force to effect compaction. Alternatively, if it deforms and compresses into the sides of the kerf, one can drive the chisel with the same force to any depth.

Re: Entry hall table for a niece: Part 12

#42

Re: My curiosity is perked

Wiley Horne

The depth is the thickness of the drawer side.

Wiley

Re: Entry hall table for a niece: Part 12

#43

Re: Bill's question

Steve Voigt

I was going to ask where the waste went, but Bill beat me to it.

I have no dog in this fight, but I think the question of where the waste goes is not trivial. If there is no evidence of it, then I think the only reasonable conclusion is that it's been compressed. I think that could cause problems (e.g. splitting), perhaps years down the road.

Again, I'm really not trying to be judgmental here--I think lots of different methods can work and Derek's results certainly look good. If I knew where the waste went, I would not have any worries, but absent that, I will stick with the approach Bill and Dave outlined, which is what I've done in the past.*

*the distant past; it's been quite a while since I made any half blinds, I'm ashamed to admit. Planemaking has sucked all the furniture making oxygen out of my life lately. :(

Re: Entry hall table for a niece: Part 12

#44

Re: I think the method that bill employs is..

Wiley Horne

To repeat, the method that Bill uses is to electrically rout everything but the corner waste. At that point, I don’t think it much matter how you do the corners.

I plan to use the kerf tool going forward, not because it simplifies the corners, but because it simplifies taking big plates out of the center—fullwidth plates.

I’m talking about drawers, 5/16 to 3/8 kerfing depth. For me, it will simplify tool use. Not involve more tools. Make all the diagonal sawcuts, then all the kerfing—it goes way quickly because it’s so easy. Then use one chisel to remove plates of waste. Then one paring chisel to take the sidewall and backwall to their lines. I can generally make final paring cuts into the back corners with whats in my hand.

I think maybe we’re talking past each other—more important to win the tribal argument than to follow a logic. For me, I’m cool with whatever anyone else wants to do. I am trying to tell all that this kerfing tool takes very little time to make out of steel you likely already have laying around, doesn’t have to be beautiful to work, and works really easily and quickly. I would not apply to 7/8” half blinds, but rather to 5/16 to 3/8 drawer sides.

Wiley

Re: Entry hall table for a niece: Part 12

#45

Re: I think the method that bill employs is..

David Weaver

Gotcha on the center - yes, that's not the part I'm talking about. I'm taking about removing those corners with their attached fibers on half of the plane of wood that isn't severed by the saw.

Those parts that are left that bill's talking about are probably the ones that are going to vex someone new who hasn't learned what you can and cant' do with wood. I think it's actually safer to pare down into that remaining triangle (you can split the top part that's sawn off if you like just by inserting a chisel and breaking the weak part off).

In my opinion, if you pare the remaining amount in the socket off in leaves, it's easier to do if the kerf chisel isn't used, because you're paring "hard wood" that doesn't have a gap behind it. You just pare leaves off until you get the plane of the socket pared off and you're done. You'll be left with a little bit of stuff in the bottom of the socket, I guess, but you can cut into the socket to release anything left from the sides - cross grain to the bottom of the socket (if you pare and then pry "leaves" off too far at the bottom, I'm sure you could affect the bottom of the socket negatively) - and then if you have a chisel with a gradual edge, pare the remaining bits off to the corner.

I have no idea how anyone else may have come to something like this. When you make planes, there are a bunch of spots like this where you just have to get comfortable paring off material and then releasing it in the corners one way or another. The paring leaves a finished surface - you blow the "leaves" of material away or dump them out. It's quick and precise.

Re: Entry hall table for a niece: Part 12

#46

It's safe...

David Weaver

It doesn't feel safe when you do it with a kerfing tool, and the flat edge is a necessity to avoid splitting things (counterintuitive to a beginner, I guess). You smashing things away so that you don't start a split.

It's suprisingly safe, and I never broke anything with it.

I'm guessing someone like frid may have preferred the method because it doesn't rely on the user paring a pane in the socket where the saw line doesn't reach.

There's probably a case where the wood that derek is using doesn't leaf away and split/break off as easily as cherry, mahogany, etc.

I'd make a comment about not cutting half blinds, too, but just cut the top side of a case on sunday. Fresh in my head is what I was thinking about as I'm tinkering to get the method faster with fewer tools so that I'm encouraged to do it again (the case is in two sections - the bottom larger), so I'll get to repeat this relatively soon after I finish putting the top together.

Re: Entry hall table for a niece: Part 12

#47

The router...

David Weaver

I have to use a router for some guitar work - pattern trimming (you can do it without a router, but it just doesn't make sense. It would be like the opposite of trying to figure out how to do a ball and claw with a router - the guitar was designed for that kind of work - the electric guitar, that is).

I think in the case of the wood that you're using, I probably would tend toward the router. if you were willing to have a heavy hand in cherry, you may find that it's a break even proposition in time, and something else to get out.

Re: Entry hall table for a niece: Part 12

#48

Re: The router...

Derek Cohen (in Perth, Australia)

I think in the case of the wood that you're using, I probably would tend toward the router. if you were willing to have a heavy hand in cherry, you may find that it's a break even proposition in time, and something else to get out.

David, I have used the kerfing chisel in many drawers, including Jarrah, Merbau, Hard Maple, Black Walnut, and Cherry. I am sure that Tage Frid used American woods, as did Frank Klausz. Of all the timbers, Jarrah is the most vulnerable, since it is more brittle and harder than the others.

A selection ...


Regards from Perth

Derek

Re: Entry hall table for a niece: Part 12

#49

Re: The router...

David Weaver

I was aiming more at the router in hard woods. I know the kerf chisel is safe. It doesn't feel like it, but it is - as long as it's smashing fibers and not modifed to split a trail through them (i'd bet some newbies have fallen into that trap).

I have cut plane mortises in wood as hard as the upper end of purpleheart and cocobolo. It's a monstrously different experience vs. mortising beech. Cut beech, the layers of the mortise lay over in a long strip. Do the same with cocobolo and they break off and fly. They might even hit you in the face.

Not suggesting your method won't work for everything (routing the back of the waste), just that the speed advantage that you may have in really hard wood isn't really there in softer wood. I couldn't say which is faster in the softer stuff, just that you can get shockingly fast wasting material with a chisel once you learn the limits of the wood and chisel. it does require good straight wood to work fast, though.

Re: Entry hall table for a niece: Part 12

#50

reply

Bill Tindall, E.Tn.

Unsure the purpose of your comment. I know how it works in practice.

I was imagining an experiment that would result in data of no practical value that would satisfy my curiosity of where the waste goes to. If it is compacting under the edge then eventually it will compact, in this experiment having no relationship to using the tool for any practical purpose, to a density where it will become first difficult and then impossible to drive the tool deeper. Maybe one can compact a 1/2" drawer side and not a 7/8" case socket, or cherry and not hickory.

On the other hand, if the material deforms into the sides, worrisome for gluing, after an initial force to get the tool started it should proceed to infinity with constant force.

Science usually works out that something entirely different happens :)