New WoodChat!
Home Articles Forums Gallery Marketplace Videos

WoodCentral Forums

Knowledge You Can Build On — Est. 1998

100+ Wood Species + Full-Shop Services: Lumber, Veneer, Tools & CNC. Everything in One Place.

Cutting gauge from a pig's ear.

Posts

Cutting gauge from a pig's ear.

#1

Cutting gauge from a pig's ear.

Derek Cohen (in Perth, Australia)

About a year ago I posted a couple of cutting gauges that were based on the Kinshiro cutting mortice gauge: http://www.inthewoodshop.com/ShopMadeTools/CuttingGauges.html


These cutting gauges were the Western version - a pseudo Japanese cutting gauge - as the knife was made from a HSS drill rather than a bent steel blade. This has a significant disadvantage, in that the cutting edge lies in board and, as a result, visibility is reduced. There is another advantage to the bent steel blade, which I shall demonstrate later.

Note that the Kinshiro is a mortice gauge but may be used as a single knife gauge for tenons and dovetails. There are a number of other uses for this type of gauge, such as slicing banding.

The Kinshiro are no longer available. I got to thinking that I could upgrade a cheap version of a Kinshiro-type gauge into a decent alternative to be used specifically as a single cutter, ala dovetail gauge.

Tools from Japan sell the Large Ryuma for $17. This comes with 2 blades for mortices ...
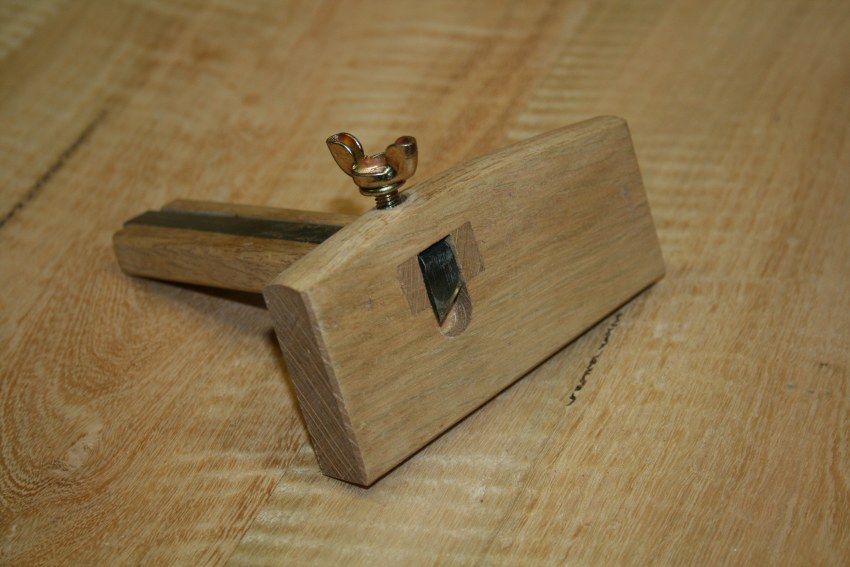

The bones are decent but need work. The body is about 3/4 the thickness of the Kinshiro. The blades are a little rough but have potential. The wing nut is a disaster - too difficult to adjust with one hand. And how to adjust one blade with one hand?

Here is the completed modification ..
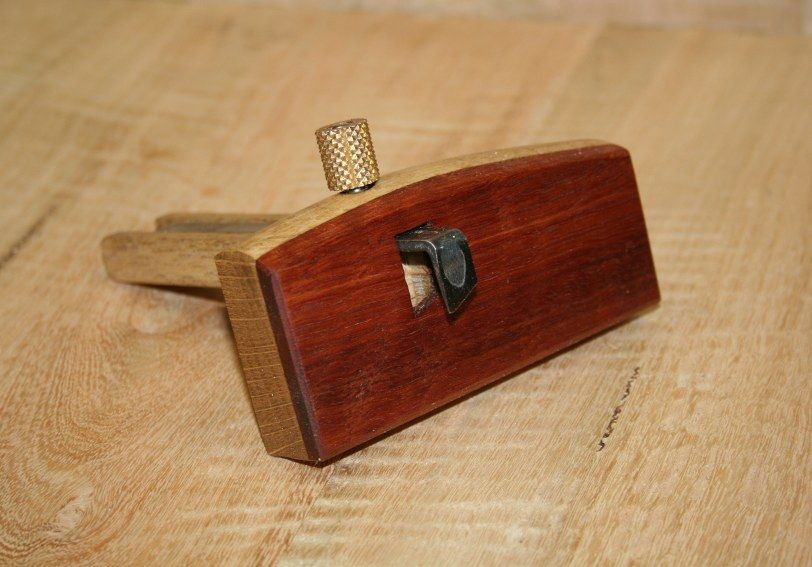

Alongside the Kinshiro ...
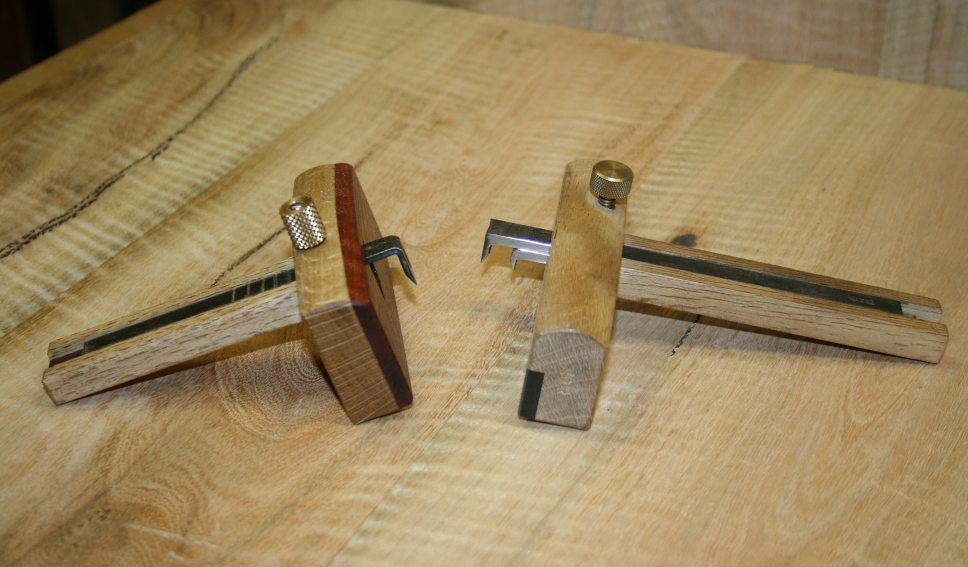

There is more registration depth than in the original ..
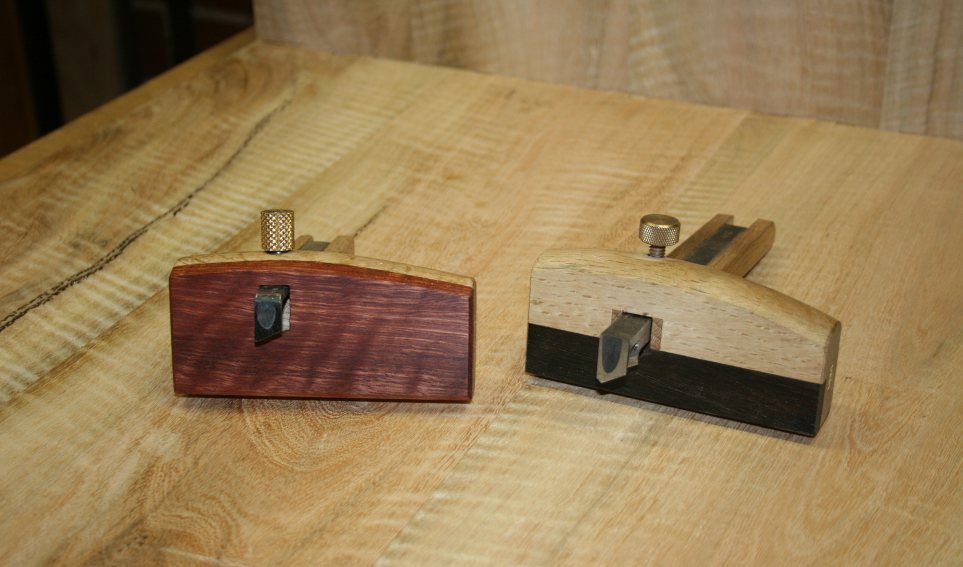

In addition to the lamination at the front (I used Jarrah - what else?!), another lamination was added to the blade carrier to replace one blade and raise the remaining blade flush with the top.

The back of the blade shaft was serrated to create resistance and enable it to be pushed with the thumb.

A brass knurled knob was added.
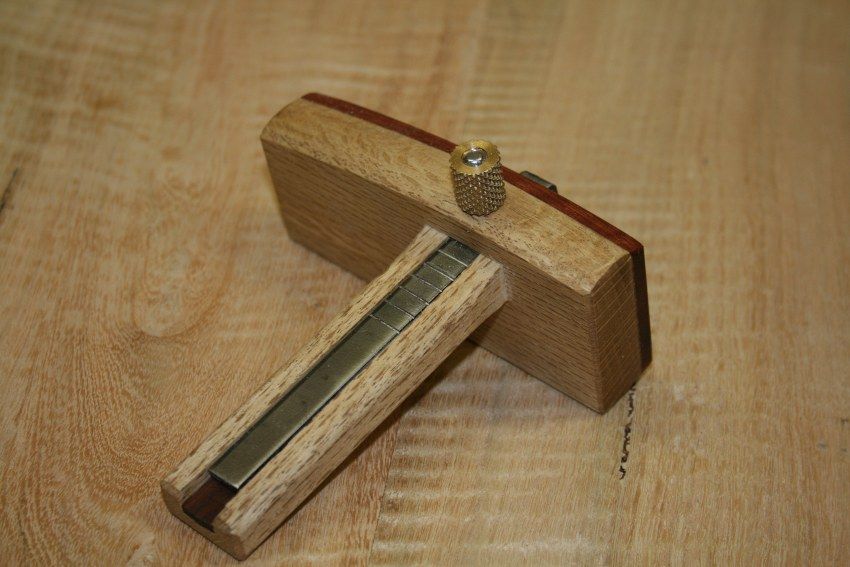

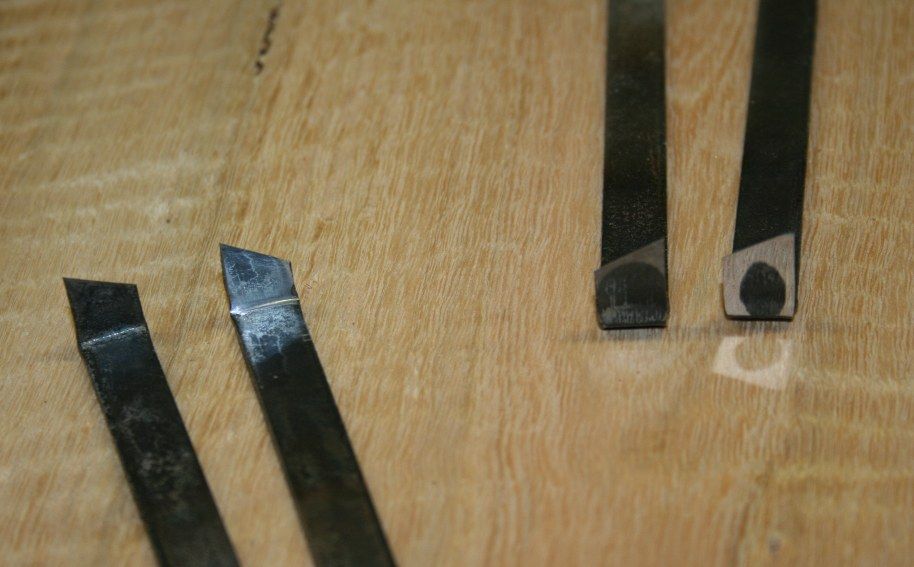
The blades need to be ground and polished on both sides. Two blades enable one to score lines in either direction, that is, with the knife's bevel either towards or from the gauge. The finished blades are on the right side ..

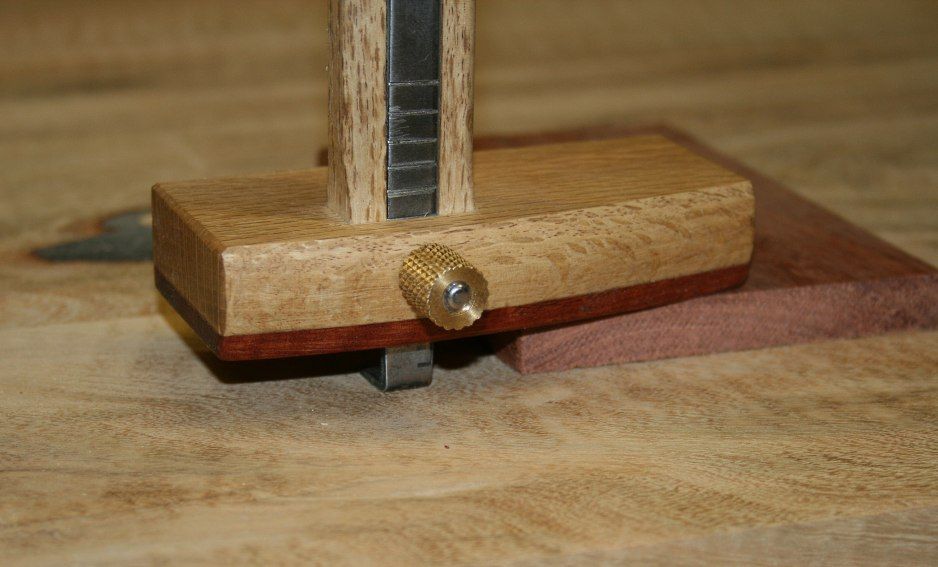
What I particularly like about this style of knife is that setting the gauge for dovetailing is so much easier. To set for an depth that is exactly that of one side, simply place the gauge on top of the board, and drop the knife to the table. Tighten. Done.

Regards from Perth

Derek

Re: Cutting gauge from a pig's ear.

#2

Re: Japanese Mortise Gauge Ergonomics

William Duffield

…question for Derek, or anyone else who successfully uses one:

A while back, I was contemplating acquiring one of these, so I went to Hida Tool to try one out. I could not figure out an effective technique to adjust the knives for the width of the mortise and then adjust the fence for the width of the shoulder without messing up the mortise width. So, I didn't take one home.

Does anyone have any advise?

Of course, that's not a problem with my Crown mortise gauge, which has a threaded adjuster on the back end of the shaft. It is also not a problem with the Veritas dual marking gauge (05N70.01), if the shaft clamp is used (05N70.05).

When I saw this post, my first thought was "Where would I put the second blade when I'm not using it, so I wouldn't lose it?" Of course, the answer is to bury it in the fence, just like I do with my Veritas gauge. My home made cutting gauge, on the other hand, allows me to remove the blade and reverse it, since it is attached to the shaft with a wedge, instead of being an integral part of the shaft itself.

Re: Cutting gauge from a pig's ear.

#3

Easy Peasy ..

Derek Cohen (in Perth, Australia)

A while back, I was contemplating acquiring one of these, so I went to Hida Tool to try one out. I could not figure out an effective technique to adjust the knives for the width of the mortise and then adjust the fence for the width of the shoulder without messing up the mortise width. So, I didn't take one home.

Does anyone have any advise?

Hi William

I wrote this up a couple of years ago on my website, so this is a direct copy ...

Use a rule to mark off a ¼” at roughly the centre of the board. It is not critical that this is exact, as long as all markings are made from the face side.


Now mark across the width with the mortice chisel, as shown below.


This is going to aid in setting up the mortice gauge. Simply place the ends of the knives (or points) in the ends of the cut. This sets up the cutting width.


Now slide the head of the gauge against the work piece to set its depth. This completes setting up the mortice gauge.


And you are set to go.

Regards from Perth

Derek

Re: Cutting gauge from a pig's ear.

#4

Re: Cutting gauge from a pig's ear.

roger lance

Derek....its been a little over a year since you help guide me in the making of a pair of cutting gauges.....I really like them and have been considering making the bottom of the fence square and flat like the original.....


thanks again for the help.....looks like you've been a busy boy as usual!!....looking forward to seeing your blanket chest build.

Re: Cutting gauge from a pig's ear.

#5

Re: Easy Peasy ..

William Duffield

Doh! Maybe I couldn't figure it out on my own because I didn't have a mortise chisel and some stile stock with me in Berkeley. :)

If you didn't have a pencil, or wanted to be sure the gauge was set to exactly the width of the chisel, you could even stick the chisel into the wood, and slide the knives up against the sides of the chisel, and then turn them into the wood to hold them in place while you adjusted the fence.

Thanks for the explanation.

BTW, a tip for the Crown gauge and other Western gauges: Knock off the corners and edges of the fence. Keep working at it until the fence fits your hand more comfortably. You can even reshape it like the Japanese gauge if you want, but just a little modification makes it a lot more comfortable, and the rounded over rosewood corners polish up to match the original surfaces very easily.

Re: Cutting gauge from a pig's ear.

#6

Re: Cutting gauge from a pig's ear.

Edward in Vancouver

Really nice work!

It was the "pig's ear" that caught my attention.

One of my first projects involving making my own tools was a bow saw. True, I got the parts from TFWW, but the wood was truly "piggish". I scored some beech wood from an Ikea "Poang" chair that was tossed in the back lane. :D :D

Re: Cutting gauge from a pig's ear.

#7

Re: Cutting gauge from a pig's ear.

roger lance

Its a rainy day in Michigan, so the yard work is out. Time for a few shop chores. Made the bottoms of my cutting gauge fences flat to more closely resemble the Japanese gauge that Derek showed......


a little finish and they're good to go.

Re: Cutting gauge from a pig's ear.

#8

The Will Neptune philosophy

Bill Tindall, E.Tn.

His marking and cutting tool shafts are rounded to enable the point to be seen whilst using. Won't matter for through cuts but for stopped cuts seeing the point beats guessing where it is at.

Re: Cutting gauge from a pig's ear.

#9

In which he is not alone

Bill Houghton, Sebastopol, CA

Stanley Tool Works is not famous for improving its tools from the originals, but the later No. 65 marking gauge runs the pin diagonally through the beam, rather than across the width/thickness of the beam (you choose, the original beam is square), to give increased visibility.


img

Re: Cutting gauge from a pig's ear.

#10

Re: In which he is not alone

david weaver

Not only increased visibility, but the fact is that when and if the shaft should shrink or become less tight with use, it will still always lock up tight because the tension screw is applying tension to two sides instead of one.

I saw a panel gauge like that at an old tool dealer, and I almost bought it just for its ability to lock up tight no matter how old or how used it was.

Re: Cutting gauge from a pig's ear.

#11

As if I didn't have enough to worry about....

:(

Re: Cutting gauge from a pig's ear.

#12

Re: As if I didn't have enough to worry about....

david weaver

Be a long time until yours are loose I'd bet, and you can just crank out more.

Obviously it wasn't as important of a design aspect as I'm making it out to be because it's not common, but I did think that it was an interesting fix to the shrinkage and/or wear issue issue, and a very sensible one.

Re: Cutting gauge from a pig's ear.

#13

Re: As if I didn't have enough to worry about....

roger lance

David....these are my first attempt at making a cutting gauge.....inspired by the poor quality of the commercial gauge I'd bought....and mine (for me) are a great improvement.....these are made with hard maple and will last awhile.....and will mainly be used in laying out dovetails for drawers etc.....I had thought of mounting the blade on the end of the beam but couldn't locate an appropriate blade (one with a slot).....and I'm no metal worker so I got these from LV and they do the job nicely....but I'm all about raising the bar and if one has a better design that's worth knowing about....many people read these discussions and there is probably someone who is thinking of making his own gauge and its good to have all aspects of this tool (simple as it seems) presented.

Re: Cutting gauge from a pig's ear.

#14

An easy means of shaping/slotting cutters

Bill Tindall, E.Tn.

When I was making cutters for string inlay I found an easy means to do so. Clamp a Lee Valley 0.030" scraper between to wood blocks and using one as a fence slice off a piece for the cutter using a Dremel and a thin cut off wheel. Then the cut off wheel can be used to shape the cutter and make a slot.

Re: Cutting gauge from a pig's ear.

#15

Re: As if I didn't have enough to worry about....

Tom

yours look great. Ultimately it isn't about the other guy, not merely because you can suit yourself. But because at one level, upper end work is about customizing or personalizing. It's great to be the team that can make a Nike shoe that fits the largest number of weekend warriors. It's also cool to be the maker of bespoke shoes in the euro tradition.

http://www.koronya.com/

And then there is the tinkerer school which is sorta a lifetime of making things approach your personal needs. This can only really be done by being a good maker, and designer and around for a long time, and having started early. You see this on boats where over 50 years a guy will get his set-up perfectly dialed in for himself:

http://www.youtube.com/watch?v=3mSVopySXlA

I have used a lot of marking gauges over the years from the cheap to the insanely priced. Nothing beats the simple Japanese style one with the screw adjuster. Hey, I wish I thought the wedge worked better, but it doesn't for me. I think the wedged blade actually does work better, but sometimes screws are the best option. I have had a mine long enough to have work out the adjuster. The metal is washed out. The interesting thing is for being oak, without any fancy wear strips, it has held up without any wear over 35 years. Japan woodworker makes the laminated blades for these things. I have about 6 of them. But my go to gauge sill has the original blade, worn well into the hollow, and it is some cheap junk, still works great after all these years.

Re: Cutting gauge from a pig's ear.

#16

Re: An easy means of shaping/slotting cutters

roger lance

Bill....I'm like you in that I have a fair number of power tools.....but I've never owned/used a dremel.....it might be time to buy one.....I've noticed that most of the ww who make tools have metal working skills (you, Tom, Derek, etc etc).....I need to improve myself in this area.....I also want to request that you post more photos of your line and berry chest.....you've got the one view on the main board, but I'd really like to see more.

Re: Cutting gauge from a pig's ear.

#17

An example of dremel need.....

roger lance

I got some beading tool blade material from Ron Hock and took it to a local machine shop to have it slotted and cut into various bead forms....but the local shop said that the material was too hard and they could not do it (remember what American manufacturing was???)....so, I redesigned my beading tool to eliminate the need for a slot in the cutter and to be able to use the tool from both right and left sides....presenting the Lance Beader 2.0....


note that you can hide part of the cutter in the fence.....still have to get to a friend with a dremel to form the bead profiles.....

Re: Cutting gauge from a pig's ear.

#18

no metal working skill here

Bill Tindall, E.Tn.

First the Dremel. I find this a handy device to have around. It, plus an assortment of cutting tools from the local flea market, Harbor Freight, etc and there are a great many things this tool will do. The thin cut-off wheels get used for sawing off screws and nails and pieces of scraper stock, the burs for "carving" (not real carving), grinding wheels for grinding profiles for scarpers.......etc.

Metal working- I don't like messing with metal, know little about it and do it as seldom as I can get by. If I need to heat treat something I take it to a heat treat business. When it comes to metal I rely on others for expertise. If I offer information on metal it is a report on something I learned from a trusted expert. I did once make some chisels and that turned out fine. The metal work involved a grinder and a hack saw.

Re: Cutting gauge from a pig's ear.

#19

chain saw files.

Bill Tindall, E.Tn.

Owners of beaders will find a selection of chain saw files handy for making profiles. The stock is easier to file than grind.


Beaders don't have to be very fancy. In a class I took with him Will Neptune assembled this version in a few minutes to scratch a profile .

Re: Cutting gauge from a pig's ear.

#21

Re: chain saw files.

roger lance

the simplest beader I've seen yet was just a brass screw with a flat head screwed into a piece of stock.....and it worked too !.....easy peasy.....chainsaw files are now on the list.

Re: Cutting gauge from a pig's ear.

#22

Re: An easy means of shaping/slotting cutters

Tom

Roger, I don't have metal working skills, I have: A 2x72 knife grinder, a 1x42, 3 metal working lathes, 3 milling machines, a huge drill press, a metal cutting band saw, a surface grinder/tool sharpener, a plasma cutter, a tig welder, an O/A torch, 3 surface plate, bridge rules, sandvick scraper, etc... Most of my cutters are made freehand with one of the sander, and the band saws. There is a ton of metal working gear going dirt cheap these days whether it's smart to bring it all home is another mater. :)

Re: Cutting gauge from a pig's ear.

#23

Tom.....I'm thinking maybe a.....

roger lance

dremel :D

Re: Cutting gauge from a pig's ear.

#24

Re: An example of dremel need.....

Tom

The simplest way to form the bead profiles is on soft steel, then just harden this. It is easier than making toast. Get some O1 tool steel, or similar, you can heat treat these little stamps in a propane torch easily. Submerge in bacon fat, then polish, and draw the temper. It can be done in a few minutes. You may not get great results the first time out, but you should certainly get results that are in the midrange of pro results. Whenever they do some tests there is always a range of results, which is sorta interesting.

The hardest part of the thing is tempering. Best thing is not to worry about it, and use the colour system. But if you need a cheap and more controlable way, you can use a couple of blocks of steel and a laser thermometer off ebay for about 10 bucks. You can heat the blocks with your torch, or induction stove, and when the heat drops to the right number place the chip between the blocks. You can't always use your oven since for these kinds of pieces the proper temper requires more heat. For planes and stuff an oven works.

Dremels cut like the metal isn't there, really quite amazing for such small tools. I prefer not to fight with hard metals if I can. If you want to use them, then consider the glass reinforced discs as they are more durable.

Re: Cutting gauge from a pig's ear.

#25

Or an intervention.

Bob Hackett

:D