New WoodChat!
Home Articles Forums Gallery Marketplace Videos

WoodCentral Forums

Knowledge You Can Build On — Est. 1998

Need a tree taken down or milled?

How would you saw the lid for this box?

Posts

How would you saw the lid for this box?

#1

How would you saw the lid for this box?

Derek Cohen (in Perth, Australia)

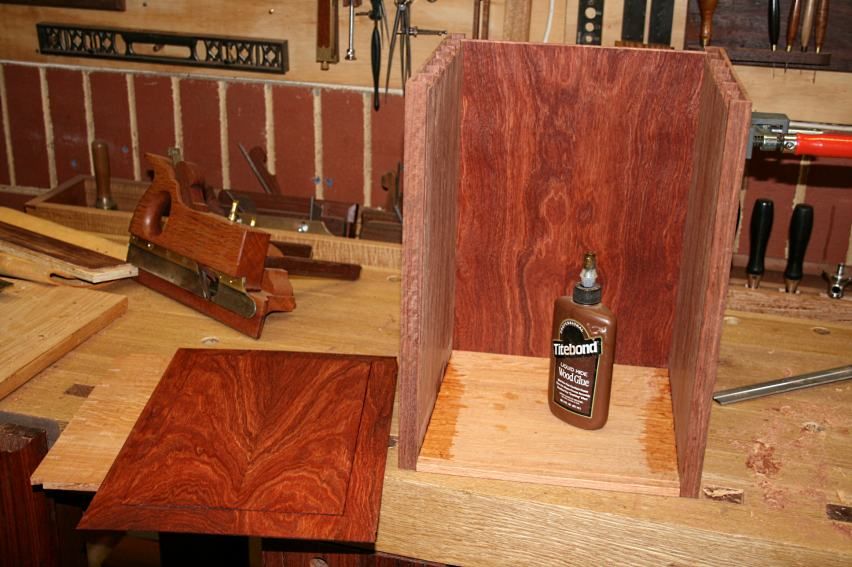
I am building a storage/presentation box for the bridle plough plane I build several months ago. Its going to get damaged if I leave it lying on a shelf. The box is 11" high and wide, and 12" long. Construction is half blind dovetailed sides and floating panels for the base and top.

The aim is to be able to open the lid to access the plane from the front (i.e. not have to lift it out). Irons will be stored vertically in slots at the rear.

Because of the height of the box, the lid needs to be sawn at an angle (rather than square). This is where the difficulty comes in.

This is a loose dry fit. The tape represents the angle of the lid/base.
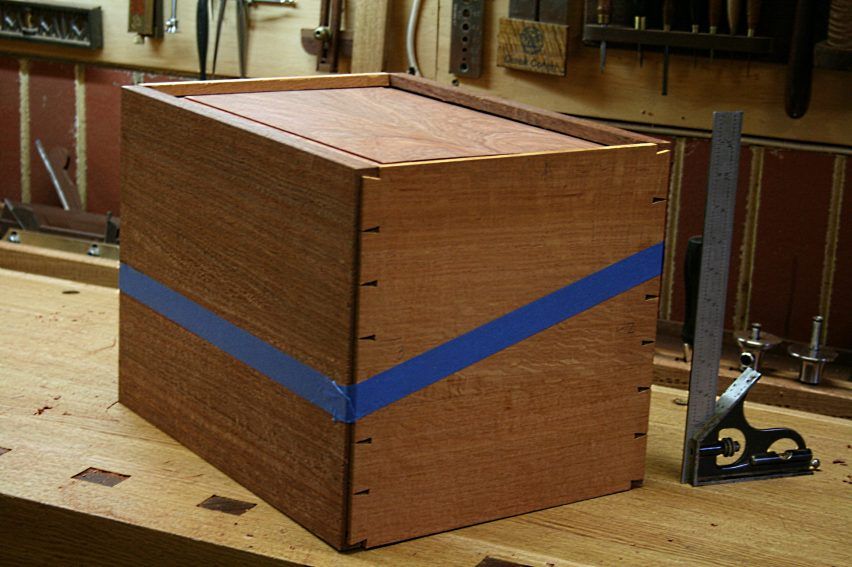

Do I assemble and glue the sides/top, and then saw the box apart (which I have done with many smaller boxes? If so, how would you do this? It is not a simple task.

Alternately, would you saw the pieces before assembly? This would, I assume, require the box to be fitted without glue, marked, disassembled and sawn. Yes?

The easiest cut is a coplanar one, that is, a straight line. My preferred cut would be at right angles at the front and back, with a the diagonal linking them. That is only possible, I imagine, if the pieces are cut in disassembled form? Frankly, I'm not sure how I could do that.

Ideas folks?

Regards from Perth

Derek

Re: How would you saw the lid for this box?

#2

Re: How would you saw the lid for this box?

William Duffield

I would do it on the table saw. Cut the front and back with the box against the rip fence and the saw blade tilted at the angle of the side kerfs.

Return the blade to 90°. Set the miter fence to the angle of the sides. Wedge and clamp the kerfs you already cut in the front and back so the kerfs don't close up when you complete the cut. Align the blade with the front and back kerfs and clamp the box to the fence. Make one side cut. Turn the box over, reset the miter fence angle to the other side of 90°, align the box to the front and back kerfs, and clamp it to the fence. Make the last cut. Clean up any minor misalignments with a block plane.

Re: How would you saw the lid for this box?

#3

Stephen Shepherd

A Rip Saw


Re: How would you saw the lid for this box?

#4

Re: How would you saw the lid for this box?

Wiley Horne--So. Calif.

Hi Derek,

That's wonderful quartered grain on the box--really beautiful.

Glue first vs. Saw first: I agree with Wm., to glue it up first, then saw. If you saw first, then glue, you're gluing up two boxes. This isn't difficult in itself, but if either or both boxes are a half degree out of square in the glue-up--in either the vertical or horizontal plane-- it will be a horrible job to make them fit.

The Sawing: If it were me, I would hand saw it, using guide blocks clamped to the box. This is because small discrepancies in angles and starting places for machine cuts will make for a large error over those 12" cuts. With guide blocks glued on, your hand sawing errors will be guaranteed to be small, and will be made at slow speed ;) . There will be errors either way, which will have to be planed out, but there is less risk of a sizable, difficult-to-correct error if you saw by hand.


Now, if you do want to use the table saw, I would make the front and back cuts as Wm. said. But again, would make the side cuts by hand, and plane out the kerf width discrepancy. Here's why: If you're 1 degree off in setting the table saw miter angle for those side cuts, you'll be 3/16+" off at the far end of the cut [error = tan (1degree) x length of cut]. A clean miss, which would take a ton of planing and screwing around and holding your mouth right to correct.

Finally, it looks like the way the box is taped, you'll have a saw kerf perilously close to your pins. It strikes me that you'd be better to locate the cut well between pins, to allow room for planing out discrepancies without running up against a pin.

Beautiful box, and fit for the great plough plane you made. When it's done, show us the plane in the box!

Wiley

Re: How would you saw the lid for this box?

#5

Re: How would you saw the lid for this box?

roger lance

Derek.....I would make these cuts with the box disassembled.....I'd position the front and rear cuts on the pin boards favorably between pins so as not to interfere with them....this set-up will give you the angle on your table saw with which to make these two cuts....then reassemble the dry fit and mark out your cuts on the tail boards.....make cuts at 90....reassemble dry.....make adjustments with hand tools.....hey, you is the man.....this is cake for you.

Re: How would you saw the lid for this box?

#6

Re: How would you saw the lid for this box?

William Duffield

Another option, which would give you horizontal (or any other angle you desired) join at the front and back, would be to use a bandsaw. Of course, it would need to be able to cut at least 12" deep. I've used that method to make a stone box, with a non-linear kerf on both sides. Again, I prefer to wedge the kerf before completing the fourth side of the cut, so that the kerf doesn't close up on the blade, possibly leaving a rougher cut and more clean-up on the back of the box, but it's not really necessary with a bandsaw.

To please Stephen's sensibilities, this operation could also be done with a turning saw with a 15" or 16" blade. I'd need to make a longer stretcher and drill holes in the end of another piece of bandsaw blade to make mine do that. You could also cut the side kerfs in the shape of an ogee, if you preferred. No reason they need to be straight. The only part of the kerf that really needs to be straight and plumb is the back, between the hinges.

Re: How would you saw the lid for this box?

#7

Example....sort of.....

roger lance

I made this cradle with splayed sides.....dry fitted the four sides, then laid out the cuts between fingers so the cut did not interfere with the joinery....made the cuts individually on the table saw/band saw....reassemble....hand tool tweak....glue up....etc etc.


Re: How would you saw the lid for this box?

#8

Re: How would you saw the lid for this box?

Bill Houghton, Sebastopol, CA

If you do it on the t*bl* saw, one technique I've seen but never tried is hot-gluing blocks inside the corners at the cuts - or, better, pieces of slat - and setting the sawblade to be just more than the thickness of the wood; and then, once done, sawing through the interior corner blocks/L-shaped blocks with a fine handsaw, and knocking off the scrap. This keeps the box as a box while you complete the cuts, no need to wedge kerfs.

I don't know if Sir William or another Centralian has tried and rejected this approach; if so, I'll be interested to learn.

Re: How would you saw the lid for this box?

#9

Re: Hyp/adj

TomD

One trick I have used is guide blocks, and false edge saws. The LV ryoba is great, though too small here.

If you use a table saw and make the lower and upper horizontals square, and the sides on the diagonal, then your 1/8" kerf allowance will be a greater gap on the sides than the top and bottom, in proportion to the hypot/adj geometry of your particular cut. While the geometry of allowing for this will be easy enough to determine, I am not sure whether just coring out the straight cuts, will give you the results you want.

A way to do this in future, that might work, would be to make these cuts in the boards first, then glue the boards together with spot welds of hide glue, and then cut your joints, then un-weld with alcohol. With that approach you can make compound curves even, and they should all line up. But that takes on some of the fiddle that using complete boards eliminates. I don't know if the spot welds would be enough.

Re: How would you saw the lid for this box?

#10

Re: Hyp/adj

TomD

I did this on a dovetailed tool box. A simple pine box with dovetails. I just laid into with ahand saw, and planed it. I recall it being a bit of a pain to get sorted out.

The problem is that to have the diagonals all the way across, and the horizontals square means that the corners do not line up. They have to shelve a little, and this makes freehand stuff more complicated because the surfaces are not planar.

Re: How would you saw the lid for this box?

#11

Re: Hyp/adj

TomD

Which means you can also consider exaggerating the discontinuity. Similar principle to the idea of having constructed edges that meet at an arise, so that they do not have to be precisely flush.

Re: How would you saw the lid for this box?

#12

Re: How would you saw the lid for this box?

William Duffield

That works if you have a glued-on top and/or bottom, but how do you apply the glue blocks to the inside of the box when you have to install the top and bottom in grooves before closing up the glued-up dovetails all the way around? There may be a trick to doing that, but I can't imagine it from here.

Re: How would you saw the lid for this box?

#13

Big band saw

James Watriss

Lay out the cut carefully on the outside. Finish the inside surfaces and glue the whole thing up.

Make the cut with a big band saw and a miter gauge.

Re: How would you saw the lid for this box?

#14

1/8" router bit & table saw

Ed Snow

The sides look thin enough to easily route through. I would rip the pin sides where you have illustrated, just not all the way through. Then set your router up with a guide to cut the tail sides all the way through.

This would give you the perpendicular edges on the pin sides and the angle on the tails.

Finish up the rips with a hand saw of some kind and done.

Re: How would you saw the lid for this box?

#15

Good point; get Schroeder's cat to do it?


Re: How would you saw the lid for this box?

#16

David Barnett

Schrödinger's


Re: How would you saw the lid for this box?

#17

Re: More Than One Way to Shred Shrödinger's Cat


Re: How would you saw the lid for this box?

#18

I would do it after assembly...

John in NM

No idea if that's going to be "easier" but that is how I'd approach it. If your kerf isn't perfect, you can always clean it up with a plane and no one would notice. I think I would use one of the end cuts to carefully set the angle for the face cuts, flattening the saw angle as the cut progresses. If I tended to cut more straightly, I might do the end cut then both face and back in one cut as you described. What would be sure to happen to me though, is the face would follow the line beautifully and the back would wander off while I'm not watching :D

Probably best to cut one end first, then the face and back, then the other end -- that way there would be no huge steps in the kerf if you wander a little. Seems like either this way, or cutting in from each end to meet in the center would both be the easiest to fudge should it be necessary.

Of course, I might also put a really nice blade on the bandsaw and just do it the easy way :D Wouldn't use the TS for this myself, too hard to get everything just so, but that's just me.

Re: How would you saw the lid for this box?

#19

No, no, I meant Schroeder's

Bill Houghton, Sebastopol, CA

no I didn't; I was just suffering a senior moment. Thanks for correction.

I understand Schrödinger got quite upset, in later years, about the cat, which he had not intended as other than a quick example, but which metaphor took on a life (or not) of its own.

Re: How would you saw the lid for this box?

#20

With your skills

Ron Harper

Make sure the cut does not involve dovetails. Mark and cut with my best handsaw, use a block plane to perfect the cuts. Might do it before gluing.

Re: How would you saw the lid for this box?

#21

more ideas

James Watriss

-Cut the angled sides, then glue up. That way you know the sides are the same, and you're just connecting the dots.

-Cut the straight sides square, then glue up. Cut a guide block to guide the saw when cutting the angled sides that references off of the bottom. I'm not convinced that angled sides and square front and back are really the way to go, though.

-Skip all of it. Make the top panel a sliding panel, get the thing done, and move on. The box will be more durable.

-Pattern rout the sides with an S-curve. Square in front, square in back, curved in the middle. Pattern guarantees identical results.

Re: How would you saw the lid for this box?

#22

Re: How would you saw the lid for this box?

CStanford

Glue it up.

Mark the cut with two knifed lines slightly wider than the width of the saw plate of the hand saw you'll use (I'd use the longest, finest crosscut saw you own). When the cut is completed there will be material left, for planing, on each side of the knifed line. It's important to saw dead between the lines and leave the same amount of material to remove to the lines.

Set the box on end, saw down the diagonal and straight across the front. This isn't a whole lot different than any long miter cut across a wide workpiece. You could even hot-melt glue a guide board on the miter line. Keep the cut perpendicular to the face of the work. Clamp the box to the front of your bench with pipe or bar clamps set across the bench so you can make the cut through from one side. Mark the lines a little deeper on the exit side of the cuts and use the weight of the saw only as the saw exits the other side. NO PRESSURE!

Once the cut is done, plane down to the middle of each knifed line and the box lid should fit perfectly to the box body.

Re: How would you saw the lid for this box?

#23

Update

Derek Cohen (in Perth, Australia)

Many thanks all for the advice. It has been very helpful.

The first decision was that the lid had to be cut by hand. No choice really. I have a big bandsaw (Hammer 4400) but it is not big enough (clears a little over 11", however I need about 13"). So handsaw it is.

The second decision was that the parts had to be glued up beforehand to keep the sides lined up.

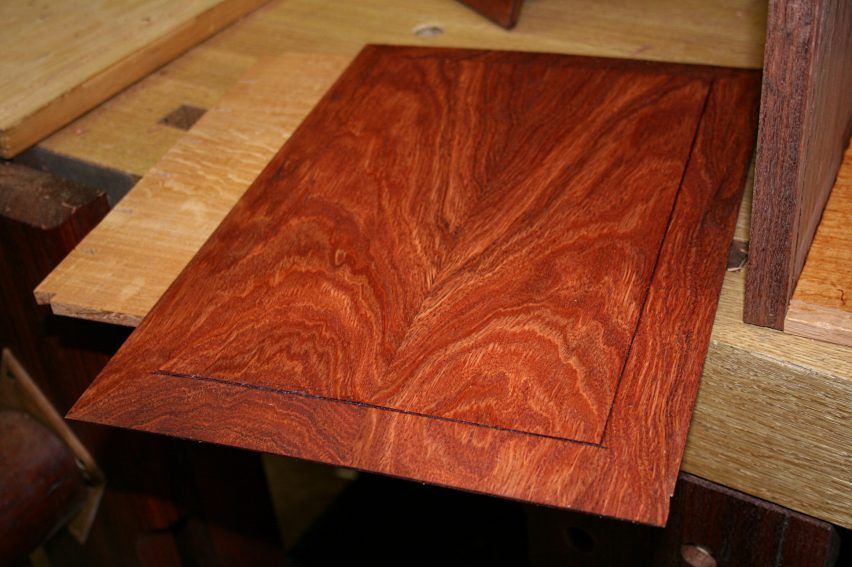
The floating panels were given a finish of Danish Oil, and then the box was glued up ...


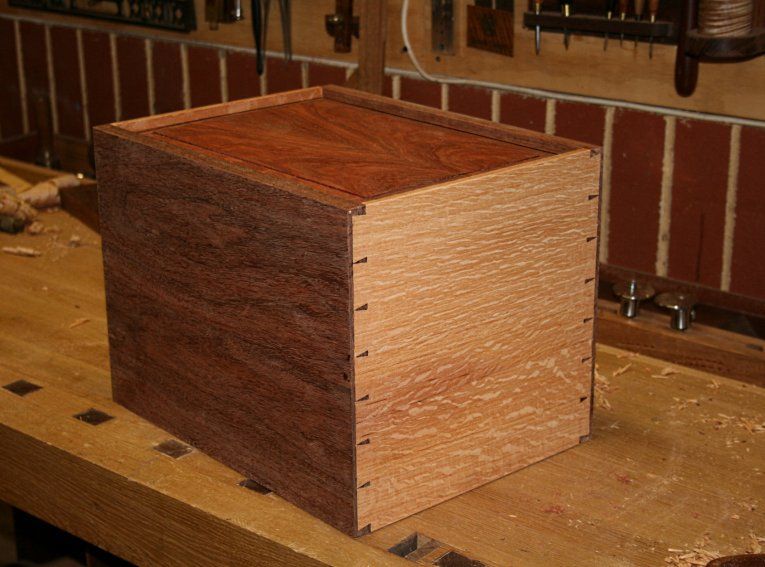
All sides are made up of two boards. The top was bookmatched. I thought it came out nicely.


A picture for Wiley - unfortunately there is no finish on the carcase yet.


I decided that the key to sawing the box was to saw the sides (She-oak) first. The front and rear (Jarrah) must not be sawn first as it would be difficult to get the angles needed to then saw the sides. The sides first also creates a guide to saw the front and rear.

I thought Charles's idea of sawing between two knifed lines was clever. I am not certain that this is the best way to go. I planned to saw the box as accurately as possible, then lap the two sides on sandpaper-on-a-flat-surface. I think that this has a better chance of enabling the two sides to go together seamlessly. This is what I have done many times before. Your comments?

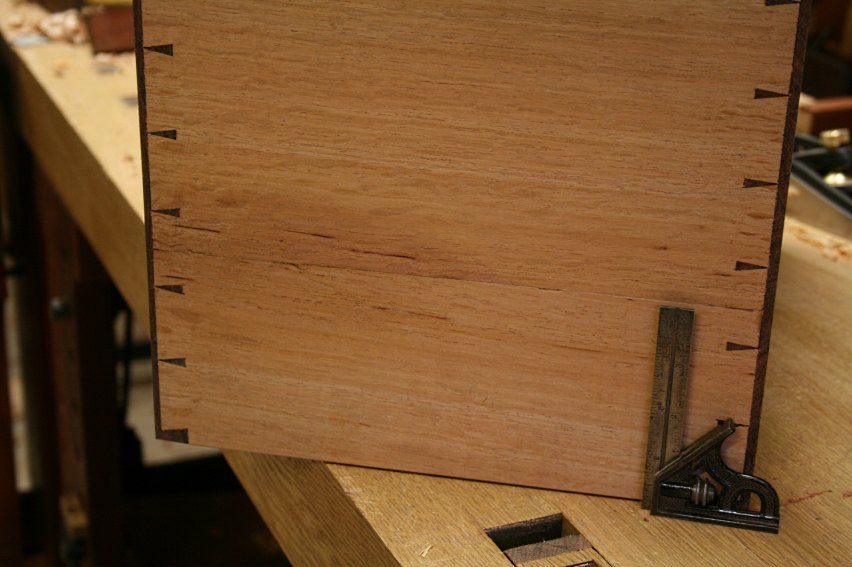
Now there is a problem that may change the whole plan. The Jarrah on the front-and-back is 3/4" thick, while the She-oak is 1/2" (to save weight). While fitting one She-oak side, I could hear that the joined pieces were not solid along the join length. That is, the glue has failed. I used hide glue. The trouble is that the saw cut will start at the join.

The top of the square marks the join ..


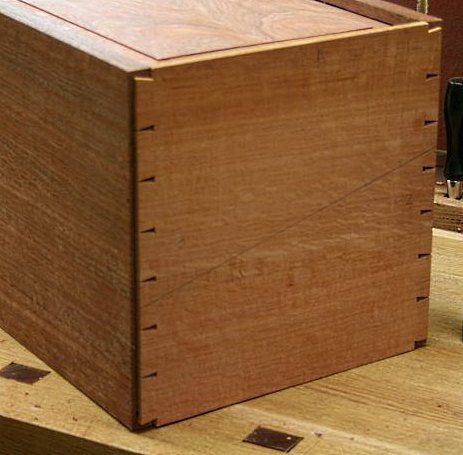
Here is a picture of the proposed sawcut (taken before the box was assembled) ...


Ideas? Can the join be strengthened after separation (superglue?)? Do I forget the angled cut and instead saw along the joined line (then I would use a table saw to avoid the blade drifting with the grain)?

Regards from Perth

Derek

Re: How would you saw the lid for this box?

#24

Re: Update

David Charlesworth

Derek,

One way we have done this is to use tablesaw, but not saw all the way through.

Leave just a mm or so of wood left. This solves closing problems and can easily be cut through with a Japanese or other saw.

best wishes,

David

Re: How would you saw the lid for this box?

#25

Re: Update

Derek Cohen (in Perth, Australia)

Thanks David.

Do you have an opinion about the join?

My thought is that it may not make any difference to the strength of the side involved as the dovetails lock in the panel, and the hinged back will take the load.

Regards from Perth

Derek