New WoodChat!
Home Articles Forums Gallery Marketplace Videos

WoodCentral Forums

Knowledge You Can Build On — Est. 1998

Find a woodworking club near you

Bench update: the top is complete!

Posts

Bench update: the top is complete!

#1

Bench update: the top is complete!

Derek Cohen (in Perth, Australia)

Well, almost. The tail vise needs to be bolted in - however I can only do that later. All work is done in preparation.... which means the end cap is completed. How this was to be built was the subject of the last post.

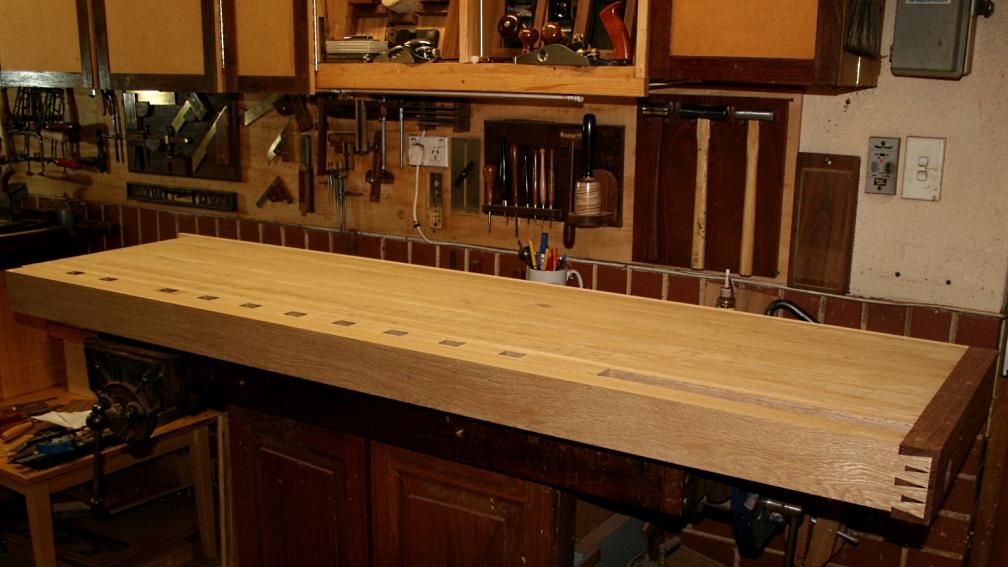
The final length of the bench top is 75", which is a little longer than I expected. About as much as I could have hoped for. The width is 21", which is what I aimed for. Perfect.

So what about the end cap? How did this turn out?

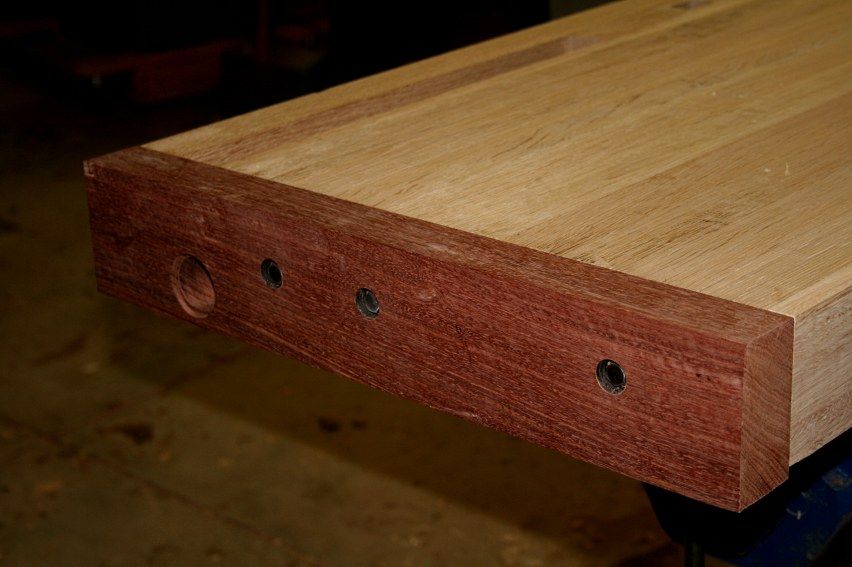
In the end the design was determined by the wagon tail vise. This requires an end cap with strength as the tail screw will create pressure at that end of the bench. This means that the end cap does need to be bolted to the bench. I checked with Jameel, and he confirmed this. I took the easy way out here and used ordinary coach bolts. I did grind and polish the ends, but no one will notice ... just being a little obsessional :)

The important aspect with the end cap is that it needs to have the ability to move, to expand and contract with changes of the weather. One end is fixed (bolted) - which has to be around the tail vise - and the other must be left unattached.

The attached end of the end cap is fixed with a dovetail and two bolts. The bolts run through the internal tenon (see earlier post). This area (half the tenon) is also glued. The remainder of the endcap is attached with a single bolt, which enters an oversized hole. There is no matching dovetail at this side of the bench as this would restrict movement.
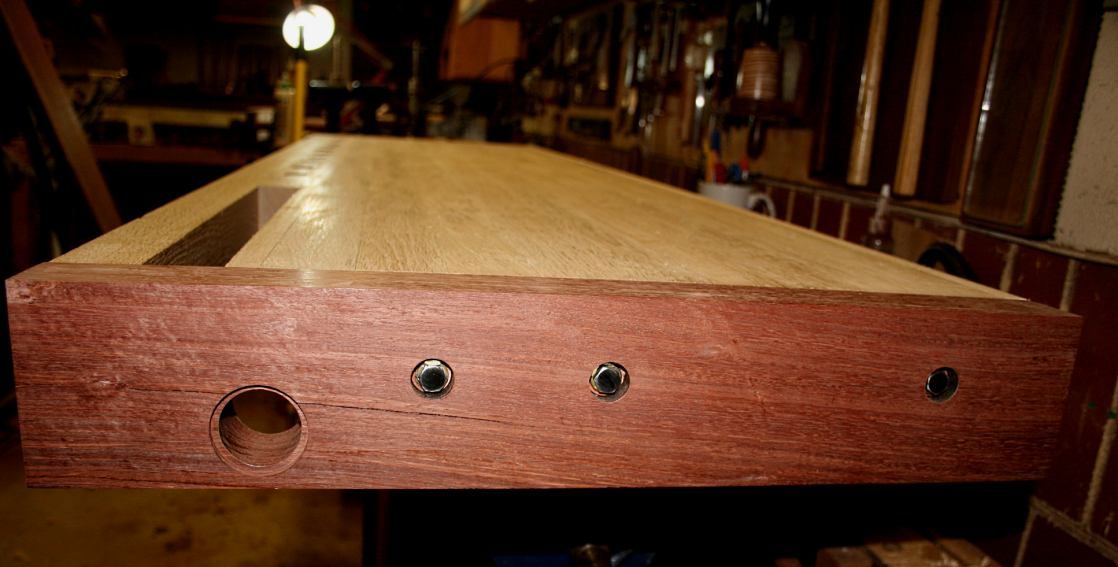

See, the top is done! Flat.

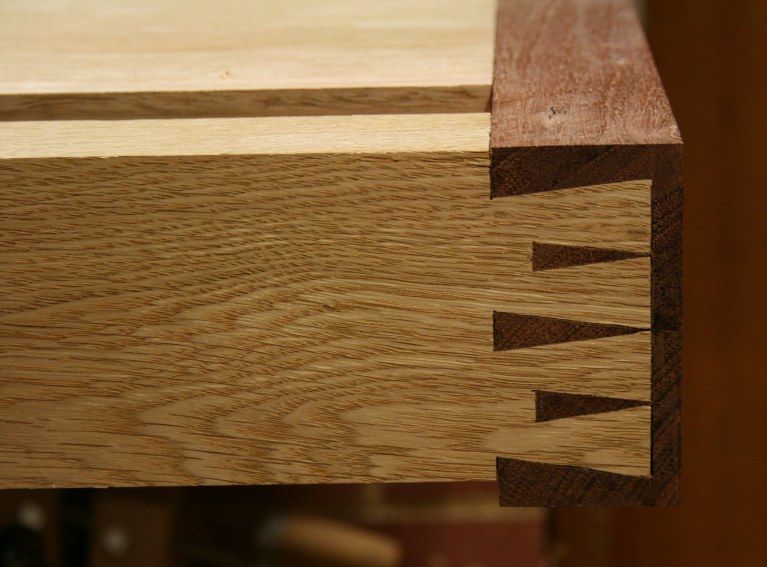
From the sublime to the ridiculous. In this case, while the end cap looks clean and simple from this angle, I did go a little OTT with the dovetail that attached the face side.

I decided that since I did not plan another bench build for ... ever ... and that there was only one dovetail I could cut, I would do something interesting. There was only one shot at this and I would have some fun.

For those who are not interested in a short pictorial of building a half blind (half lap) houndstooth dovetail involving one h-u-g-e board, then simply skip to the end.

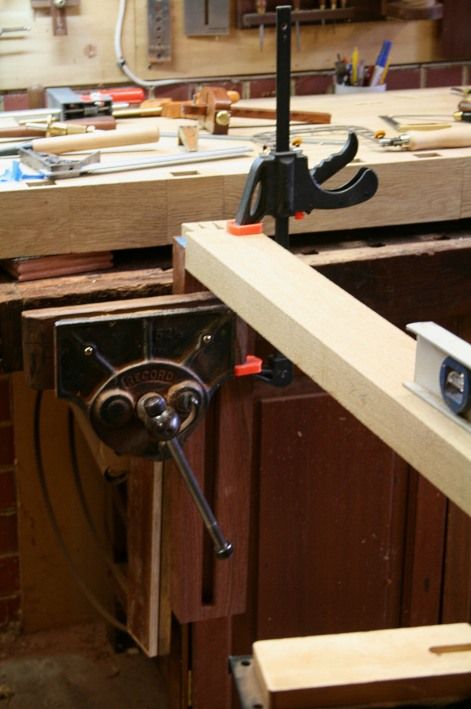
What made this even trickier was that I was struggling for space. I clamped the tail board in my Record vise at an angle, thus ...


... and was forced to saw the lines from the opposite side ...
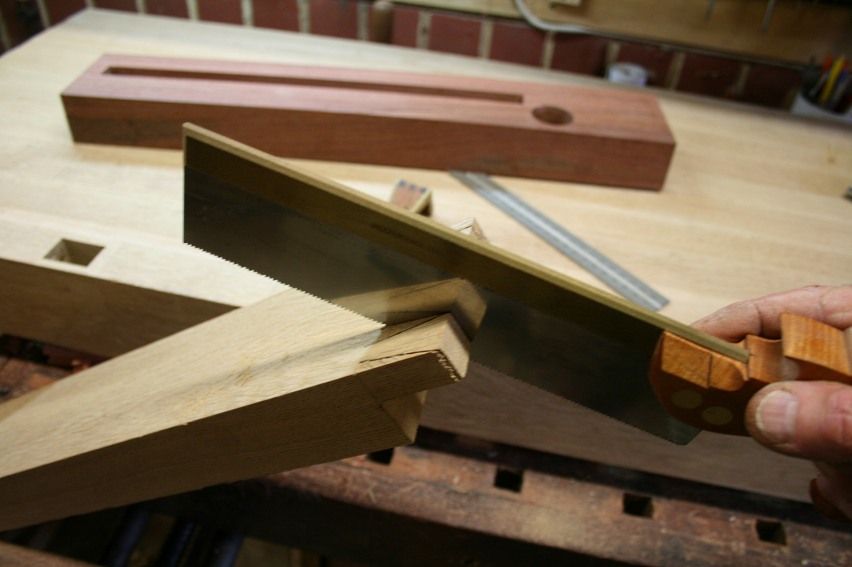

Ok, here you are - the layout for the houndstooth dovetails. There are a couple of reasons for using this format. The first is that the end cap is 2" wide (to maximise the internal screw length) and 4" deep (to get the vise wheel below the bench top). Anything other than slim dovetails would end up looking blocky. Several "normal" tails would look too busy. Houndstooth tails could break this up.

Secondly, you may note that the tails are offset on the tail board. This is deliberate in order to centre the tails as the tail board is 3 1/2" wide and has to join a 4" wide pin board.

The tail waste is removed with a fretsaw ...
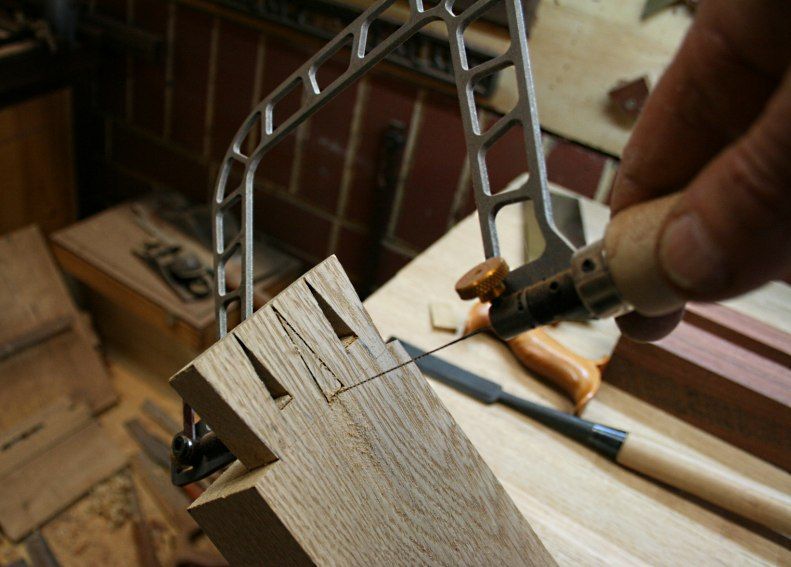

.. and then the remaining waste is chiseled out ...
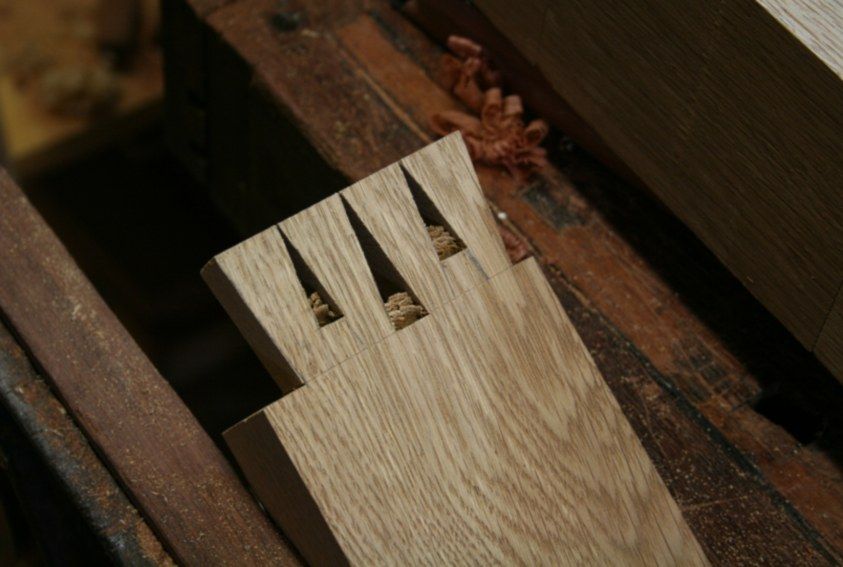

Transfering tails to pins was fun! :(


In addition to the balancing act here, the kerf for the tails was so tight that a standard narrow marking knife would not fit. I quickly whipped out my Vesper extra-slim marking knife ... (I have to find space for a plug for Chris Vesper :) - great toolmaker) ..

Here is the extra slim alongside a standard slim marking knife ...


Time for the Blue Tape Method!

Place blue marking tape over the area where the marks will be transferred ..
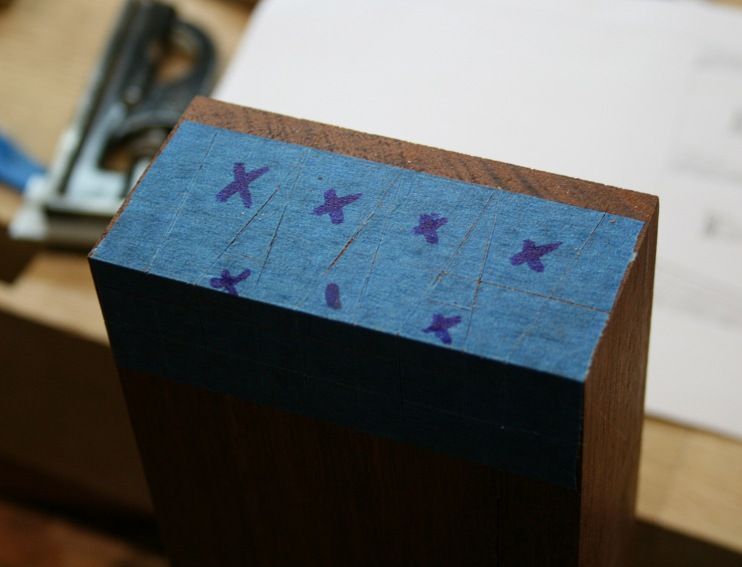

Transfer the marks ...
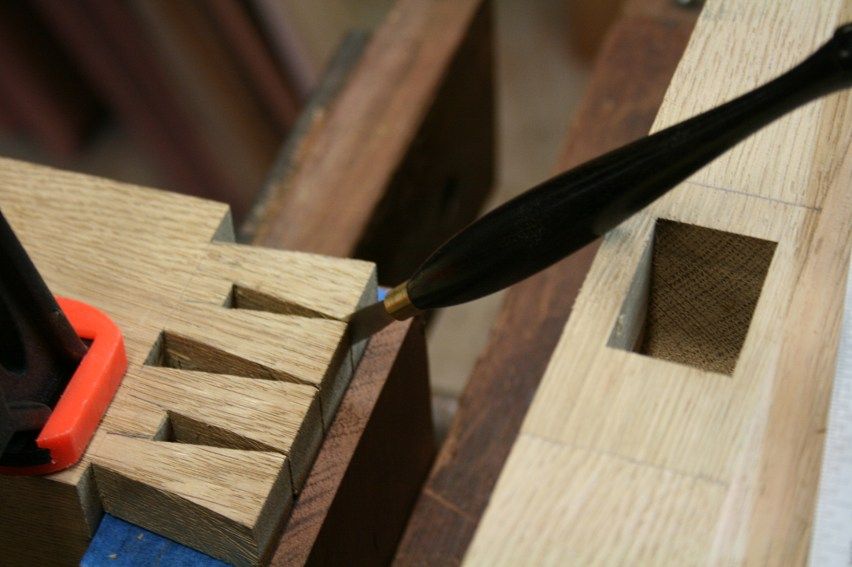

Peel away the waste (at this stage I leave the short pins as long pins) ...


This makes it so easy to saw to the line. Here are my saw cuts. Can you see the kerfs?
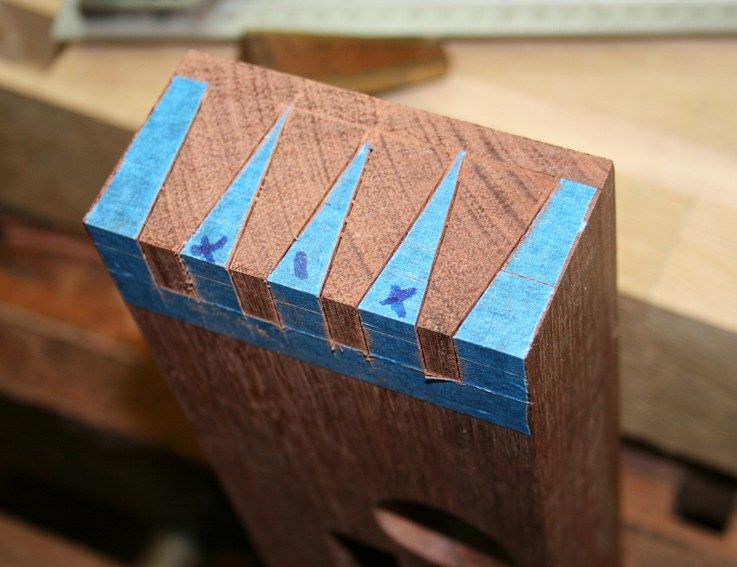

Now you can remove the tape from the waste area of the short pins ...
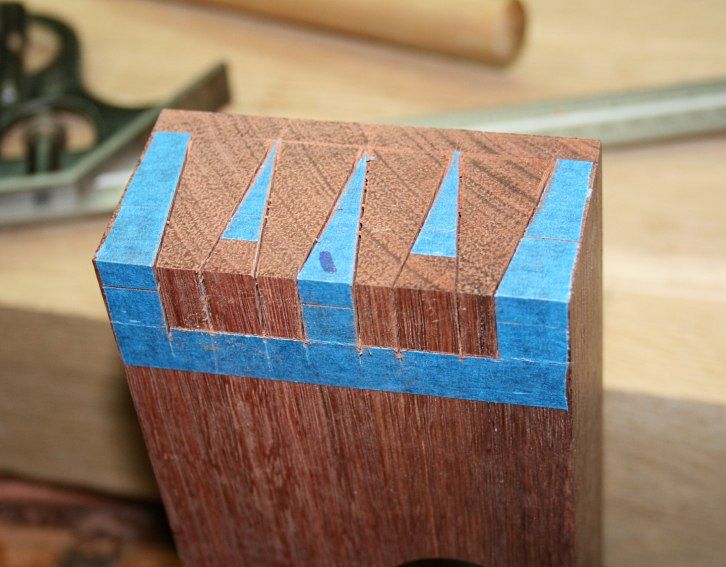

At this point I deepen the kerfs with a kerf chisel (its on my website under Shopmade Tools) ..


Drill the waste to the depth of the pin. This will make it easier to split out the waste (rather than spend hours chopping it away) ..
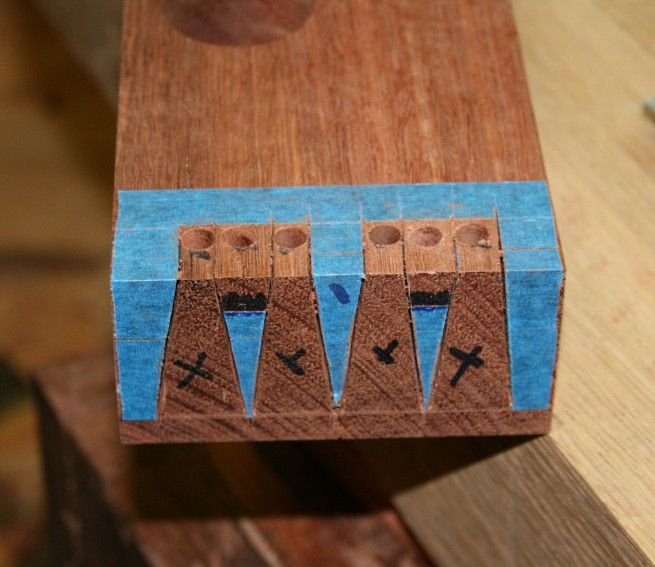

Chop it out about 2/3 of the waste ..


Remove the remaining waste (this is basic stuff), using a backing board. Note that the short pins are still intact at this stage ...
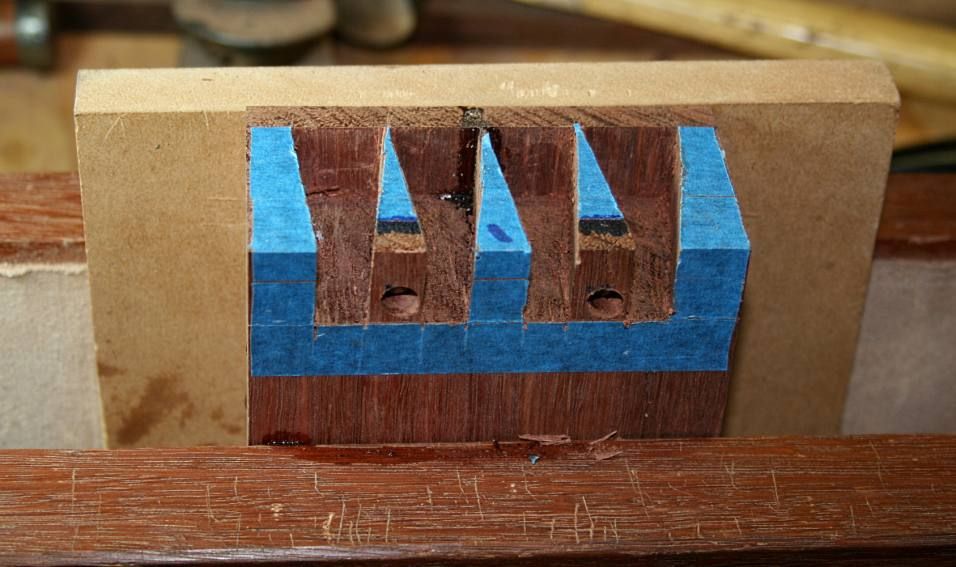

Now you can pare them to length ...
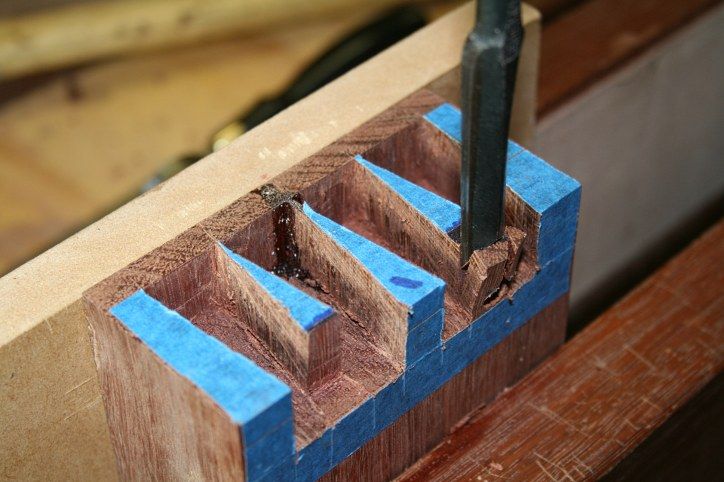

If you are using a Moxon vise, as I am, lower the pins level with the top of the vise. The board may now be used to flush the base of the pins ...
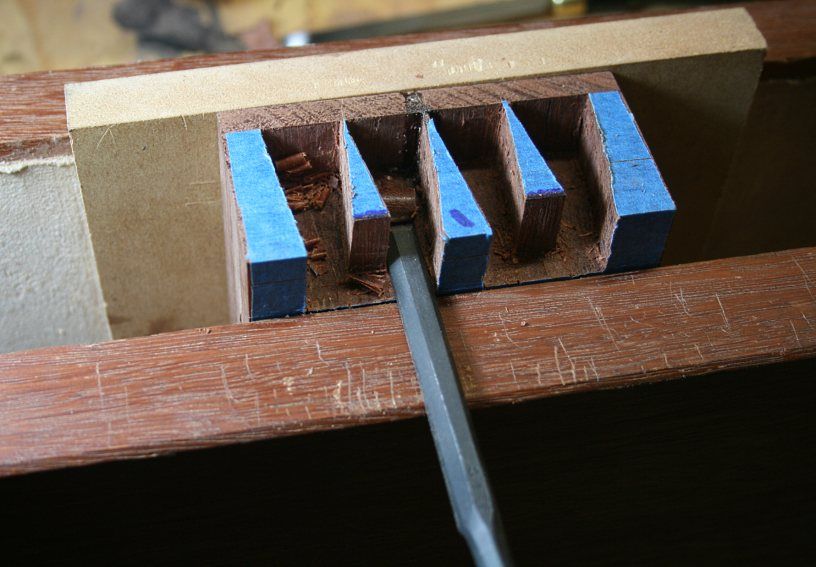

Here you are, nice and tidy ..
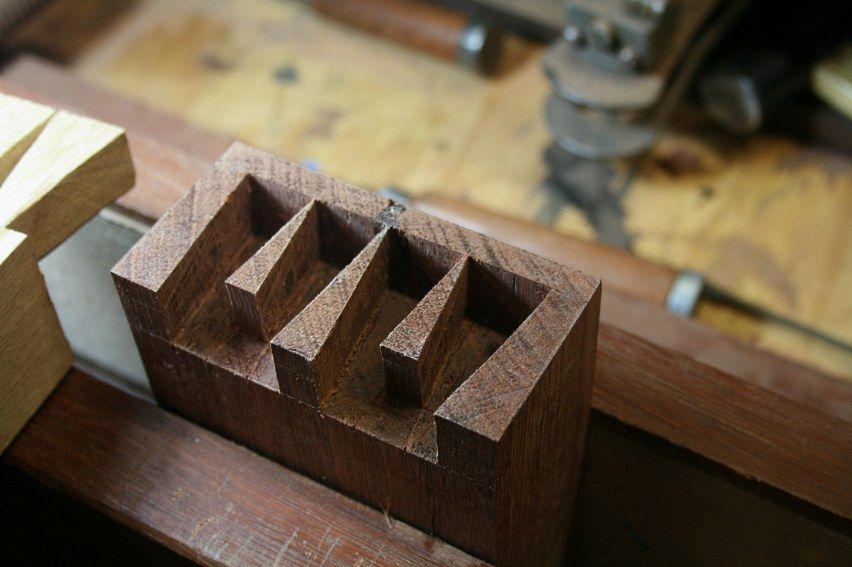

Slight tangent ...

With so little room to move in I stumbled over the tail board, which went crashing to the ground, and dented the end near the tails. Fortunately the tails were not damaged. Still, not needed at this point.
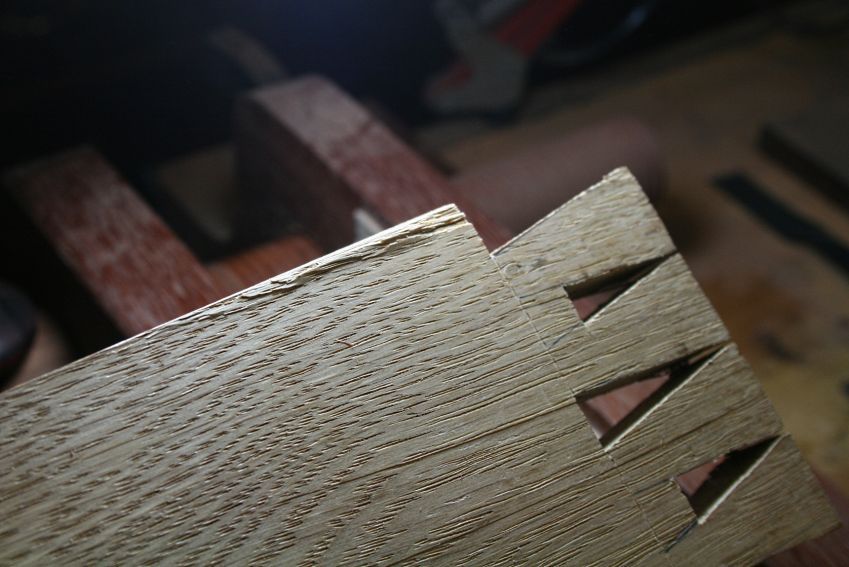

I had to leave the dent wrapped in a wet paper towel for an hour or so to try and swell it out ..
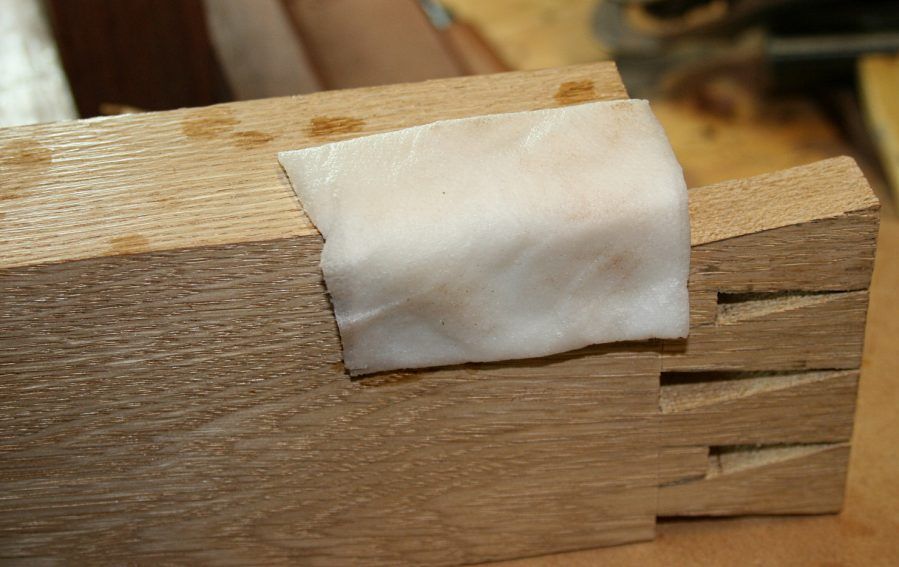

It worked reasonably well. Then, without further ado, and with my heart in my mouth, I added glue to the pins and wacked in the tails. The result was decent, and so I set about glueing the end cap/side board to the bench top ...
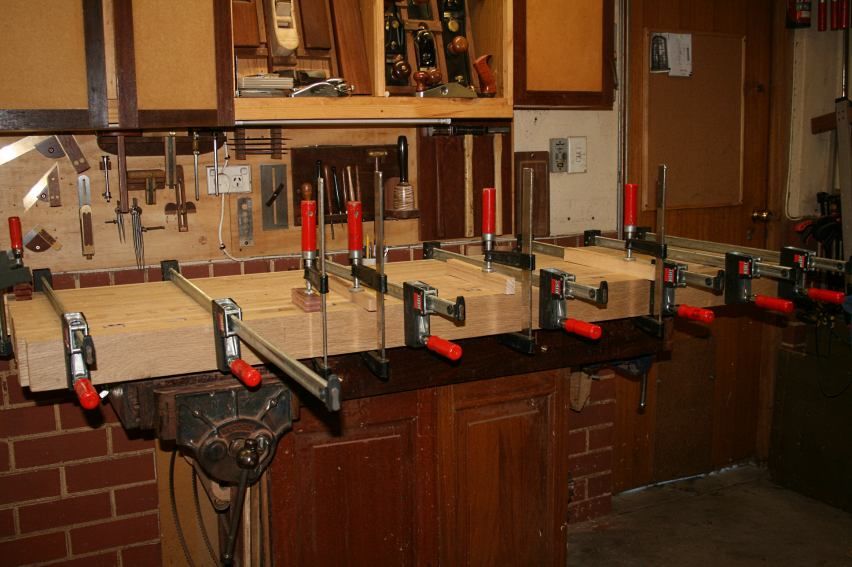

What that .. can't see ... the clamps are in the way? :) OK ...


Decent job.

Regards from Perth

Derek

Re: Bench update: the top is complete!

#2

Looking really nice!

John in NM

I like the blue tape method, going to swipe that one :D

I generally avoid dovetail discussions if possible, for obvious reasons. Is this a new idea you came up with or something everyone but me knows about? :D

Keep up the good work, looking fantastic!

And thank you for the picture of the dinged up board you tripped over - always good to know that I'm not the only one who does that :D

Re: Bench update: the top is complete!

#3

Thanks John

Derek Cohen (in Perth, Australia)

I wrote an article on the blue tape method a little while ago ...

http://www.inthewoodshop.com/Furniture/HalfblindDovetailsinJarrah.html

No, I did not invent it. Someone posted the idea on a forum a few years ago. It seemed then to fade into obscurity. All I have done is resurrect it and demonstrate it a few times. Now I would not do it otherwise.

Regards from Perth

Derek

Re: Bench update: the top is complete!

#4

Coming along beautifully!!


Re: Bench update: the top is complete!

#5

End cap and vise

Bob Hackett

First let me say that the craftsmanship and thought you displayed on this project is second to none and an inspiration. I also like that you are willing to show the dings and dents and their fixes as these reflect the reality that most of us live yet few of us see online. Fine stuff all the way around,thank you for this.

I still don`t understand why this vise was designed like it is. I can`t see why a supposedly premium product (I`m assuming it came with an equally premium price)would be designed so it exerts destructive forces toward weakness instead of strength in a bench. The rather unsightly bolts thru the end cap that are required to hold this design together could have been completely eliminated with a more thoughtful design.

I`m not even going to ask why those required bolts are anchored into end grain. It just doesn`t make sense to me,can someone explain the rational behind why they did it this way?

Re: Bench update: the top is complete!

#6

Who knew......

Bill Tindall

......that bench building could be a spectator sport! It's been fun watching and a welcome distraction from the task at hand.

I have been installing stairs. Tedious and not very interesting to do or watch. The hand tool skills have come in handy for fitting treads and risers to the space. The treads and risers are captured on both sides by the skirt boards following the vagaries of the drywall, so there is no degrees of freedom for fitting either riser or tread, and the intersecting angles are inconsistent and seldom 90 degrees.

Re: Bench update: the top is complete!

#7

Basic rule of physics.....

roger lance

its been a long....long....time since high school physics but I recall some basic rule that for every application of force there is an equal and opposite impact or force (you'll have to forgive the improper terminology...as I said its been awhile)....no getting away from that....so as pressure is applied to the dog of the vise, there is equal and opposite pressure that has to be absorbed someplace and that is the cap....I'm sure some other component(s) could be engineered to spare the cap this role but at what cost ($$$)??

Re: Bench update: the top is complete!

#8

Re: Who knew......

TomD

Apparently the magazines that seem to have a bench, sharpening, dovetailing, or plane fettling article in each issue, if not all four subjects.

Re: Bench update: the top is complete!

#9

I understand the physics

Bob Hackett

I just don`t understand this design.

As I said in a previous post that force really would have been better absorbed thru the opposite end of the screw and would be easily captured and distributed by a thrust plate and collar at that end. That plate would then distribute the force into the body of the bench which is far stronger and more capable of dealing with that force. The end cap is the wrong place to concentrate this force IMO.

If the end cap does anything more than act as a support for the handwheel end of the vise screw it`s setting yourself up for failure. That`s why those bolts are mandatory additions and since they thread into end grain ( not a recommended application) they have the appearance of being an afterthought and not even a good one at that. Perhaps that is why there seems to be an overabundance of them in the pics. Barrel bolts or a backing plate let in thru the bottom of the bench top would be a far better way to fix this design flaw.

Good thing that vise is activated by a relatively small diameter handwheel. If it had a normal size rod type handle acting as a lever I`ll bet you`d have no trouble ripping those lag bolts out of the end grain and separating the end cap from the top. All it would take in that case would be one overenthusiastic teen age football player and your bench would be toast.

I am frankly surprised that someone recommended this particular version of this vise.

Re: Bench update: the top is complete!

#10

Maybe....

John in NM

If the thrust plate were tied to those tracks and the whole thing were a bunch beefier, that would distribute the clamping force over the area occupied by the tracks. If the plate were just bolted to the bench inside that trough, you've just moved your endgrain bolt problem from a place where it's easy to fix to one where it is less so - though admittedly the bolt heads will not offend the eye in there.

Given the length of the end cap, I don't think that's the problem with this design, the screws holding the vise bushing to the cap will pull out long before a bolt into end grain a foot away will. A better solution would be to put that bushing on the inside of the cap, then all the force is borne by the cap mounting bolts and joinery. But that presents a problem for the manufacturer - how to deal with different thickness caps? I think I would make an inside plate too and put bolts all the way through the cap, pinching it between the plate and the bushing.

Re: Bench update: the top is complete!

#11

Re: I understand the physics

roger lance

Derek has used the term "ordinary coach bolts"....I'm not familiar with this term....coach bolt....but I certainly agree with you about using barrel nuts (aka dowel nuts) in this end grain application....those solve the problem. Even an old end vise design like that used by Frank Klauz (not talking the L shoulder vise) relied on the end cap to take the back force of the clamping action....perhaps not the best design in that regard but a design that has been around a long time.

Re: Bench update: the top is complete!

#12

coach bolt (English) = carriage bolt (American)


Re: Bench update: the top is complete!

#13

Re: Maybe....

Bob Hackett

I wouldn`t bolt the plate or anything else into end grain.

Make the plate 1-1/2 " wider than the slot and cut a 15/16" slot on either side to to slide the plate into and then a single lag bolt and washer into the side grain will retain the plate yet allow it to readjust itself if and when the top moves in any dimension. No end grain holding anything, a single shot lag keeping the plate from dropping out and the forces are distributed over a 3/4" wide by pretty close to the thickness of the bench top (say thickness minus 1") X 2 instead of over 4 points held by end grain threads. Much stronger and far cleaner installation as well as operation.

Now that end cap is just a support of the other end of the screw and the handwheel and is not subjected to any of the forces that originally were trying to push it free of the bench.

Re: Bench update: the top is complete!

#14

Re: Bench update: the top is complete!

TomD

Nice! That is the way I would have done the dovetail, orientation wise. plus it looks nice in the money shot. As to whether it is strong enough, one way to look at that is whether the end as seen would be strong enough to function as a planing stop, since all this stuff about a tail vise is just the rear end of a planing stop. If it is strong enough to take planing energy, it is strong enough to function as a stop, and then some. I assume it is built so that it can expand with the top. Another thing is that presumably this kind of vise does not actually have to close. The forward most position of the vice could be such that it didn't close. Thereby avoiding the tendency to crank these things down with enormous force for not particular reason.

Re: Bench update: the top is complete!

#15

Re: Bench update: the top is complete!

Philip Duffy

I am speechless! Philip

Re: Bench update: the top is complete!

#16

That would do it...

John in NM

And then they wouldn't need that track thingy on the bottom.

Re: Bench update: the top is complete!

#17

Re: Bench update: the top is complete!

Hank Knight

Derek,

That looks wonderful! Are you going to plug the bolt holes or leave them open?

Hank

Re: Bench update: the top is complete!

#18

Re: Bench update: the top is complete!

Derek Cohen (in Perth, Australia)

Hi Hank

I am in two minds about the bolt holes. One side says the bench is a tool and the bolts are where one adjusts the end cap (which is necessary in this design). The other side wants to build furniture and hide the bolts. I think, however, should I go down this path, I would fit matching plugs and make the bolts completely disappear.

Regards from Perth

Derek

Re: Bench update: the top is complete!

#19

Similar thing I did...

John in NM

Built a bed with bed bolts, but I was too cheap to buy actual bed bolts, used regular 6" bolts with a big shiny hex head. I made some rosewood caps using one of those chattering fly cutter like rosette things, with a shallow hole in the back for a dowel. The dowel sticks into the bolt head hole and has a magnet let into it - get the dowel length just so and the magnet holds the cap over the bolt head.

Of course such a thing would fall off the bench every time you whacked something with a mallet :D but maybe you can improve on the idea

Re: Bench update: the top is complete!

#20

Re: I understand the physics *LINK*

wilbur

Jameel Abraham, who's one of the principals of Benchcrafted, is both an excellent woodworker and machinist, and I'm sure he has thought through the issues you bring up. I've also seen the Benchcrafted wagon/tail vise in action, and given the forces needed for this vise to hold boards, I hardly see how failure of the end cap would be an issue.

Here's a link to the installation instructions. The suggested methods to hold the end cap on include (1) a large dovetail, which is the first choice and I have a hard time seeing how this would fail, and (2) beefy lag screws. Also, the rails of the vise screw into both the main part of the workbench and the end cap from the underside, which provides another mechanical method of preventing the end cap from coming off. I think that if you actually look at the method of installation, any concerns would be laid to rest.


Benchcrafted tail/wagon vise install manual

Re: Bench update: the top is complete!

#21

Fantastic job on those dovetails!


Re: Bench update: the top is complete!

#22

Thanks Wilbur....the link was helpful.


Re: Bench update: the top is complete!

#23

Re: Bench update: the top is complete!

TomD

Short of faux painting you can't really make the holes go away, so I would be for some kinds of removable plug or decorative bolt head. Form follows function.

Re: Bench update: the top is complete!

#24

Re: Bench update: the top is complete!

Hank Knight

Ah, a quandry. For what it's worth, I left my end bolts uncovered thinking I might need to adjust them. It's been five years (doesn't seem that long) and I've never had to touch them. They don't bother me, though. I never notice them anymore.

Again, very nice job on the top. You may have already covered this, but is the top going on your old base, or are you building a new base?

Hank

Re: Bench update: the top is complete!

#25

Re: Bench update: the top is complete!

Derek Cohen (in Perth, Australia)

Hi Hank

There is a whole new base in the building. The legs are done. The stretchers are cut.

Then it is the turn of the leg vise, and the sliding jack.

Finally, all the dogs (without them the tail vise does not exist).

All then (who said "finally"? :) ) there are a few other bits and pieces before I am ready to quit.

Three weeks into the build. I'd like it done in three more.

Regards from Perth

Derek