New WoodChat!
Home Articles Forums Gallery Marketplace Videos

WoodCentral Forums

Knowledge You Can Build On — Est. 1998

Price drop on over 1300 Rockler items

Thanks to Rob Lee/An Informal Plane review (LONG)

Posts

Thanks to Rob Lee/An Informal Plane review (LONG)

#1

Thanks to Rob Lee/An Informal Plane review (LONG)

Guillaume Dery

Last week was a special meeting for the Handplane Special Interest Group (operating under the umbrella of the Ottawa Woodworkers Association). Turns out that Robin, in an assumed fit of insanity, actually entrusted one of the Lee Valley staffers who is also part of our group with a selection of planes from his own collection. Not only were we allowed to drool at these planes, the combined value of which is more than some people make in a year, Rob actually let us play with them!!!

Prior to arriving at our humble meeting, all of the plane irons received some loving attention from LV’s resident sharpening guru (among other skillsets), Brian. Brian respected blade geometry (grind angles and cambers) but boy did he hone them. Once Brian is done with an iron, forget shaving a patch of arm hair to test for sharp, you can actually split the hair lengthwise. All this to say that the playing field was level between all of the planes.

Ok, so what did we have to play with?

From Rob’s private stash:

• Marcou bevel up smoother in brass

• Sauer and Steiner Infill panel plane

• Holtey Special edition smoother

• Bridge City adjustable pitch smoother

• Bridge City block plane (a weird transformer looking thing which looked somewhat like an alien probe destined for unmentionable parts of your anatomy…)

Now Rob had requested that we not play with the Bridge City toys… errr…. tools… so we just admired them and only played with the first three items on the list.

From our own group:

• 2 shop-made wooden planes, one smoother sized and one jackplane sized.

• A multitude of Stanley/bailey smoothers

• LV bevel-up smoothers

What an opportunity! After the reverential oohs and aahs and the obligatory photo op, we got down to business. To test these planes’ mettle, we broke out some gnarly cherry with lots of tearout and a soft knot, some maple (birds eye and normal) and, at the end, a board of wenge (really nasty stuff to plane!).

Rather than a narrative, let me just give the rankings in 3 categories before giving some general observations.

Aesthetics/Design


Plane Score Notes


Marcou 8/10

The mass of this plane has to be seen to be believed. The lever cap alone weighs over a pound. Workmanship is flawless. My only two quibbles would be as follows:

• The mouth adjustment screws, although they function perfectly well detract from the overall appeal and are not the most elegant solution.

• The tote although extremely comfortable and well executed, is not the ideal shape for me.

Overall, a gorgeous plane which is well designed and easy to adjust. Low score probably reflects the lack of aesthetic appeal that the bevel up variety holds for me.

Sauer 10/10

Perhaps it is just my fondness for infill planes but this plane is drop dead gorgeous, the workmanship is flawless and the tote fit my hand like a glove. I wouldn’t change a thing on it.

Holtey 9/10

One can easily understand why these planes are considered the pinnacle of the planemaker’s art. Again, flawless workmanship and an overall gorgeous plane. Only reason it didn’t get a 10 is that it isn’t an infill and although different strokes for different folks, I cannot say that I am a fan of the look of the brass cones (flawlessly executed). Other minor quibble is that there was a bit of play in the rear tote.

Bridge City 8/10

Another flawlessly executed plane. However, the adjustment is too complicated/fussy, probably due to the variable pitch (gimmicky to me). The infill on adjustment screws is a gorgeous detail and they have probably the loveliest knobs in town. The tote however was a turn-off for me.

Woodies 5/10

Function over form. This is as basic as a plane can get with nothing to get in the way. Adjustments with a hammer (my preferred method at any rate). Stock is chosen for stability and usability, not appearance. Interesting note, one of the woodies had textured areas in the side for grip and tactile registration as well as a more raked back which tended to direct planing force down and forward. I intend to incorporate this on my upcoming woodie build. Highly recommended.

Stanley/Bailey 7/10

The old ways are often the best ways. No substantial improvements have been made to this form since mr. Bailey himself. Personally, I am a fan of black, brass and rosewood. Looks good, works good. Lateral adjusters are however, finicky beasts. I ignore them and reach for the plane hammer.

Veritas 7/10

A prime example of function dictating form and innovation. Certainly not the prettiest planes around but they do have a certain charm. I am however, not a fan of the totes although I realize that their shape is dictated by economy of manufacturing and function. From a design perspective, these planes go up to a 9/10. Norris adjusters are tight, work well and the mouth adjustment is ingenious. The designers have spent a lot of time and it shows. One should also note that when mass manufacturing at a certain price point, some compromises must be reached.

Functionality


Plane Score Notes


Marcou 10/10

The mass of this plane helps in use. Full width sub-thou shavings can be achieved easily and with little effort. Once started, the mass of this plane is like a freight train, you are just pulled along for the ride. Your only job is to steer. However, keep the wax handy for the sole, this is a lot of plane to move. Tearout, zero.

This plane demonstrates the value of a bevel up for dealing with gnarly wood. Bedded at 20 degrees and with the blade ground to achieve a functional planing angle of 50 degrees, it laughs at figure, knots and reversing grain. As a practical experiment, it left a glossy finish going against the grain in gnarly cherry. Having a few blades around lets you plane at a conventional angle for tame woods and softwoods.

Sauer N/A

Unfortunately, the mouth was so tight that it was difficult to achieve anything other than dust and intermittent shavings at best. However it feels like it would be a flawless performer if the mouth was opened just a titch. I was also discouraged from opening up the mouth as a favour to Rob.

Holtey 9/10

Another prime contender for the fluffy shavings society. It also laughs at grain direction and leaves a primo surface.

Being lighter than the Marcou, more effort was expended in use however. One had to bear down more significantly to start the cut and through the cut. I am unsure as to whether this is due to the weight difference or a bevel-up vs. bevel down difference. I would love to try one of his infill planes to remove mass from the equation.

Bridge City N/A

Rob only let us look at these, not play with them

Woodies 7/10

For those who want to spend the time to build one, these little beauties come out above the baileys and just shy of the Vertias. Adjustment is an art (although when mastered, like riding a bicicle, it becomes second nature). The normal planing angle and their light weight make them less than stellar for difficult wood however. Tearout was nothing that a bit of quality time with a scraper would not fix. However, being made entirely of wood, it should be noted that these can prove to be cantankerous beasts as they can move in unpredictable ways when taken out of their environment. This can affect overall plane geometry which may give a user fits to address.

Stanley/Bailey 6/10

These planes are perfectly functional once well fettled. However, they are rather light, there is a fair amount of backlash in the depth adjustment and the lateral adjusters are useless. A marked improvement in quality when the blade and chipbreaker are upgraded to Hock or LV. This pretty well eliminates chatter. The fact remains however that they are bedded at a standard angle which is proven sub-optimal for difficult woods. Unless you are solely doing studio furniture with cantankerous woods, an old Bailey with an upgraded blade and chipbreaker will be perfectly suitable for 90% of your planing tasks. Tearout can be significant with difficult woods.

Veritas 8/10

The first thing to point out is how close this plane came to matching the Holtey and Marcou in performance at a fraction of the price. It is nothing short of outstanding. The Norris type adjuster works very well and the entire plane is well thought out. Mouth adjustment is brilliant. When properly sharpened, this plane leaves a beautiful finish although there can be some tearout in more difficult woods

Affordability


Please note that these prices are my approximations based on conversations and may no longer reflect reality.

Plane Cost Notes


Marcou 2,000

The most reasonably priced premium plane.

Sauer 6,000

Considering what Norris Jointers are fetching, not at all unreasonable.

Holtey 14,000

Price reflects reputation and craftsmanship… and is in British pounds

Bridge City N/A

No longer made.

Woodies 80

Brass or steel rod, solid stable stock and a plane iron. That plus a lot of sweat equity gets you one of these

Stanley/Bailey 150-200

Approximate price includes an old plane and a replacement blade and chipbreaker. Adjust upwards for a Bedrock plane. Significant sweat equity in fettling

Veritas 200

Out of the box, lap iron, sharpen iron and go. Best bang for your buck

Parting Thoughts


Bevel-up vs bevel-down:


Aesthetics aside, in difficult woods, a marked preference arose among the users for the bevel-up smoother by Marcou. The ease of changing planing angle by dropping a new blade in cannot be overstated. Lack of a chipbreaker removes one point of failure and/or frustration. As these have thicker irons, they are less prone to chatter. If the planing angle is the same, the nod goes to the bevel-down. As an interesting aside, the bed of the Marcou is 20 degrees vs 12 degrees for the Veritas. When one shoots for a high planing angle, a higher bed angle is beneficial.

Planing angle:


50 degrees for figured or difficult woods. No questions, enough said. The increase of effort is not significant enough to outweigh the benefits. 45 degrees for normal tasks. Lower for end grain

Mass:


Heavy is good. It keeps the plane from stalling and powers through the difficult cuts. The Marcou was a monster and gave us the best experience. Interestingly enough, no one in the group found the extra weight tiring or a burden however. I thing I will solder some led to my Veritas now :D

Which plane would I take home?


Cost notwithstanding, if offered my pick of any of these planes to take home as a user. I would pick the Marcou hands down. This is the best performing plane I have ever used, bar none. It feels and performs flawlessly. What is scary is that it is borderline affordable so the temptation is there!

Some thoughts on the Veritas:


Rob, if you are still with me here, playing with these planes as a group led to some consensus. The Veritas plane was surprisingly close to the primo planes in use. Kudos to your design team for producing such a fine plane at such a low price. Here is what we/I would change on it (or introduce at your hinted at primo plane line):

• Introduce more mass, I don’t know how much it would affect your production costs to make a more massive casting or otherwise add weight to the plane but count me in for buying it if you come up with it.

• Increase the bed angle. I am now 100% sold on the bevel-up benefits. However, unless planing end grain, I would rather have a higher bed angle… say 20 degrees?... Not only does this add some mass and stiffen the plane, it makes for more reasonable grinding and sharpening angles for the iron when one wants a ridiculously high attack angle. It is hard to quantify but that 20 degree bed just works better.

Couldn't figure out how to insert pictures so I will save them for later.

Thanks for your patience.

Guillaume in Ottawa

Re: Thanks to Rob Lee/An Informal Plane review (LONG)

#2

I don't know where to start

Bruce, a MN Galoot

In no particular order,

First, the drool factor. The closest I've come to any one of them is heavy fondling of one of Wayne Anderson's planes (and his don't take a back seat to anyone's). That was mega cool. But a whole room full of them? Uffda!

Second, yours was a mighty fine review. I've frequently wondered how the primo planes would fare against the others.

Third, that was an extremely strong endorsement of Rob's efforts.

It would have been interesting, though, to see how the Bridge City would stack up.

Re: Thanks to Rob Lee/An Informal Plane review (LONG)

#3

Re: Thanks to Rob Lee/An Informal Plane review (LO

Derek Cohen (in Perth, Australia)

Hi Guillaume

Out of interest, what were the cutting angles of the planes? Were they the same? It is difficult to draw conclusions if they were not.

50 degrees for figured or difficult woods. No questions, enough said. The increase of effort is not significant enough to outweigh the benefits. 45 degrees for normal tasks. Lower for end grain.

I would not consider 50 degrees to be a particularly high cutting angle. Certainly not for the interlocked grains I am used to working with. 60 degrees is more common.

I also do not find a significant difference between a 45 degree and 50 degree cutting angle. The next step up from 45 degrees that makes a noticeable difference is 55 degrees.

As an interesting aside, the bed of the Marcou is 20 degrees vs 12 degrees for the Veritas. When one shoots for a high planing angle, a higher bed angle is beneficial.

Yes, it makes more sense to have a higher bed with a BU plane dedicated to smoothing. In addition to the 20 degree of the Marcou, the Holtey is 22 1/2 degrees. I would argue for a 25 degree bed, and in fact I built a BU infill to this specification. This permits the blade to be hollow ground at an angle that is easy to freehand with a camber. I grind/hone mine at 35 degrees. The fact is, a dedicated smoother for difficult (interlocked) grain is more likely to be used at 55-60 degrees than at 45 degrees.

Regards from Perth

Derek

Re: Thanks to Rob Lee/An Informal Plane review (LONG)

#4

Re: Thanks to Rob Lee/An Informal Plane review (LO

Guillaume Dery

Hi Derek,

Been reading what you have to say for a while now. Much respect and admiration here so it means a lot to me that you bothered to read and reply. Let me preface that I am less far down the slippery slope than you are and consequently less proficient and technical. Also, this was a review of planes as provided and used and not meant to be a deep technical comparison (hence the informal part of the title). Those caveats aside, let me attempt to answer your questions.

Out of interest, what were the cutting angles of the planes? Were they the same? It is difficult to draw conclusions if they were not.

They varied between 45 and 55 depending on the plane in use. As these were as built configurations I thought it fair to compare the planes as they come. Also, although the BU planes like the Marcou can be easily made to a different planing angle by regrinding or swapping out the iron, this option wasn't available to us.

I would not consider 50 degrees to be a particularly high cutting angle. Certainly not for the interlocked grains I am used to working with. 60 degrees is more common.

I also do not find a significant difference between a 45 degree and 50 degree cutting angle. The next step up from 45 degrees that makes a noticeable difference is 55 degrees.

Agreed, although your difficult woods are significantly more difficult than what is native in North America. For my usage, I find that 50 degrees does make a marked difference over 45. Back to the as received configuration, I found that the Marcou with it's 50 degree planing angle performed at least as well as the Holtey with it's 55 degree planing angle (in the "tame by your standards" woods that we used). This is most probably helped by the mass of that plane. I would reserve 60 degrees for extremely difficult exotics as there is a marked difference in effort at that high an angle. This again, to me, points to the benefits of the BU configuration. I guess my statement should be amended to "at least 50 degrees".

I promise that if Rob ever lets us play with his Marcou again, I will procure some blades ground to different angles (I hear that he uses standard LV blades) and devote some space here to a comparison of planing angles on the same plane, thereby removing all other variables from the equation.

Yes, it makes more sense to have a higher bed with a BU plane dedicated to smoothing. In addition to the 20 degree of the Marcou, the Holtey is 22 1/2 degrees. I would argue for a 25 degree bed, and in fact I built a BU infill to this specification. This permits the blade to be hollow ground at an angle that is easy to freehand with a camber. I grind/hone mine at 35 degrees. The fact is, a dedicated smoother for difficult (interlocked) grain is more likely to be used at 55-60 degrees than at 45 degrees.

This makes total sense to me if one is dedicating the BU smoother to difficult woods. Rob, if you are reading this too, please note. However, I feel that the 20 degree is a good compromise bedding angle if one is going to have a single BU smoother. One can vary from low to high planing angles. I would be worried about edge friability if one were to try and grind a blade to achieve a low angle with a 25 degree bed.

I hope that answers your questions. I don't claim to have all the answers. Hell, I usually just try to generate the questions as I am always learning. Think of the informal plane review as personal observations.

And now for something completely different...

Here is a question I would like your thoughts on Derek:

All other factors being removed from the equation (such as room for the tote etc.), what do you think the ideal placement of the blade would be in relation to the sole? Instinctively, I would tend to think that it would be smack dab in the middle of the sole. I haven't any empirical evidence, just a gut feeling but apart from increased registration, I would think this configuration would be more ideal for flattening surfaces as it would ride the peaks and hollows better(sort of like an inverted planer with a fixed cutterhead). Unsure if any real benefits would be gained from evening out the mass distribution...

Thoughts appreciated (from anyone, not just Derek).

Cheers from the Ottawa valley,

Guillaume

Re: Thanks to Rob Lee/An Informal Plane review (LONG)

#5

Re: Thanks to Rob Lee/An Informal Plane review (LO

Rob Lee

Hi Guillaume and Derek -

Not a lot I can add here... you both have given a lot of consideration to what you've written...

We've given a lot of thought to dedicated HA smoothers, but are not going to do it within the B-UP line, as it just compromises the the basic design too much (reduces flexibility)...

We will be addressing it a different way.... ;)

Cheers -

Rob

(hoping for snow.... )

Re: Thanks to Rob Lee/An Informal Plane review (LONG)

#6

Blade location in plane sole

Steve Elliott

“. . . what do you think the ideal placement of the blade would be in relation to the sole? Instinctively, I would tend to think that it would be smack dab in the middle of the sole. I haven't any empirical evidence, just a gut feeling but apart from increased registration, I would think this configuration would be more ideal for flattening surfaces as it would ride the peaks and hollows better(sort of like an inverted planer with a fixed cutterhead).”

First, thanks for your review. I’ve only seen pictures of the high-end planes and was interested to get a user perspective.

On the placement of the blade in the sole, I believe Lee Valley has put the blade nearer the center of the sole in their bevel-up jointer, as compared to the Stanley jointer. This does increase its effectiveness for flattening.

For smoothing I strongly prefer a plane that doesn’t try to flatten the surface. I want it to ride the existing surface and refine it by .001” increments, not change its shape. My Ulmia wood-bodied smoother has 42% of its sole ahead of the blade and 58% behind it. I now use it when I want to flatten but not for smoothing. My infill smoother has 28% of the sole in front of the blade and it’s dramatically better at predictably skimming the surface.

I notice a difference between the 49 degree cutting angle of the Ulmia and the 45 degree angle of the infill. The Ulmia is the only bench plane blade I don’t add a small back bevel to when sharpening because I don’t want the increased effort to push the plane. Higher angle planing takes so much more effort I only use a high angle when other methods won’t do the trick. When needed, high angles are the most reliable solution, though.

Re: Thanks to Rob Lee/An Informal Plane review (LONG)

#7

Great review Guillaume, very well written


Re: Thanks to Rob Lee/An Informal Plane review (LONG)

#8

Blade location

Ian (in Sydney, Australia)

I'm not in a position to measure the percentage of the sole in front of or behind the blade on any of my planes right now.

However if the blade were smack in the middle of the sole, registration would be a toss-up between the surface in front of the blade and that behind. It might be diff

icult to be consistent stroke to stroke leading to some unexpected results.

When most of a plane's sole is behind the blade, registration is mostly on the freshly cut surface -- which should lead to consistency stroke to stroke.

Re: Thanks to Rob Lee/An Informal Plane review (LONG)

#9

Re: Thanks to Rob Lee/An Informal Plane review (LO *LINK*

Derek Cohen (in Perth, Australia)

This makes total sense to me if one is dedicating the BU smoother to difficult woods. Rob, if you are reading this too, please note. However, I feel that the 20 degree is a good compromise bedding angle if one is going to have a single BU smoother. One can vary from low to high planing angles. I would be worried about edge friability if one were to try and grind a blade to achieve a low angle with a 25 degree bed.

Hi Guillaume

Lots of interesting points in your last post - great for discussion!! Let's take the one above first.

Firstly, a 12 degree bed originates with the Stanley #164 and #62, which became the LN #164 and #62 and the Veritas LA Smoother and LA Jack, respectively. In other words, the 12 degree bed was a legacy of the Stanley planes, and at the time these planes were first released the idea of a high cutting angle had not been popularised. That was to come.

The idea of a high cutting angle for interlocked grain has been around a long time, but I think of the research, especially, of Lyn Mangiomelli in this regard.

http://www.woodcentral.com/bparticles/haspc.shtml

Lyn conducted some wonderful, objective evaluations, and his results emphasised the importance of cutting angles. I know that he was a large influence on my thinking, and took these ideas up when I began playing with BU planes several years ago:

http://www.woodcentral.com/cgi-bin/readarticle.pl?dir=handtools&file=articles_461.shtml

The other influence in high cutting angles is Terry Gordon (HNT Gordon planes), who chose his bedding angle (of 60 degrees) for Australian woodworkers.

Now I agree with you that many of my conclusions are not only based upon experiences with Australian hardwoods, but that the comparisons with North American (and other) hardwoods is probably unfair. However look at this another way - the local Aussie hardwoods take the tools to their limits, and many want to know this for times when they will work equally difficult grain.

So the issue then becomes 'how do we achieve a high cutting angle on a low angle (12 degree) BU plane?' The answer is 'with some relative difficulty compared with BD planes'. Question: What is difficult about this? Answer: the acute angles needed to increase 12 degrees to 55/60 degrees (and greater) are difficult to do freehand and the thick steel on a flat high angled bevel is difficult to camber. Solution: use a honing guide to create a high secondary angle (e.g. 50 degrees) on a low primary bevel (e.g. 25 degrees), and add your camber at this stage since there is now less metal to remove.

We get past one obstacle to be faced with another, the dreaded "wear bevel" on the back of the blade. :( This is stated (not yet proven) to occur more easily on low bed angles. To be blunt, I have yet to experience the incursion of a wear bevel, and I have a lot of time on BU planes. Still, it is an argument of the anti-BU plane brigade, and one that must be taken seriously.

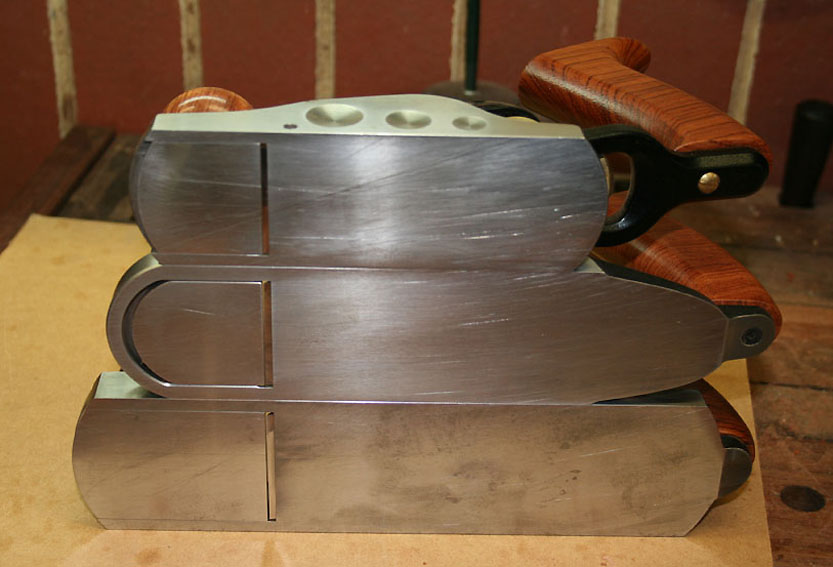
I want to kill two birds with one stone: avoid the necessity of a honing guide and prevent the possible incursion of a wear bevel. The solution is to raise the bed angle of the BU smoother.

If the bed angle is 20 degrees, a 25 degree primary bevel will put the cutting angle of the plane in the Common range (45 degrees). This has all the advantages of a BD plane (longer blade life) with all the advantages of the BU plane (easier set up and adjustments).

But we could take it all a step further. If we are considering dedicated smoothers, with a cutting angle between 50-60 degrees, then a 25 degree bed is even better (lower bevel angles and easier honing, and even less risk of an intrusive wear bevel).

I decided to test out the latter, and built this plane ...


It is a fantastic performer, lacking only the authority of a Marcou (since it was built from a Stanley #3).

This takes us to the question you raised about placement of the mouth on a smoother.

Here is a question I would like your thoughts on Derek:

All other factors being removed from the equation (such as room for the tote etc.), what do you think the ideal placement of the blade would be in relation to the sole? Instinctively, I would tend to think that it would be smack dab in the middle of the sole. I haven't any empirical evidence, just a gut feeling but apart from increased registration, I would think this configuration would be more ideal for flattening surfaces as it would ride the peaks and hollows better(sort of like an inverted planer with a fixed cutterhead). Unsure if any real benefits would be gained from evening out the mass distribution...

I think that Steve's answer was perfect.

With a smoother, we want to remove as little waste as possible. A smoother is not intended to flatten a board, rather to follow the topography of the surface. By moving the mouth back on a plane, the effective length is increased. Look at the Veritas BU Jointer. It is 22" long, the same as a #7. Yet it has the same registration in front of the mouth as the 24" long #8 as the mouth has been moved back 2".

Traditional coffin smoothers run between 6" - 7 1/2". Smaller is better for smoothing in my opinion. I think the Marcou in question is an amazing plane, but it almost defies categorisation owing to its length of 11". It will smooth any surface, but it feels large.

Consider the new Veritas Small BU Smoother (SBUS). Prior to its release I recall Rob mentioning that his favourite smoother was the LA Block Plane (LABP) with handle attachment. This converted the block plane into a "#3". (Actually, I think the length is closer to a #2, but anyway ..). I have this plane and it is in my travelling kit. There was something I did not like about this combination ... and when the SBUS was released I could identify what it was - there was too little registration at the mouth of the LABP when used with the handle, since this placed greater force over the mouth and made it tippy. Pulling the mouth back on this combination (not possible) would help. This is what we have with the SBUS. Perfectly balanced now ...

The LA Block plane on top, followed by the SBU and LAS.


OK, I think that I have waffled on too long. Everyone has very likely gone to sleep.

Regards from Perth

Derek


Review of the Marcou smoother (2006)

Re: Thanks to Rob Lee/An Informal Plane review (LONG)

#10

Question....sharpening

Bill Tindall

Details of how Brian sharpened would be of interest.

Re: Thanks to Rob Lee/An Informal Plane review (LONG)

#11

Re: Thanks to Rob Lee/An Informal Plane review (LO

Pam Niedermayer

That SBUS looks to have the makings of a great plane.

Pam

Re: Thanks to Rob Lee/An Informal Plane review (LONG)

#12

Difficult woods

Warren in Lancaster, PA

Here is an advertisement I read in 1973.


Fortunately, I believed that 18th century workers knew more about planes than 20th (or 21st) century workers. I have used double-iron'd planes for "difficult" woods ever since. Planing in the 40 to 45 degree range will leave a finer surface than planing at high angles, and will also result in much less abuse to the edge of the iron.

Re: Thanks to Rob Lee/An Informal Plane review (LONG)

#13

Re: Difficult woods

Pam Niedermayer

That's proved true for my Japanese planes, too; although I seldom have to use a second edge. However, I haven't run into much jarrah in Texas.

Pam

Re: Thanks to Rob Lee/An Informal Plane review (LONG)

#14

Re: Question....sharpening

Guillaume Dery

I will answer this reply first since Derek's reply and the other replies regarding blade location require some thought and analysis so I can reply in a semi-intelligent fashion :D

I believe that Brian lurks here occasionally so if he is around, I hope he will step up to answer and/or correct any innacurate statements on my part.

First things first. Brian specifically stated that the blades were only honed and that the geometry of the blade was preserved as shipped. Therefore, grind angles were definitely preserved but blades which were sharpened straight across were honed that way. i.e. cambers were preserved where present.

There is probably 2 reasons for this:

1. We really didn't want to mess with Rob's collection

2. When it comes to the premium planes, we get to use them as the manufacturer intended and built it. This makes a fair basis for comparison. At the price of these toys...errr...tools, one must assume that all the details have been figured out.

Although no specific mention was made, I believe that the backs were lapped on all these planes prior to Sharpening (I don't think Brian lapped the backs, just polished and removed the wire edge on the finest stone).

Now to stones and method. Brian is a waterstone and freehand guy. That being said, he is more consistent and repeatable freehand than most people who use a jig. I guess setting up all the sharp toys for LV road shows pays off in the long run. He once told me an estimate of how many blades he had sharpened in a year and I remember thinking it was more than I would probably do in a lifetime.

I believe that Brian has switched over to the Bester stones. At any rate he raves about them. Stone progression was 1000, 4000, 8000 followed by a final hone with the green compound (.5 microns) on a flat maple block. No back bevel on any of the bevel down irons.

Hope that answers the question. let me know if not and I will attempt to clarify or try and strong-arm Brian into clarification.

Cheers,

Guillaume

Re: Thanks to Rob Lee/An Informal Plane review (LONG)

#15

Re: Difficult woods

david weaver

It is an advertisement to sell planes that are priced higher than single-iron or toothed planes, right?

Re: Thanks to Rob Lee/An Informal Plane review (LONG)

#16

Re: Difficult woods

Warren in Lancaster, PA

I can assure you, Pam, that if you can handle planing quarter sawn cherry, (Prunus serotina), and Osage orange, (Maclura pomifera), both of which can be found growing in Texas and Pennsylvania, you can easily handle jarrah as well.

Re: Thanks to Rob Lee/An Informal Plane review (LONG)

#17

Re: Question....sharpening

Brian Greene

Thanks Bill for the question. I'll pick up where Guillaume left off.

I used 700 (17 mic), 2000 (6.7 mic) and 8000 (1.2 mic) Bester/Imanishi stones.

Two of the blades had been previously used and cambered. I matched the existing shape as best I could. One was 25-ish and the other 30-ish degrees as I recall. One had not been used so I cambered it using the five point method (10-7-3-7-10) on all three stones.

Stones were lapped (drywall screen on plate glass on a corian work surface). All work is freehand. The typical stroke is a figure-eight but for cambered irons I usually do straight strokes.

As Guillaume pointed out I always start with a bit of 8000 polish when I sharpen to eliminate any issues that might be lurking. One blade was new so it received a bit more polishing. I always test that a blade has been lapped properly. No issues were noted.

I usually check a previously enjoyed blade to determine what it needs. Not every tool always gets the full treatment. It's not efficient. If only a touch-up is required, a couple of licks on the 8000 followed by a stroping is all that I do. Less than 1 minute.

In this case two of the blades were taken back to 2000. I raised a consistent burr all across the back, polished it off on the 8000 and then proceded to the 8000 stone and did the same thing.

When cambering it is important to check for consistency. I do this on my thumbnail. A little roughness may occur in the transitions between finger pressure points.

For the third blade, I stated at 700, shaped the camber as noted and checked for a strong consistent burr. Repeated on 2000 and 8000 as above.

All three irons are now in the same condition.

The 8000 stone was now re-lapped and dressed with nagura to create a dryish slurry then lightly spritzed with water. The iron is now gently stroked three times, pulled only with a weight shift from side to side, and de-burred after each stroke. (front-back-front-back-front-back).

I finished with a single, pulled stropping stroke on a maple block with honing compound (0.5 mic), shifting weight from side to side, followed by a vigorous buffing on the back to bring up the shine a bit and remove any burrs.

I re-checked my work carefully.

I probably spent about five minutes per iron. This is 2-3 three times longer than I would normally spend unless there is a problem or the back of a blade needs more lapping. I took my time because these were special tools I was setting up.

Before someone asks, I never do the ruler thing. I think it's a waste of time with lapped blades in this league. Also, I prefer to see the polish and I want to know that a blade is flat. I would only do the ruler thing with an older plane iron that is causing problems.

I should also note that I'm not looking to chase away every last scratch. I want a good polish, not necessarily a perfect polish, and consistent burrs. Any more than that, in my opinion, is counterproductive in a practical sense.

Re: Thanks to Rob Lee/An Informal Plane review (LONG)

#18

Re: Difficult woods

Warren in Lancaster, PA

David, I mentioned that it was an advertisement. I assume they cost more than single iron planes. I have assumed that 18th century planemakers and their customers were more knowledgeable than 21st century amateurs. This assumption has reaped rewards.

Look at the Dominy collection of planes. They made well over a hundred planes for their own use continuously from 1765 to at least 1815. In 1790 they changed to making double iron planes. Are you thinking that they were stupid?

Re: Thanks to Rob Lee/An Informal Plane review (LONG)

#19

Re: Difficult woods

david weaver

Warren, you're reaching some. I understand how and why double iron planes work. In every book that I have where there is a price list, they are considerably more expensive - you do not need to make an assumption about that.

For someone who wants to have the minimal number of tools, and tools that are not expensive to produce, then I think they are the answer.

I do not believe that they are materially superior to a collection of single iron planes.

I also think there are other factors that contribute to them being in planes, other than breaking chips. For example, in modern bench planes, it allows you to have a thin iron that is easy to sharpen with the slower stones that most people used. A single thin iron without the support of the second iron wouldn't work as well.

I do not see a lot of evidence in older planes that they were universally used in a way that would improve surfaces, especially in old woodies. For example, the irons of large planes quite often come with a lot of camber and a bevel that suggests they were sharpened and ground freehand entirely. The second iron, however, does not follow the camber. What does it do in the cut other than stabilize the iron?

Also, few of the smoothers that I've accumulated have a second iron that is in good enough shape to be close enough to the edge to actually break chips. Perhaps someone at some point had tuned the edge of the second iron to allow it to, but it's apparent that quite a lot of use of the plane was done without being able to effectively use the second iron to break chips. If the second iron on a smoother has to be set back a 16th of an inch, it does nothing other than add mass to the iron assembly.

I also don't necessarily believe that everyone had the same idea about the biggest benefit of the second iron, because some of the texts that I have accumulated mention a second iron and describe how effective it is at ejecting chips from the plane without mentining any improvement in performance in regard to tearout.

I do not read as much very old text as you do, so perhaps I've missed the many places that plainly state that the main point of the second iron was to improve the surface in regard to tearout and leave it with more shine.

One separate aside, also, it takes me about half as long to sharpen and reset a single iron plane as a double. My planes with a 55 degree iron don't take twice as long to sharpen. I don't think the edge issue really amounts to much at least until you get to 60 degrees, and even at that, the issue of iron economy itself is more just that - parsimony in iron use - something I don't care a lot about. I care more about the cost of lumber and finishing supplies.

Re: Thanks to Rob Lee/An Informal Plane review (LONG)

#20

I enjoy these discussions quite a lot, btw.


Re: Thanks to Rob Lee/An Informal Plane review (LONG)

#21

Well OK, that sure makes me feel good.  Thanks.


Re: Thanks to Rob Lee/An Informal Plane review (LONG)

#22

Re: Difficult woods

Pam Niedermayer

According to Inomoto-san and Harrelson, the sub blade is used when having difficulty with tear out and the like. Same with a plane landing. I've gone this way on some white oak on occasion.

Pam

Re: Thanks to Rob Lee/An Informal Plane review (LONG)

#23

Re: Thanks to Rob Lee/An Informal Plane review (LO

John Wilson

Here are some photos of the planes we all enjoyed and Guillaume wrote about.


John.

Re: Thanks to Rob Lee/An Informal Plane review (LONG)

#24

Re: Thanks to Rob Lee/An Informal Plane review (LO

Guillaume Dery

Hey Derek, took me a bit to analyze and think about your last post and go through the reference material you linked in. A bit of good news somewhat shell-shocked and sidetracked me as well. I love these discussions BTW... plane geeks of the world unite :)

First off, having read your reference material, it is interesting how all of us seem to have come to pretty much the same conclusions on plane rankings... Nice to see I am not totally out to lunch (or if I am, I am in good company).

I was also intrigued by Rob's reply. Good that LV is looking into the HA smoother. Perhaps not so good that they are not going the BU route. Extensive playing seems to tell me that this is the preferable plane configuration. That being said, Veritas has always done good product so we shall have to wait and see and do a critique when it comes out (hint to Rob: If you need testers for pre-production testing...I am sure you can find a few volunteers around here).

Having digested Lyn's article and your reviews, let's just say that I believe in HA as well, just adjusting the definition of high for usage. Once I get the shop set up, I will break out my LA LV and play with different angles just so I can bore the board members with an analysis of angles on the same plane, thereby removing other variables. In principle and by experience, I fully agree with you however (except for the fact that I find there is a considerable difference between 50 and 45 degrees). I realize that this will duplicate some work by Lyn (great read that was BTW) but I intend to concentrate solely on angles with a single plane so the take is a bit difference.

So the issue then becomes 'how do we achieve a high cutting angle on a low angle (12 degree) BU plane?' The answer is 'with some relative difficulty compared with BD planes'.

Agreed, almost more trouble than it's worth. This is why I was arguing in favour of the 20 degree bed. A 35 degree (I really need to find the keyboard shortcut for the degree symbol. This will save a lot of typing in these discussions) grind will give you a cutting angle of 55. Not quite your preferred 60 degrees but a reasonably high angle. Conversely, a 20 degree grind will give you a low 40 degrees for end grain.

Actually, you know, as I type this, I just changed my mind. Let's say that the ideal configuration is 2 BU planes, one with the traditional 12 degree bed strictly for low angles (end grain work) and one with 25 degrees for normal to high angles. OK, color me convinced. The variance between low angle and ultra high angles is too much to accomplish with one plane without introducing significant compromises.

We get past one obstacle to be faced with another, the dreaded "wear bevel" on the back of the blade. :( This is stated (not yet proven) to occur more easily on low bed angles. To be blunt, I have yet to experience the incursion of a wear bevel, and I have a lot of time on BU planes. Still, it is an argument of the anti-BU plane brigade, and one that must be taken seriously.

I want to kill two birds with one stone: avoid the necessity of a honing guide and prevent the possible incursion of a wear bevel. The solution is to raise the bed angle of the BU smoother.

I am not buying into the wear bevel and like you have yet to see it. It would be interesting if Brian is still reading this thread if he could pipe up on whether he has ever experienced it. He has put a lot of mileage on many planes and I pay a lot of attention to what he has to say (his sharpening seminar he held for our handplane SIG was eye-opening and although it was geared towards our handtool newbies, it was still a learning opportunity for me).

As stated above, I agree with you now on the 25 degree bed if you want to take your planing angles up to 60 degrees. Obviously this really increases the effort involved in planing however and I would reserve that for the most cantankerous exotics. In my experience 50 degrees gets you most of the way and 55 will handle anything that I have worked with so far.

Other side question, what is your issue with honing guides? I notice that you wanted to avoid them in your reply. I have no issues with them either way. Freehand is faster but the guide gives you consistency and repeatability.

That little smoother you built is a very sweet looking plane. Any reason the sacrificial plane was a #3 rather than a #4? I am only asking as we seem to be in agreement on the benefits of mass and naturally a #3 base will be lighter than a #4 base.

Reading through the material you linked in, I twigged to the email exchange between yourself and Rob in which he states that he agrees that their handles are not the prettiest but were designed for the ergonomics of planing in the modern era.

I quote:

"The plane handle design evolved from an ergonomic assessment of bench heights, grip, and application of force along an axis in-line with the blade" One's hand has numerous pressure points that can lead to fatigue (mostly in the palm). A more curved handle that fits the hand better (with a loose grip) isn't necessarily the best shape for prolonged or intense use. In addition, it isn't as comfortable when one skews the plane. Believe me—I, too, much prefer the look of the older Stanley handles...but they were designed in another era, when hands were smaller, and benches were generally lower, and ergonomics was more Darwinism than science. For us, a more upright handle made better sense, and in prolonged use was more comfortable."

In two places Rob mentions the bench heights as being higher nowadays and that their handles were designed for these ergonomics. I tend to prefer a lower bench for planing so that the upper body does more work than the arms and bearing down on the planes is easier. This raises two questions for me:

- Is there a negative ergonomic/usage impact from a lower bench as the totes were designed to be used from a higher angle. In other words, would introducing more forward curvature to the tote prove beneficial.

- Bearing in mind that the reality is that LV planes are mass-produced, designed to work for the masses and must meet a certain cost/price point in order to be profitable, were there some compromises in design which compromised the plane's functionality. Let me be clear, I think they are great planes and performers. I am just wondering if there was a certain amount of de-tuning done for broader market appeal. Obviously this is based on the premise that a lower bench than what is the current norm is more ideal for planing and that current bench heights are more inline with machining operations. If one rejects this premise, then the question is moot.

Now to mouth placement. I realize that the thread is smoother based. I should have prefaced my question as a general question. This was more of an across all bench planes question.

With a smoother, we want to remove as little waste as possible. A smoother is not intended to flatten a board, rather to follow the topography of the surface. By moving the mouth back on a plane, the effective length is increased. Look at the Veritas BU jointer. It is 22" long, the same as a #7. Yet it has the same registration in front of the mouth as the 24" long #8 as the mouth has been moved back 2".

I agree with the removing as little waste as possible. However, I believe that a distinction needs to be made here. Yes, other longer planes are used to flatten. However, all bench planes, in my opinion, are used to create and refine flat surfaces. Therefore for me, the smoother is used to to the final prep on a flat surface. If following the topography or increasing the effective length makes a difference, I would rather improve the flat (either through the smoother or by going back to my larger planes) than create or worsen a hollow.

Also, on the subject of registration, physics and gut feel tell the most important registration is at the beginning of the cut and therefore at the front of the plane. After that, it is really about 3 point registration (heel, toe, mouth). Mouth placement would only affect how high a peak would be planed off based on the intersection points between the board hollows and troughs and the plane's heel and toe.

I will leave this off for now as I really need to sketch it out to explain myself properly. I hope you are getting the gist of my muddled explanation however.

Traditional coffin smoothers run between 6" - 7 1/2". Smaller is better for smoothing in my opinion. I think the Marcou in question is an amazing plane, but it almost defies categorisation owing to its length of 11". It will smooth any surface, but it feels large.

That is interesting. Could you elaborate on why you believe that smaller is better for smoothers? I am very curious and interested on that point.

Consider the new Veritas Small BU Smoother (SBUS). Prior to its release I recall Rob mentioning that his favourite smoother was the LA Block Plane (LABP) with handle attachment. This converted the block plane into a "#3". (Actually, I think the length is closer to a #2, but anyway ..). I have this plane and it is in my travelling kit. There was something I did not like about this combination ... and when the SBUS was released I could identify what it was - there was too little registration at the mouth of the LABP when used with the handle, since this placed greater force over the mouth and made it tippy. Pulling the mouth back on this combination (not possible) would help. This is what we have with the SBUS. Perfectly balanced now ...

Aha! Thank you. I couldn't quite put my finger on it but there was something I did not like about that setup. I love that block plane and it is a staple in my arsenal. However, after playing with it for quite a while, I removed the conversion kit and went back to using it as a block plane. Much happier now. (Side note, thanks to LV who replaced the bits that I had removed for the conversion and then put away in a safe place and obviously never found again. Them doing it at no charge was a very pleasant surprise)

I am enjoying this exchange tremendously, however, I will sign off for now as I have a tendency to ramble on....

Cheers from Ottawa,

Guillaume

Re: Thanks to Rob Lee/An Informal Plane review (LONG)

#25

Re: Blade location in plane sole

Guillaume Dery

Hi Steve, sorry it took me a while to respond. I wanted to think on this for a bit and digest the reference info Derek had thrown at me and I am a somewhat ponderous thinker.

For smoothing I strongly prefer a plane that doesn’t try to flatten the surface. I want it to ride the existing surface and refine it by .001” increments, not change its shape. My Ulmia wood-bodied smoother has 42% of its sole ahead of the blade and 58% behind it. I now use it when I want to flatten but not for smoothing. My infill smoother has 28% of the sole in front of the blade and it’s dramatically better at predictably skimming the surface.

Interesting. I haven't really played with a smoother that has a more centered blade yet. This was a purely theoretical general question on my part.This was all in my head. Philosophically, as per my reply to Derek, I tend to think of the use of any bench plane as an exercise in creating and refining flat surfaces. Flat being the key word. Based on what you have to say, I will have to take the theory out of my head and do some real world experimentation.

So the take away is that for flattening, a more centered mouth is definitely beneficial. No that being said, if one already has a flat surface, should mouth placement make much of a difference in a smoother apart from initial registration? I will bow to your real world experience and earmark this for future experimentation on my part.

I notice a difference between the 49 degree cutting angle of the Ulmia and the 45 degree angle of the infill. The Ulmia is the only bench plane blade I don’t add a small back bevel to when sharpening because I don’t want the increased effort to push the plane. Higher angle planing takes so much more effort I only use a high angle when other methods won’t do the trick. When needed, high angles are the most reliable solution, though.

Agreed, I find there is a significant difference between 45 and 50 (or 49 in your case) and that 50 definitely helps with difficult figured woods. I believe, based on these discussions, that there may be some benefit to creating a handy-dandy reference chart after some experimentation just to show the best angle by wood type/figure. We can leave the nasty stuff part of the chart for Derek to complete :D

Cheers,

Guillaume