Home Articles Forums Gallery Marketplace Videos

WoodCentral Forums

Knowledge You Can Build On — Est. 1998

This $39 jig will make you a WOODWORKING GOD!

Hinge Morticing

Posts

Re: Hinge Morticing

#26

Fiddliness of the mortise plane

Bill Houghton, Sebastopol, CA

>I have seen pictures of the LN plane, but never held one in my hand, much less used one. I am struck by the difference between the cutting iron width (3/4") and body width (1-1/2"). Granted, mine is 3/4" wider than the cutting iron, too; but it's almost all sidewall. I doubt the LN plane has 3/8" thick sides, so there seems to be a lot of room for cutting iron wiggle. I can see that getting the iron set to the right depth AND straight when you've got nothing to assist you would be hard. A good application for some lateral-motion-limiting setscrews.

I don't find mine particularly fiddly to set; I think the limited lateral motion available helps in that.

Were I making another one, I'd probably grind down a 4" powered jointer blade, or a cutoff from a planer blade, or similar, rather than cutting up a Stanley-type iron - given how much the cutting iron hangs out beyond the body, extra stiffness would be good.

Another comment: LN recommends creeping up on the final depth with successively deeper settings. I don't find this necessary; I set to full depth, and use the sole of the plane as a "fence." When the iron stops cutting, I know I've reached full depth, but, in the meantime, the heel of the plane isn't in contact with the wood during much of the cutting.

Re: Hinge Morticing

#27

Re: Mortising of hinges

Pam Niedermayer, Austin, TX

>Andrew, what does feathered mean, exactly? I see in the book you referenced that there is a "feathering" step, but that appears to be a standard way to remove wood with chisels. And you say it's used with heavy doors. Does that mean the base for the hinge is somehow off level?

Pam

Re: Hinge Morticing

#28

Re: Fiddliness of the mortise plane

Pam Niedermayer, Austin, TX

>So the main thing the plane provides is a preset depth stop? It sounds like you're essentially using it as a chisel until it gets close to bottom.

So what are the main problems doing hinges? 1) Tear out, especially on the ends; 2) Mortise depth; and 3) Various set up problems such as placement. The BM and router planes do depth and could help avoid some of the tear out, so yeah, I can see how it might be faster to use a plane instead checking the depth by inserting the hinge multiple times.

Seems that Derek may have the better method with the router plane in that he doesn't have to reset it multiple times (he's using it at the end) and you both can preset the depth for multiple hinges.

Pam

Re: Hinge Morticing

#29

Re: Fiddliness of the mortise plane

Bill Houghton, Sebastopol, CA

>I don't reset the depth, either - LN recommends this, but I haven't found it necessary.

Lots of roads up the mountain; all of the good ones reach the peak.

Incidentally, within reason, I'm not sure that there's anything wrong with a little tearout in a mortise that will be entirely out of sight. Great, heaping bunches, sure, that's a problem; but minor tearout that won't affect hinge solidity, not so sure.

Re: Hinge Morticing

#30

Feathered hinge mounting

Bill Houghton, Sebastopol, CA

>Andrew,

A Google search on the phrase you suggested offered me all kinds of useful websites for the mounting of artwork using paper hinges; not so much on our discussion. Can you elaborate or offer a website with a direct link?

Bill

Re: Hinge Morticing

#31

Re: Feathered hinge mounting

Andrew F in Australia

>Hi Bill,

See link at bottom of the original post, currently writing answers to Derek and Pam - let me know if it didn't work for you.

Cheers,

Andrew

Re: Hinge Morticing

#32

oops - link *LINK*

Andrew F in Australia

>bottom of my original post


link again

Re: Hinge Morticing

#33

Re: Mortising of hinges - Pam and Derek response

Andrew F in Australia

>HI Pam,

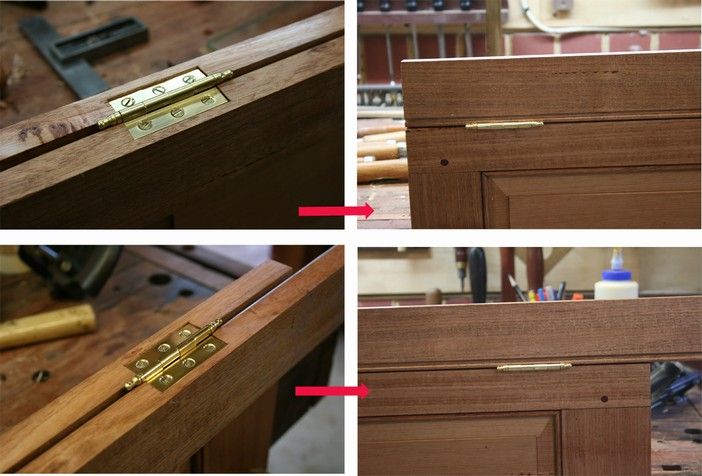
The 'feathering' term I think refers to the hinge recess, which feathers out to zero depth at the edge of the pilaster/carcase side. [feather = trade terminology for something which gradually decreases in thickness to zero - ie: 'feathers out,' 'feathered edge,' 'slip feathers,' etc...]. Yes, the bottom of the hinge recesses are not parallel to either the edge of the door hinging stile or the carcase side.

Derek,

It's standard (professional) trade training in our system, which, as you alluded to, comes from the English traditions. It's not commonly known or referenced, as it requires a bit of skill with tools that wouldn't be usually presented in a DIY book.

Having said this, feathering in of a hinge is also *really* esoteric and hardly used.

It's one of the subtleties in higher end work.

The way I was trained is that, normally, the hinge recess is cut into the door and the pilaster/carcase side are not touched. By doing this, the visual line of the carcase inside line is not interrupted.

This means that the hinge recess is set deeper into the door to compensate for the lack of recess in the opposing carcase side/pilaster.

Similarly, feathering in a hinge produces the same result, no disruption to the visual line of the carcase.

Regarding 'questioning of the essential methodology,' no I'm not. There's many ways to get to Rome, and the end result in your case looks perfectly fine.

You just asked: "if others do it differently, and if so, how?"

I'd suggest that perhaps, the method you've used has been transposed from the method used in carpentry to hang a door (in this case, it is the only acceptable way to hang it, by the way.) Over time, the books and authors have referenced each other to a point where alot of DIY books show this as the accepted 'how-to.' Just pure supposition on my part.

Cheers,

Andrew

[Edit to correct typo, at Andrew's request - moderator]

Re: Hinge Morticing

#34

Jack Guzman from Maine

feathering hinges

Jack Guzman from Maine

>In Joyce's Woodworking Encyclopedia,in a section on hanging cabinet doors they describe mortising hinges in this manner.---Jack

Re: Hinge Morticing

#35

This is how I do it as well...

Scott Burr in Ben Lomond CA

>One nice thing about is your always working with the grain of the wood. Another is you won't blow out the thin strip of wood left at the edge of the hinge. Mark the hinge by knife, set the planes depth and go to town. Thick quality hinges like Brasso (sp) you might want to do in two passes with the plane. That depends on the type of wood also.

Happy New Year!

Re: Hinge Morticing

#36

Re: Mortising of hinges - Pam and Derek response

Pam Niedermayer, Austin, TX

>Thanks, Andrew. If you feather the carcass mount do you also do a reciprocal feather in the door mount?

Pam

Re: Hinge Morticing

#37

Re: Mortising of hinges - Pam and Derek response

Andrew F in Australia

>HI Pam,

Yes, the hinge plates are parallel when the door is closed. The link I gave Bill below pretty well summarises installation.

Happy 2010

Andrew

Re: Hinge Morticing

#38

Another link for "hinge feathering"  *LINK*

Derek Cohen (in Perth, Australia)

>I was given this link to a pdf on using a butt mortice gauge, and in it there are some detailed drawings and descriptions of hinge setting, including "feathering".

I want to take this opportunity also to thank all for their contributions. I plan to summarise all the helpful tips and put them together in one article.

Lastly, here are the hinges of the second door of the armoire. I must go and find some substitute screws. These really are just beyond terrible!


Regards from Perth

Derek


Three-Dimensional Hinge Gauge

Re: Hinge Morticing

#39

Link?

Bill Houghton, Sebastopol, CA

>Derek,

the link you offered goes to an Australian woodworking forum discussion, paralleling our discussion here. Are the instructions for the gauge in there?

Bill

Re: Hinge Morticing

#40

Link - trying again... *LINK*

Derek Cohen (in Perth, Australia)

>Hi Bill

I will try again to upload the pdf file. I have not done this before, and my previous link took you to the discussion where this link was posted. You would find it there, eventually. Easier if I can upload it myself. Let's try again ...

Regards from Perth

Derek


Three-Dimensional Hinge Gauge

Re: Hinge Morticing

#41

Re: Link - trying again...and working just fine *LINK*

Bill Houghton, Sebastopol, CA

>Thanks, Derek - I missed that reference in the discussion you had linked before.

That's a good discussion of feathered hinge mounting, with clear explanations of why one would do it that way. I particularly liked the attention to the location of the hinge barrel as it affects opening of the door and thus access to drawers (and, presumably, adjustable shelves) behind the doors.

The "three-dimension hinge gauge" described is similar to the Stanley 94 and 95 gauges, with the significant difference that the Stanley 94/95 puts two of its cutters on the same rod. This limits flexibility; however, it does provide a self-setting feature for the two cutters, helpful with architectural hinges, where clearance from the doorstops is important. I've attached a link to Stan Faullin's helpful list of instruction sheets, with the sheet for the 95 gauge down quite a ways (I have no idea how to attach a PDF download link on my Mac - the internet address isn't visible when I complete the download). In the States, Stanley 95s appear on eBay pretty well constantly, and seem to go for low prices; my two (one of which now belongs to my son) came to me from garage sales, at about $1 each. I don't know how frequently they appear in other parts of the world.

The 95 is optimized for architectural hinges, as evidenced by the instruction sheet; I don't know whether it work with cabinet hinges.


Scroll down quite a ways to find the instructions

Re: Hinge Morticing

#42

Re: Mortising of hinges - Pam and Derek response

Pam Niedermayer, Austin, TX

>Thanks, I read that before asking the question (redid the search), which was why I asked the "feathering" question.

Pam

Re: Hinge Morticing

#43

I use a different marking method.....

Bill Tindall

>With much family visiting for the holidays it took me a while to study this post.

With no formal training in this task I developed the following only to find this same approach appears to be what is done in the Krenov school, and likely elsewhere. The one operation I can reliably do as well as any one is tightly fit a hinge, so I am satisfied with the approach I use.

I have never fit a door so small that I didn't find mortising frame and door to be the preferred approach. If nothing else, it looks better. The mortises of a well done door will hold itself in place without screws and this is the standard I strive for. The other standard is that the hinge should "snap" into the mortise with a secure press fit.

Step 1 With a fine file lightly chamfer the bottom edge of the hinge plates. This will slightly inset the scribe lines to follow.

Step 2 Temporarily "fix" the hinge in place and scribe around it with the marking knife. The fix can be simply holding in place with a thumb or finger or depending I may fix with cyanoacrylate glue (which shears off easily after marking), or with the aid of a stop block for simple barrel hinges where I want the barrel partially buried in the frame. I would be interested in learning why you use a marking gauge for scribing the hinge outline instead of using the hinge itself.

Remainder: If I have many hinges to do a trim router will be used to remove most of the waste, or if I have a few it will be with just a chisel as Warren described. I don't see the need for specialized mortise waste removing tools.

I use Vix bits and they always work well for me if the drill is perfectly perpendicular to the wood (otherwise they drill off center). I have not had reliable success drilling centered holes with twist drills as they tend to follow grain density variations and track off center on occasion. I would like to know more how you avoid this problem.

I temporarily install hinges with a shorter steel screw if a temporary installation is required. Final installation will be with brass screws from Whitechapel, the only place I have found that sells quality brass screws now days. All the slots will be aligned perpendicular to the frame length.

Re: Hinge Morticing

#44

Re: Link - trying again...and working just fine

Pam Niedermayer, Austin, TX

>To get the pdf link, hold down the control key and click and hold. At that point you have several options, such as copy link.

Pam

Re: Hinge Morticing

#45

Re: I use a different marking method.....

Pam Niedermayer, Austin, TX

>I like the sounds of "lightly chamfering the bottom edge of the hinge plates." Will give that a try along with feathering.

Pam

Re: Hinge Morticing

#46

a comment on feathered installation

Bill Tindall

>If I understand this discussion correctly this is what someone local does on their cabinetry. My eye is so used to the look of the typical way of installing hinges that I find the feathered look strange and, hence, unattractive. For anyone considering using this installation, my suggestion would be to experiment with this type of installation before jumping on it for your next project. I will admit that my tastes sometimes push the 3 sigma limit but maybe someone else out there would not prefer this look either.

Re: Hinge Morticing

#47

Does anyone know whether the 'feathered hinge'

Wiley Horne--So. Calif.

>method was typical in Period furniture (British or American or ____)?

I'm curious whether this is a method of long-standing, or a late 19th-20th century innovation.

Wiley....who agrees with Bill but is in no position to argue with Ernest Joyce

Re: Hinge Morticing

#48

Re: Mortising of hinges - Pam and Derek response

Sgian Dubh

>Andrew, I think this sketch below is similar to your description. I most commonly make the cut-outs equal in the stile and carcass similar to the method shown by Derek, although I suspect my methodology of excavating the cut-outs or mortice is more efficient-- it usually takes about five minutes per hinge leaf from marking to finishing the excavations.

Sometimes I angle the hinge with the carcase leaf set into a diminishing mortice so that the knuckle on that part of the hinge sits flush with the outside edge of the door stile. This means also taking a diminishing cut on the door stile to accommodate the double hinge thickness at the outer face of the door. On other rare occasions I've reversed the cut-out orientation. The main reason for these alternative fitting methods are to change the throw of the door so that when opened they can pass by a moulding and still open to 180�. The other reason the angling is done is to present a visually uninterrupted carcass edge or stile edge line, and you can also usually set the door tighter in the opening with this type of hinging.

It's possible to visually see how the different positioning of the hinge knuckle affects the throw of the door by cutting up bits of card to represent plan sections of the door, the carcass and the centre of the hinge pin all overlaid on some soft pin board or something like that, and pivoting the card representing the door to see what happens.

I can't say if these alternative hinging methods are peculiarly British or not, but they do have particular uses, eg, allowing a door to open to 180� around an applied carcase moulding. Slainte.

Photobucket

Re: Hinge Morticing

#49

Re: Mortising of hinges - Pam and Derek response

Andrew F in Australia

>Thanks Richard,

I looked over our trade notes again, as I noticed that Joyce gives details of how to feather hinges (to repeat, not commonly done,) but showed how you and Derek mount hinges as the other method. Normally, books like Joyce mirror our training, so I was surprised to see it done differently

All that I can surmise is that the method that's used to train our trademen (don't touch the carcase side, double thickness mortice in the door,) has more to do with getting things done quickly. I'll be sticking to what I know.

Cheers,

Andrew

Re: Hinge Morticing

#50

I dug out an old trade "practical skills exercise

Andrew F in Australia

>I'm working at the moment (in between watching us get soundly beaten in the cricket and attending to other equally important stuff.)

I found someone else's practical skills exercise floating around my shed from when I did the training. It shows the difference, albeit with a pretty major layout error in this exercise (door is set 3mm into carcase.)

I'll put up a photo tonight, but yes, it's exactly as per your sketch.

The door swings evenly on both hinges. If it didn't, you failed the exercise.