Re: Dovetails according to Joyce (the furniture Jo
Joe Rogers, Northern Virginia
>That would be Roy Underhill of the Woodwrights Shop on PBS.JR
Est. 1998 — 27 years of woodworking knowledge
Re: Dovetails according to Joyce (the furniture Jo
Joe Rogers, Northern Virginia
>That would be Roy Underhill of the Woodwrights Shop on PBS.JR
Dang Dean...you type fast
Joe Rogers, Northern Virginia
>
Re: Dovetails according to Joyce (the furniture Jo
stephen wiseman
>Oh Sure, I use to watch his show as well. Thanks!
Question of Don (or anyone) re chopping *LINK*
Wiley Horne
>Hi Don,
First, I'm so glad your daughter is there visiting, so please don't spend any time answering this until the Holiday is past. But I would like to discuss this a little further. Not from the standpoint of arguing at all, but I do find the subject interesting.
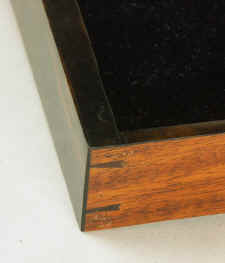
My question goes to chopping vs. sawing in regard to narrow-entry pins. The link below is to a small table with two drawers. These are the size entries I expect to be using mostly. This particular dovetail pattern is adapted from the Seymours (Robt. Mussey book, p. 124). The center pin is narrow entry, and it's very close to 5:1 aspect. The paring width at the baseline is approx. 5/16".
As I said, I fret-saw the small sockets in the tails board, with both drawer sides still in the vise after sawing the tails. So the tails are sawn together, and then the waste on both drawer sides is sawn together--all in one setup. I imagine the pins you're talking about are finer than these if you're using 7:1 or 8:1, but still I am curious about how they are chopped. This is my ignorance--I'm not arguing the efficiency point, but rather am asking exactly how you do it. Do you drive a chisel all the way through the waste of that small confined socket without damaging either the adjacent tails or the baseline? Or do you chew away at the waste to make some room before cutting through?
By the way, in regard to transferring marks, I will concede efficiency because I don't want anything to move. At all. So I clamp the pins board vertically and the drawer side down on it. My hat is off to you and to all those who can hand hold the two parts securely! Truly. But I want them clamped.
Please don't interrupt your daughter's visit--this will keep.
Wiley
P. S.--Everyone else's info is welcome of course. Just trying to learn something.
Drawer dovetail pattern
Re: Question of Don (or anyone) re chopping
Don McConnell
>Hi Wiley et al,
More than happy to discuss this topic with anyone interested in a collegial exchange. Especially someone capable of the very nice work you provided a link to. Though I'm not surprised, as Larry has been telling me what an accomplished woodworker you are.
I think what may be particularly useful about such discussions is exploring the ways in which our materials and our tooling inform our decisions.
For example, as I noted earlier, I often follow the traditional British convention of thinner drawer sides (1/4" oak, e.g.) in conjunction with drawer slips grooved to house the drawer bottoms. In this instance, the bulk of the waste can be chopped out of each pin socket with a handful of mallet blows and a similar number of paring cuts.
Take the case of a pin socket which is 5/16" wide at the gauge line. Using a 1/4" bevel-edged chisel set approximately 1/16" inch (give or take) from the gauge line, a single mallet blow can sink it about 1/16". Beginning farther away from the gauge line, but well short of where the narrowing waste is as narrow as your chisel, use a downard sloping paring cut to lift out the waste. An iteration will sink the chisel approximately another 1/16", or about half-way through the socket. When you feel you're about half-way through, you can then vertically pare to the gauge line. Do the same for the other enclosed sockets, turn the board over and repeat the process. Once the waste breaks free, work it out of the socket with your fingers. Actually, I tend to break the waste in all the enclosed pin sockets free, work all of them out with my fingers, then vertically pare to the gauge line. The same can be done with thicker drawer sides, but will take more iterations.
The downard sloping paring cuts help avoid fouling the adjacent tails and leaves some material at the end of the waste for support while chopping from the other side. If this is completely unclear, I'll try and get together some illustrations. But, it may be a couple of days before I can get to that. It really is a fairly straightforward and orderly process.
Now, as to how my tooling has shaped my decisions.
I was taught, and continue to prefer, to use a dovetail saw, for drawer work, with no easily discernible set. Though there is probably a little residual set after knocking it out and filing the teeth may leave a slight burr. The narrow kerf left by my dovetail saw precludes slipping my coping saw blades down through them. They have enough set that they would foul the adjacent surfaces. My fret saw blades would slip down the kerfs, but the ones I have had available cut far too slowly for my taste in this application. Maybe I've not look hard enough for faster cutting fretsaw blades, but have felt no real urgency to do so.
I'm not suggesting that you, or anyone else, *should* do things a particular way. I think it best if people experiment to find methods and techniques which are comfortable for them and bring them to the desired results. But I do feel that it can be helpful if that process is informed by some knowledge of traditional trade practices and techniques. I believe the general process described by Joyce, Hayward, and others, is one of those trade practices, so some consideration of it may prove beneficial.
Don McConnell
Eureka Springs, AR
One opinion *LINK*
Andrew F in Australia
>Hi Wiley,
I've lost two long and detailed replies before posting here, so I'll rewrite a reply for the final time.
I was trained to (and usually do) cut out the waste in the pin sockets by using a 1/4" chisel in your case (the width of the pins at the base was 5/16" from memory) to deepen the cutting gauge line in the appropriate place, then switch to a 1/8" or 1/16" chisel to cut a 'V' notch in the board, with one side of the 'V' forming the base of the socket.
I come through halfway, then flip the board and repeat the exercise.
The important thing in cutting dovetails this way (if you've seen Frank Klausz cutting dovetails, this is how he does it) is to leave some of the original surface on the waste when you're cutting out the 'V' notch, as it is needed for support when you flip the board over.
After a lot of fruitless searching, I came across the following link that shows basically how I was trained.
http://www.amgron.clara.net/dovetails/whichside/whichside.htm
As well, Phil Lowe shows another good method in the attached link, which is a dovetail similar to the one you linked to. Basically it's the way I was trained with a couple of minor variations. I'd want to be confident in the quality of the timber and the sharpness of the chisel to pound the chisel through in a single motion as he does in the video - I also undercut as much of the tail socket as possible when cutting the tail to remove it prior to using the chisel.
A point to bear in mind is that the dovetails espoused by some studio makers are very weak - a london pattern dovetail, as it's known on the internet, is very weak, and is brittle as well as looking delicate.
Essentially, a fine dovetail acts more as a dowel, and if there are insufficient pins, then a lap dovetail becomes essentially a dowelled rebate joint, and a through dovetail becomes essentially a butt joint fixed with a few dowels.
For example, look at these two photos:
http://www.hygra.com/wb/wbagsec.htm (3/4 of the way down the page)
http://www.hygra.com/uk/jb/jb115/ (once again, an image about 2/3 of the way down)
The amount of timber left as a pin might as well be a dowel - if the drawer binds on one side and racks, then the drawer dovetails could easily break at the base of the pin. This is a common antique repair.
I try to get the width of the pin about 1/2 to 2/3 of the thickness of the drawer side, and spaced about 3 times the pin width apart.
Trust that this helps - I give up if this one doesn't go through.
Cheers,
Re: Question of Don (or anyone) re chopping
Andrew F in Australia
>Hi Don,
It would have been quicker and easier for me to go out and physically cut a dovetail and take some photos, but I found some photos that illustrate the way both you and I were trained.
I've linked to them in my post that's paired with yours here. We must have been writing at the same moment in time, albeit a lot later at night in Arkansas.
Cheers,
Andrew
Damn....it's justa DT...
Scott Burr in windy/raining Ben Lomond, CA
>Just cut 'em and slap them together. What ever way works for you, just do it... Bo knows DT's!
Re: Damn....it's justa DT...
mikew
>Yep, in the final analysis, it's just a joint.
What I like about this conversation is it causes me to explore bonth in my mind and in actuality a method different than what I am accustom to.
It's sort of like reading broadly and not only reading people with whom one agrees. It can often open the mind to other possibilities.
Quite often I read of techniques and practice them. In the end, it is not often I significantly alter how I do something. Sometimes I may alter a portion. Always it is educational and if nothing else it encourages me to simply practice.
And practice can be very productive.
Take care, Mike
How Simple Can It Get?
Jim Shaver Oakville, Ont.
>Hi,
Well that's what my simple mind thought...9 years ago this was my first set of hand cut DT's. I measured marked and cut....

Problem was I didn't mark the waste....go figure, nothing a few #8 Robertston Screws couldn't solve.....
:-)
Just a simple joint..
Take care,
Jim
Re: How Simple Can It Get?
Greg B�tit, Crown Point NY
>I still have my first dovetail- one corner of a tool box I made when I was working as a carpenter. It looks like the ones in your picture. A finish nail on each pin made it hold together. I brought that tool box to work, too. The other guys on the job thought I was putting on airs making dovetails, so they wouldn't look closely at it. That suited me just fine.
greg
Re: Damn....it's justa DT...
Donald Pierson
>But does Bo know twisted dovetails? Chuckle chuckle. A dovetail joint is an art and a great teacher of using tools and the nature of wood fibers, an expression of one's skill as a craftsman. It is easy to buy a dovetail jig and router bits to make dovetail joints but it is not as rewarding as doing it with handtools. While practice is important trying the methods of others is equally important. I am a noobie to this game and have been trying all manners of cutting DTs. One thing I have learned is stand with you feet north-south to the board when your are cutting so that your forearm and elbow can swing freely while sawing the DTs...something learned from spending time shooting pool...in cold windy Vancouver,WA,USA
Re: One opinion
stephen wiseman
>Great Post Andrew - Thank you VERY much. I would have loved to have or have had the British/Australian way of training. Will study this carefully.
Best,
Stephen
If that was the case....
HC Sakman
>...this conversation shouldn't have been this long, right? If it's a simple thing to do, anybody could do it perfectly, as they wish.
Dovetail joint is a typical case of "complexity of a simple design", IMO.
Nevertheless, it mostly takes practice, practice and more practice. So, I don't think it's an art form, rather a craftsmanship that requires vigilance and discipline.
Chico...
Makes me feel better
Stephen Kirk in Quakertown PA
>Starting out as a beginner, I usually see only examples of flawlessly executed dovetails. Mine aren't quite so good. I generally get them tight, but I have gaps, so I think I'm doing them terrible. Guess I have to remember that those flawless examples weren't someone else first try, or second, or third, or fifty sixth. Some shims or nails are perfectly acceptable to hold things together. And making more is the only way to learn.
I have found another thing that helps me as a beginner is to not try more than one method at a time. I have the Cosman DVD, so I'm using his methods. I want to use them for a while to see if I get better, or if I find things aren't working well. Either way, I'll try another method after I feel comfortable with one. Otherwise, I'll never know if it's me, the method, my lack of knowledge of the method, etc, which could cause poor work.
To sum up, conversation and study are fun, but don't suffer analysis paralysis. Wanna know if a method works better, go try it. But if your a beginner, be careful not to confuse yourself further.
Ahhh... the Martian DT returns!
Scott Burr in windy/raining Ben Lomond, CA
>I still get a laugh at it. My first ones look just like it!
I agree Chico...
Scott Burr in windy/raining Ben Lomond, CA
>Kinda like Greene and Greene furniture, deceptively simple. But, it is a simple joint none the less. I see it like Jim Kingshott...
A mortice and tennon joint is harder to get correct than DT's just MHO.
Re: Makes me feel better
Dean J in MN
>Starting out as a beginner, I usually see only examples of flawlessly executed dovetails. Mine aren't quite so good. I generally get them tight, but I have gaps, so I think I'm doing them terrible.
Another perspective can be had by finding some 18th C. case work. Take a peak at the dovetails. Compare them to your work. You may be suprised.
-Dean
Re: Ahhh... the Martian DT returns!
Jim Shaver Oakville, Ont.
>Thanks Scott!
Did you notice how they have mellowed with age....so relaxed...
LOL
Take care,
Jim
Re: Question of Don (or anyone) re chopping
Wiley Horne
>Don,
Thank you very much for the detailed description of chopping technique for an enclosed socket, and how you got there. Your description is perfectly clear, and no need for drawings. There is also much wisdom in your opinion that it is important to be grounded in the traditional methods, even (or especially!) if you decide to depart from them. People doing piecework don't leave anything to chance, and all their lessons were hard-earned and endlessly refined over generations of workers.
For some reason, I have been under the impression that sawing the waste was a particularly British (or English) method, as contrasted with the unvarying Continental Europe technique of chopping. What you and Andrew are saying is that the standard UK/Commonwealth practice taught to you is chopping. Live and learn.
Your discussion of drawer construction also raises questions in my mind of the merits and drawbacks of the different methods of capturing the drawer bottom, but that can wait for another day.
Thanks again, Wiley
Ya but....
Dan Donaldson
>If the saw is not oriented properly in the Earth's magnetic field, the pull will make it track crookedly. You also have to take into account the offset to true North so it is exactly right. ;-)
Ducking and running .....;-)
Re: One opinion
Wiley Horne
>Andrew,
Thank you very much for the detailed and lucid description of clearing the waste from a confined socket, and for the supplemental links and extended discussion on London pattern dovetails. You have the knack of teaching, as Don does.
It seems like a super skinny chisel would be useful for the task. Like one hollow ground to an overall bevel of, say, 15 degrees. Something that will penetrate deeply without moving much wood sideways, and without backing up much.
Thanks very much, Wiley
Dan...
HC Sakman
>...give me some of whatever you're smoking or drinking...! Quite an imagination is going on in there...! ;-)
Chico...
Re: Ya but....
Donald Pierson
>Dan! Dan! The earth's magnetic field is an inaccurate indicator of true north. First I get the published magetic deviation for my location. Next if employ a gyrocompassing system to determine TRUE north direction of my workbench vise. Then I combine this information so as to align my saw. But this is only after doing a several "joints"...Happy New Year
Short cut
Bob Hackett
>I cut all my joints while inside by my crystal pyramid.That way I don`t have to contend with magnetic fields.
I also find wearing my tinfoil hat helps me to focus...
Mainely,Bob