WoodCentral Forums

Est. 1998 — 27 years of woodworking knowledge

Derek - Bill dovetail challenge

Posts

Derek - Bill dovetail challenge

#1

Derek - Bill dovetail challenge

Derek Cohen (in Perth, Australia)

Recently, Bill and I swapped notes about using a trim router to remove the waste from half-blind sockets. Bill maintains that laying the pin (socket) board flat on the bench works best for him, while my method is to support the router on the board held vertically.

Now this is all meant as a bit of fun, with the winners all of us as we demonstrate the different methods. Perhaps we will have a vote, but that's not the aim - rather to present two different methods from which others here can choose.

There are pros and cons for each system. I suspect that some will look at mine and view it as more work, or more complex, however it removes more of the waste, especially into the dovetail angles, and does so in a way that the work easier in the end. That's my take, anyway.

I was dovetailing today, and took some pictures. Bill has posted some photos already but hopefully will post more with his new trim router.

We begin with a pin board which has already been hand sawn and is ready for removing the waste from the pins. The kerfs have been deepened with a kerfing tool (Tage Frid used a scraper blade. Mine is similar but is shaped like a chisel). The wood is Black Walnut.
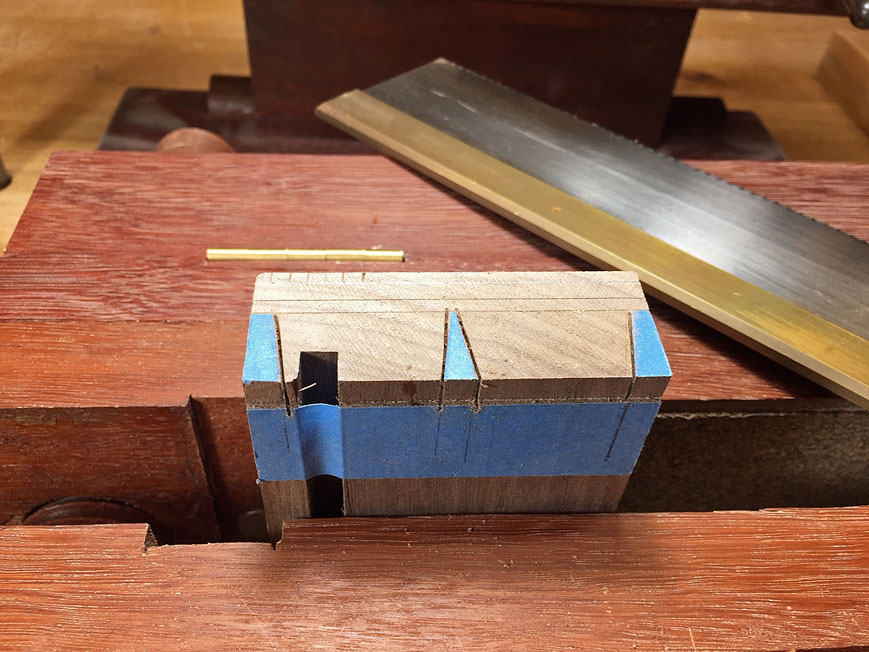

The reason for the extra depth after the boundary line is that this will be removed later when the drawers are shaped into a curve.

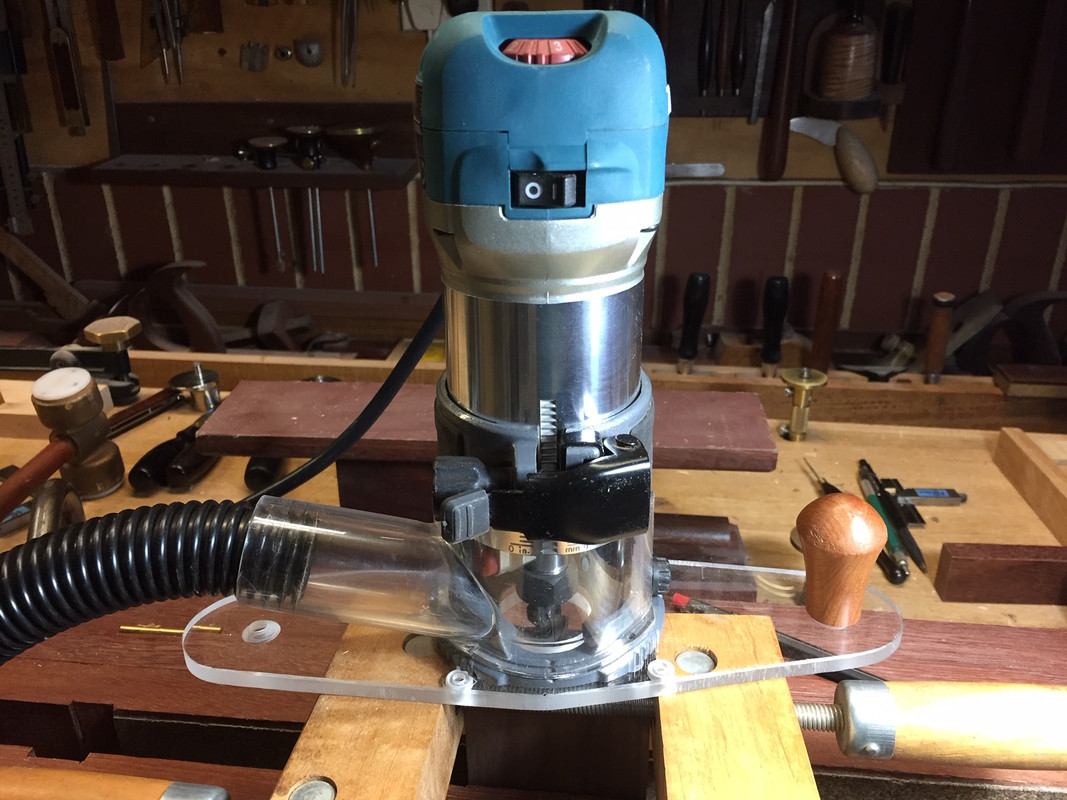
The trim router is a Makita RT007C. It is used on a Lexan base I made. The bit is a 1/8 carbide upcut. There is a shop made single point fence.

To set the depth of cut, rather than worrying about a fine adjustment, this is done using a template. This is a 1/4" board - the same thickness as the drawer side - with a hole at the end for the bit ...
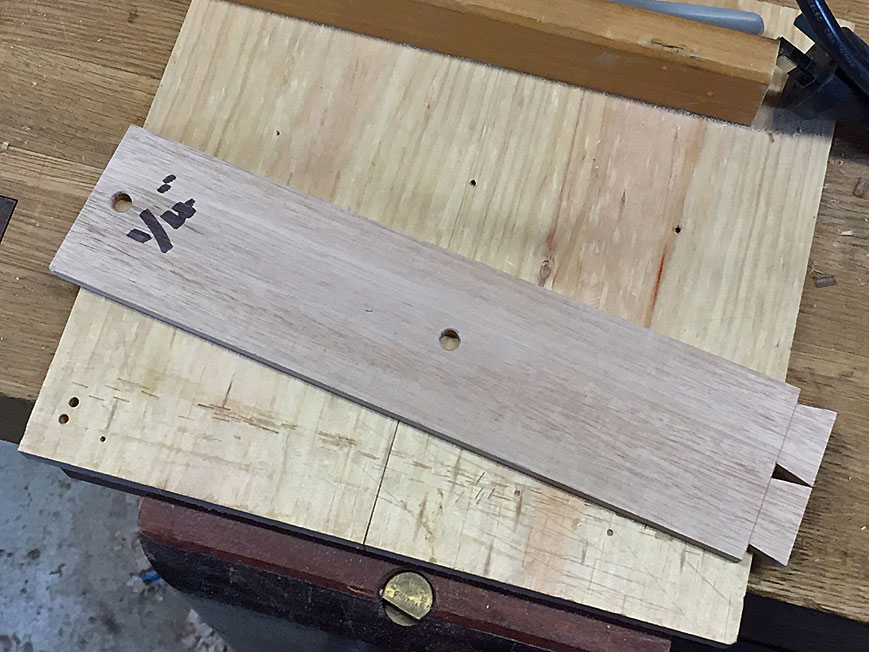

Setting the depth of cut ...
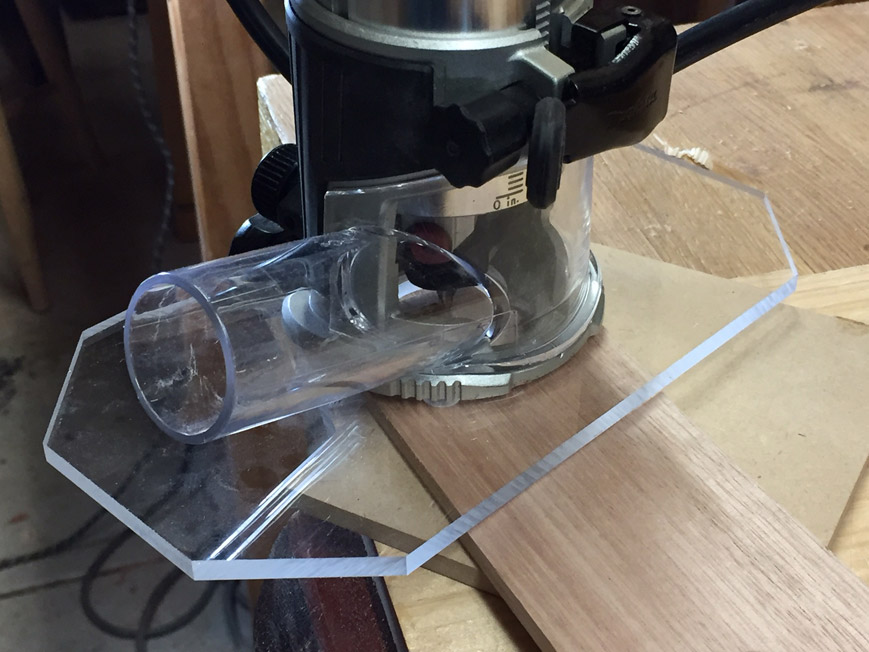

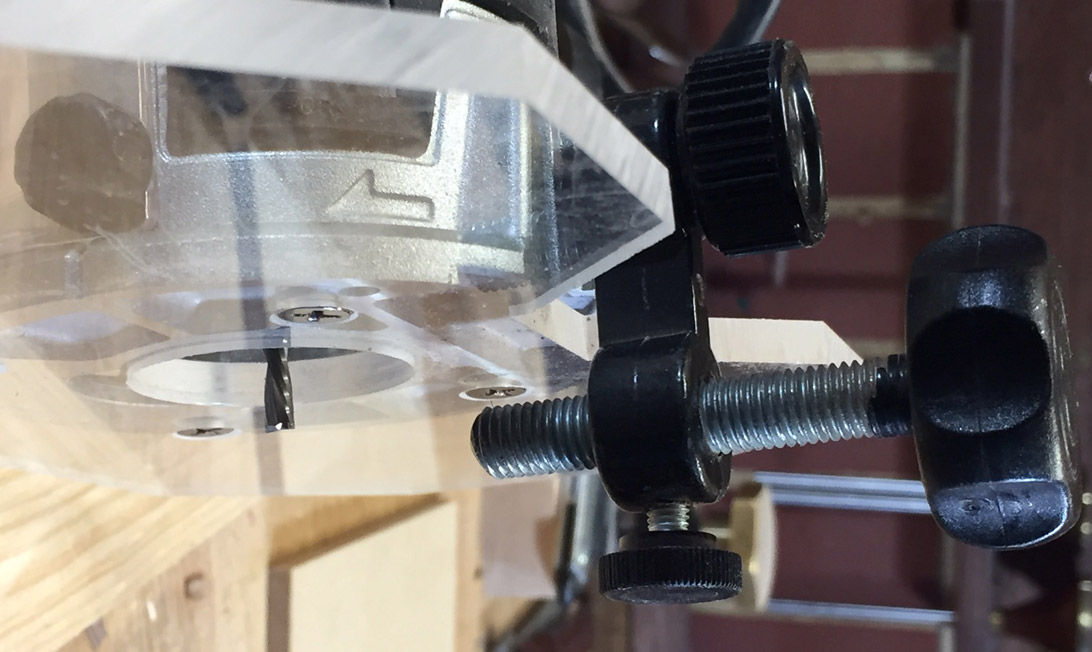
The fence is set up a little later. It is below ...

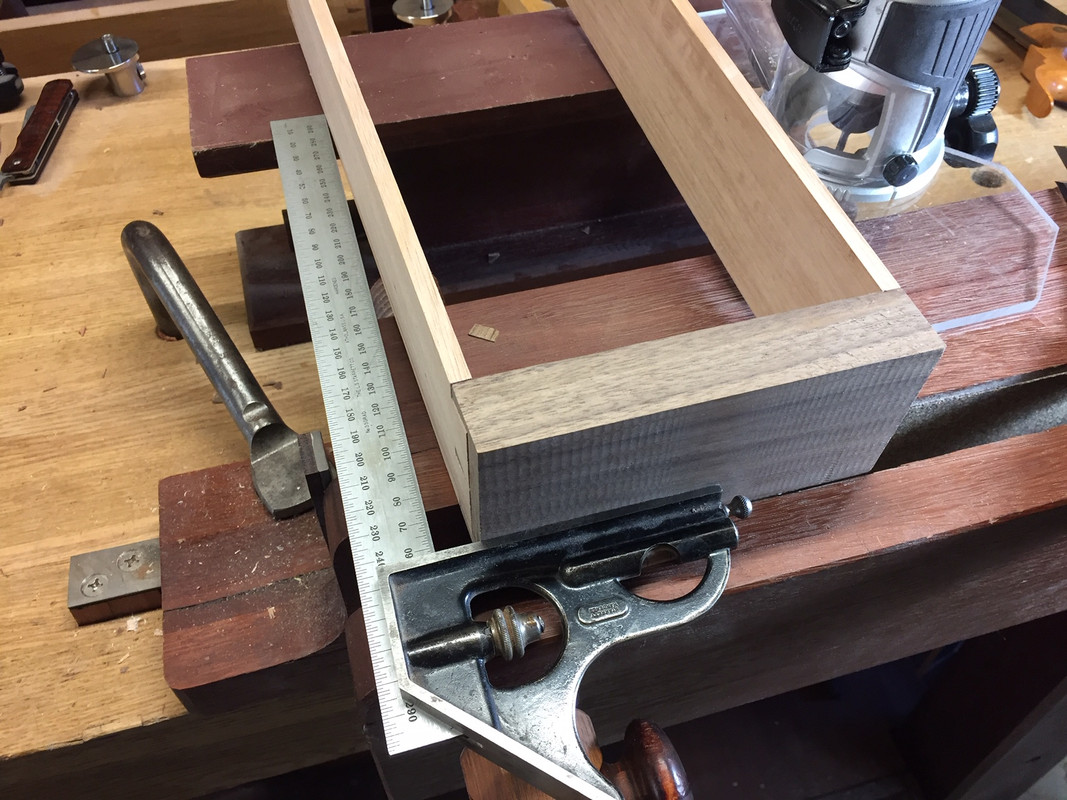
First the board needs to be supported in my Moxon vise. A slight complication is that the ends are not square, since the drawers are bow fronted. This is the reason that they lean forward sightly when captured in the clamps below ...
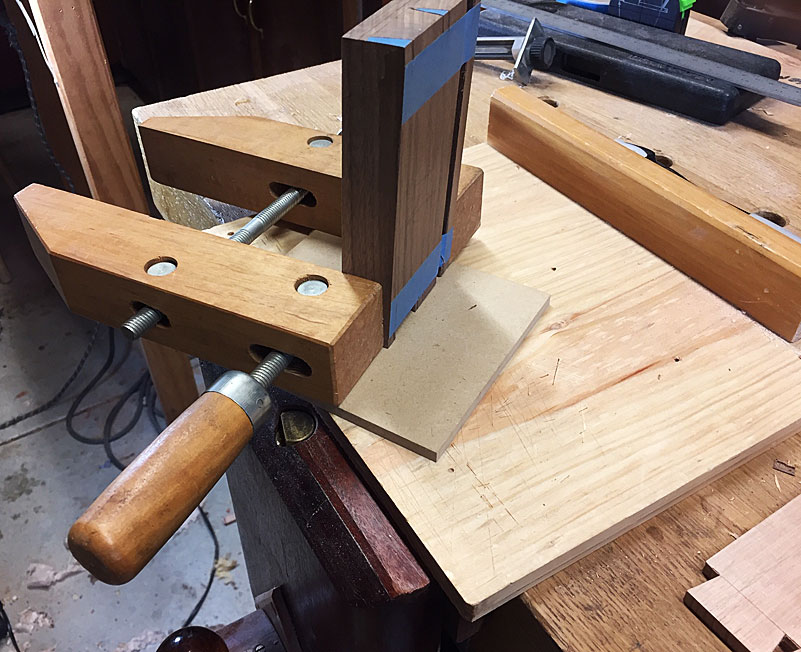

The edges are coplanar sideways and lengthways .
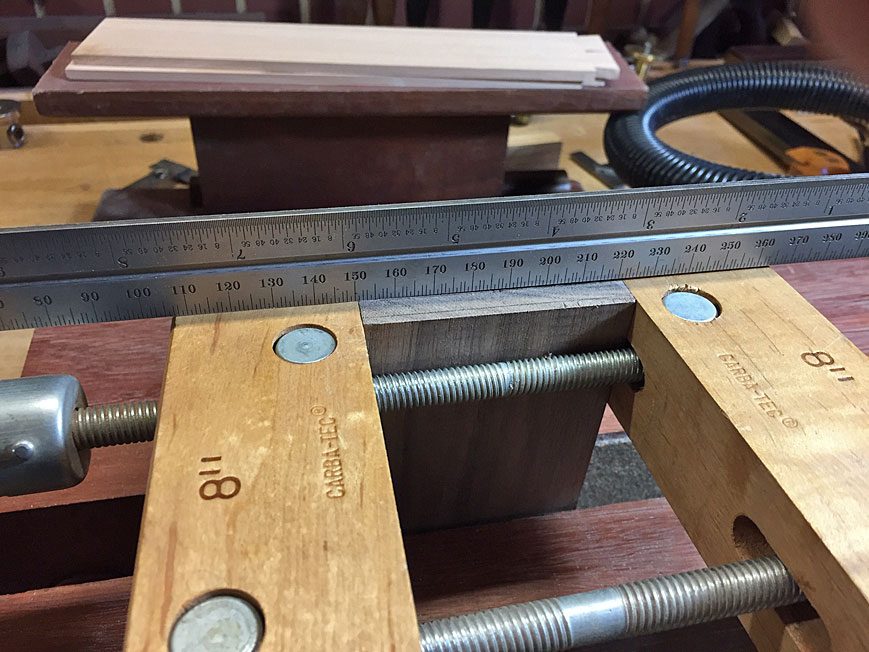

Once the board is clamped in the moxon vise, the fence is set with the screw. The reason for the single point is that it allows the router to pivot, which is needed to angle along the dovetail angle. A straight fence would only allow the router to move laterally. All routing is essentially freehand.
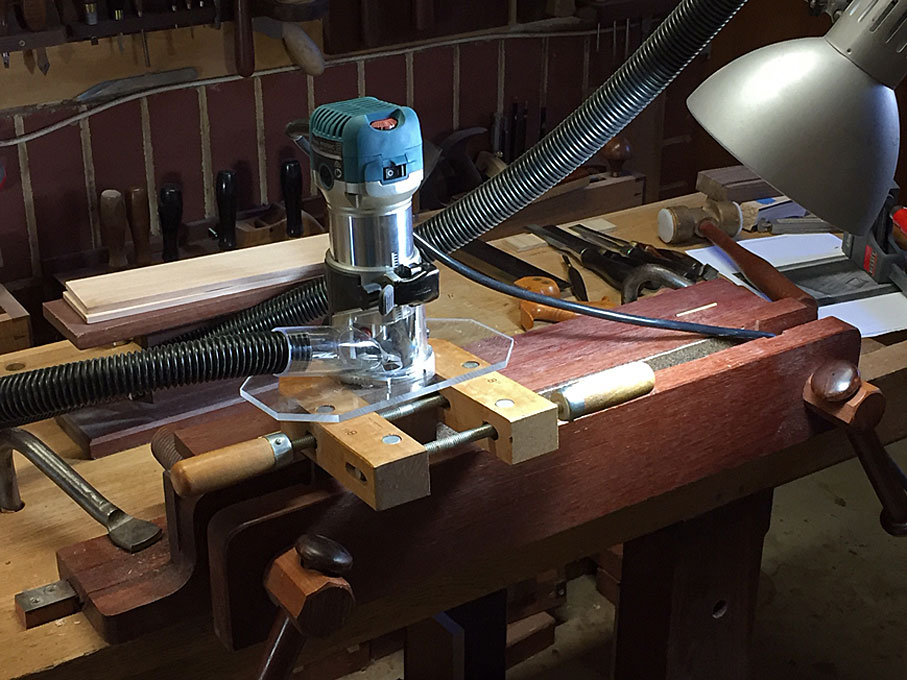

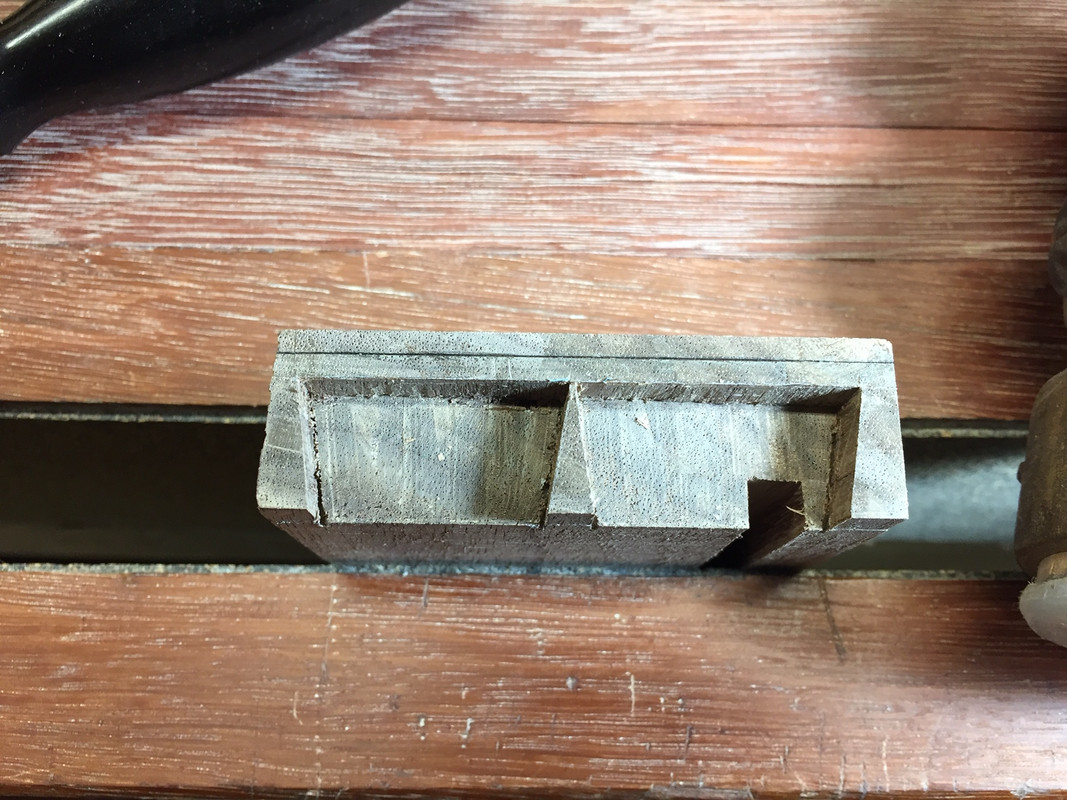
Here is the pin board with the waste removed. I should point out that this was the first of 8 drawers completed. This was definitely the most tentative. It could only - and did - get better.
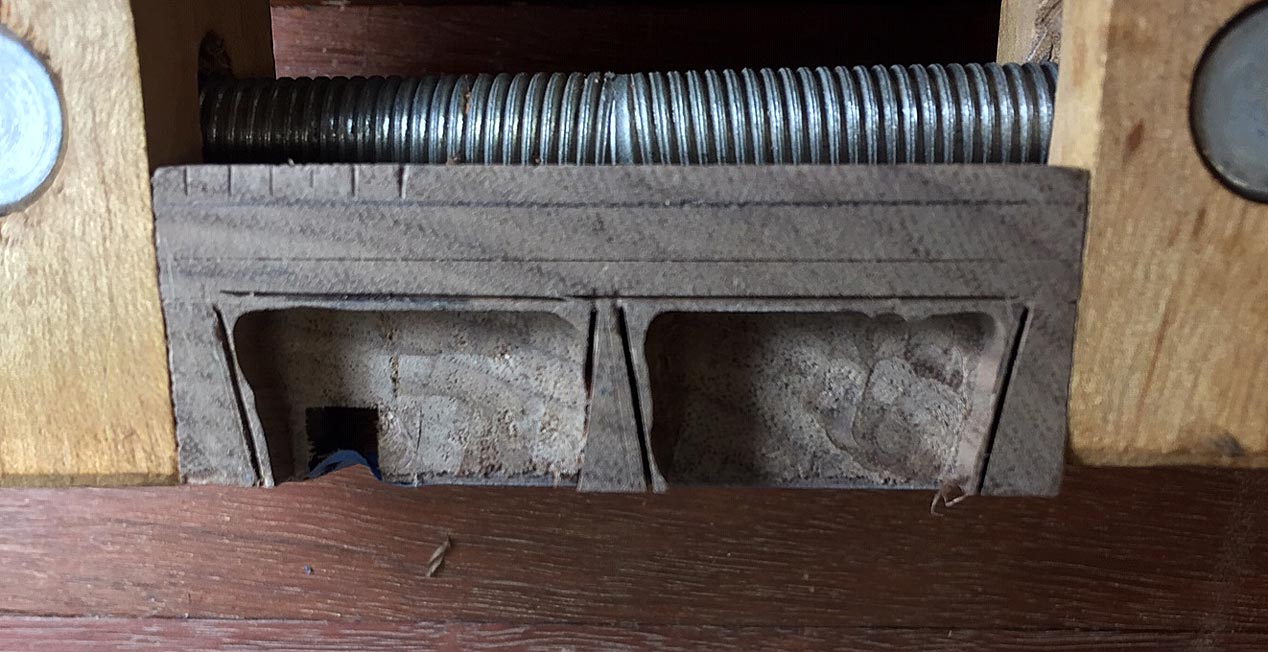

The sides of the sockets split of easily ..
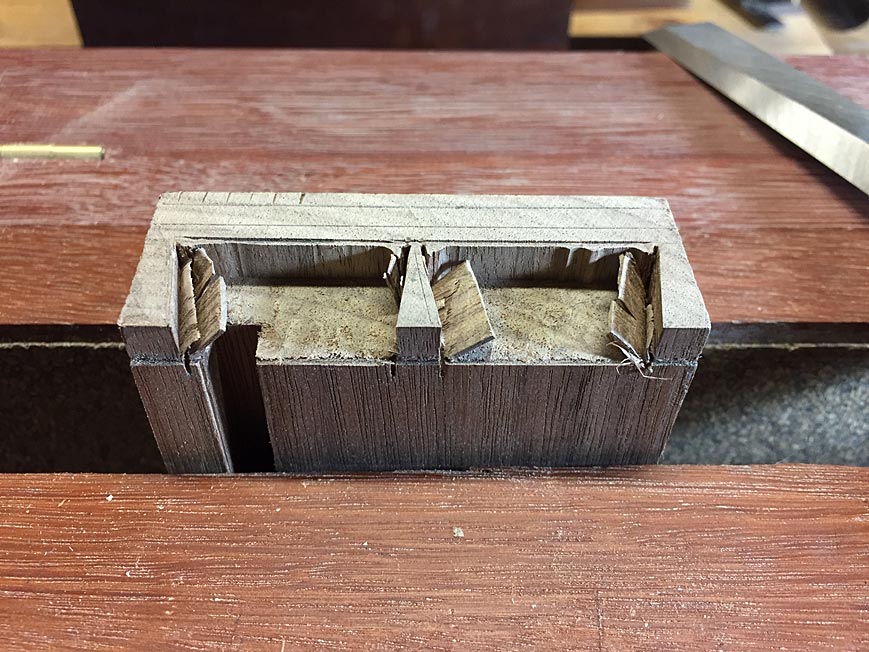

The baseline is pared away ...
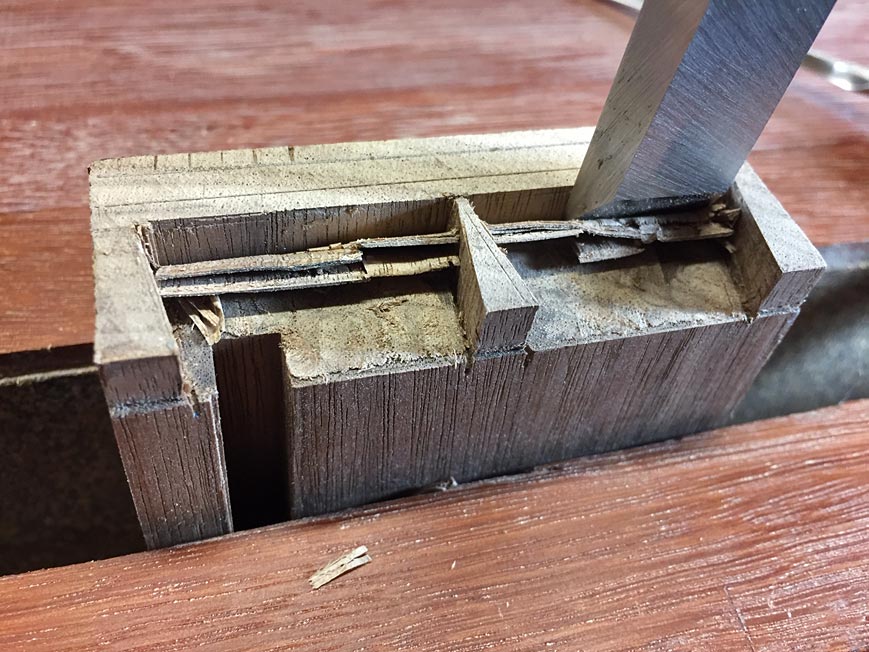

A little cleaning up, and it is done ...
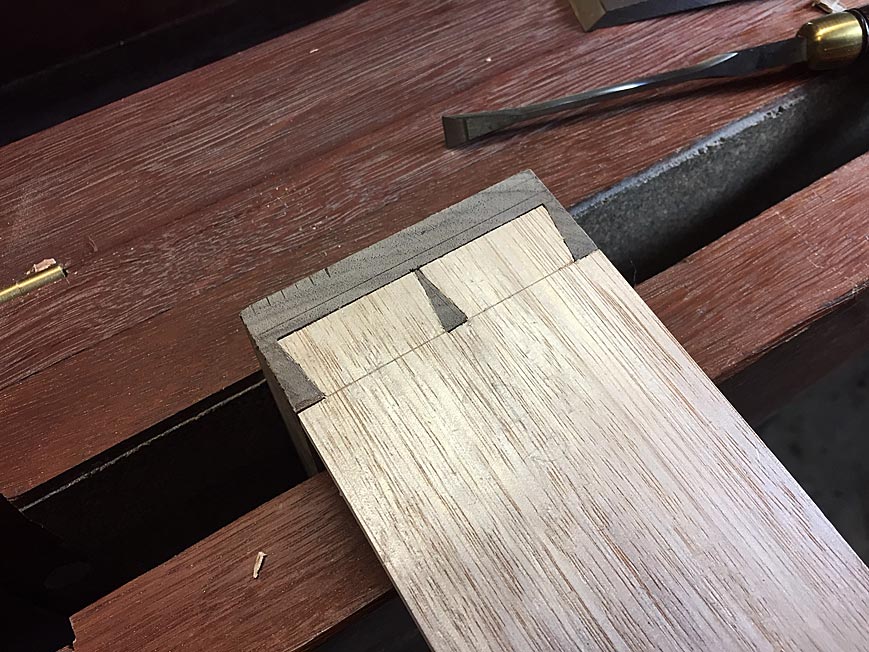

First one done ...
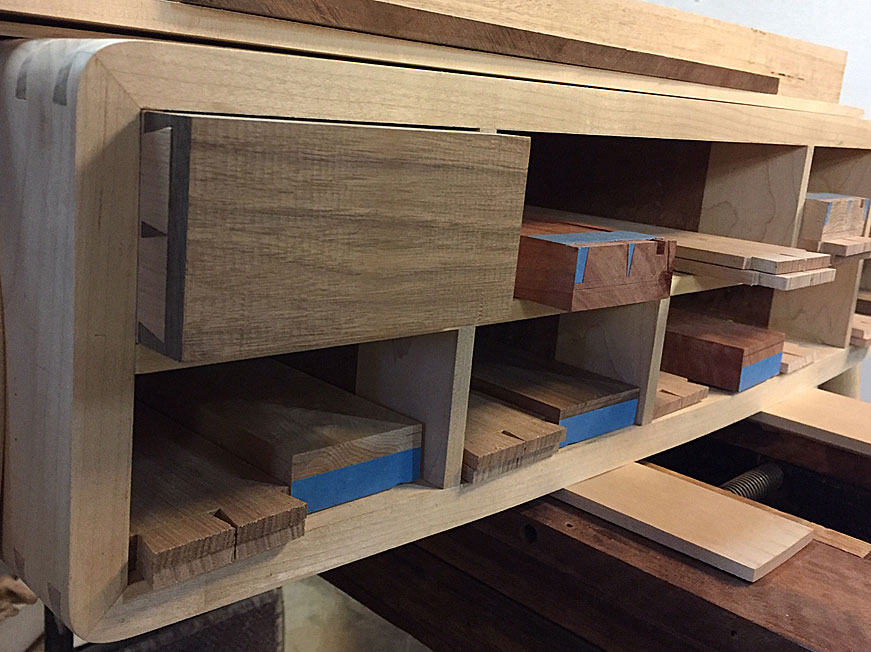

Regards from Perth

Derek

Re: Derek - Bill dovetail challenge

#2

I'll take a piece of this.....

roger lance

Must be a slow day in Perth......

I'll be leaving soon to enjoy a nice day in Michigan; so, I'll only show a few pictures and let them do the explaining......


Re: Derek - Bill dovetail challenge

#3

Well there you have it.....

Bill Tindall, E.Tn.

If one can explain a procedure in 3 pictures and brief text something easy has been described. Roger likes his jigs and I mean no disrespect for I have copied some. But if he gained the confidence of free-hand routing one picture would have sufficed.

I will add one tip. Take arcing cuts less then the bit radius to prevent the bit from digging in and going its own way.

Re: Derek - Bill dovetail challenge

#4

Re: I'll take a piece of this.....

Derek Cohen (in Perth, Australia)

Ahha, Roger ... it is not the ease of routing, per se, that is in question, but how routing facilitates the removal of the remainder of the waste with a chisel. What I note from your photos is that the centre of the waste is removed, but the angled sides remain. These cannot be split away, but must be chiseled out. Yes?

Can you say something about, or demonstrate, the removal of the remainder of the waste.

Regards from Perth

Derek

Re: Derek - Bill dovetail challenge

#5

Seems

Mark Mandell - Gone Round In New Jersey

he's routing from the face grain while you're cutting the end grain.

Re: Derek - Bill dovetail challenge

#6

Re: Well there you have it.....

Derek Cohen (in Perth, Australia)

Bill, the issue in the photo here (which gets less and less the more one does) is hand memory. Add to this visibility. This little Makita is fantastic to use, but it let down by the absence of built-in lighting. The dust control is really excellent. There is no swirling to obscure the bit cutting. But one must get the light pointed just so to avoid reflection on the plastic window. A previous Makita trim router I had did not have this dust control - did not have the window - and visibility was better. Routing was easier. But everything ended up covered in dust.

I wonder if it is possible to add lighting inside the router?

Regards from Perth

Derek

Re: Derek - Bill dovetail challenge

#7

Exactly

Derek Cohen (in Perth, Australia)

Routing end grain facilitates splitting away waste (recall that I also deepened the kerf for release cuts). Routing face grain does not all ow this.

Regards from Perth

Derek

Re: Derek - Bill dovetail challenge

#8

in a word, trivial

Bill Tindall, E.Tn.

how routing facilitates the removal of the remainder of the waste with a chisel.

Can you say something about, or demonstrate, the removal of the remainder of the waste


1. Demonstrate- Does anyone care? If so I will repost the process I have posted most every time I have described building a chest of drawers. Summary, easy aggressive paring cuts with the grain with the saw kerf as a guide. Takes seconds per side. I use one chisel taller than the dovetail and occasionally a 1/4" chisel to get a pesky sliver that might stick in a corner. I do not know why some find a skew chisel necessary.

2. say something about- it's trivial, which is to say quick and easy. Anyone that tries it will soon confirm this statement. But again....does anyone care?

Half blinds are something I look forward to because they go fast enough and reliable enough to be enjoyable for the impatient. My advice would be to do them any way one finds enjoyable.

I have settled on the size of dovetails for things like chests of drawers. I leave a cheap router set up with a 1/4" solid carbide bit at the correct depth. When I need to excavate socket waste there is no set up beyond holding the drawer front on the bench. I have no visibility problems and free-hand route to kiss the saw kerfs and almost kiss the base line. Chiseling the base line takes no less time than removing the remaining corner waste with the drawer front held vertical.

Re: Derek - Bill dovetail challenge

#9

Re: in a word, trivial

Warren in Lancaster, PA

It looks like the router is a lot of extra work compared to a chisel.

Re: Derek - Bill dovetail challenge

#10

Router saves me time, here' s how

Bill Tindall, E.Tn.

I have built 10 chests of drawers and some other assorted stuff in the past few years that involved half blinds, lots of half blinds, both for drawers as well as the case. I am not a stranger to doing the whole excavation by hand. It's presumptuous to conclude the router is a lot of extra work for me I think it is in Derek's procedure, but he doesn't agree. I've tried them all and know what works best for me.

I have people waiting on the stuff I build. I don't sell it in Galleries nor enter it in competitions so I build to a lesser "show" standard than those that do. I have a lot of "irons in the fire" competing with building time. I'll save time wherever I can if I don't sacrifice quality. And I am not alone in this philosophy. I see professional shops with a need to get product out the door employing some means of aiding the excavation of dovetail waste. The most novel is the Headley shop that uses a hollow chisel mortiser (which I never got the hang of myself). More common is what I do.

For anyone that cares, that is to say not yet settled on a way to make this joint, the most important interface in a half blind is the end of the tail to socket joint. This joint shows the most. In figured wood, common for my drawers and case sides, this surface is the most difficult to chisel because the chisel wants to follow the grain lines that won't line up with this surface. If the router bit depth is set to the scribe line depth this interface will turn out perfect. Chiseling then occurs on edges that are either easy to chisel accurately no matter what the grain is doing(end grain) or that doesn't show (socket sides).

This discussion provides an example of how I approach woodworking. I examine each operation to determine what is critical. Then I focus on how to make this step accurate and reliable, and quick, with the skills and tools I have at hand. Your results may differ.

PS unless you can get high velocity dust collection near the router what I do throws chips around the land and makes a mess. For a single drawer I would just chisel it to avoid this mess.

Re: Derek - Bill dovetail challenge

#11

Re: in a word, trivial

Derek Cohen (in Perth, Australia)

It looks like the router is a lot of extra work compared to a chisel.

Warren, I wish that a chisel was quicker. I much prefer hand tools - I trust my hands over a machine. I've hardly used routers much over the past 25 years since moving to hand tools. Over the past year I have begun to explore a few of these tools - not to replace hand tools, but to compliment them. Removing waste is one of those areas - waste when jointing and thicknessing. Waste from the sockets of half-blind dovetails.

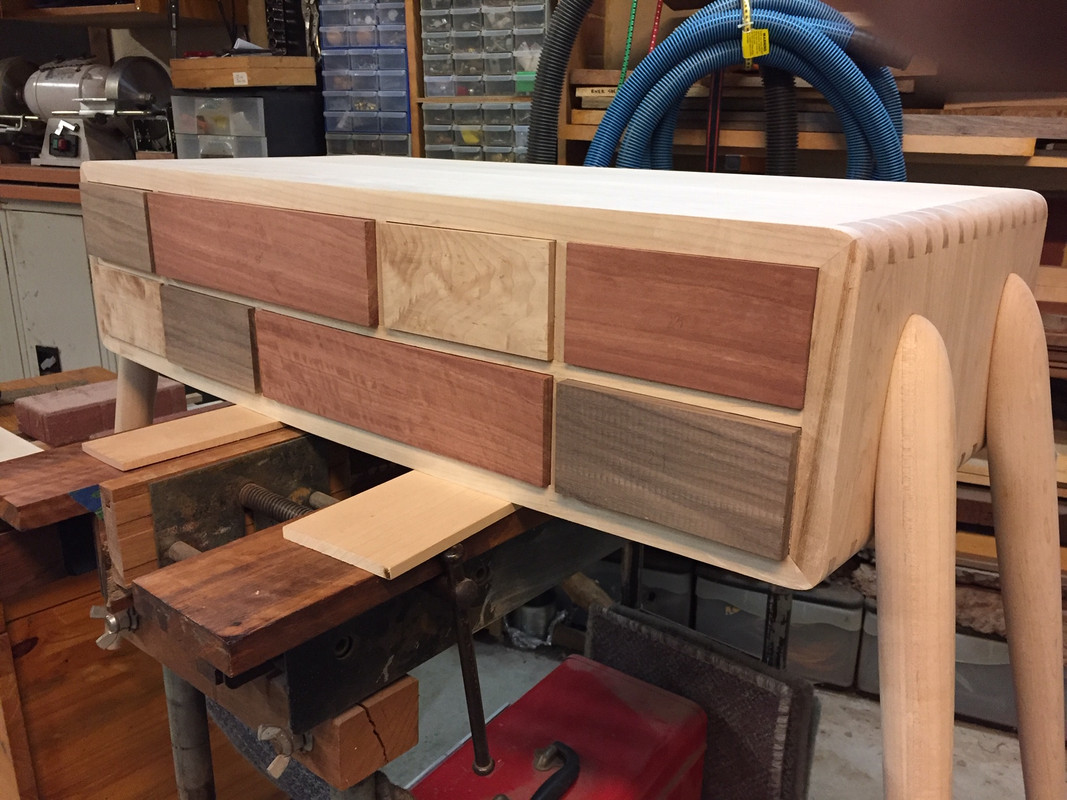
My current build has 8 curved drawer fronts, and I began them on the past weekend (preparing the faces, sides, bottoms, backs, slips). I only work on weekends (plus the occasional Monday afternoon) and have 2 more weekends before this piece must be ready for the Perth Wood Show furniture competition.

I completed 4 drawer fronts yesterday (Sunday). I hoped that I could get 2 more done this afternoon (Monday). As it turned out, speed came with practice, and I completed the remaining 4 drawers.

I timed the last drawer. The only work that was done beforehand was the tails were cut and the pin board was ready to transfer marks.

At 6:35 p.m. I began transferring the tails to both sides, sawing the pins, and then used the router to remove the waste from the sockets. At 7:05 I had completed both sides. Can you mark, saw and excavate waste for each side in 15 minutes a side?


Watch for my reply to Bill for more details.

Regards from Perth

Derek

Re: Derek - Bill dovetail challenge

#12

Re: Router saves me time, here' s how

Derek Cohen (in Perth, Australia)

It's presumptuous to conclude the router is a lot of extra work for me I think it is in Derek's procedure, but he doesn't agree. I've tried them all and know what works best for me ...

For anyone that cares, that is to say not yet settled on a way to make this joint, the most important interface in a half blind is the end of the tail to socket joint. This joint shows the most. In figured wood, common for my drawers and case sides, this surface is the most difficult to chisel because the chisel wants to follow the grain lines that won't line up with this surface. If the router bit depth is set to the scribe line depth this interface will turn out perfect. Chiseling then occurs on edges that are either easy to chisel accurately no matter what the grain is doing(end grain) or that doesn't show (socket sides).

This discussion provides an example of how I approach woodworking. I examine each operation to determine what is critical. Then I focus on how to make this step accurate and reliable, and quick, with the skills and tools I have at hand. Your results may differ.

PS unless you can get high velocity dust collection near the router what I do throws chips around the land and makes a mess. For a single drawer I would just chisel it to avoid this mess.

Bill, this afternoon I had a few hours after work and returned to the drawer fronts. I had completed 4 yesterday and there were 4 more to do. I hoped to do 2 more today in the available time, but my technique improved with practice, and all 4 were done.

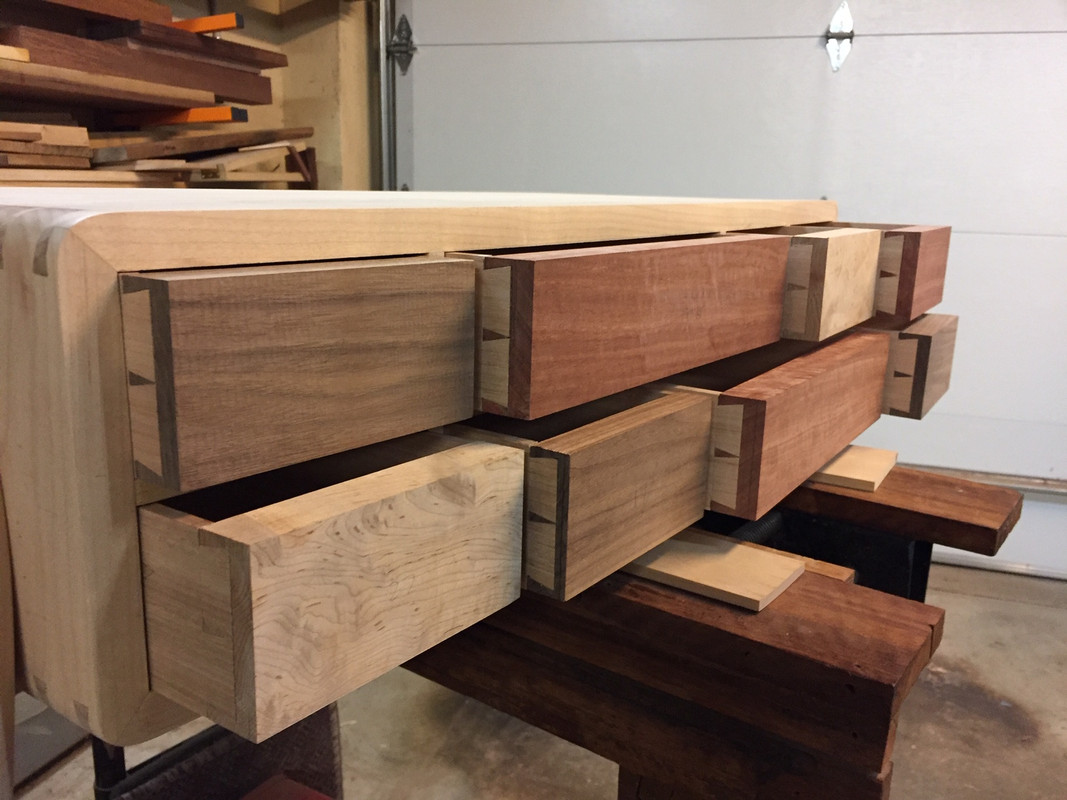
When I posted earlier, I showed you the first drawer front. Now I'll show you one of the last. The results are very different. I am quite convinced that my method would take less than half the time you take with yours.

The one thing I changed was the base for the router ...


The difference is that this has a handle on the one side. That made it easier to control. Also, the light I had was better than before.

Remember that the drawer fronts I am routing are not square but parallelograms.

This is the angle involved in one ...


This takes more time to set them up in the wooden clamps. Still, I timed how long it took to do so - 45 seconds.

How long to route out each set of sockets (i.e. two sockets combined)? 60 seconds. Really. I use a 1/8" carbide bit. It does not get pulled out of line. I work straight up-and-down, back-to-front, and then clean up along the front (boundary).

What is an important difference between your method and mine is that I am working end grain. I also use a scraper to extend the saw kerfs, which creates relief cuts. At the end, it is possible to split away what little waste is remaining. There is minimal paring to do. I shall demonstrate this, so you can see for yourself.

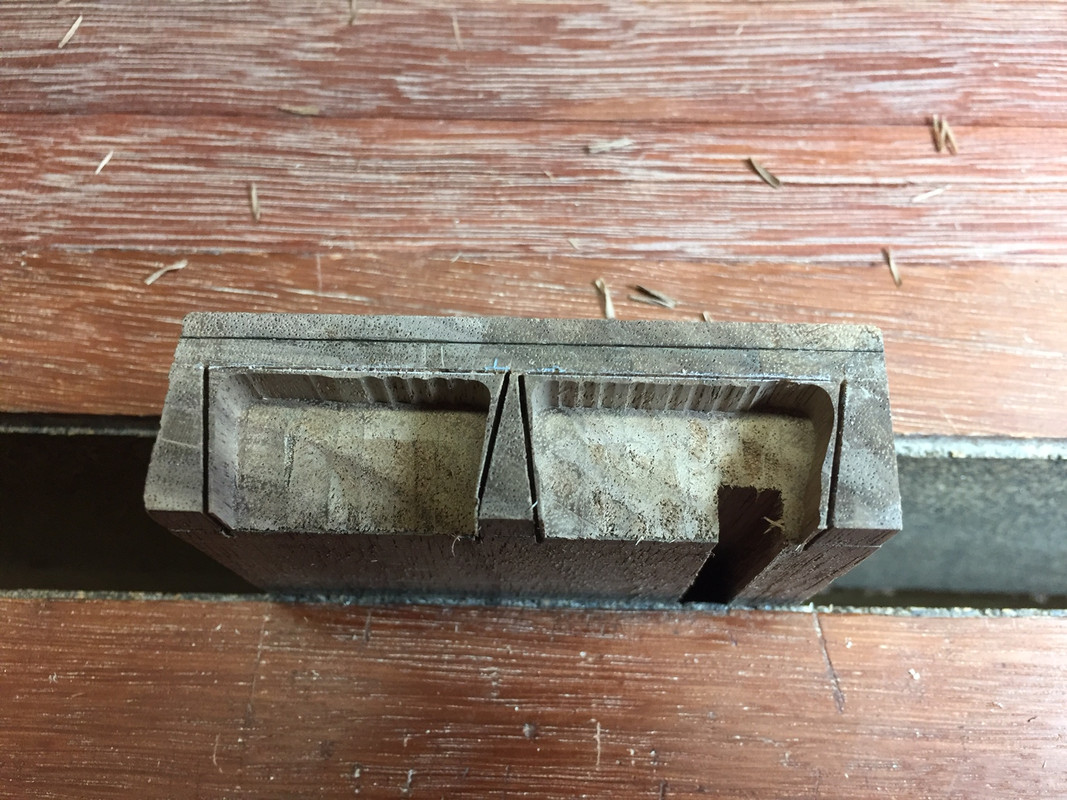
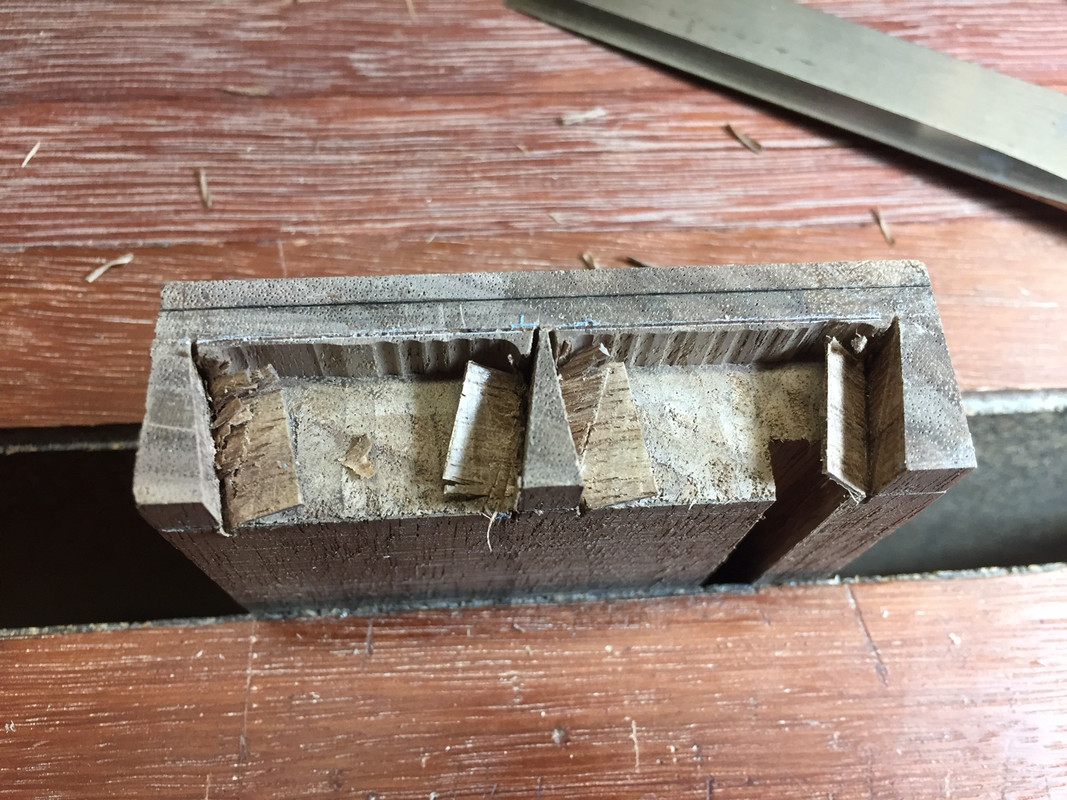
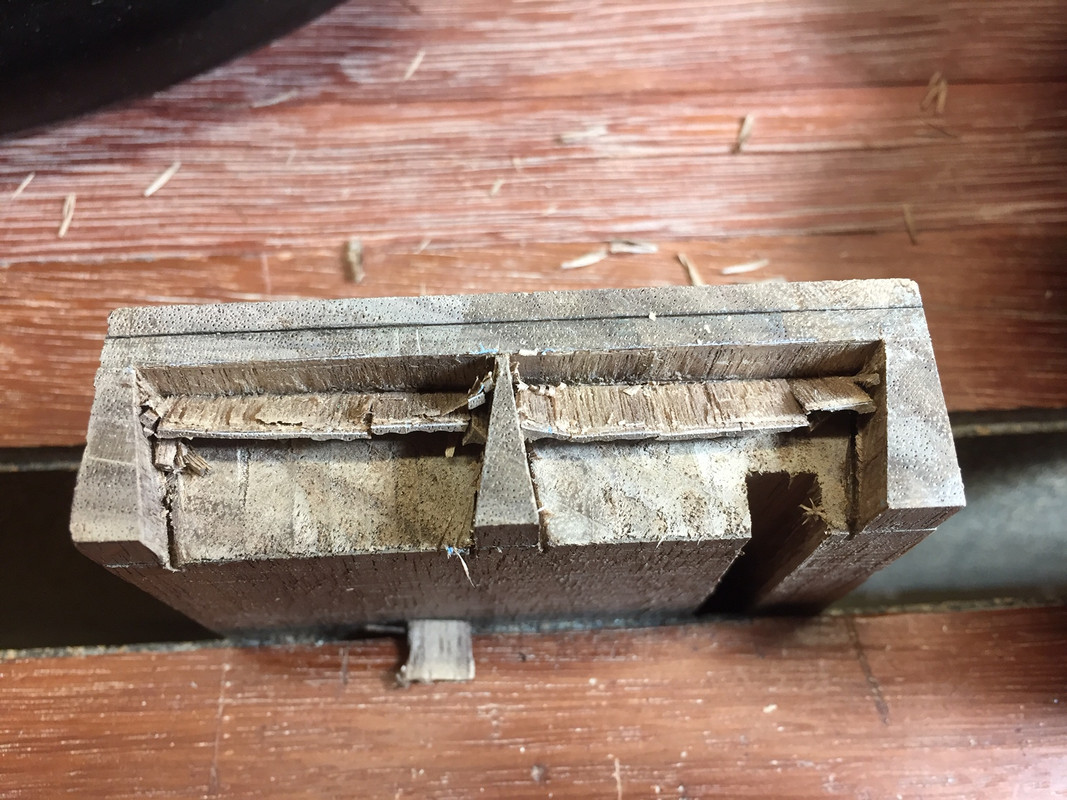
These are the sockets out of the router ...


There is about 1-2mm waste remaining. The floor if the socket is about 0.5mm high.

Split off the sides ...


Pare away the waste at the boundary ...


Clean up with a 3/8' straight chisel and a fishtail chisel.

You dislike fishtail chisels but they do a terrific job, reducing the risk of damage to skinny dovetails.


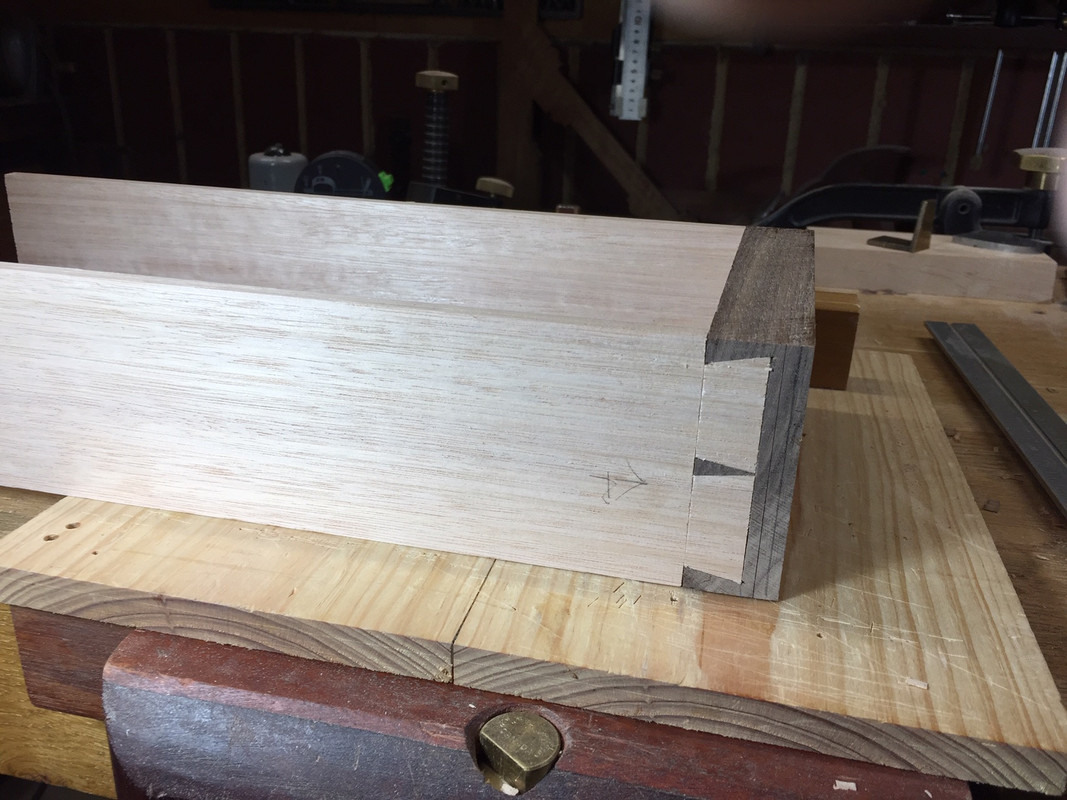
This was the result (dry fit). One side ...


... and the other ...


8 drawer fronts done (they will remain square until the backs are done, and then the fronts will be shaped to round) ..


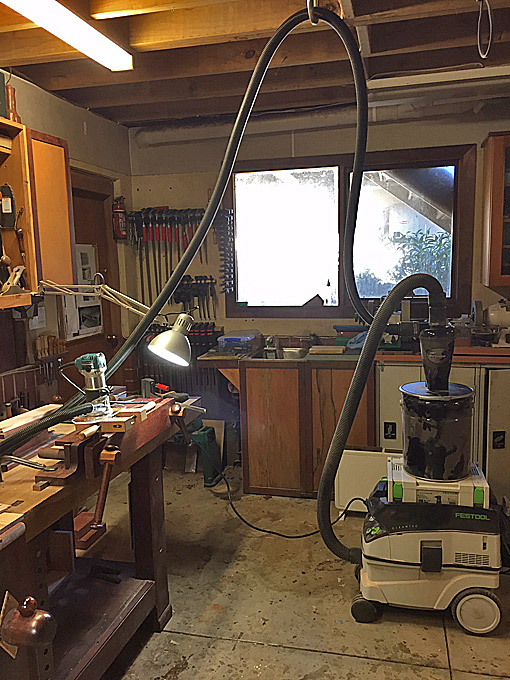
Incidentally, the dust collection on this Makita is superb. There is no dust at all. The hose is a 27mm Mirka, which is light (lighter than a Festool) and anti-static. It feeds a Festool CT26E vacuum cleaner. Quiet and powerful ...


Regards from Perth

Derek
Re: Derek - Bill dovetail challenge

#13

Thus spoketh the unplugged......


Re: Derek - Bill dovetail challenge

#14

Re: Router saves me time, here' s how

Bruce, a MN Galoot

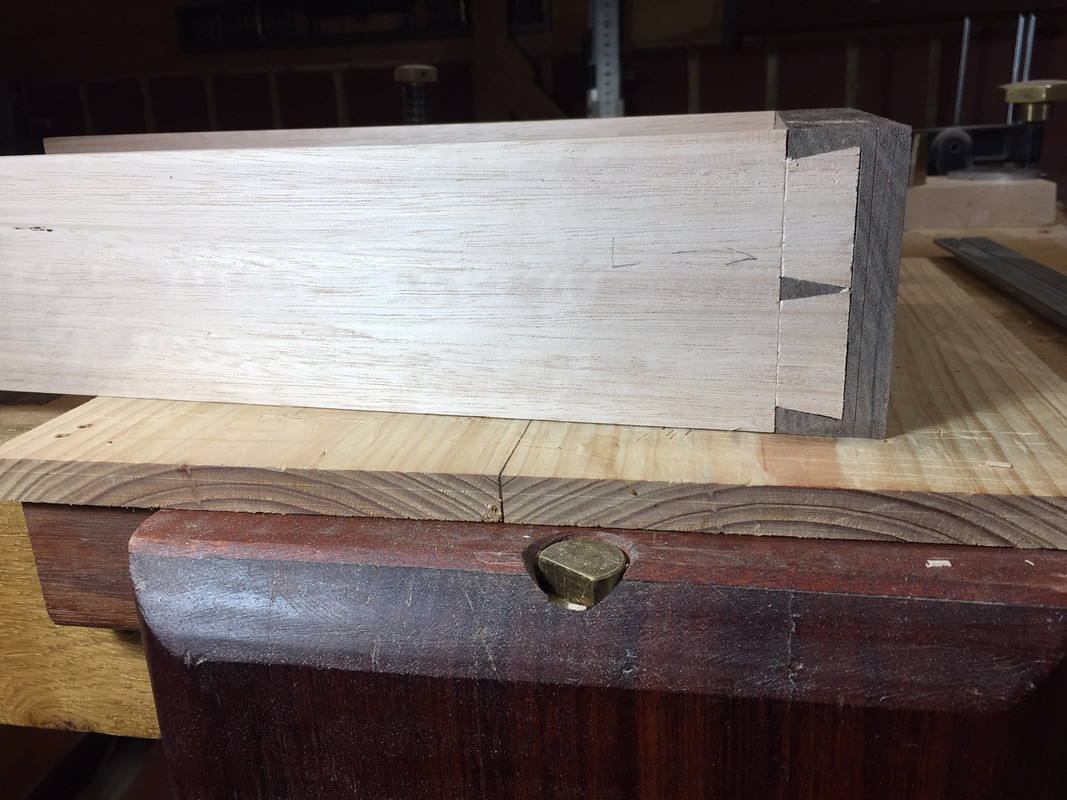
Why don’t you rout to the bottom of the socket?

Re: Derek - Bill dovetail challenge

#15

Re: Router saves me time, here' s how

Derek Cohen (in Perth, Australia)

Hi Bruce

I have routed 1/4” deep. Exactly 1/4” (based on the template). The drawer sides are are 1/4” plus about 0.2 - 0.5mm. I could plane down the outside of the drawer later, but I would prefer to fit the drawers into the recess now (they’re a tight fit at this stage). It is easier to simply take a shaving off the socket floor.

Regards from Perth

Derek
Re: Derek - Bill dovetail challenge

#16

Re: in a word, trivial

Warren in Lancaster, PA

Yes I am more like 10 minutes a side or a little less. I also wonder if you are counting the time to set up the router and dust collection clamps, etc.

Re: Derek - Bill dovetail challenge

#17

Re: in a word, trivial

Derek Cohen (in Perth, Australia)

The time includes setting up the router and dust control.

Warren, this is not a competition with you personally (I am sure that you are quicker than the average chisel wielder), but a gauge of possible speed savings when excavating with a router. I would not bother for a one-off drawer. I do bother with 8 drawers. The time I mention is a guideline for others wanting to do the same as I did.

I recall a similar experiment I did several years ago, when I compared speeds using chisels, drill, and router for this very task. It would be in the archives here.

Regards from Perth

Derek
Re: Derek - Bill dovetail challenge

#18

Re: Derek - Bill dovetail challenge

Brian Holcombe

If you combined methods with bill you could cut the floor and wall accurately.

Re: Derek - Bill dovetail challenge

#20

Explain what's confusing please.


Re: Derek - Bill dovetail challenge

#21

I too am confused

Bill Tindall, E.Tn.

Brian, I don't know what you are suggesting either. What are you proposing? How to remove the waste with a router? What router procedure would establish the height and length of the socket?

Use a fence on what I do? Not worth the effort to set the fence. Hand tool enthusiasts can overlook the hand skills that can be brought to bear with power tools. I learned to carve with a band saw and router in the Headley shop, a shop that does the magnificent carving of Period Furniture with hand tools but "carves" with power tools when it saves time without sacrificing quality.

I have to pick up a chisel to do the corners that the router doesn't get. If I route to near the base line, and to the saw kerfs, the chiseling is minimal. It simply isn't worth any effort to minimize it further, as Derek advocates, or possibly you are suggesting.

Re: Derek - Bill dovetail challenge

#22

Re: I too am confused

Brian Holcombe

I'm suggesting you cut, with a router, from the end grain and from the side grain to establish reference surfaces at the back (end grain interior) and bottom of the joints. The remainder can be removed by hand with chisels.

On the bottom you can just get really really close and remove the remainder by hand.

Routers are depth adjustable and so they can establish a decked surface accurately so long as the reference surface (end grain cut) is accurate. This implies that you must accurately make the end cut prior to making your joints, but you both already know this.

I worked in a machine shop prior to woodworking and I own a 20" resaw bandsaw, 16" jointer/planer, router table, sliding table saw, hand routers, track saw, hand held machine planer, industrial chop saw, Automatic mortiser, hollow chisel mortiser, slot mortiser and Bridgeport knee mill with rotary table and probably a few things I'm forgetting.

I value my hand skills and hand tools above all other things, but as my work moves towards creating the same product with regularity involving machines helps me to be productive. I worked near entirely by hand for a number of years to help to form those important skills in myself and I've slowly added more machinery to my repertoire to improve productivity while maintaining or in many cases improving upon the end result.

Re: Derek - Bill dovetail challenge

#23

Re: I too am confused

Bill Tindall, E.Tn.

I'm suggesting you cut, with a router, from the end grain and from the side grain to establish reference surfaces at the back (end grain interior) and bottom of the joints.

Again, not worth the effort to do two router orientations. Set router depth exact to tail length. Nothing more to do with this surface. Route free hand to near base line and all the way to saw kerfs. Quick pareing cuts finish the surface to the base line all the way to the corner of the socket. Stand board on end and quick coarse cuts to saw kerf and a finish cut to remove the last bit to the outside of the saw kerf. Done. Well not quite...there will be some pesky fibers in the corners that need a 1/4" chisel thrust.

Nice tool collection by the way......

Re: Derek - Bill dovetail challenge

#24

Re: I too am confused

Brian Holcombe

Bill, certainly you do what suits you best, but you asked me to clarify and I did so.

I can tell you for certain that in my shop it's often worth the effort in productivity, but I'm not using hand routers for either part of my own process.

I also adjust my method depending on how high the stack of material is. :D

Speaking of productivity, off I go.

Re: Derek - Bill dovetail challenge

#25

Re: I too am confused

Derek Cohen (in Perth, Australia)

Again, not worth the effort to do two router orientations. Set router depth exact to tail length. Nothing more to do with this surface. Route free hand to near base line and all the way to saw kerfs. Quick pareing cuts finish the surface to the base line all the way to the corner of the socket. Stand board on end and quick coarse cuts to saw kerf and a finish cut to remove the last bit to the outside of the saw kerf. Done. Well not quite...there will be some pesky fibers in the corners that need a 1/4" chisel thrust

Bill, clearly you are comfortable with your approach and I with mine.

Yours has the advantage of registering the router on the back of the drawer front. Mine has the advantage of less waste to remove, along with less paring to do.

You set your depth of cut to the boundary and I set mine to the baseline. Brian suggests doing both. I feel that is counter-production with a hand-held router. It no doubt works in his shop, where he has fixed, set-up machines. The router is to speed up waster removal, not do it instead. Hand cut dovetails are still essentially hand cut.

I do believe that my method is golng to be much quicker than yours, however I have not heard you speak of time. Just taking the socket waste removal time, I can do this, including set up, in under 5 minutes per side.

It is good to have choices.

Over the years I have read many who consider a small chisel is all that is needed for clearing the waste in socket corners. Obviously this works. All I can say is that the fishtail chisel works better. You should try one and experience what I do. I have made these by grinding out a common chisel. Further, if you do make sockets with a skinny pin separating them, the fishtail chisel will be the safer choice.

Regards from Perth

Derek
👍 This page answered my questions

Your vote helps other woodworkers quickly find the answers and techniques that actually work in the shop.