
by Bill Tindall
1. Where It Grows
Introduction
I have participated in the hardwood lumber industry in Eastern Tennessee for many years, including, but not necessarily limited to, logging, part ownership of a saw mill, consulting for a mill, operating small kilns, wholesaling hardwood lumber, and even manning a fire tower—watching that it all didn’t burn down. During the course of preparing this treatment, I have visited several mills, log yards, and lumber yards, and talked with the owners about their current operations. These photo essays will be drawn from this experience. Hardwood lumber production could be different elsewhere, and softwood lumber production certainly is, but I believe what I describe accurately reflects what goes on here in Eastern Tennessee and to a large extent is applicable in many other enterprises.
What I have seen is an industry in transition. Furniture factories, which were the main customers for hardwood lumber, have moved from close to our forests and sawmills to overseas. Small family owned mills which supplied these factories have been replaced by huge hardwood production facilities. Naturally the details of converting a forest to kiln dried lumber are changing, too.
Most of the hardwood lumber in the world is produced in the United States and most of this lumber is produced in the Appalachian Mountains because of their unique location. This range runs north/south in a temperate climate, and that orientation enables a wide variety of hardwood species to thrive in these mountains and valleys. During the last ice age the advancing ice drove northern species like maple and birch south. When the ice retreated, the plant species that required a cold climate likewise retreated up the slopes of the mountains while warmer loving species occupied the valleys. As a result, these mountains have an unusual diversity of trees—from balsam and mountain ash at the mountain tops to tulip poplar and walnut in the valleys. Every major commercial species of hardwood lumber grows in these mountains.
These mountains receive an abundance of rain and there is a long growing season—two months more than the northeastern United States. Trees growing in these ideal conditions grow straight and tall with few defects, and therefore yield high grade lumber. A tree which is struggling because it is too cold, too dry, or the soil is poor, is more prone to disease and its injuries don’t heal quickly. It will yield low grade lumber. A good example of this can be found in the cherry in the southern Adirondacks in New York State. This cherry is stunted for the most part and knotty, while cherry 300 miles to the south in the Appalachian Mountains is the finest that can be found. High grade lumber is produced elsewhere in the U.S., but not in the abundance as here in the Appalachians.
To yield clear lumber, the young tree must compete with its neighbors to reach for the sky. Dominant trees shade their slower growing neighbors as well as their own lower branches and these die. In the warmer Appalachian climate dead branches rot quickly and fall off. Fairly rapid growth of the tree will heal over the branch scars before rot proceeds into the trunk. Once the branches have fallen off and the scars healed, the trunk continues to make the clear, knot-free lumber we desire. With adequate rain fall and rich soil these trunks will become tall and broad.
In succeeding sections I will describe all aspects of lumbering from the landowner wishing to sell his timber, to the logging, sawing, grading, drying, and marketing of the hardwood lumber product.

This is a fine Appalachian tulip poplar that would yield nearly 2000 board feet of high grade lumber.
2. Selling Your Timber
If you own a woodlot, someday someone is going to knock on your door and ask to buy your timber. If you decide you’d like to sell your wood, you owe it to yourself to plan the harvest for maximum revenues and the optimal health of your forest.
Generally speaking, there are three ways to harvest your timber:
- Clear cutting: removes all the saw logs as well as everything else that can be chipped to make paper. In my area, it takes two generations, or about fifty years after clear-cutting, before another crop of timber can be harvested. It requires much of this time span for the thicket of new sprouts to thin out and eventually start growing the surviving trees at a normal rate.
- Loggers choice: leaves the decision of what to harvest up to the logger. Left to their own interests, loggers will remove anything that they can make money on and leave the rest—trees smaller than 12″ diameter and larger trees with no value—either because they are defective or because there is no market for the species ( beech, for example). Walnut and cherry trees greater than 10″ may be removed. It will be a generation before the woods can be harvested again.
- Selective logging: removes the trees someone has decided should be removed. If this person is your local forester, both mature and worthless trees are removed, leaving behind young trees to fill the gaps left behind. This forest can be logged again in half a generation.
Logging for maximum return
Before you can start your planning process, you will need to gather some information. For the example discussed here, I’m using information that is current for my region, eastern Tennessee. The details will change with time and place but the conclusions will not. Think of your trees as your employees, and see how they can work for you.
As will be discussed (in Part 3, Logging), the board-footage yield of hardwood logs is measured with the Doyle scale:
Bd ft = (D – 4)2 x L / 16
where D = log diameter inside the bark, and L equals the log length.
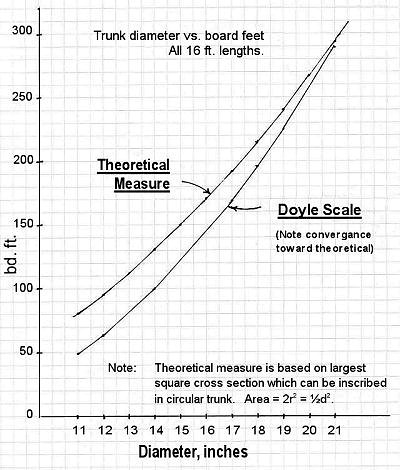
This measuring system substantially underestimates the volume and yield from small logs, accurately determines the yield from large logs, and overestimates the yield from very large logs. As your trees grow, the measured board footage in the logs from your trees will increase two ways—first, the trees add volume by growth; second, the scale used to calculate the yield grows them an additional amount because the difference between what the tree will scale using the Doyle scale and the actual volume of the tree converge as the log diameter gets larger, as can be seen in the chart at left.
Let us suppose you have eight trees that at harvest yield one 16’ log from each tree. Four of the trees have limbs on two sides of the trunk. They will grade “S” or select. The other four are limbless and “clear” for the full length of the 16’ log. They will grade “P1,” prime. If you harvest these trees today, they will bring, delivered to the log yard, the prices shown in Table 1 below. The landowner usually gets about half this amount and the logger the other half.
Let’s see what happens if these trees grow for another eight years. Let’s assume that the two limbs on the 17″ diameter tree (#2 in Table 1) didn’t die and heal over so they will still show as defects in the harvested log. But, the limbs on the smaller trees (#4, #6 and #8 in Table 1) died, fell off, and healed over, which will normally be the case for young rapidly growing trees. The “+” cloumn in Table 1 is my estimate of how much these trees will grow in eight years. These are not unreasonable growth estimates for poplar—or even oak in good growth conditions—in the southern Appalachian valleys.
We see from Table 1 that in eight years the value of these trees went up nearly threefold, not counting whatever price increases there might be for poplar after eight years! The value received for the smaller trees went up even more. This illustration shows why I tell people that their trees are worth more than money in the bank, presuming they stay healthy.
Let us examine why the value went up this astounding amount. The trees grew larger adding board footage to the measured logs. The grade of the smaller trees improved because the limbs fell off and the limb scars healed over to produce clear, higher grade logs. Finally because of the way logs are measured the logs grew twice—once in the earth, and again because of the Doyle scale used to measure them.
Lessons learned from this exercise
- Let small trees (trees #3 to #8 in Table 1) grow to improve their volume and grade.
- Large trees with defects (tree #2) don’t add much value with time. Harvest them and make room for better trees.
- Large, good trees (tree #1) add value with time but not as much as small trees. Harvest them if you need the money or if they risk becoming damaged with age.
So, which method should you opt for: clear cutting, logger’s choice, or selective harvest?
Most everyone chooses option #2 (logger’s choice) in my neck of the woods—a poor choice by my estimation. This choice takes many trees at the peak of their productive growth and leaves trash trees that should be replaced by healthy and vigorously growing trees. It is the equivalent of letting a competitor skim off your most valuable staff.
Your trees are your employees. Make them work for you or get rid of them and hire some new ones. If the woods has lots of damaged and/or low grade trees then clear cut it if you can stand to look at it afterwards. Otherwise hire a forester, or get one for free from the state, to evaluate your timber and select trees to harvest.
Table 1
Comparison of Tree Value Today vs Eight Years From Now
| Log # | Diameter/ Grade | Doyle Measure (bd ft) | Price/ 1000 bd ft | Total Selling Price | 8-year Diameter Increase | Grade | Doyle Measure (bd ft) | Price/ 1000 bd ft | Total Selling Price |
|---|---|---|---|---|---|---|---|---|---|
| 1 | 17″/P1 | 169 | $375 | $63 | +3″ | P2 | 256 | $375 | $96 |
| 2 | 17″/S | 169 | 150 | 25 | +3 | S | 256 | 150 | 38 |
| 3 | 14″/P1 | 100 | 325 | 33 | +4 | P2 | 196 | 375 | 74 |
| 4 | 14″/S | 100 | 150 | 15 | +4 | P2 | 196 | 375 | 74 |
| 5 | 12″/P | 64 | 325 | 21 | +5 | P2 | 169 | 375 | 63 |
| 6 | 12″/S | 64 | 15 | 10 | +5 | P2 | 169 | 375 | 63 |
| 7 | 11″/5 | 49 | 125 | 6 | +5 | P1 | 144 | 325 | 47 |
| 8 | 11″/S | 49 | 0 | 0 | +5 | P1 | 144 | 325 | 47 |
| Totals | – | – | – | $73 | – | – | – | – | $502 |
NOTES
Log grades
- P2 : clear, over 17″ diameter
- P1 : clear, 12 to 16″ diameter
- S : clear two sides, over 12″ diameter
- Grade 5 : 10″ to 11″ diameter
Prices
Typical for yellow poplar logs as of June 2007. No price increase was assumed in eight years—a most conservative assumption.
Eight-year increase: I assumed that the 17″ select tree had large limbs on two sides today and that it would not lose these limbs and heal over in eight years. I assumed that in eight years the smaller trees would lose the limbs they had today and they would heal over and present a clear log in eight years. The growth in eight years would be typical for trees of these sizes in Eastern Tennessee valleys.
3. Logging
Harvesting timber begins with the contract between the owner of the timber and the saw mill, or an independent logger supplying logs to saw mills. Skid roads are graded into the forest and a place is cleared and leveled for loading the log trucks. This work is typically done with a small bulldozer. Then logging can begin, an activity that occurs all year in my area.
Sloppy loggers can make a mess of a woods leaving skid roads to erode and remaining trees damaged by skidding and felling. But, even under the best of circumstances a logged woods is not a pretty sight. The contract may specify stabilizing the abandoned skid roads, replanting trees or any number of factors that lessen the impact of the logging operation on the forest.
When I was a kid I carried water and supplies to a pair of French Canadian loggers in the Adirondacks. They skidded logs with a single horse that only understood French. The horse was guided through the forest with oral commands, the French equivalent of the English commands “gee” and “haw,” horse talk for right and left. It was fun to watch but way slow by modern standards. Later in the last century logs were skidded with a small bull dozer and winch which was still slow by modern standards.

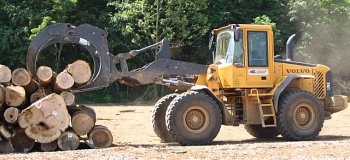
Now logs are skidded with the nimble device shown in the picture at left. One or more logs are hooked with a cable off the back of the skidder. A winch pulls the logs to the skidder, lifts the log end up off the ground and away it goes to the loading area. The blade on the front is handy for pushing brush out of the way, or bunching up logs. With the aid of the skidder and truck with a log loader shown in the picture below it is practical for a single person to do logging.

The small boundaries of timber located on private land in our area are most often logged by a lone logger. This person will cut some trees, remove the limbs and then skid these trees to a loading area. Here they are cut to length for optimum yield (8-16’), loaded onto the log truck and hauled to a local collection point or directly to the mill. One load of about 2000 to 3000 bd.ft. of logs is a typical days work. It is a hard, dangerous way to make a living.

I often hear people fret over the “wasted” logs left in the loading area when the logger moves out. If these logs could be sold at the mill they would have been hauled away. These remains are unmarketable for a variety of reasons—rotten centers, severe crooks, foreign material (nails and the like), etc.

Logs typically come into the yard on trucks like what is shown in the picture at right. These are boom trucks and they have the advantage that the logger can load the truck by himself with the mounted crane. This truck was unloading 3200 bd ft of very nice 16’ poplar logs. The logger is up there sitting in the chair of the boom because he had to climb up there and get the boom out of the way of the unloading crane.

Once on the ground the logs are spread out for inspection and grading (picture at left). The length of the logs is measured with a tape measure fastened to the graders belt, the log grade is determined from the diameter of the log and what ever defects are showing (crook, knots, or rot), the log is scaled (scaling is the term for measuring the bd ft in the log), and this information along with species and the logger’s identification is recorded on the end of the log with crayon.
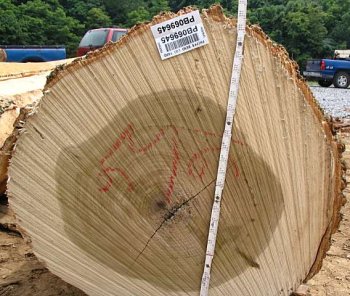
These crayon marks are shown on the end of the log in the picture. While we can’t make out what the marks mean, the log yard people can. Next, someone comes along with a bar tag and portable computer and enters the bar code and log information into a data base for inventory and payment of the logger.

The rule shown is used to determine the bd ft in the log. A close up of the rule is shown in this picture. Just to the left of the first ruler joint one can see the numbers 16,14 and 12 (these numbers correspond to log lengths) and three rows of numbers down the length of the ruler for each of these long lengths.
The opposite side of the ruler has the scales for other common log lengths. The end of the rule is placed at the bark/wood interface and the bd ft in the log is read from the value on the rule that aligns with the bark-wood interface across the diameter of the log. In this case if the log was 16’ long the top scale would be used and this log would contain 49 bd ft of lumber, according to the Doyle scale. Logs are always scaled from their small end.
Hardwood is typically scaled with the Doyle Scale. The formula for the Doyle Scale is
Bd ft = (D – 4)2 x L / 16
In words, subtract 4 from the log diameter (inside bark), square this result and multiply by the log length in feet divided by 16. The Doyle scale substantially underestimates the yield from small logs. This issue was discussed in more detail in Part 2 on selling timber.
The owner of the logs will be paid by the size and grade of the log. As an example the current price paid for a clear, large red oak log is about $0.50 per bdft, while a small red oak log, or one with several knots, would sell for only $0.20 per bdft. There is a considerable difference in the amount paid for the various species and this amount varies weekly according to demand. Currently, as of June 2007, the best cherry logs bring $1.50 per bd ft while hickory logs only bring $0.30 per bd ft. As an example of how demand can rapidly change pricing, prime red oak logs brought $1.00 per bd ft last year.
Logs are sorted, moved around the yard and piled with the machine shown in this picture. The big log in the picture is a red oak. Some inventory tags can be seen on the log ends.
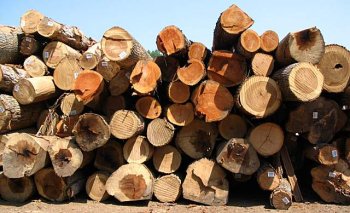
Here we see a portion of a log pile. This pile is unusual in that it has not yet been sorted by species. Log piles at the mill are always sorted by species because only one species at a time is sawed. The logs with the red ends are cherry and most of the other logs are poplar. This picture illustrates a trend in hardwood lumber quality. With the development of highly mechanized mills, as well as other market factors, it is now practical to saw logs as small as 10″, the size of the smaller logs shown in this picture.
This fact has an impact not only on the quality of lumber being sold today, but on future supply. If trees as small as 10″ are harvested today, it is going to be longer for the forest to grow back large trees. Twenty years ago it was common to get oak and poplar boards 12″ and wider in typical wholesale packs of hardwood lumber. Not any more. Wide lumber is going to become even more uncommon in the future. If you have an opportunity to buy exceptional quality hardwood make the investment if you can afford to. I can only see the trend in quality going down and price going up.
Many of the best logs that would have been sawed in times past are now sold as veneer logs. Veneer logs are worth at least 50% more than the best saw logs and the sky is the limit for the very best veneer logs. These are the logs that yielded the most desirable lumber (wide and clear and/or figured) when they were sawed.
Finally, the logs are loaded on a tractor trailer for hauling to the saw mill (right). Between 3,000 to 6,000 feet of logs can be hauled depending on the size of the logs.. Because these tractor trailers can haul more logs than the boom trucks it is more efficient to use them for the 75 mile trip from this log yard to the saw mill.

4. The Saw Mill
In the old days the saw mill was set up near where the logs were harvested. There was no automation in these simple mills—logs and lumber were moved by man power and a portable engine powered the saws. They were only able to saw a few thousand feet of lumber in a day. Now the mills are more complex, automated, and they are permanently located at sites which are conveniently accessible to wide spread logging operations. The smallest mill in our area saws 100,000 bd ft per week while the largest saws 100,000 bd ft in a day—that is about 30 tractor trailer loads of logs per day.
All of these mills use the same steps to convert logs to lumber. Logs are debarked, then brought to the saw or saws, and sawn into boards. Boards with bark on the edges are ripped to remove the bark. All the boards are then graded and defects are trimmed away to improve grade. Finally, the lumber is sorted and bundled by species, grade, thickness, and length, ready for shipment . The mills mainly vary in the amount of automation employed to move lumber around, the automation to determine how to saw a log for best yield, and the details of the saw or saws.
It is difficult to get good pictures of a mill in operation, so most of the pictures will be of the mill at rest for they will best show the equipment. The mill pictures were taken at two of the smallest mills in the area because they are closer and I can wander around them at will.
Debarker
The bark of the log accumulates all sorts of saw-dulling grit during the process of skidding the logs out of the woods and while on the log yard. This grit would dull the saw prematurely and result in lost production. Furthermore, the slabs and cut-offs are chipped for making paper. No bark can be tolerated in these chips. Therefore, mills remove bark with a debarker, a machine that comes in several varieties. Logs are loaded onto a live skid way with a forklift or log grabber such as was shown at the log yard (previous section). The live skid way is a series of parallel chains like on a bicycle which rotate over sprockets and move logs or lumber forward upon command of the operator. We will see an example later in the mill and during grading.

The operator sits in the green house on the right and the debarking head is on the left. The wires overhead power the debarker motor. A log is brought forward by the moving chains and dumped onto the cogged wheels, half of which are seen in front of the small log which has just been debarked. These cogged wheels capture the log on each side and upon command of the operator they rotate the log under the debarking head. The head is moved across the log on the track in the foreground.

This picture shows the debarking head (180° from the previous picture). It is just some rotating teeth which tear bark from the log. One can see the small log on the cogged wheels and the large log on the skid way awaiting debarking (it already has some bark gone—probably torn away during skidding). The debarking head is lowered onto the log and then moved across the rotating log to chew off the bark. The bark shreds go to a pit where it is hauled away and sold for mulch or fuel at the local paper plant.
Mill Front End

Here we see an overview of the front end of a typical mill. The yellow booth is where the sawyer sits. A joy stick with buttons controls various hydraulic devices and motors which move the debarked logs along the skid way, lift the log onto the saw carriage, rotate the log on the carriage, set the dogs, position the log to saw a set width of board, advance the log through the saw, and control where the board or slab goes when it falls from the saw.
It should be apparent that this is the most highly skilled job at a mill. A 19 year old wisp of a sawyer occupies this booth and he runs everything on this end of the mill. In the old days without automation three very strong men would be needed here.
The circular saw is shown in left center with the end of a log behind it ready to go through the saw. The saw is driven by belts from the blue electric motor, probably around 100 HP. The green conveyor can be swung with the red hydraulic cylinders to direct the slabs seen on the belt to the chipper, finished boards to the green chain, or cants to a gang saw. More on these parts later.
The Skid Way and Log Carriage
The next two pictures were taken at a different small mill. The lighting in this mill is better for showing the log carriage. This mill does not debark logs, which is very uncommon, but the skid way and log carriage functions are typical, although the carriage is less automated than most (it is a small mill). Logs are carried to and dumped onto the live skid way in front of the main saw called the head saw (see below). The picture below shows some walnut logs on the skid way chains. The crescent shaped pieces of metal in the foreground hoist the log onto the saw carriage with a hydraulic cylinder.

In the old days the skid way was just a sloped ramp. The sawyer and a helper rolled the logs up the skid way and onto the saw carriage with cant hooks. It takes great strength to roll large logs. One day while I was at a mill someone bet the sawyer that he could not pick up a hickory railroad tie he had just sawed. The sawyer hoisted it to his shoulder with ease and then danced a jig for good measure.

This picture shows the log carriage. The carriage is the heart of the mill and it performs several functions. It holds the log securely during sawing. It travels on a track to move the log across the saw and it advances the log perpendicular to the saw in increments determined by the sawyer to produce boards of specified thickness. The log lays on the horizontal metal piece just above the carriage wheels. It is supported in back by the vertical head blocks and held on the carriage by the dogs, the downward pointed things on each head block. One can sometimes see dog dents in the edges of hardwood lumber. They will be serious dents about 1″ wide in the edge of a board.
The log is positioned relative to the saw by moving the head blocks forward or back. To saw the log the carriage is pulled toward the saw with a cable, which can be seen under the carriage. The large dial at the top of the picture tells the sawyer how thick the board will be.
The big orange thing is one variety of log turner. It has a chain with some teeth and on command rotates these teeth to position a log. A hydraulic cylinder pushes the device forward to the log on the carriage. The teeth engage the log and rotate it. Hardwood logs are typically sawn to yield the most high grade lumber. To do this the log is frequently turned to find the clearest log face from which to remove a board.
It takes a great deal of skill to set up the carriage. If it is not aligned perfectly the mill will cut boards that are not of uniform thickness. If the lumber is not uniform it will be down-graded by the lumber inspector.
The Head Saw
The first saw a log encounters in a typical hardwood mill (the head saw) is a circular saw, seen here. The job of this saw is to make at least two parallel flat sides on the log and in most cases this saw also removes as many high grade boards as the log will yield. In smaller mills this is the only saw that makes boards from the log. In larger mills this saw saws the log down to a cant—a portion of the log with at least two parallel faces—and the cant is sent to a band saw or a gang saw (more on this operation later) which more rapidly converts the cant to boards (usually lower grade boards).
The circle saws are fast and accurate and most importantly, it will be the only area in the mill where the log can be turned to search for the clearest log faces to produce the highest grade of board. This saw typically cuts a ¼” kerf. The teeth, called “bits,” are removable/replaceable and held in the saw plate with rings. The sawyer sharpens these bits on the saw with a file, and then swages the end of the bit to widen it to provide set for the saw. If a nail is hit and it ruins a “bit” (tooth), or a few bits, new ones can be quickly installed. If a fence insulator or a bolt is hit and the saw plate is damaged, it must be taken to a saw shop to have it re-hammered back into shape.
The first boards removed from the log will have rough edges where the bark was attached. There are various strategies for removing this rough edge. This mill has two small horizontal saws perfectly aligned with the main saw to cut a strip from the top and bottom of a board as it passes the main saw. A laser beam shows the sawyer where these saws will cut and he moves these saws up and down to just remove the rough edge from the board being made by the head saw.
An alternative device to do this task is an edger. It is a sturdy rip saw with two vertical blades which can be adjusted to rip a board of specified width by removing a strip from one or both sides of the board. Rollers grab the board and feed it in a straight line through the edger. Sophisticated edgers have lasers, scanners, and computers to calculate the best value and rip the board accordingly.
Various other parts of the mill can be seen in this picture. Sawdust falls out the metal chutes under the saws into the pit where it is scooped up and carried away with the dust chain to a storage area. It will be sold for mulch, cattle bedding, or fuel for the local paper mill. You can see the small oak log secured on the carriage and behind it, logs on the skid way. The sawyer has a bird’s eye view of the saws from inside the yellow booth. The window protects him from flying debris.
The advantage of the head saw and carriage is that the sawyer can turn the log to find the clearest faces from which to saw boards. This process is relatively slow, but it pays off in yield from the log so long as the log has clear faces to saw from. In high volume mills once the high grade boards are removed by the head saw the cant will be passed to a faster sawing operation to saw the lower grade lumber. A gang saw is a common machine for converting cants to boards. A gang saw is similar to an edger but with multiple blades spaced a board width apart. It converts the cant into boards in one pass through the machine.
Sawing Strategy
Our retail customers would be astonished that we didn’t have 6″ or some other standard width boards of their choosing. In a softwood mill the objective is to make boards of such a specified width. After all, the end use of much softwood is dimensional lumber for construction. In a hardwood mill the objective is to get the highest value boards from the log, with little regard for width. Clear boards from the outside of the log can bring ten times what the pallet lumber from the heart brings.
The clearest lumber in a log will be located on the outer portions of the log. This is the wood which grew after the limbs died and fell off the young tree. The overall strategy for sawing hardwood lumber is to remove as many high grade boards from the outside of the log as possible in the shortest amount of time, while concentrating defects—knots, rot, pitch, etc.—in the remaining interior portion of the log. Turning the log enables the sawyer to find clear faces to saw but it takes time away from sawing. The sawyer is always budgeting his time between trying to get the highest grade lumber from the log vs getting the log sawn and moving on to the next log.
This strategy of frequent turning of the log on the carriage will result in boards narrower than if the log was just sawed through in one position on the carriage. Through sawing would yield wider lumber that could be book matched. While through sawing might be more desirable for our needs it would yield less high grade lumber overall from the log. But, commercial mills saw lumber to meet the needs of furniture factories, not us.

The following sequence illustrates an example of the sawing strategy which would be used on an ideal log with no defects in its outer portion. The sequence of turning and sawing which would be done on logs with defects on their outer portions will vary somewhat from this ideal example.
At right is a view of the end of a typical log to be sawn. Note the blue arrow pointing to a ripple in the grain in the pith. We’ll use that as a reference to follow the orientation of the log in the following sequence. If it isn’t otherwise obvious, the green line in some pictures represents the cut made by the saw blade.


Sawing starts by removing a slab plus two or three boards from one side of the log.
Next the log is rotated 180° (note the blue arrow)…


…and a slab plus two or three boards are removed from that face.
The log is then rotated 90° (note the blue arrow)…


…and a slab removed. Having removed just the right number of boards from the log in the first two positions (not perfectly illustrated in these pics), followed by rotating the log 90°, subsequent cuts from the remaining cant will not have a bark edge. These boards will not require a trip to the edger and that saves labor. The sawyer typically stops cutting from this face 3″ away from the pith.
The log is now rotated 180° (note the blue arrow)…


…and boards removed from the last face, again continuing until the sawyer reaches the 3″ from the pith point.
Not shown in the preceding series of pictures, but continuing, the sawyer rotates the log through 90° once more and takes one more plank off, then rotates the log a final time through 180° and cuts off one last board leaving a boxed heart or cant 6″ square (last picture, above right). This heart wood (center) of the tree is low grade material for a variety of reasons. It contains the pith, cracks, and many knots from early in the tree’s life. The boxed heart goes for pallet material and other low grade wood needs.
In the above illustration the sawyer didn’t encounter any defects until the log was sawed down to a 6″ cant. In a more realistic case a knot or some defect that would cause the lumber to be downgraded would be encountered in an early cut. In this case the log might be turned earlier in the process and/or more frequently. Log scanners coupled to sophisticated computer algorithms are replacing the judgment of the sawyer in some mills.
To meet the specifications for the top grade of lumber, FAS (firsts & seconds), the boards must be at least 6″ in width. Notice therefore how cutting the log in this sequence ensures none of the potentially high grade boards from the outside of the log fall below the critical 6″ width. Depending on market factors this 6″ goal is not always important. Keep in mind that this discussion was for an ideal log. The details of sawing an actual log will vary somewhat depending on its shape and the defects encountered in sawing it.
5. Inspection and Grading
Grading Lumber
After the log has been converted to boards they are inspected by a lumber grader. The grader has two tools, a lumber rule in his left hand and a crayon on the end of a stick in his right hand. The lumber grader’s first job is to determine if the value of the board can be improved by cross cutting it into a shorter length. For example, the log may have been 12′ 6″ long yielding boards 12′ 6″ long. (note: logs are cut 6″ longer than their nominal even foot length. This extra length enables the boards to be double end trimmed to 1″ over the nominal foot length to remove end checks which may have occurred during storage of the logs on the log yard). Suppose one of these boards had a large knot at 11′ 6″. By trimming the board at 11′ 1″ the value of the board would be improved because it would now become a higher grade board and worth more, even though a foot of this board has been scrapped. The lumber grader would make a trim mark with his crayon to indicate to the trimming operation to trim this board at 11′ 1″ length.
The next task is to determine the lumber grade of the board after trimming, or as is, if the board is not to be trimmed. The grader uses his lumber rule to turn the board and to make measurements of the board to assist in determining grade. The grade is indicated on the board with a mark from the crayon—“O” for top grade, “\” for the next lower grade and “X” for next lowest. The final task of the grader is to measure the bd ft of the board and enter it and the board grade on a tally sheet described below.

This picture shows the least sophisticated lumber inspection I have seen. Boards come from the mill, get dumped at the head of the green chain, and move past the grader for inspection. After he makes his marks, one of the helpers trims as needed with a chain saw. Finally lumber is pulled from the chain and stacked into shipping packs by length and grade. When about 1000 bd ft has accumulated of one grade and length, the pack is banded and loaded onto a truck for a trip to the dry kiln.
In the largest mills everything except the grading is automated. Once the grader makes his marks the board passes under automated cross cut saws which drop to trim to the marks. Robots remove the lumber from the green chain and stack it by grade and length. It is likely that scanners and a computer will become common for inspection in the most automated mills of the future.
We saw how turning the log to saw for best yield results in lumber of random width. The trimming operation then results in lumber in lengths ranging from 6′ to 16′ in one foot increments. For this reason hardwood lumber is most frequently sold as random lengths and widths. However, lumber is assembled into packs of nearly the same lengths. So, for example, a pack of 12 foot lumber will contain 11 and 12 foot long lumber, or maybe even 9, 10, 11, and 12 foot long lumber.
Tallying Lumber

The process of measuring grade and quantity of lumber in a pack is called tallying. The bd ft in the board is determined with the lumber rule, shown at right. This process always fascinated our customers. The rule is hooked over the edge of the board and the bd ft in the board is read from the rule.

The scale used to determine bd ft depends on the length of the board. The top scale of this rule is for 16′ lumber, the next for 14′, 10′, and 12′. These length values are stamped on the other end of the rule next to the handle. Odd lengths are on the other side of the rule. The dots next to or between digits are located at that bd ft value and the vertical marks are located at the ½ bd ft values.
If the board falls less than half way to the next increment one rounds down its measure, or rounds up if it is greater than half way to the next value. If it falls at exactly half, one alternates rounding up and down. For example, if this board was 16′ long it would contain 10 bd ft of 4/4 lumber, if it was 14′ long it would contain 9 bd ft, if it was 10′ long it would contain 6 bd ft and 12′ long it would contain either 7 or 8 bd ft because the edge of the board falls on the ½ mark between 7 and 8.
The values stamped in the top metal part of the rule are for determining thickness, by quarters. Lumber sawn as 4/4 is actually cut about 11⁄8″ thick such that it winds up 1″ after shrinking in the drying operation. Lumber sawn as 8/4 is actually cut 2¼” thick for this same reason.

For each board the grader makes a mark in the tally sheet next to the corresponding bd ft value. There are ten boards per box—nine dots and a slash complete the box of ten. A filled out tally sheet is shown at right. I don’t have an official printed sheet any more but they are easy to make, as shown. This pack of 5/4 red oak has 27 pieces that are 6 bd ft as measured by the rule, 22 pieces that are 7 bd ft, etc., for a total tallied as 4/4 lumber of 867 bdft. This tally is then multiplied by 5/4 to get the tally as 5/4 lumber. If this was kiln dried lumber it is common to then have this tally multiplied by 1.07. All the wholesale packs of lumber we ever bought had this 7% added to the actual tally.
Why? It all goes back to grading convention, I think. Lumber grade is typically determined before drying. Defects which occur or show up after drying are charged off to whomever is buying the lumber. Because grade is determined before drying, I suppose it became convention to also determine bd ft before drying. Since lumber shrinks about 7% during drying there should be no mystery as to where the tariff originated.
Retail customers go crazy if the seller adds 7% to a tally, so we never did it in a way the customer saw it. It never bothered me because I expected it and I just adjusted our cost of the lumber up 10% to cover this 7% shrinkage and a bit of down grade from drying. We then billed on actual measured bd ft.
The National Hardwood Lumber Association (NHLA) instruction book for grading lumber is more than 100 pages in length. I considered, but gave up on, the daunting task of trying to summarize its Byzantine rules. But there is one point I want to make as a result of trying to occasionally sell hardwood lumber to retail customers. First, some background for this point.
Hardwood lumber grades are set by the NHLA in cooperation with producers (sawmills) and buyers (furniture factories). I don’t know the actual number, but I suspect that retail hardwood lumber sales are not even 1% of total sales. It follows that the small volume furniture makers’ needs and concerns have little influence on how lumber is graded or marketed on the wholesale scale.
Furniture factories historically have been the main customers for hardwood lumber. They build furniture by ripping and cross cutting boards into smaller pieces and then gluing them back to make parts sized to fit their needs. Because the factories break lumber down into cuttings, lumber is graded by what fraction of the board will yield these clear cuttings and how big these cuttings will be. The better grade board will yield a larger fraction of clear cuttings and these cuttings will be larger in size.
There are numerous possible lumber grades. In decreasing order of yield of clear cuttings they are: Firsts, Seconds, First & Seconds 1 Face, Selects, #1 Common, #2A Common, #2B Common, #3 Common, etc. In spite of these possible grades I have never seen a pack of Firsts for sale. The highest grade of lumber actually available in a wholesale pack is a combination of the first three grades and this grade is abbreviated FAS1F and Better, which translates firsts & seconds, 1 face and better. When small logs are all that is available—for example in cherry and maple—it is common that the best grade that can be bought wholesale is Selects and Better (Selects allows more narrow lumber than the higher grades). Pallet lumber is #3 Common, and #2 Common looks like knotty pine.
And now to the point of all this. A factory making end table tops would get essentially the same yield from a clear board 12″ x 12′ as they would from a 12″ x 12′ with a small knot or two. Hence, it matters not to the furniture factory that these two boards would fall in the same top grade. However, these two examples would not be valued the same by a retail customer.
The best grade of lumber that can be bought in commercial quantities is a far cry from the clear lumber most retail customers expect to get for their $6/bd ft retail sale price. I will leave it to the reader to imagine the difficulty a retail operation has buying Sel & Btr cherry and trying to sell it retail. Further, imagine what would be left in this pack after retail customers were allowed to pick half the lumber out of it.
6. Drying
Drying Basics

What happens to lumber after the green chain (see previous section—Inspection & Grading) has changed markedly in the past twenty years. In the past there were numerous small mills in my area and they supplied lumber to the area furniture factories, flooring factories, kitchen cabinet factories, and other high volume end users of hardwood lumber. The lumber was seldom end trimmed or even graded at the mill. The lumber was sent by truck to these nearby factories where it was graded, stacked with sticks between the layers to enable air circulation, and piled outdoors in stacks as high as a fork lift would reach—about 20′.
It was not uncommon to see hundreds of thousands of bd ft drying by these factories. When the lumber had air dried to around 30% MC (moisture content) it was moved to steam heated kilns and dried to about 7% MC. The factories used their wood waste to make the steam. Most of these furniture factories have closed, so today these local markets are gone, as well as the small mills that supplied them.
Today, huge and highly automated lumber operations sawing as much as 100,000 bd ft of lumber per day dominate hardwood lumber production. It is common for these large mills to have drying facilities integrated into their operations. They’ve found it useful to produce attractive bundles of lumber for sale often for the export market. From 50 to 70% of the hardwood lumber produced in recent years was exported.
Nowadays, what happens to lumber after it comes off the green chain varies widely among mills, depending on the market for their lumber. In what follows I will describe some typical operations found in my area.
Before the lumber leaves the green chain the lumber will almost always be double end trimmed to a length, about 2″ longer than nominal foot increments. This operation makes the bundles more tidy at the expense of about 4″ of end trimmings going to waste. I prefer untrimmed lumber for my use and get this extra 4″ for free. The ends may be sealed but often they are not. The lumber will be assembled into packs of about 1000 bd ft according to species, length, and grade. The lumber packs may be dipped in a chemical bath to prevent the growth of mold and fungus, but more often it is not dipped. If the lumber is to be sold green then the packs are banded, loaded onto trucks, and sent to the domestic customer or shipping point for export.
Stickering Piles
I am going to dwell more than usual on this topic because it is important to anyone drying their own lumber. In the past, lumber was usually dried by the end-use customer but now it is common for the saw mill to integrate drying into their operation. Once the lumber comes off the green chain it must begin the drying process immediately unless it was dipped in the chemical bath. Otherwise, susceptible species like maple and other light colored woods can begin to develop mold which will stain the lumber grey or black within a day or two in hot weather.
Getting the surface dry is sufficient to prevent mold growth but if the moisture content of the interior is not brought down fast enough, enzymes within the wood make chemicals that darken the lumber when it dries. This defect is called chemical stain and it can be confused with mold stain. Sticker stain is one or the other of these stains that occurs under the sticks used for stacking lumber. It is usually the result of having used sticks that are not dry.
The first step in the drying process is to get sticks between the layers of lumber so that air can freely circulate between the layers. This picture shows some stacks that just came out of the kiln with the sticks still in place. The important points of preparing these stacks are illustrated in this picture. The objective of the sticks is to enable air circulation between the layers while adequately supporting the lumber so that it stays flat during drying.
In this case the sticks are 8′ long and ¾” thick, although I have seen these sticks up to 1″ thick (thicker sticks enable better air circulation but the kiln will hold less lumber). The bottom packs are cherry and the sticks are 12″ apart which is closer than I have seen in most cases. This operation, Mountain City Hardwood, told me they stick cherry and maple every 12″ and other species at 2′. It is common to see stick separation of 18″ at other operations.

Some mills use kiln dried sticks made from domestic species but this mill uses foreign woods that don’t pick up moisture as readily as domestic species. At this mill grooves are milled into the sticks to promote air circulation and hence, more rapid drying under the stick. These are grooves in a 4×4 used to support the stacks.
It is essential that the sticks be aligned one above the other to properly support the layers. These piles are assembled by automated stackers and they are perfect. When these stacks were in the kiln the 4×4’s which enable the fork lift tines to go between stacks would have been aligned exactly under the sticks. Note that the bottom layer has already begun to sag because it is not supported under each rank of sticks by a 4×4. Any warps and wiggles before drying will be flattened by the moist hot environment of the kiln provided the lumber is properly supported in the kiln. But, any bows set in the hot lumber when it leaves the kiln will be there forever.
Logs are cut in even foot increments so most lumber will be even foot increments. However, as a result of trimming some odd length lumber is produced. Lumber stacks are assembled from just one even length of lumber plus the odd length 1′ shorter. These odd lengths present a problem for supporting the layers. This problem is usually dealt with by alternating the end alignment of these odd length pieces when the stack is assembled. Note in the top pack of 12′ long poplar the sticks are spaced every 2′ except at the ends of the pile where they are spaced one foot. This extra stick one foot from the ends support the ends of the 11′ long pieces in the interior of this pack. The odd lengths should be in the interior because they are supported better there.
Predryer
After stacking (or stickering as it is often called) the stack may be placed outside with a cover over it for air drying. Air drying is cheap and it is what was usually done some years ago. But the drying rate is subject to the weather. Too slow drying and the lumber may stain and too fast drying and the lumber may check. In any case the wetting, drying, and sun will turn the lumber grey. While this discoloration is of no practical consequence, nowadays it is important for lumber packs to be attractive even to the point of painting the ends of lumber stacks and putting company logos on the sides. Therefore, it is common for large mills to use predryers.

The function of the predryer is to do what outdoor drying once did, but in a controlled way. By carefully controlling the initial drying rate, most drying defects are avoided and the lumber stays bright and attractive. Predryers come in many variations of sophistication. This predryer is a pole building with fans to move the air through the stacks and side vents which are opened or closed to control humidity, which in conjunction with the fans, determines drying rate. Predryers can hold as much as a million bd ft of lumber.
Kiln
The predryer can do its job with out heating the air, but getting lumber to a marketable moisture content of 7% requires heating the air well above ambient conditions. While the predryer can be a relatively crude affair, kilns are, by comparison, sophisticated buildings and greatly more expensive to build and operate.

This picture shows kilns of 200,000 bd ft capacity. Every kiln I have ever seen looks just like these—they vary only in width. They are always silver—I suppose to reflect heat back into the interior. In the front they will have large sliding doors to accommodate fork lifts full of lumber stacks. These kilns are heated by steam generated by burning wood waste from the saw mill. Operating costs for these kilns many be only a few dollars per 1000 bd ft of lumber dried. Smaller kilns often are heated and dehumidified with a heat pump arrangement. Needless to say, an all electrical energy source results in higher operating costs.
To avoid drying defects water removal must be uniform within the stacks and the rate of removal matched to the species and thickness of lumber that is drying. These criteria are accomplished by fans and baffles that direct air though the stacks. There is a hurricane of air moving inside an operating kiln and a constant hum of the fans. By controlling the temperature and humidity of this air the drying rate is controlled so that moisture gradients which would induce stress in the lumber are minimized.
While it is common for the kiln to be charged with air dried or predryer dried lumber this particular kiln dries lumber right from the saw. It takes about a month to dry green 4/4 oak in this kiln while 4/4 poplar can be dried in a week. Kiln drying times are shorter if the lumber is predried because it starts out drier to begin with. It is common practice to dry to a moisture content of 5% and then steam the lumber back to the industry standard of 7%. The post drying steaming relaxes any drying stress induced in the initial drying process.
7. Lumber Prices and Buying Lumber
For this discussion I will use poplar as an example. Its price tends to be more stable so my numbers will be more consistent. The prices are current for July 14, 2007. Prices for hardwood lumber are published weekly in trade publications such as the Hardwood Market Report.
Let us begin with a prime poplar log 12′ long and 16″ diameter. This log will scale 108 bd ft by the Doyle scale (see Part 5 Inspection and Grading for a discussion of log scaling). The log will bring $35 delivered to the log yard (Part 3, Logging) here in eastern Tennessee. Of that $35, the logger will get about $17.50 and the land owner $17.50 (see Part 2 Selling Timber). The actual split will depend on how easy the forest is to log and the quality of the timber.
This log will yield abut 136 bd ft of lumber if sawed on a typical circle saw with ¼” kerf (Part 4 The Saw Mill) or more if the log is sawn more or less with a band saw which has a narrower kerf. This log will typically yield lumber in all the grades from #2 Common up to FAS (Part 5 Inspection and Grading). Current prices for green (right off the saw) 4/4 poplar are $790, 390, 295 for FAS, #1 Common and #2 Common respectively. Prices are always quoted per 1000 bd ft. These prices are determined by demands in the various markets for these grades. Amateur woodworkers don’t buy enough lumber to have any significant impact on demand and price.
Let us assume this log yielded after grading half FAS lumber, and one quarter each #1 and #2 Common. The mill would receive $54 for the FAS lumber, $13 for the #1 Common and $10 for the #2 Common, for a total of $77. In poplar the FAS grade will be largely clear lumber, #1 common boards will have one or two knots, and #2 will look like knotty pine.
Next the lumber is dried. Prices for KD (kiln dried) 4/4 poplar are $950, $560, and $405 for the grades described above. Prices for KD 8/4 are $1015, $750. and $515, respectively. The 8/4 prices are higher because it takes longer to dry the thicker lumber, there is more downgrade from defects induced in drying thick lumber, and another factor which is less obvious. Logs will yield less high grade lumber when sawed 8/4 than 4/4. The reason is that lumber is, with one exception, graded from the worst side of the piece. Adjacent saw cuts that yielded a FAS 4/4 board followed by a #2 common 4/4 board would yield one #2 common 8/4 board. The premium for 8/4 oak is especially high because it must be dried exceptionally slowly to prevent cracking and even then there may be drying defects.
The quotes for KD lumber at the wholesale level will always state that the lumber is “measured before drying” and it may state that the grading is before drying. This is a code phrase to indicate that the KD tally (Part 5) will have 7% added to it on the billing. Sometimes it is hard to rationalize the price difference between green and KD lumber. The obvious factors such as cost of drying are confounded with other factors such as spot shortages of KD lumber.
Your local retail lumber store will likely pay more than $950 + 7% for the lumber in their rack. There will be shipping charges, which are not great, and the lumber may pass through one additional middle man on its way to the retail store. This middle man may do additional sorting of the lumber for the retail trade, especially in species like walnut and cherry where the differences in quality within the FAS1F & Btr grades is much greater than in the case for poplar. I will leave it to you to investigate how much mark up there is at your local retailer.
We can see that there are many places along this supply chain where the woodworker can buy lumber, from trees in the forest to the retail store.
Other than the need for logging equipment, buying trees and logs presents a special problem for the amateur woodworker. Beyond obvious defects such as branches an experienced timber person will see subtle irregularities in the bark which signal defects that lie within, and which the amateur may not detect. The first walnut veneer log I ever bought to saw had a large rotten cavity hidden in its center and the log yielded mostly lower grade lumber. Buying a log is the proverbial “buying a pig in a poke”—especially for an amateur. You will also need to learn to dry the wood without ruining it (no small task) and you will need to learn to efficiently use the lower grades of lumber from the logs in your projects. But if you have a trustworthy sawmill that will sell you logs, this is by far the least expensive route to lumber. Additionally, one can pick logs that have figure or size that could be attractive. I recommend this route for the serious woodworker. Bribing the sawmill with cookies and woodworking trinkets is effective.
Buying graded lumber from a mill is less risky and it is only somewhat more expensive a route to lumber. However, you won’t be able to pick logs which might yield figure or unusual sized boards.
Neither of these routes is available to persons who don’t live where hardwood is produced. Lumber is marketed internationally, and shipping is cheap. Every locale has a cabinet shop and they will have a source of lumber at near wholesale prices. Find out from these shops where they get their lumber. At least here in the southeast these suppliers will deliver a wholesale pack of lumber right to your door on the trucks they use for supplying cabinet shops. You may have to buy a minimum of 200 to 500 bd ft and you will be buying by grade. Recall that within a grade, lumber may differ substantially in quality—especially so for walnut and cherry (Part 5).

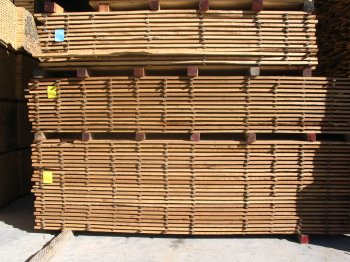
This picture shows a shed at a typical wholesale operation. The forklift is for unloading and loading trucks. It can lift several thousand bd ft of lumber at a time. When they get gravel on the tines and then lift a pack onto my truck the gravel embeds and it is not nice on planer blades. The colored ends on the lumber packs are purely cosmetic.
Another route to less expensive lumber is to buy the lower grades. The secret to working these lower grades is to learn to pick through a stash to find clear cuttings that efficiently make use of the clear wood between defects. Most of my furniture framing is cut from cheap #2 common poplar. If I have a good selection to choose from I have almost no waste. In walnut and cherry the #1 common grade is about one half the top grade price. The #1 Common grade typically has less sap and an experienced woodworker with a good stash to choose from can work it with little waste. You might only need the higher grade to make a long table top.
I would like to credit the following companies for help assembling this material:
- Banish and Rickard
- Gilbert Hardwood
- Hunterville Hardwoods
- Linda Hughes Lumber
- Malone Logs and Lumber
- Mountain City Hardwood
- Stuart Lumber
The people at these companies have been most generous of their time and patience in letting me take pictures of their operations.