Searching For Unicorns In A Field Of Abrasives And Wood
Buff your way to a sharper, more durable edge...the Unicorn Method
by David Weaver
Before presenting this method, I would like to thank Bill Tindall, Winston Chang and Wiley Horne. It's one thing to have an idea and find that it works in practice. It takes contributions from others to see if it can be applied easily and to see if this application results in success. Bill, Winston and Wiley have taken this proposed method and run with it with varying equipment and results, showing that not only can the method be used successfully and almost immediately, but that it's forgiving.
Sharing this method on Wood Central resulted in interesting discussion, pictures from others and proving out of the method far beyond what could have been expected.
To view more excellent work on the Unicorn method, including a video of the technique, visit Winston Chang's website.
Part 1: A summary of the method, all you really need. The rest is details and testing.
Unicorn: something with a combination of positive attributes so rare that nobody believes it exists.
When we dull chisels for most woodworking tasks other than deep mortises, the dulling or edge failure generally occurs at the tips of chisels. Damage starts at the very tip and if unaddressed, spoils the cutting ease and propagates further. The very tip in this case refers to the first several thousandths of an inch. If breakage occurs much deeper than that e.g., breaking tips or corners from mortise chisels, then that's generally a matter of abuse or defective tools and that should be addressed. This article discusses a method to modify and sharpen the tip of the chisel with ease, and without having to directly observe what's being done at a level small enough that's measured in thousandths of an inch. At the same time, once the failure at the tip of the chisel is eliminated, the bevel thickness behind the edge can actually be decreased.
The result is a chisel that holds an edge as well as or better than a chisel with a steep bevel, but also has the cutting ease of a chisel that has a shallow bevel, or at least near it. Perhaps more importantly, application of this method will allow underperforming chisels to work about as well as those of much higher quality. If all of these results weren't backed into just by tinkering and progressive improvement, but rather were goals from the start, it might be appropriate to refer to this as searching for unicorns.
The method is simply this (for chisels and gouges other than mortise chisels):
A primary grind of 20 degrees. Regrind when the secondary bevel becomes difficult to refresh.
A freehand honed secondary bevel only slightly steeper; low 20s to a maximum of 25 degrees honed with any medium stone. Hone off most or all of the buffed edge from the next step each time you hone.
Evenly buff the honed edge with a power buffer for about five seconds on a stitched cotton wheel that has been charged with a relatively fine (super fine is not needed) abrasive buffing compound bar. Buffing is done approximately at 45 degrees. You are buffing only the very tip of the chisel when you do this.
If you find that your chisel continues to chip or fold in use, increase the amount of buffing. Some slower-abrading steels, like PM V11 or hard high-speed steel will take about twice as long to buff.
If you find that your chisel does not chip but feels dull, experiment with buffing less making the contact angle with the buffing wheel more acute.
The entire rehoning process takes about 30 seconds and will result in an edge that you are not likely to match honing on stones or fine abrasive media. Add another minute or so to refresh the grind once the secondary bevel grows too large to rehone quickly. It's that simple. The rest of this article describes details, but the process is no more difficult than this short summary and most will find that this process improves all paring, bench and firmer chisels, and masks the poor edge holding quality of even poor chisels.
The remainder of this article discusses how this method was stumbled upon, why the angles are described as above, details on buffing equipment and a test to show how this method improves most chisels and makes poor-performing chisels nearly equal to the best even in heavy work. These details are provided as a courtesy, but you do not need to read the remainder of the article to apply this method. It is simple, quick, inexpensive, and accessible. Do not let the volume of information that follows distract from that. When you are finished, you should have an edge that looks like the one shown in Figure 1 below. Notice the small bright strip at the very tip, and notice that none of the rest of the bevel has been steepened or heavily polished. The slightly lighter gray area above the polished strip is the secondary bevel that in the case of the pictured chisel, measures at 23 degrees.
Figure 1 -- Chisel Showing Small Buffed Strip at the Cutting Edge
Part 2: What is the Rationale and Why the Angles?
You may use a buffer or felt wheel to hone chisels, you may have rounded over edges, but if you haven't used the same details as shown in the summary buffing only the tip and being quickly diligent about resetting geometry each time before buffing, then you probably will be missing some benefits for no good reason. The background on where this came from follows, and it may help in applying this method to more than chisels.
Several years ago, a knife enthusiast named Cliff Stamp posted a video discussing the rash of premium knives with hard honing steel and thick bevels. Cliff discussed relatively low-quality knives made of simple steels performing well in slicing tests and actual normal day to day tasks if they had a comparatively thin bevel. Try slicing some mushrooms with a five inch knife made of neutron star steel with a ¼â€+ spine. No good and a valuable lesson about geometry and cutting. Separately, he commented that the combination of edge and bevel behind the bevel determines where failure of the edge will occur. If a very thin edge is used, it will fail at the very edge, but may also push into the bevel. If the tip of the edge is rounded over, the edge may not fail, but the bevel could buckle behind it. Or not. I took account of this advice and improved my knives and forgot about it for tools. Why? It sounded novel, but also sounded like a way to exchange small damage at the edge for big damage into the bevel.
For chisels and plane irons, there are various theories about different types of primary bevels, and some debate about which creates the strongest edges, but most of these are based on supposition and not observation of actual edge failure. Faulty supposition is how old wives tales start. Supposers peddling old wives tales generally won't encourage you to test their theories for obvious reasons.
Through off and on fits of laziness, I have gradually been honing less and less of the chisel tip to eliminate failure, finding that in heavy work mortising planes, the amount of the edge modification that needs to be done is only a very small amount, similar to the buffed strip shown on the chisel in the article summary. Modifying more of the edge steeper does not improve outcomes, but it does make a chisel feel blunter.
I finally stumbled upon using the buffer and some softer abrasive wheels to maintain incannel crank neck gouges as damage with them is punitive and honing is slow. They are push chisels, so the edge needs to be shallow. They are hard to hone compared to flat chisels, making damage intolerable. That made them an ideal candidate for a shallow bevel and a modified edge. With the edge buffed to a finish, and the shallower bevel behind it, they were easier cutting and more durable than I have ever achieved with single bevels or normal sharpening with stones. It only made sense after that to see if a shallower angle will hold up on chisels.
Because it was so easy to almost walk into this unintentionally, there must be no chance that it is not already being done elsewhere. One of the carving systems marketed to carvers appears to be doing something similar with a combination of hard and soft felt wheels and proprietary pastes, and more than one professional carver has mentioned to me that they do their sharpening on powered buffs rather than with stones. Carving seems like a natural application since profiled tools are more difficult to sharpen, and edge damage is intolerable as it leaves little lines on carved elements.
In addition, there was a trend of using layered leather or paperboard wheels almost two decades ago. These wheels are usable, but they and high speed hard felt wheels are too strong cutting for the small modification we are attempting here. High speed with those harder wheels generates heat, and their roughness batters edges. Felt and leather wheels can be used for this method at lower speeds, but success is easier with a buffer as the buffing wheel is more forgiving of changing variables and does a better job of stropping the wheel free of any remaining wire edge.
Before we move on to other details, it's useful to address a few questions that have come up more than once:
Why not use the method on mortise chisels? Mortise chisels depend on their ability to rotate inside of a mortise to separate a segment of chips from the cut line. If the primary bevel is made shallow on all but the tallest profile mortise chisels, this rotation is negatively affected. If a mortise chisel is chipping at the very tip, it's fine to do a tiny buff of just the edge without modifying the rest of the profile.
Can this be done by hand? Yes -- a few strokes on fine abrasive lifting the chisel handle and dragging will do the same thing. I've rolled edges like this for several years before using a buffer. It is easier to roll the edge with a fine hard stone and then strop lightly on a charged strop than it is to physically strop dozens of strokes on a strop charged with abrasive.
Why not make the primary bevel even longer and shallower? Some brief testing with a 15-degree primary angle showed an edge that can't tolerate malleting, and grinding at a shallower angle is more difficult than grinding at 20 degrees.
Can this method be used on planes? Yes. Two methods to use the buffer to finish plane irons are posted as an appendix to this article. One provides a very strong edge, and the other provides a result similar to honing with fine stones.
Part 3: A detailed description of the method
This method is described with two bevels and a buffed round over. There is some aversion to multiple bevels, and if that is the case, a single hollow grind at the secondary bevel angle can be substituted. That is, just hollow grind the edge to something like 23 degrees. Only the buffed edge and the secondary bevel are critical to the cut. The shallower primary bevel is added for ease of maintenance and to make sure the job can be refreshed and completed with minimal effort.
Hand honing a single freehand bevel is also fine at the secondary angles shown in the illustration), but it's needless work unless you enjoy it, and it generally increases the chance that the sharpening job isn't completed. I base that on tools that I have received from people either due to purchase or to refit. The tools with a large rounded full bevel or a hand honed single flat bevel usually arrive with damage accumulating at the edge. It is not that easy to hand grind several thousandths of an inch from an edge at each sharpening. What can be done and what people do when they are rushing to get back to their project often differs. Sharpening needs to be easy in theory, but it needs to be easy to complete so that you can do it well even when you do not feel like doing it well.
Now that bevels have been explained, next is a picture (Figure 2) of the secondary bevel and buffed edge created using the suggested method. The primary bevel does not fit in the picture because of the level of magnification -- it is far off to the left of the picture. The height of this picture only covers about 1.5 hundredths of an inch.
Figure 2 -- Side Profile of the Chisel Edge Secondary Bevel and Rounded / Buffed Edge
The secondary angle shown is the result of freehand honing just higher than the primary bevel. It is not critical to be a specific angle, just avoid allowing it to become steep.
In Figure 2, you can see that what the buffing has done is to round (by abrasion) a very small amount from the edge. This illustrates taking the initial failing part of the edge and addressing it by removing some of it and leaving behind a profile that has better behavior. A flat faceted chisel generally likes an angle of around 32 degrees to really stop damage from occurring, but it is no longer needed after edge modification and the change to a shallower secondary angle is the next natural step. The angles shown are the result of freehand honing and buffing, and Figure 2 is shown just to see what's there. This method was established without looking through a microscope and performance tells a better story than judging pictures. You are better off getting the feel for things without looking through microscopes in this case.
The secondary bevel controls the cutting geometry and removing any damage left by grinding. The step of buffing is generally seconds back and forth pushed into an appropriate buffing wheel. A good starting point is to try for a 45-degree angle at the center of a buffing wheel with the wheel spinning downward on the side facing you. If you manage to catch a tool in the buff, you would rather have it thrown downward than up or toward you. Stay away from feeding anything against the direction of travel of the wheel.
After a couple of passes across the buffing wheel with the edge, it is useful if your wheel has a very soft unsupported corner to quickly run the back of the chisel lightly parallel to its rotation. This remove any minor burrs as well as wax that may collect on the underside of the edge.
My personal preference is to leave the buffer on the floor. This keeps the buffer out of the way, and bending down to use it makes catches less frequent.
Buffing can be done with anything that can spin a buffing wheel (buffer, drill press, lathe, grinder, cordless drill with an arbor, ..). In regard to the buffing wheels themselves, it is desirable for the very edge of the wheel to be soft cotton, and for the wheel to have a strong stitch about 1/4th to ½ of an inch from the edge. A very loose floppy wheel is undesirable, as is any wheel that is relatively solid, rough or hard on the surface. A buffing stick is applied to the spinning wheel lightly every several uses, but not heavily enough that layers of the wheel stick to each other. Figure 3 shows wheels that I have had good luck with. These are cotton or cotton with shellac. Denim wheels may be suitable, but are sometimes sewn with the last stitch right at the edge making them very firm and somewhat rough.
Figure 3 -- Stitched Shellac Treated Cotton and Two Cotton Buffs (the third is dirty from use). All are ½†thick.
If you are using a grinder instead of a buffer or using or a drill, drill press, or a lathe, remove anything that may be in the way of the tool if it catches on the buffing wheel. No guards or rests on grinders, especially. This is done on an open wheel and at least at the outset, loose strings will fly from the buffer. You can ignore them as the wheel will become uniform and they will be gone relatively soon.
If you insist on using felt or leather, you will need to experiment with lower speeds. My high speed buffer of choice is the inexpensive 4 amp 6 inch 3600 rpm buffer that Harbor Freight sells for about $55. It's sold under other brand names from other retailers, but I haven't found it cheaper anywhere else. Buffers of this type are not precision tools, so there is no great reason to go upmarket.
For abrasives, the action of a buffer makes it so that you do not need ultra-fine or expensive abrasive materials to get an extremely fine surface finish. I prefer a 5 micron buffing stick made by Jackson Lea, but type is not critical. McMaster Carr lists this bar as yellow for cutting/coloring, two terms standard for buffing where cutting is obvious, and coloring generally refers to fine polishing. This wheel is between the two. The cost of the bar at the time of this article is $11 for 3 pounds. This is noted because you will find many options at much higher cost and some will leave you worse off.
Illustration of how effective the buffing wheel is at making an aggressive abrasive gentle is show in Figure 4. Note that an aggressive abrasive on a hard surface becomes far finer than the finest oilstone I have ever used, and finer than hand-use of the often used microfine/veritas green compound bar.
Figure 4 -- Abrasive Patterns on Steel, Left to Right: Dan's Black Arkansas, Formax Microfine/Veritas Green honed on a hard surface, 5-Micron J-L honed on a hard surface, and 5-Micron J-L used in a stitched cotton buff. Note that the far right buffed surface shows nearly no abrasive scratching, only a layer of oil and wax, despite the fact that the buffing compound is the same as used for the picture second from right. 
The first time you apply this process with a buff, you are likely to have some success, but feel like you are flying completely blind. My suggestion is this while learning this:
Buff the edge as per the instructions above. Then use your chisel for something you typically do.
You need to reset the secondary bevel to the edge or very near it each time removing most or all of the buffed edge (the buffer will remove a little it each time, but honing off the entire buffed edge is good policy at the start). Be diligent in not raising the secondary bevel angle and regrind the primary bevel if this step is becoming difficult. There is no reason to use a fine or slow stone for this secondary angle. The buffer is gentle at the edge, so the stone used to refresh the secondary angle doesn't need to be.
Once you are using your new edge, observe how it feels. If it feels sharper and smoother through the cut than you are used to and it incurs no damage, good.
If it incurs some damage, buff it a little bit more. If you want to increase the amount buffed, you can keep the tool in the buff longer, or you can push the tool into the buff with a little bit more pressure. If you stall your buffer, you either have a wheel that is way too soft or you are using far more pressure than needed.
If the tool incurs no damage but feels dull, then do less buffing or at a more acute angle the next time you prepare an edge.
You should see a very fine line of tiny polished edge when you are done, as shown in figure 1.
It should not be long before you better your honing method with this. Perhaps the same day you try it the first time. Insist on getting to the point that the edge has better life and is easier to use than your prior method and stick with it until you achieve that.
Having read all of this, it seems like a bunch of very specific steps. These are habits to adopt, but it will quickly become easier than honing any other way, and substantially faster.
Part 4: Putting this method to the test
From experience, the most noticeable benefit is turning chisels that you may really love except for their edge holding ability into chisels that you really love. Solutions to edge-holding problems have generally involved serious spending. If you enjoy spending, that's fine, but even expensive solutions are improved with this method, and they are not necessary if you do not enjoy spending.
This test will demonstrate that very marginal chisels can perform at the heels of very well-regarded chisels.
The test includes pictures of the backs of chisels. Chisel backs are easy to photograph in a microscope, but rounded bevels are not. Since the damage in chisels is generally denting or chipping, it's easy to see on both sides of the bevel. The microscopic pictures in this article are shown at the same magnification (150x). This is a high level of magnification and a very large damage area may only be four or five thousandths of an inch deep. This damage can be seen with the naked eye as uneven light at the edge and any moderate damage shown results in poorer chisel performance that can be felt.
It is easy to see the benefit to marginal chisels based on the reduction of edge damage, but the benefit is not just edge longevity. If we have our choice, we want the chisel to work better, as in less effort than other methods and with good behavior in heavy cuts. Consistent feel for a long time in use, no bouncing out of cuts and no blunt feeling steep angles.
This test is short but is long enough to show damage occurring in tested edges. One may suspect that the undamaged edges would further separate themselves from others in longer duration testing, but counting thousands of strikes is beyond my attention span.
The Chisels Tested
Four chisels (Figure 5) of varying quality, type or price were chosen. In my opinion, the final three are excellent performers, and can be seen to perform well with typical flat bevels. The Sorby chisel is very poor at edge holding in hardwoods.
Chisel 1 -- Robert Sorby. This is a chisel with nice proportions, but the edge holding is poor. Having used several sets of these
Chisel 2 -- Ashley Iles MK 2. This is a good quality chisel made of O1 steel specified at a hardness of Rc61. Lighter in weight (not suitable for prying or twisting) and about the same price as the Sorby chisels or slightly more.
Chisel 3 -- Lee Valley PM V11 -- purchased for this test as it's often referred to as the top end of the western-made chisel market. Chosen partially to avoid answering how it would perform had it been absent.
Chisel 4 -- Japanese Oire Nomi (bench chisel). A personal chisel of mine purchased directly from the Japanese auction site (used chisels in japan cost a small fraction of retailers' price in the US).
Figure 5 -- The Chisels Tested, L to R: Robt Sorby, Iles MK 2, veritas PM V11 and Japanese Oire Nomi
The Test, the Data, Photos and Results
The test is to chop one inch of length from hard maple sticking. The sticking is 13/16†thick and 1 3/8†tall and chopping one inch of length represents the volume of several half-blind dovetail sockets. Very soft cherry-faced fir-core plywood is placed under the sticking to prevent edge damage on overcuts. The backs of the chisels are prepared on a washita stone for all tests, and the flat bevels are prepared to 1 micron diamond finish and lightly palm or bare leather stropped. Unicorn, or buffed edges are prepared with a 20 degree primary bevel, a very slightly steeper secondary angle and then approximately 5 seconds, but somewhat more buffing for the harder to abrade Japanese and V11 chisels.
Prior experience in eliminating damage chiseling hardwoods has shown that edge behavior improves drastically around 32 degrees for good chisels. The pictures show this, thus edges are tested at 30 and 32 degrees to compare to the buffed edges. A separate test with the Iles MK 2 and V11 chisels honed with a 25 degree flat bevel is shown to ensure that no great benefit in effort is yielded at a shallower angle in exchange for tolerating more significant damage.
The V11 chisel does, in fact, show less effort 25 degrees, but the damage to the edge is significant and thorough sharpening will need to occur often.
The Test Data and Observed Edge Damage
A small data table is shown in Figure 6. This may be uninteresting compared to the pictures, but the data is provided to illustrate how many mallet strikes are needed as a matter of efficiency. Edge retention is the first goal of this method, but even better would be edge retention combined with a more efficient chisel edge. The number of similar mallet strikes shows how easily each respective edge makes it through maple, but this number tells only half of the story. An easier-working chisel removes material neatly and requires less resetting of its edge in the cut. The shavings on the left in Figure 7 are characteristic of a 25-degree flat bevel or the unicorn edge, and on the right are remnants of what is left in the wake of a dull or steeply beveled chisel edge. Subjectively, the difference in total effort is about double the difference in effort that the numerical strike count would suggest.
In a perfect world, edge damage would correlate perfectly with mallet strikes, but perfect correlation evades us, partially thanks to the different behavior of the powder-steel PM V11 chisel. Based on the images shown after the data, it could be reasonably expected that the Unicorn profile chisels would work for quite a while longer without much.
Figure 6 -- Data from a Small Test and Subjective Edge Condition after Testing
Figure 7 -- The Simple Test Bed. Pleasant chopping on the left with the Unicorn profile, and The few shards that remained after the rest fled at high velocity (ouch) off of dulling or steeply beveled chisels.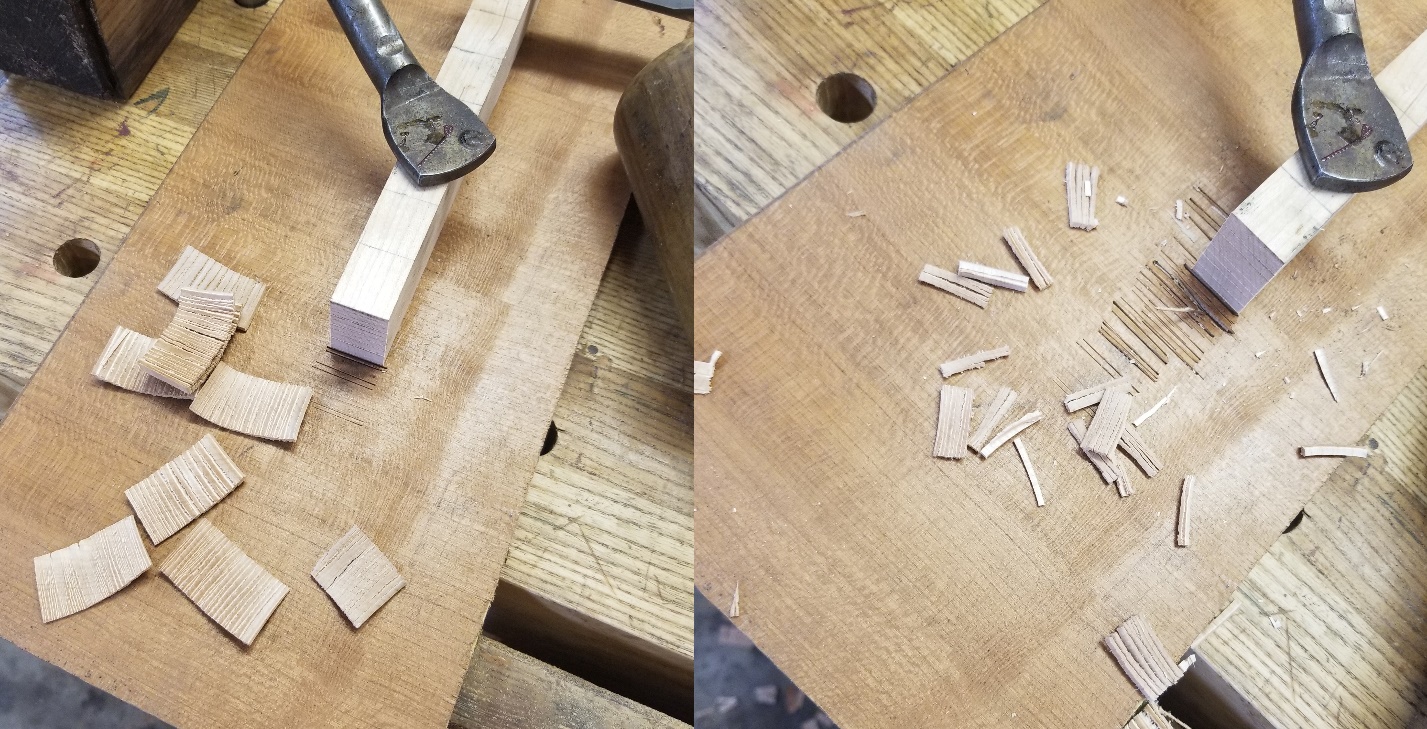
A few notable items from the small data table:
Ideally set up (with the buffed edge), the very soft Sorby chisel can match some setup variations of the other chisels. Cells illustrating this are highlighted in yellow in Figure 6.
The V11 chisel seems to be less sensitive to different choices in edge angles, but two tries at the unicorn profile, the first and last tests of the entire experiment, did not yield an edge with no damage. No further work was done to determine a profile that yields no damage viewable at the edge, but it would be surprising if no such profile could be found.
The Iles MK2 and Japanese chisels held up well with 32 degree flat bevels, matching expectations, but both cut much more sweetly with the edge rounded over by the buffer, and the pictures show no damage for either once this unicorn profile is applied.
The number of strikes does not illustrate something that can be felt quite easily, and that is the sweetness of the cut. The V11 and Japanese chisels seem to move through the cut more easily. I did a small amount of research on this and would guess at this point that this sweetness is due to the level of polish. Though the same abrasives are used for all tests, the last two chisels are harder and more resistant to honing and likely achieve a higher level of polish on the same abrasive media. It should be noted that while V11 hones to a fine edge, it does take approximately twice the number of strokes as would be required for the Iles chisel when creating a secondary bevel of visually equivalent size.
The data collected and the pictures below do generally suggest that the goal of the method, to be a unicorn and not just another horse, is achieved. Better edge retention, better cutting than the typical sharpening dogma of superior edges only occurring when two flat planes intersect.
Figures 8 through 12 are pictures of each chisel in four panes. The first pane is an unused chisel, and each following pane is after use at each profile. An illustration of a soft chisel bending can be seen in the Sorby pictures. Harder chisels chip instead of bending, which can be seen in the pictures of the other chisels. A black void exists for those harder chisels vs. the outline of the edge remaining on the Sorby chisel. Figure 12 shows the Iles MK 2 and V11 chisels after chiseling at 25 degrees. Note that in all pictures of edge damage, there may be some clear sections of undamaged chisel, even at 25 degrees. Pictures were chosen to be representative of what was observed on each edge on average.
Figure 8-- Robert Sorby Boxwood Handled Chisel. Note the first picture showing a bent edge.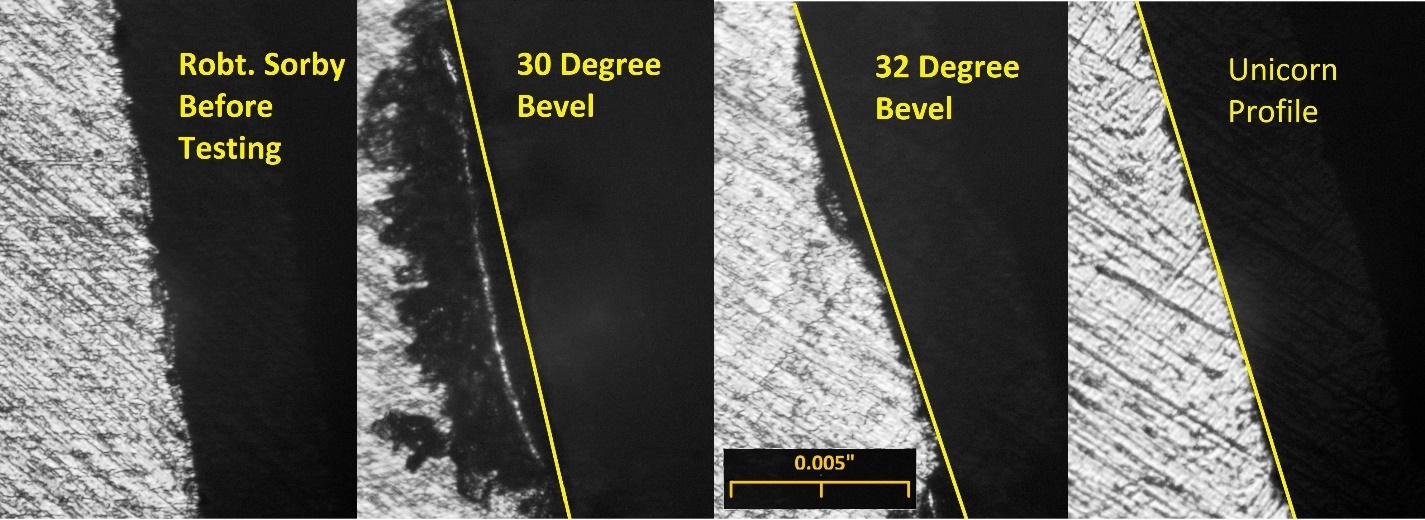
Figure 9 -- Ashley Iles Mk 2 Chisel (note that using the corner of the buff to remove the wax from the back of this chisel may have abraded some steel from the back, resulting in slightly less favorable cutting, but the count of mallet strikes suggests not enough to warrant a retry).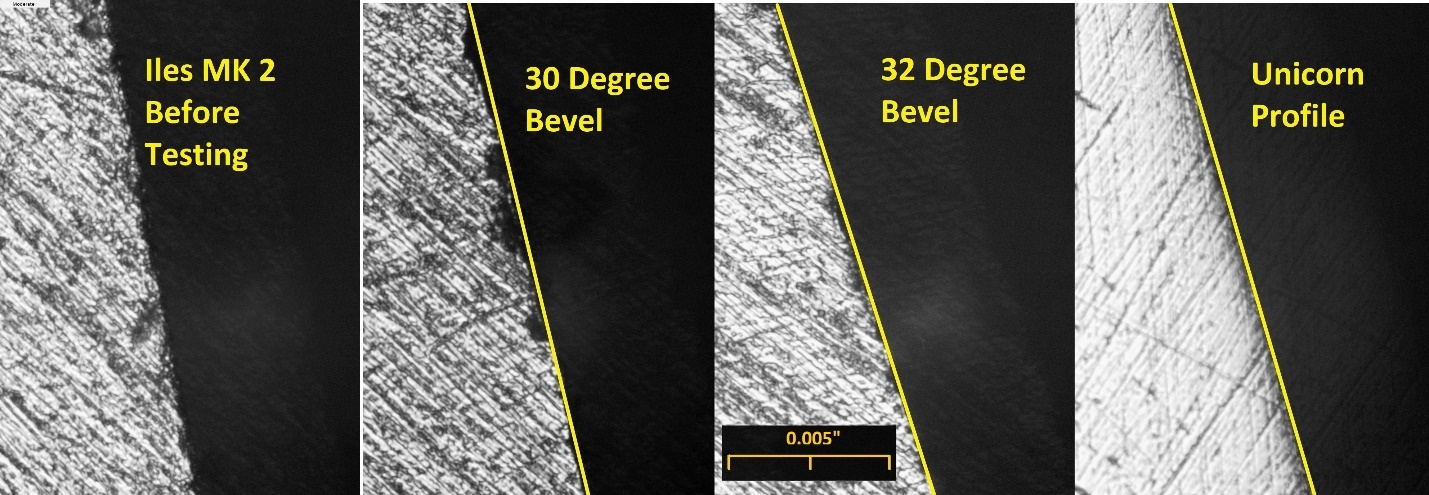
Figure 10 - Veritas PM V11 Chisel. Note that some damage remains in the last picture, but only minor.
Figure 11 -- Japanese Oire Nomi. When properly set, Japanese chisels remain the king of skilled chopping, even with the modified edge. The smooth and neat cutting action and completely undamaged entire edge encountered in the unicorn test was the most pleasant of all for testing. The very hard edge showed significant distaste for less than perfect setup, but cut better than expected given the damage shown in this figure.
Figure 12 -- Damage for the Iles MK 2 and PM V11 Chisels with a 25-degree Cutting Edge (same magnification as shown above, but greater edge length is shown).
What Next?
If you spend a little bit of time mastering this method, you will find uses for it elsewhere. Not the least of which will be kitchen knives, but if anyone else uses your knives, warn them. Relatively inexpensive Japanese knives will become far more tolerant of heavy-handed spouses or others who scrape cutting boards with knife edges. Before publishing this article, several beta testers have found uses for this on drawknives, kitchen knives, pocket knives and hatchets used for carving. The buffer is our hammer and we will be able to find many nails to improve.
You may also have some difficult-to-hone steels at hand in specialty knives. In my experience, those finish to a far smoother and sharper edge on the buffer if they are intolerant of stones and hard surface strops, and too slow to hone on charged leather.
Plane irons are discussed in appendix next.
Appendix -- Two Methods for Sharpening Plane Irons
Showing this method for chisels resulted in requests to make it work for plane irons. There is less to gain on plane irons if you are already quick honing plane irons with stones. The exception is when the tip of the iron fails when planing. This usually occurs only when planing dirty wood or wood with silica or other similar contaminants. Silica can be found in mahogany, khaya, limba, rosewood, cocobolo and teak. Textbook suggestions for dealing with this generally refer to an increased small bevel on the back of an iron, but this greatly reduces effort when planing, which is undesirable.
Both methods are somewhat more protective of the tip of the iron, and for reference, we will call one the unicorn and the other, buffing to finish. The implication is that the first method involves rounding over the bevel side of the tip and the second method is just a matter of partially finishing on stones and buffing all surfaces.
Method 1: The Unicorn -- Buffing the Bevel Side Only -- Excellent for Bevel-Up Planes and Other planes in Abrasive Wood
This edge loses some clearance vs. honing flat facets on an iron. When mastered, the result is an edge that planes less long than two flat bevels meeting at a point when using a bevel-down bench planes like a Stanley. In abrasive wood, however, it shows the same resistance to deflection, and will outlast a typical edge with an unmodified tip by several times. This edge also improves the performance of soft (cheap) plane irons or irons that are hard tempered.
The process is almost identical to the process presented for chisels, except honing the back of an iron is added both to remove wear on the flat side of the iron and to weaken the wire edge and limit the amount of buffing that is needed to remove the wire edge and refine the bevel:
Grind at 20 degrees when the secondary bevel becomes difficult to refresh, or only every several times sharpening is done.
Hone a secondary bevel just above the grind by lifting the end of the iron slightly higher than it sits when the primary grind is held flat against the stone. If you are using a guide, 23 degrees should be fine. Hone until you have raised a wire edge. This can be done with a medium stone and no additional refinement on the bevel is needed.
Flip the iron over and lap the back with brisk pressure for about 10 seconds -- this step should not be skipped, or too much buffing will be required to remove the wire edge and the result will be a plane that lacks clearance. Use a reasonably fine stone for this step as it becomes the finished edge on the flat side of the iron.
Buff the bevel side of the iron in two or three quick passes across the buffing wheel with the flat side of the iron oriented approximately 45 degrees to the buffing wheel. Buff only enough to remove the wire edge completely so that it is not visible. If you are using a bevel up plane, you can buff longer without concern. If you are using bevel down planes, buffing is more sparing to preserve clearance between the bevel of the iron and the wood being planed. The flat side of the iron is not buffed.
When you have mastered this process, you will have edge life in clean wood of about 80% of a honed edge with flat bevels. The surface left by this method, however, should be extremely bright, presumably due to the buffed tip of the iron burnishing the wood as you plane. This is a very pleasing effect if you plane to a finished surface with no sanding or scraping. The feel of this edge while dulling will be different than you may be used to. The iron will begin to skid across a surface while it is still seemingly sharp, and this occurs relatively abruptly. Once this occurs, repeat the sharpening steps above.
If you are planing silica-filled wood, you will recognize that even in soft woods like limba or mahogany, small lines appear on the surface of the wood quickly while planing. This is due to deflection or chipping from the silica particles. As the spots accumulate, plane shavings split and the edge fails to enter a cut easily, wasting your efforts. In this case, the loss of clearance will be far offset by the lack of edge damage, and the comment about edge life above does not apply. You will be able to achieve a finish planed surface on these types of woods without lines spoiling the result. Figure 13 shows damage due to silica in an unmodified edge vs the buffed bevel edge. This damage is typical, with some larger than shown in this picture on the same edge. Within 125 feet of planing rosewood, the edge on the left fails to be usable, and damage as deep as 4 or 5 thousandths is observable. After planing the same footage in the same wood, the buffed edge is undamaged.
Figure 13: Performance after planing 125 of rosewood showing the tip of the iron unmodified vs. modification by rounding. Since no buffing is performed on the flat side of the iron, the scratches from sharpening stones show in the picture while the rounded edge is on the opposite side. The same iron is used for both pictures Despite less sharpening refinement, the bevel-buffed iron remains undamaged planing the same length of wood. The bottom of the figure shows the split and torn shaving from the edge on the left and the last shaving at the same distance planed with the profile on the right in the same piece of wood. The modified edge would continue to plane for a long time and the surface of the rosewood shows no lines.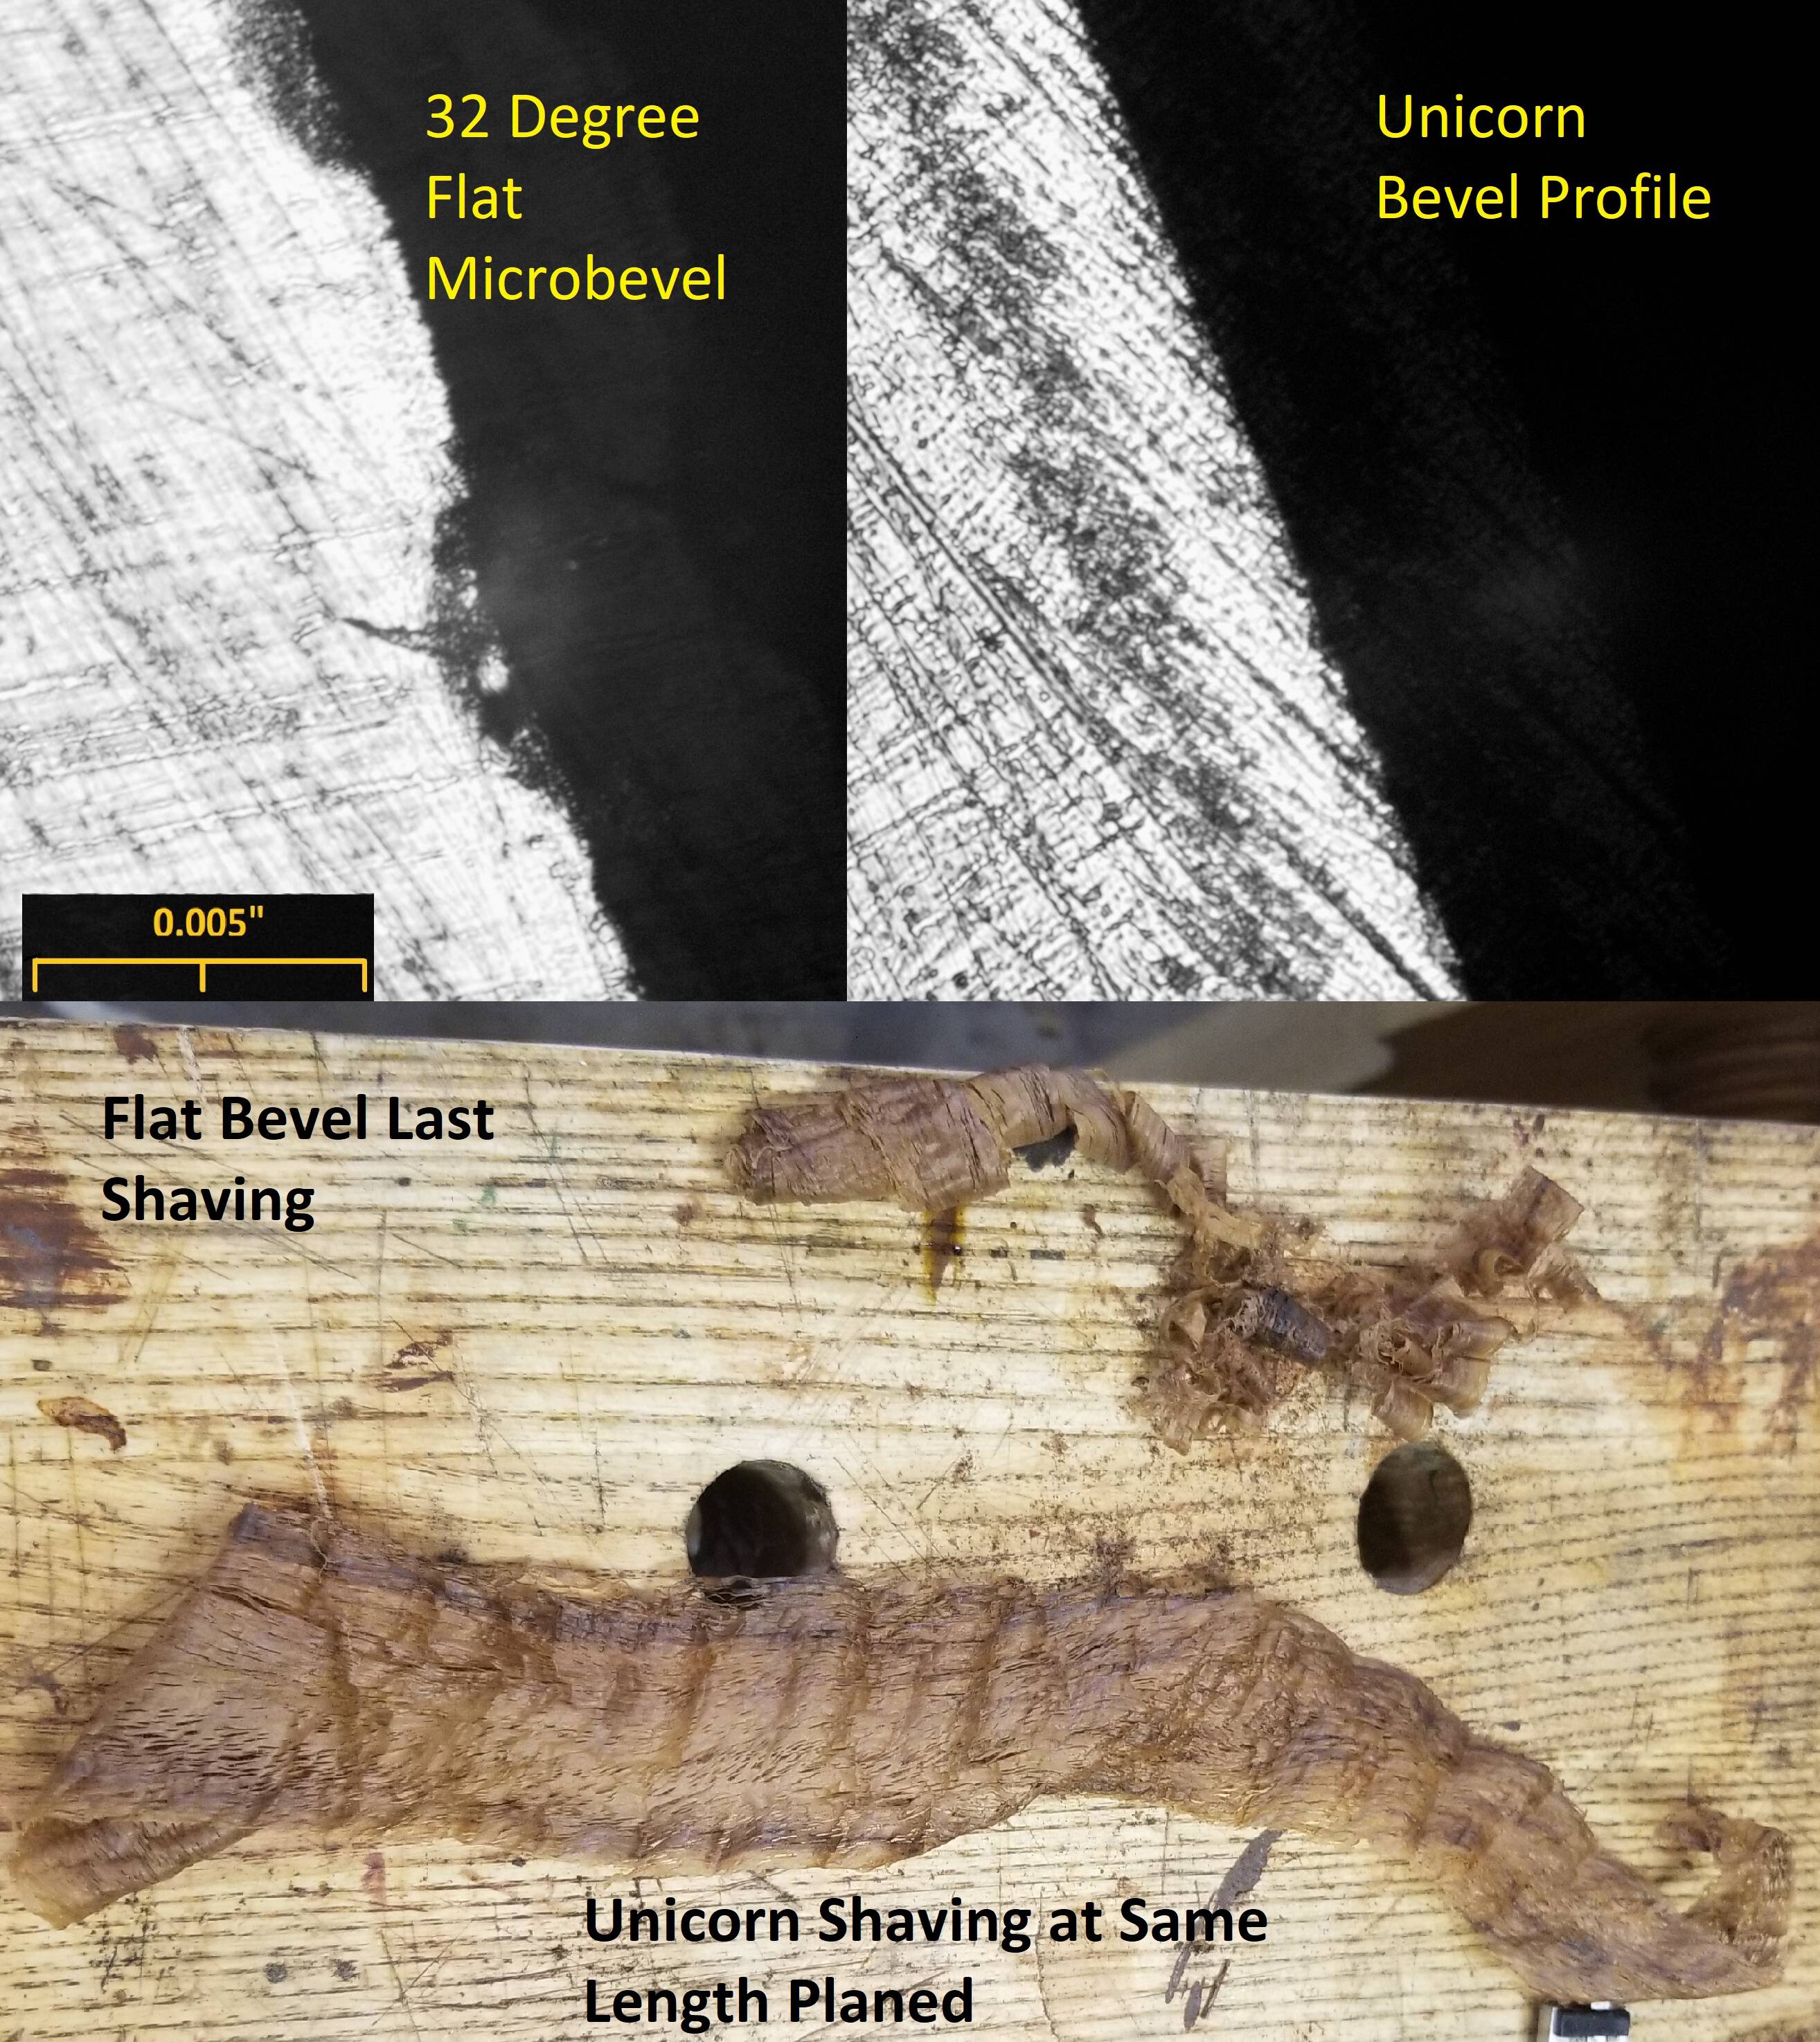
Method 2: An All-Purpose Edge where Buffing Replaces Finishing Stones and Strops
Aside from very small differences in concept, this method is likely to be less original. That is, we are using the buffer to refine the edge as a finishing stone normally would, and we are allowing it to strengthen the edge by slightly rounding both sides of the bevel while it does this refinement. The result is an edge that is slightly more resistant to damage and at least as long-lasting in all wood vs. one created by two flat intersecting bevels.
While solving the shorter edge life issue created by method 1, another woodworker pointed me to references already published using the buffer as a strop. That reference advised not to round any of the carefully created edges, but we would like to go a step further and start with a thin honed edge rather than one suitable for work, and then buff both sides of the edge. Some rounding is necessary to strengthen the edge. On the non-bevel side of the iron, the amount of rounding should not be greater than what will be removed in normal back lapping and honing of the bevel side. That is, all effect of the buffing wheel should be removable just in regular honing and back lapping. If that is not easily accomplished, rounding by the buffer is too much.
Compared to the first method, the two differences are:
Intentionally buffing both sides of the edge instead of only the bevel side
The iron is introduced to the buffing wheel at the angles already on the iron. That is, no attempt is made to increase the angle of the bevel or flat side of the iron to intentionally round over the edge. Alternating back and forth on the back and bevel side, the iron should be moved across the buffing wheel until the wire edge is removed entirely. Moderate pressure is used to be sure that the wheel abrading steel. While most of the force is on flat surfaces, the buff will spring back and still round the very edge of the surface. This rounding is invited and is desirable.
Steps 1 through 3 are the same as method 1.
This results in an edge that feels like one created by two intersecting flat bevels, but still offers a very bright polish on a planed surface and has some measure of edge toughness that a very crisp tip to an edge does not.
The total honing and buffing process takes about one minute, as does method 1.
Figure 14 A picture of the back of a plane iron after method 2. The rounding at the tip is measured in fractions of a thousandth rather than thousandths, but we invite this small rounding due to its level of refinement and added toughness. The effect of the minute rounding can be seen by the darkening edge as light is reflected in a direction other than back toward the microscope lens. The fine finish of a relatively aggressive 5-micron buffing compound can be seen against a typical waterstone that is marketed sometimes as an 8000 grit stone and sometimes as a 12,000 grit stone. Wax from the buff also provides protection against corrosion, and this buffer lives below a bench grinder with no effort made to avoid contamination. The spots on the image on the left are likely tiny wax particles or bits of cotton. The two largest appear to be smiling!


