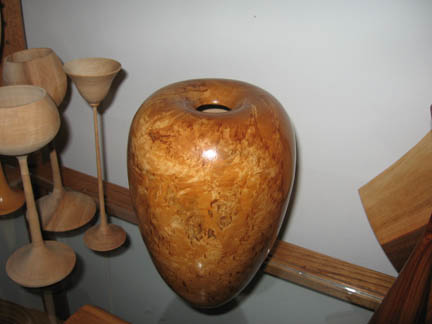
Hi, folks, bellow you will see the few picture of an Elm burl I got few days ago from George here. I ventured to see what I can make out of it and it ended up being a box. In the pictures you will see the bottom half of the box. Here is where I need the help. This incident has happened to me before and I ended up tossing and in one incident got rid of the top of the bowl and shortened the hight of it.But I don't want to do that to this piece. The problm you are about to see is caused by Easy Wood tool's carbide hollowing gouge. It needs some getiing use to it and I guess lots of practice. Iny ways, I was trying to clean out under the rim and on the outside you will notice I left a band that I wanted to do some embelishment or carving to enhance the design so right now the thickness of it is sufficent for me to do my carving and then sand it smooth. However, as you notice right under neath this band where it meets the main body of the box tool really cut it very thin and therfore I don't think there is enough meat for me to sand it smooth without going right through it, and perhaps losing the top band. And as you can see in some spots there are even holes created by this cut. So, what would be the best course of action to save this box bottom without getting rid of the band at the rim and remodifying the box all together? Any advise would greatly be apprecaited.
I don't know of any way to add wood back on after it is already too thin. You can cut it off and add a ring of new wood or segment another piece in the thin area. A lot more work then just making a new one. Using the scraping mode is harder to judge the wall thickness than using a bevel supported cut from a bowl gouge. Also in scraping mode you will have torn out grain that will need significant sanding so you will likely take the top off while sanding. If it was me, Id chalk it up to a learning experience and make a shallower bowl and use the rim for firewood.
Phillip, I've done the same thing more times than I would like to admit. I agree with Lyle, either shorten the piece, or start over. Sometimes after "fixing" a piece it just never seems right. Luckily for me, the wood stove is handy!
I'd like to add just a little to this discussion...
First, getting a good bead on a side grain bowl form is not as easy as on a spindle piece, since the grain changes direction twice for every revolution, so it is pretty difficult to get really nice, clean cuts. Therefore, many of us have messed up a great design while trying this.
Second, I'd use the scraper until you got close to the bead, but approach the top and bottom of the bead very carefully with a detail gouge held right over on its side with a slow tool advance.
Third, you could cut the current bead off flush with the outer profile you already have, and either leave it w/out any bead, or if you have enough thickness left, try for a similar effect with an in-set bead -- essentially two carefully cut "V"'s into the profile, and then rounding the corners of the middle strip to produce a symmetrical bead. With a long bevel (fairly "pointy") detail gouge or standard spindle gouge, you can make these cuts with care, and a very slow, steady hand, and round over the bead corners a little with sandpaper.
The hard part about raised or inset beads on a side-grain bowl is keeping in mind which direction you'll get the cleanest cut with the best support for the wood fibers you are cutting. For a single inset bead I work in the direction from the base of the bowl toward the rim: down into the V-cut, then up the lower side of the bead, then across the top of the bead (you can skip this, as this is essentially scraping and likely to pull fibers), then down the curve of the upper side of the bead, and lastly up the other V-cut. I sometimes make a separate cut down into the upper "V" to clean up that upper-most surface, but support the tool well, and have it right over on its side -- you will be going the "wrong" way here, against the grain, which can work fine with care, but could also catch or leave a rough surface. A slow tool advance will help here.
This is more difficult to describe than to demonstrate in person, so if you have someone in your local club(s) who routinely puts beads on bowls, the very best plan would be to watch them do it and try to get the same result.
A good exercise sometime is to rough turn a nice bowl form, then create a series of continuous beads from the foot right up to the rim to learn the rhythm and hand movements. Al Stirt once did this in front of me at a club demo in VT, making about 20 beads that started about 1/10" at the base, and progressed to about 3/8" at the rim, with each one a tiny bit bigger than the last. He was able to do this in one continuous, rolling motion, moving from foot to rim, and it was most impressive! He used a 1/4" spindle gouge with a fairly long bevel -- probably 45 degrees of so included angle. Start a little thick and try it, so if you need to you can cut them all away and still have enough wood to try it a few more times. Even if you throw the bowl away, the practice will be worth the effort.
you wrote: "First, getting a good bead on a side grain bowl form is not as easy as on a spindle piece, since the grain changes direction twice for every revolution, so it is pretty difficult to get really nice, clean cuts. Therefore, many of us have messed up a great design while trying this."
First of all I apologize not including the picture of the Elm burl the way i got it from George. Here they are:
As they show in the picture the burl was already cut to a form that i didn not hav any choice as how I was going to proceed to hollow it out to a design form. So, I was limited to that. I went with the best orientation I could go with and then ended up with bowl as you will see bellow. As I was turning I discovered that the wood is very rough and full of charactor,so, I decided that not to incorporate lots of bead or coves or any fancy cyrves to the body of the design. I decided that I just give it a little band at the rim and come back and add few lines of decoration on this band in balck color to enhance the grain pattern in the wood itself.
Sorry for that black line in the middle of the pic.s i think is shadow.
then you wrote: "
Second, I'd use the scraper until you got close to the bead, but approach the top and bottom of the bead very carefully with a detail gouge held right over on its side with a slow tool advance"
I did use the scraper, howevr, as you can notice when I get close to the bottom of the band form the bottom side of the bowl upward then I run under the band shouder, that's where I don't have any wood left for me to make the bottom of the bead since it got too thin, even if i don't do anything when I go sanding it smooth, I am afraid I'll go right through the band and knock it off the rim.
Brad I ahve designed many beaded bowls, jsut haven't goten around posting them here so, I think I got that idea early on. as in this pic.
or this one:
So, on this ealm burl, I was trying to go with the band. And, in the past this have happened to me and I just tossed the piece, those were something that I procured them myslef so I dodn't feel bad about tossing them. This one, George has taken time to pack it and take it to the next town and sent it to me and I felt as appreciation for his generosity I try to save it and turn it to something worth keeping.
i 've been podering about it and I think I am going to try to cut a ring out of walnut and bring it up fro the bottom and gently glue it to under the bead to give me soem meat to just sand it to shape and not take too much form the beautiful look of the pattern. I will report back as how it goes. May be in the process I push my ability to see how far I can go with it.
Meanwhile, I thank all of you tha took time to share your thought on this.
Dale, which part is confusing? The EWT hollowing tool I got has not been that easy to work with like the way they discribe it to be. It is designed with a very wide shanke that should be rest up on the tool rest then it needs to be slightly above the center line. When in action, and as you are hollowing inside of a bowl/vessel, as you travel from the bottominside of he bowl up towards the top(rim) it ges very chattery, aggresive and the tool needs to be tilted slighty on an angle towrds you so the cutter won't be so agressive, and point of conyact is smaller. However, this tool is supposed to be for hollowing and getting under the rim to clean out the rim/lip design and so far it has not delivered or I may not have been able to easily master what they mean by the use of it. In most cases, when buying our tools they have descriptive instructions as how to use it and sometimes lack of using the right words can confuse the end user as how that particualr tool needs to be used. The evidence of this can be found in every wood turner's shop that we all own tools that we spent money on and tried to use it once or twice then it ends up in a corner or a drawer and never get used. I am at that point with this tool, the only different is the $106. I own several easy wood tools and am happy with them, what promped me to buying this tool is that I thought it would be as good as the others.But, i found out otherwise.
The main difference here is how I can show you my earlier works which I didn't have most of these fancy tools and I managed to get a very nice under cut at the rim just with basic tools. However, just like most of us my head is corrputed by the ads of how great one tool works and I have forgoten how I managed to to do those undercuts with basic tools.
Now, that all this said and done, the main issue is that it did happen and I am trying to find an answer to save the day by remedying the probelm. so, when I was answering Brad's reply, I was simply saying that his idea is good and I aknowleged his comment by showing that I have done some beading on the bowl before.
I do not cliam to be a seasoned turner and there a lot for me to learn and I am simply trying to understand the process or learn to not have this happening again.
Hello, back again. Do you remember few weeks back I created this thread and asked for help? please take a look at the original thread above and then take a look at what it turned out to be now. I think you will be surprised of the result. After, thinking about it for a good while here is the solution I came up with. I finally, did something that I am proud of sharing, it may have something to do with me being a "Leo" that we don't easily give up every time there is a problem. I hope this passes the test of talent with you folks and maybe that next time this happens to any one of us we can save the piece we are working on and not chuck up all the time spent to get to the stage where the problem happened. Well, here was the solution:
1- (Failure) I thought of adding a layer of raised band with just using some clear epoxy mixed with the fine dust I sifted the Elm's dust through a panty hose sifter ((very fine holes for getting a very fine dust particles, almost as like cooking flour)) and added it to the Part A of the epoxy and mixed it well. I then applied it over- under the main band around the rim. I let it dry with the hope that when I sand it I will blend it with the band above and make it part of the design. (It didn't work, because when I went to sand it and blend it it went back to the same thin wall and the hole came back showing) So I went back to plan B.
I wanted a very good contrast of some sort to distract from the holes around the band and also recreate a good thicker wall that can be blended to the design without compromising the grain pattern, and compliment the whole thing.
1- solution was to try some very fine walnut dust very very fine texture. So, I took some walnut cut offs I had and took it through spindle sander and got very fine dut.
2- I first determined how thick I wanted to build this band and then proceeded to make a line (pencil mark) under the band to this width towards the bottom of the box.
3-I then took masking tape applied few rounds over each other around this mark to build a dam deep enough to make a raised band.
4- poured some thin CA glue on this band and poured the walnut dust on it and kept on doing this until I built up a raised ring underneath the main band. (note that this ring is going to be uneven, unless you have a very steady hand on pouring fine dust and keeping it even)
I hit it with accelerator and let it sit until it cured.
(note: your CA glue and the dust will sip over on to your masking tape which is ok. Just make sure that you covered the ring width yo set out to have)
5- After it dried I then removed what I could of the masking tape and some were left on the ring in a jagged line.
6- I then took a very sharp skew and cleaned out the jagged line and made it as clean as I could.
7- I proceeded with shaping and blending the top band with the new ring and blended them well together being careful not to over do to thin it out again.
8- proceeded to go through my sanding process and applied finish on it.
Note: I intentionally left the surface of the ring with some dimples and dents that would compliment the overall look of the box, since the box body has some natural dents and divots which already given by mother nature. ( if your design calls for an absolute smoothest ring or you do not want to have any dents or divots then, you have to build the ring much higher than I did and come back and sand it smooth to almost a slick surface)
The box is not fully finished yet the inside has to be sanded and finished and a finial needs to be added. But, I just wanted to share the cure to the problem which was discussed.
Although there is general agreement that "life is too short to turn crappy wood" I would venture to say that most of us have on occasion spend way too much time to save a piece that was important to us. As long as it can be safely done, working though a "save" can be a learning experience and can lead to very satisfying results.
This is a pretty friendly group here at WoodCentral. You do not need to seek approval or have to worry about if you work will pass muster from the more experienced turners. There is lots of constructive commentary but ultimately, the real question is are you happy with the result and are you extending your personal range in the craft.
It looks like you came up with a good fix for this piece that was important to you.
I think Steve C. did a phenomenal job in responding to your ask.
I also think that I agree, and I would offer the following (on top of every word Steve C. said)
When I get to a piece that doesn't "pass muster", I am OK with it. I realize that not every piece that I make will pass my personal standard for what I consider "my work". Just because I made something doesn't make it "my work"...if that makes sense?
My shop is riddled with practice pieces, experimental ideas, technique development pieces, things that I bring to demos to illustrate ideas...etc. It is important to be OK with the idea that some things will fail, and that failure is not a bad thing. You learn more in failure than you do in success.
In my shop, something like this would never get finished. I would most likely keep it around for demos, or to spur on some future ideas (or remind me about some technique), but it would be "done" as it is picture. You can spend too much time trying to fix a mistake, and that is certainly your choice, but I would just move to another piece of wood and consider this piece an old friend that taught you along the way. I have a shelf full of these pieces... and visit them a couple of times per year.
Steve A's post reminded me of a couple of funny stories.
I have a bin in my shop that I call the burn bin because I have a neighbor that would take my rejects and use them as kindling in his fire pit. One day I was in his yard and looked at his kids sandbox and noticed that his kids had about ten of my bowls in the sand box and were using then for everything from playing house to moulding castles. The kids said they were too good to burn.
Another time, one of my sisters came to visit. She took a bowl out of the burn box and asked if it was for sale. I explained that it was a reject and was going to be burned. The bowl was a very large poplar bowl with an inlay rim. It was completely finished but I did not like the yellowish hue the wood took on when I oiled it so I tossed it. My sister, in need of a large salad bowl, would have nothing of the reject part and took the bowl over my objections. It is still being used and my sister said she often gets compliments on it. Go figure.
I think you've created a pretty attractive piece from some difficult wood. I would turn away the tenons where it was chucked on both ends (Raffan's box turning methods are what I'm thinking of here), sand and finish the top & bottom, and call it a done deal. Then off to the next project!
I'm in agreement with the general view of the group here that if wood is giving you fits, just toss it aside for a future inspiration, toss it into the burn box, or save it to make useful things like friction chucks, colletts, etc... I consider any piece of wood that is cracked to the point it could come apart to be firewood, and not worth pressing on to a finished turning. When rough turning something with dangerous-looking cracks that won't turn away, I typically split it in two with a hatchet so it is obviously not turning stock, and toss it onto the firewood bin so I won't be tempted to try to re-mount it someday, even if the cracks appear to have closed up. Never trust "invisible" cracks -- they are just as deadly as the ones that are easy to see.
A long time ago, someone on WoodCentral said never give away your mistakes, especially to friends or family, or you'll have to look at it every time you visit them.
I bandsaw all of my truly bad stuff, just to avoid someone garbage picking my burn piles. The stuff I am not ready to burn inhabits a dark shelf, away from eyes...
Took a class at Arrowmont. the students in other classes such as pottery or whatever would come through a beg for the shards of whatever was in the trash and take them. They made some amazing stuff out of the trash.
Gentlemen, thank you very much for your advises and replies. I just figured out what happened. I have been having trouble with internet Explorer killing me in responses and pop ups, freeze and all kind of head aches. While I was writing this reply I did run into my usual problem and I was having the IE opened in multiple screens. In the midst of all this a friend call me with a problem and I was trying to send him an email and the subject line on that email got mixed up with the subject of his thread and he called me on the phone and the whole thing was a mess. then he told me that start using the Google plus browser which solved all my problems.
I was simply trying to report back as what I thought of to fix this problem. And it sounded that I was asking for group's approval or try to impress the muster, like Steve, mentioned. Although I respect you all's advise at the end of the day if it is OK with me then that is all matters. By me joining this forum I respect all of your advises and tips and most importantly your experiences and skills. Believe you me, If i was to sit in a class and have every one of you teach me what you know vs. here on the forum that would be way too cost prohibitive and unrealistic. However, beside me being grateful for your generous contribution and help I appreciate the chance of you guys taking time and reading through my threads even if it sounds irritating to some of you guys.
This incident of hollowing too thin with the EWT hollower had happened to me before too many times and I was seeking a solution to not toss everything that has to do with my doing and not the wood. At the bottom of this box as you can see in the pic. is only an indentation of the burl forming that is close to the tenon which will be turned away and at the top the tenon wil transform to a nice transition to the base of a finial. the last two picture was to show you what solution I came up with and so I learn next time to fix it quick and go on about the next step in design. I screwed up a nice roughed out walnut bowl that Dale larsen (the current president of AAW, who lives in OR) who when I visited their meeting in Portland OR, and he gave it to me as a token of my visit and asked me to make something out of it and take it to the meeting next time and show him or send him a pic.. However, I ended up almost tossing it because I didn't know how to remedy it and so I left it on the shelf and now I think I can come up with some answer to finish it and then maybe segment it with a maple base to still use his piece. I have tossed many pieces as I was learning to turn and didn't feel guilty about it, but when someone is gracious to send me a piece of wood or give it to me to inspire me to further my skills then I feel obliged with the feeling of not letting them down. I come from a culture that respects any one who gives a gift to you and we are taught to return the favor.
In this manner I learned a lesson from it and next time when I go too thin on a piece that will result in this kind of mess, now I know how to remedy it.
All, you advise is very well taken to heart and I appreciate everyone's input.