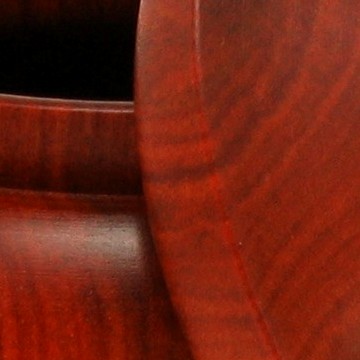
>Here is a walnut box that is just about as large as any I have turned. I had this stick of walnut in my inventory and could not decide what to do with it. I decided to turn a large box. This box is 2 1/2" tall and a bit over 4" in diameter. It is very uniformly 1/8" thick or less every where except the lid and base where it is closer to 1/4" thick.
>Here is a view of the box open. I still have not figured out a good way to photograph the inside of boxes of this shape without looking into a black hole. Jamie suggested a flashlight and that is a good idea but I need a better way to position the box so I can see into it with the camera or a tripod different than the tabletop model I am using.
>Jorge, I have not turned many large boxes with snug fitting lids. People can have difficulty getting them off and with seasonal swings in temperature and humidity here at certain times of the year the lid can be locked on if it is too large to effectively grasp.
And besides, I can only turn boxes as large as the wood I have...I am wood deprived Jorge....LOL.
>Gary, I realized that later and decided I didn't want to push my luck with that thread hijack. You are so correct though. Thanks and take care. You made me chuckle and I appreciate it.
>My favorite form, of course. Funny how a lot of forms will translate well through different size ranges. Perhaps it is because everything stays in proportion, and there is nothing visual to give the scale away.
>... to illuminate the interior of a piece like this is cover the front half of the the top panel of the light enclosure with silver(aluminum) foil. The light will bounce down and show details on the inside, but also creates a harder shadow around the base area. You just can't have everything go your way all the time!
Nice! I like way you did this one with the small bead on the lid rather than on the body as in the koa and shedua boxes you posted earlier. I think this way looks more elegant when opened.
If you haven't, you might try tilting the box and propping it forward with a bit of hidden modeling clay or beeswax formed into a cone (perhaps on a small piece of waxed paper to prevent staining the backdrop paper). I've also used a few grains of salt to keep small roundy things from rolling while photographing.
>John, those are good ideas. I had thought about creating an angled platform that would tilt the box forward so I could peer down into it. I think the clay is a simpler solution and much easier to accomplsh. I had also considered a bean bag but I didn't think I could make it small enough to be out of the picture and still be effective. And I have had problems with boxes and lids rolling so the salt crystals are an excellent idea.
>Jamie, I know all these suggestions are second nature to you because of your professional experience but they are wonderful for us fledling photographers. You should write a book for on line photographers who use little photo booths and phrugal photo setups.
On line Photography for Dummies by Jamie Donaldson. I can see it going aluminum....LOL
Seriously, thanks for all the suggestions. I have them in a notebook.
>As usual, beautiful work. Do you make your lids with a "pop" fit or a "lift-off-with-one-hand-fit".
I keep reading that the ladies like the lift off with one hand type but us guys like the pop fit so that's what I strive for. I give all my boxes away to friends and family and they're all female. None have complained but wouldn't expect them to since it was a gift......Ron
>Ron, I prefer a fit that allows the lid to stay on but is not difficult to remove. Of course that fit is dependent on existing humidity and its variation. My experience is that women will buy what appeals to them unless they have a specific purpose in mind. I make lots of boxes with lift off lids but they are not end grain boxes. They are more like lidded bowls. I have included a picture of what I am talking about.
Re: I hate those " .....for Dummies" books! I ....
Jamie Donaldson
>....bought the "Photoshop for Dummies" (is that the correct spelling?) when I started playing with digital, and it made me feel like such a ... a dummie! I don't need to pay money for a book to also make me out a dummie!!!!!
>Mike What I do to illuminate the inside is to put a piece of aluminum foil on the inside of the vessel just out of sight. The light from above bounces off the foil and illuminates the back side of the box that you see. You may have to add a little more light up above to do this.
Sounds like a genius of an idea to me. Just wondering - is the inside light diffuse or do you get specular hot spots from the shiny foil? If the latter, how would a bit of the silver side of the scrim cloth work?
I haven't tried it with turnings, but another thing you can sometimes do to illuminate black holes is blast the entire object with light (blowing out everything else) and take a second photo without moving the camera. Then combine the two images in Photoshop and use a mask to combine. It is more work though to keep from looking unnatural, and perhaps considered cheating!
>John I'm a firm believer in getting the photo right first. If there isn't any way then you try photoshop fixes. A simpler method than blowing out the foreground is simply lighting just the back letting the rest go dark. Do an exposure for that and then turn the other lights on and that one off and do the second exposure.
If silver is too much use dull silver or white. If white is too much then use smaller torn pieces of white. I've also used small mirrors out of the frame to bounce light back in. You can shape the "output" of the mirror by putting tape or black paper of the mirror to control where the reflected light falls.