FYI - when Giants walk among us...
Jim Matthews
I experience a thrill when you post here.
It's the contemporary version of receiving a postcard from Edward Barnsley.
Est. 1998 — 27 years of woodworking knowledge
FYI - when Giants walk among us...
Jim Matthews
I experience a thrill when you post here.
It's the contemporary version of receiving a postcard from Edward Barnsley.
Re: Hand scraping?
David Weaver
Carbide scraper. Super hard sen (japanese).
Re: Back Rounding - Excellent explanation!!!
Re: Rounding or wear bevel
david charlesworth
It seems to me that the ruler trick is helpful in removing the wear bevel.
The polishing stone is working on such a small area of blade.
If we think about it. normal removal of wire edge with a flat back involves working on a much greater area of the back.
Best wishes,
David
directed pressure
David Weaver
This is where the issue of directed pressure comes in...
Last year, I durability tested irons. Because I took pictures of them along the way, I had to adhere to a visual standard that I wouldn't normally adhere to. Couple with this, that I was using the double iron (which creates a shorter wear bevel on the back of an iron, but it's deeper).
Using a 0.5mm rule (guess where I got that idea on the first video I ever learned to sharpen from? success on the first try, too!), I was unable to get the wear bevel completely removed (so that none could be seen at the edge under a microscope for the test pictures) without chasing the back bevel further and further back the edge.
I do not know if the conclusion would've been different without a double iron (i suspect it would - that less ruler trick would've been needed).
I also think that some mitigation of chasing the bevel could've been had just by using a steeper ruler with the double iron (in reality, you, me or anyone else would perform the ruler trick and allow some of the wear to remain as long as it wasn't damage )
In comes directed pressure and a faster stone if needed. It ends up being faster (but maybe beyond a class full of beginners) to forgo the ruler trick and direct pressure with fingertips right at the edge of the iron. Most people probably don't think about how much an iron will flex under finger pressure, but it's a lot. If that doesn't satisfy, a slightly faster stone is in order to do the back work - first rule of sharpening is complete the job. Fineness is somewhere down the list.
I've seen a lot of tools, and most of the time, they have evidence of fine stone use on them, but not all the way to the edge.
Insurance policy for ‘complete the job’
Wiley Horne
Tangent buffing. My experience, anyway. Like you, I use finger pressure at the edge, prior to a quick tangent buff. Everything needed is right there together, so it takes no time.
Wiley
Re: Insurance policy for ‘complete the job’
david charlesworth
It seems to me that directed pressure is still polishing a much larger area of the back.
David, the surface produced by a thicker ruler might interfere with the fit of the chipbreaker.
Best wishes.
Nuance..
David Weaver
..there's some nuance - as far as working a larger surface, I suppose it is, but for some reason it works better and faster.
The bias is right at the very tip. As implied, I've come to prefer stones that can do a little bit faster work than some of the super fine stones that are preferred now (as in, when I as using 1 micron diamonds in the test, the level of wear created chased the back bevel wider and wider, then it became a compounding problem where it got harder yet to get the wear at the tip completely removed).
Practical solution mentioned above is just to allow some of it to remain. The picture of an edge polished with directed pressure looks better, though.
I didn't experiment, so one would wonder if a 1mm rule would solve the problem vs. a 0.5mm rule (and it still may not interfere with the chipbreaker). I don't know the answer to that, and perhaps someone who avoids edge damage would never notice any of this without a scope (and if it's not noticed, is it a big deal?).
All that said, the issue of directing pressure at the edge with a faster stone and then backing off pressure while finishing seems to have eliminated all of the issues, cap iron use or not.
The "sharpening stone omnibus" below brought this back to the front of my mind because I could try the stones relatively close together (in time) and notice how long some of them took to remove the back wear.
Who really knows how much all of this matters - 15 years on or so, I saw this only because I was looking through the scope. The only thing I know for sure is that once someone looks at an edge through magnification, the "this edge is good, the last wasn't quite as good, etc - that variance is gone".
Re: Nuance..
Winston
> Who really knows how much all of this matters - 15 years on or so, I saw this only because I was looking through the scope. The only thing I know for sure is that once someone looks at an edge through magnification, the "this edge is good, the last wasn't quite as good, etc - that variance is gone".
The reason I started heading down this path of trying to create a hollow on the back of the blade is because, since I started buffing my blades, I've gotten accustomed to much sharper, more uniform edges. The surface from planing with a freshly-sharpened (and buffed) blade is incredibly smooth.
However, with bevel-down planes, I did notice some inconsistency with the resulting planed surface when I sharpened this way. It was probably more noticeable because when the edge is good, the surface is flawless, and I've gotten used to the idea that I can easily achieve that.
I think the cause of the inconsistency in sharpening with a bevel down plane blades is because of (A) the wear on the back of the blade makes it harder to hone that side, so it's more likely for a bit of burr to remain, and (B) I try to only do minimal buffing on these blades, to maintain clearance, so if there is a bit of burr left on the blade by the time it gets to the buffer, it's less likely to be fully removed.
Since I started applying more pressure near the edge when working the back of the blade, that has pretty much eliminated the inconsistencies in buffing BD plane blades for me -- even though (as seen in the picture of a bit of light reflection) there may be still a bit of convexity right at the edge. Note that in my case, I'm using a waterstone, so in addition to the extra pressure near the edge, the slurry and softness of the stone probably helps it to abrade any burr despite the remaining convexity.
Back Bevels and Cap Irons
Steve Elliott
I didn't experiment, so one would wonder if a 1mm rule would solve the problem vs. a 0.5mm rule (and it still may not interfere with the chipbreaker).
When I started using a microscope to examine edges and was also testing edges for sharpness I found I couldn't achieve the highest levels of sharpness unless I used a small back bevel. Eventually I made a sharpening jig that puts a 2-1/2 degree back bevel on the blade and can be flipped over to hone the bevel at the desired angle without adjusting the jig. I used the jig to produce edges for endurance tests of different blade alloys.
The back bevels seldom get wider than 20 thousandths of an inch, but that's still too far from the edge to set a cap iron. All my cap irons have their undersides honed to give about three degrees of clearance and they work fine with the 2-1/2 degree back bevels.
I'm not recommending this method to others, just noting that using a close-set cap iron is entirely possible on a blade with a back bevel.
Re: Back Bevels and Cap Irons
David Weaver
That's good information in combination with the fact that once the wear from a close-set cap iron is introduced (the deep short wear), the 1/2mm rule (which I understand to add a fraction of a degree) ends up getting chased larger to try to keep up with wear unless the wear is left or a bunch of the bevel is ground off.
Re: More experiences making a hollow on a blade
bridger berdel
I have had decent luck hollowing the backs of hard blades with an angle die grinder (think dremel on steroids) using a 1-1/2" resin cloth sanding disc, at indecently coarse grits. 40 or 60 grit, something like that. It takes a bit of practise and still is a crude method but it moves the metal quickly and leaves a reasonably smoothly curved hollow. You could easily refine it a bit with your dremel.
Re: Back Bevels and Cap Irons
John Aniano in central NJ
Steve,
Sounds interesting! Could you share your 2.5 degree backbevel jig either by photographing/describing it or with a simple drawing?
Thanks
Re: Back Bevels and Cap Irons
William Duffield
When I put the back bevel on the iron, I use the ruler trick. When I stone the back bevel on the chip breaker cap iron, I rest the rear end of the breaker cap iron on the bench and the business end on a diamond stone, which is about 1/4" or 5/16" thick, and much thicker than any ruler I might pick up for the task. That insures the breaker's cap iron's back bevel is greater than the iron's back bevel, and there is no gap at the critical juncture for broken chips to jam.
Working on it . . .
Steve Elliott
Hi John,
I took some pictures yesterday but I'm having trouble posting them on WC. Please stand by.
Steve
Re: Working on it . . .
Winston
Hi Steve, if file size is the issue, you can use this image resizing web app that I made: https://winston.shinyapps.io/image_resizer/
Re: Working on it . . .
Steve Elliott
Thanks, Winston. The images are all less than 40 KB so that's not the issue. I'm going to host them on my website when I get a little more time.
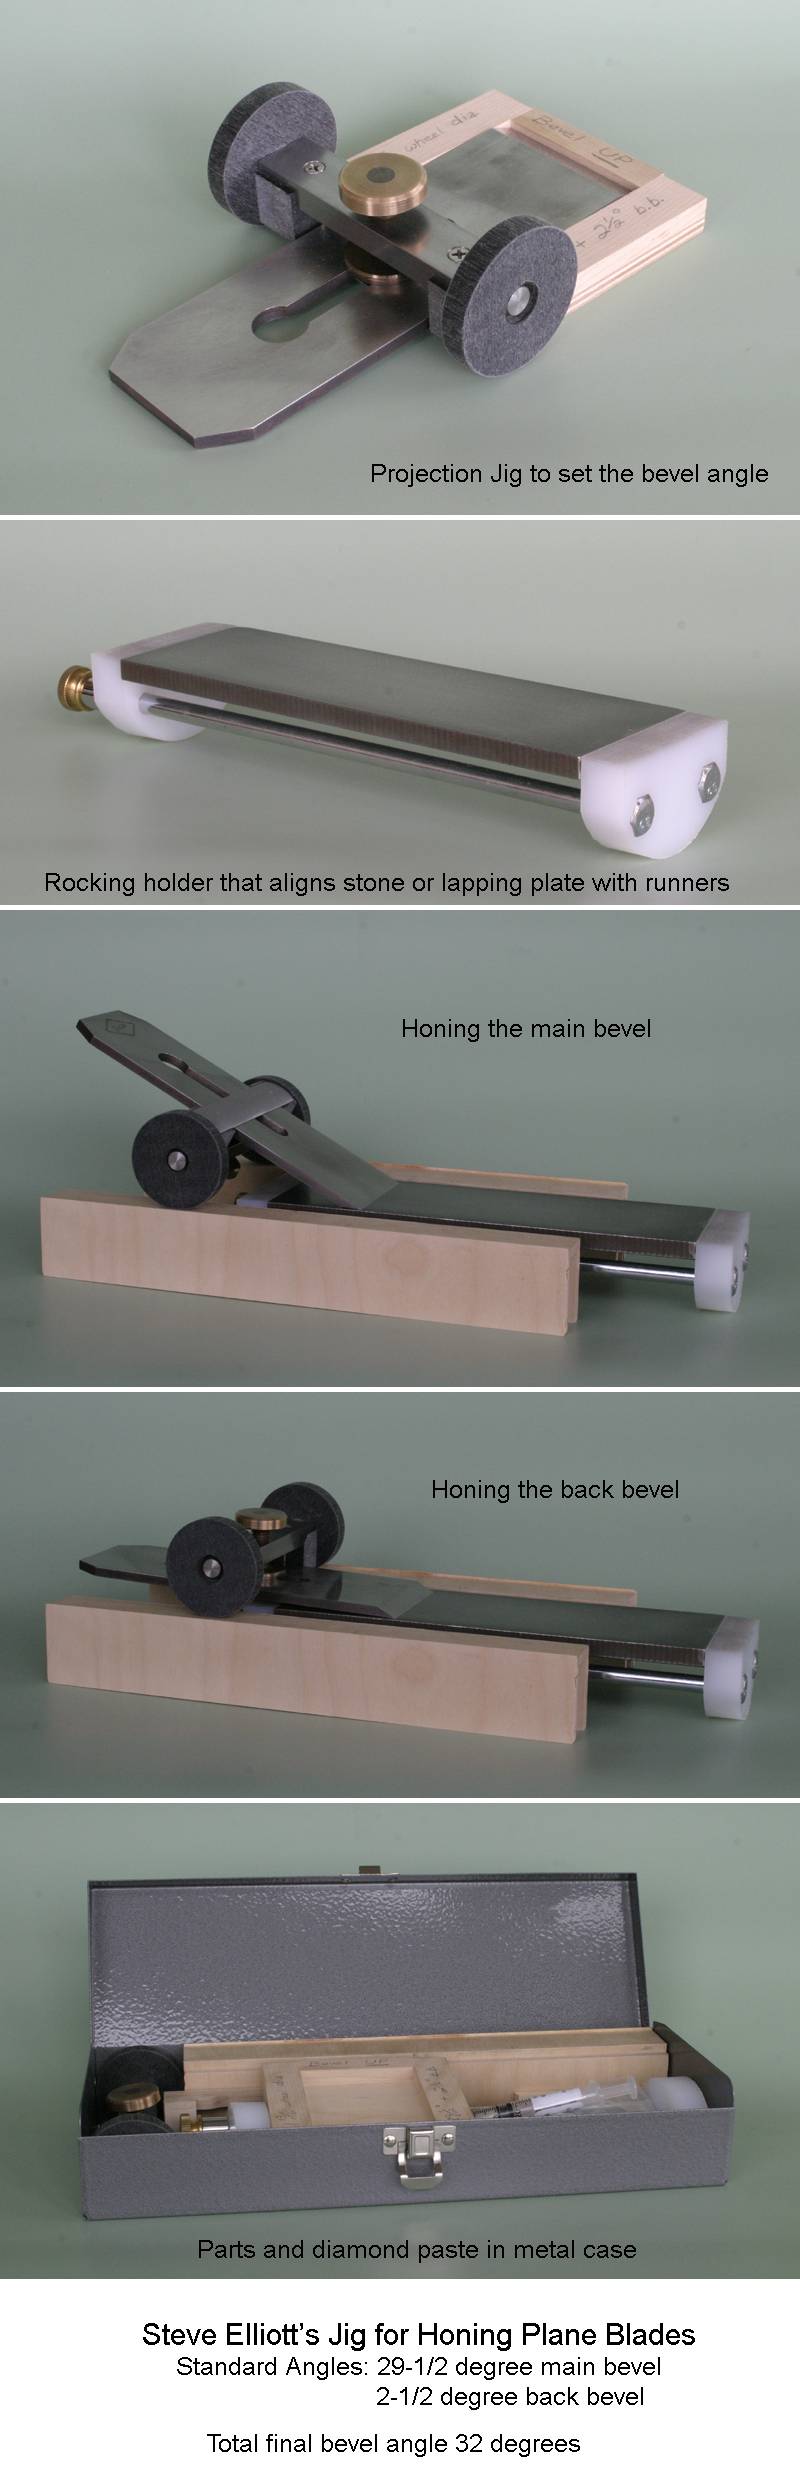
Honing Jig Pictures
Steve Elliott
Here are a few pictures of an earlier version of my jig, taken a few years ago. I've made a new one that looks a little sleeker but works the same. There are three parts: the wheeled jig that clamps to the blade, a clamp that holds the sharpening stone and rests on curved end pieces that allow the stone to rock sideways, and runners for the wheels to ride on. I think of the first two parts as "the roller" and "the rocker" because of their function.
The sharpening stone (or cast iron plate for diamond grit) is aligned with the top of the rocker by placing them both on a flat surface and tightening the bolts. When placed between the runners it is held in position by a bar that engages one of the clamp's end pieces.
To clamp the blade in the roller I use a plywood jig that sets the blade extension to produce the bevel angle I want. Both the bevel and the back bevel can be honed without changing the blade's position in the roller.
The wheels of the roller run on tracks that are just a few thousandths of an inch lower than the top of the iron plate. That way the blade never touches them even if the blade is rotated sideways while honing.
I like to relieve the corners of my smoothing plane blades and can do that by tilting the iron plate so that only the corner of the blade touches it.
All the parts plus diamond paste and the little plywood jig to set the extension fit into a metal case for storage.
Now for the MOST IMPORTANT PART. Don't try this at home! I developed this while testing plane blades for sharpness and edge retention. Accurate results required exactly repeatable blade geometry and the jig provides that. These pictures show the Mark IV version so you can imagine all the fiddling around it took to get to this one. For ordinary woodworking using one of the sharpening methods we like to argue about is a better choice. If I was starting today I'd look into the buffer method David Weaver and Winston Chang have developed.