New WoodChat!
Home Articles Forums Gallery Marketplace Videos

WoodCentral Forums

Knowledge You Can Build On — Est. 1998

This $39 jig will make you a WOODWORKING GOD!

English Dovetails

Posts

English Dovetails

#1

English Dovetails

Bill Tindall, E.Tn.


On the return trip from the Midwest Tool Collectors meeting we stopped in Shelbyville, KY to visit an antique store that specializes in English Furniture. This time they had an exceptionally large collection of chests of drawers- 1700 to 1800. The owners don't mid if I poke into them to examine construction. The early 1700 pieces typically have pine drawer sides and oak bottoms. The dovetails will often be large and crude. Later, the sides are quartered white oak with pine bottoms and the dovetails are dainty.

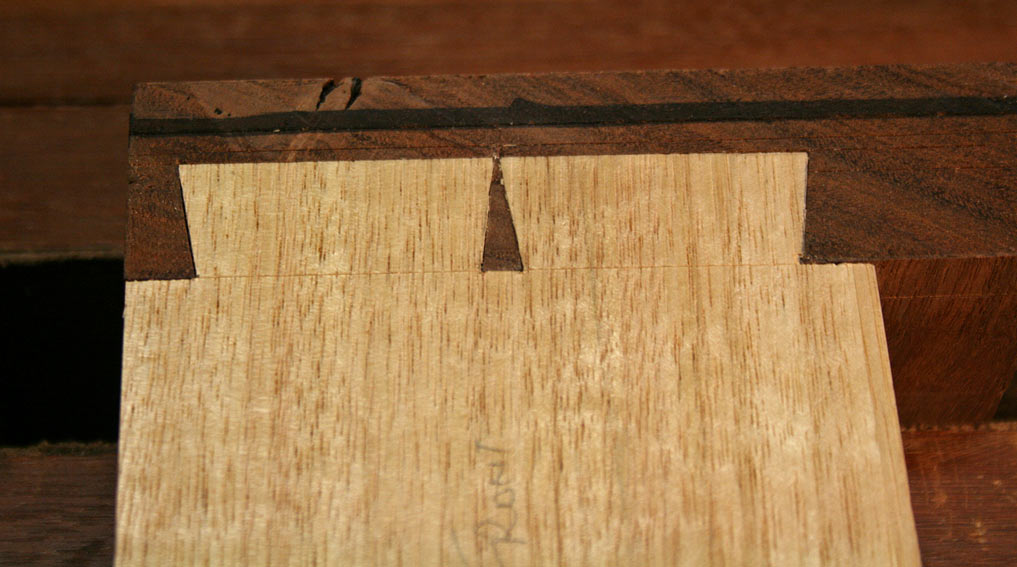
The piece in the picture is an exception to the rule, and , it had the most tiny pins I think could be made and still have a dovetail! Yet it held just fine for 300 years of use.

Re: English Dovetails

#2

Re: English Dovetails

Brian Holcombe

I find the approach used to dealing with the drawer bottom to be interesting. No grooves or slips, except at the front of the drawer under the drawer sides.

Are they glued or nailed or other?

Chris Hall recently restored a tansu cabinet for the MFA Boston and practically all of the damage done was due to nails used in the construction.

Re: English Dovetails

#3

Slips

Bill Tindall, E.Tn.

Keep in mind that the observations reported are for the furniture that survived in good enough shape to appear in a US antique store 200-300 years after it was made. I have no idea how representative these pieces are of English craft.

For the purposes of this discussion let us generically call the bearing surface upon which the drawer slides the "slip". So in the simplest case the edge of the drawer is the "slip" as is the case with most American drawers.

I have looked at a few hundred English pieces in this store and ALL had something more added to the bottom of the drawer to provide the bearing surface. Drawer sides are often 3/8" but I have seen 1/4" and something slightly more than 3/8 and very rarely anything thicker. During this visit I saw slips that were glued to the side of the drawer with a groove. But most often the slips are simply applied to the drawer bottom in a host of arrangements. Sometimes they are segmented, for reasons I don't understand.

I usually don't study slips. It involves standing on my head or taking the drawer out, and neither is handy. I don't care how they are done because I have settled on how I am going to make them. That said, as best I can tell and remember, the slips are attached to the drawer bottom somehow and they are thin (about 1/8" or less) and about an inch wide. I don't think nails are used because I don't see nail damage.

The drawer in the picture did have a thin 1" wide slip applied to the bottom of the drawer.

Re: English Dovetails

#4

Re: Slips

Brian Holcombe

Do you have more pictures? It's hard to dissect the construction of this piece of furniture with one image.

What appears to me is a drawer bottom attached via groove and some method (possibly glue) between the bottom and the drawer sides. You mention a slip but it is hard to recognize a slip in this photo.

Re: English Dovetails

#5

Re: Slips

Bill Tindall, E.Tn.

My objective of the picture was to show the most dainty dovetails I have ever seen on a full sized drawer. As I said, I have little interest in the details of antique slips so I don't, and in this case didn't, investigate that facet of drawer construction. I did feel underneath and felt a thin slip about an inch wide. I think, emphasize think, it was glued to the bottom of the drawer bottom and drawer side bottom.

The drawer blades were fine and the drawer worked fine. Whatever was done was effective for 250+ years. It was a well made piece and in good shape. About $7000 as I recall.

Re: English Dovetails

#6

Re: Slips

Brian Holcombe

I'm interested in discussing the nuances of that drawer. I find wear of wooden parts interesting to me as a maker. I build mainly original designs yet I find interest in how things were done in various cultures and how they have worn over time. You presented 300 year old drawers in fine shape and so that jumped out at me as something interesting.

The dovetails are nice, and nicely done. I found it interesting that they did not care to hide the drawer groove, something I'm certain would earn an e-flogging if shown online in the context of current work. They've chosen economy over aesthetic.

I find pine drawer sides to be interesting, I've contemplated using softwoods for drawer sides but instead usually use oak.

Re: English Dovetails

#7

Re: Slips, what Alan Batty said on topic

Bill Tindall, E.Tn.

The drawers on these English pieces can be huge and who knows what was stored in these large drawers.

When the slips fail (wear out) the drawers with oak sides mill a groove into the divider. That wear is not easily repaired.

I don't know what the slips were made of. It is light colored and fine grained. It could be pine or boxwood as far as I know. I just haven't been curious about the details as I don't make drawers this way. If you ever get to Shelbyville KY take a flashlight and mirror and you can spend the day studying.

Below is what Alan Batty wrote me about what was done in the factory where he worked making drawers:

] I do not understand what you mean by slips, on the bottom of the drawer we put a wearing piece, which ran on the runner for the drawer it ran the full lenght of drawer at on 2 sides, this was only a rubbed glue joint fixing in place, this wearing piece was tenon sawed all most thro but no quite, it was cut every 21/2 to 3 inches at approximately at a 30 degree angle, it was important the saw cut did NOT go all the way through, I was given to understand by doing this the wear was less, never did understand how this was supposed to wear better, but we always did it anyway

Re: English Dovetails

#8

Re: Slips

Derek Cohen (in Perth, Australia)

Two successive posts that dovetail (sic) ...

Brian wrote: The dovetails are nice, and nicely done. I found it interesting that they did not care to hide the drawer groove, something I'm certain would earn an e-flogging if shown online in the context of current work. They've chosen economy over aesthetic.

I would disagree that this is an economical approach. The slim dovetails indicate that an effort was made to provide an aesthetic. What I think we have, in the case of the open drawer groove, is someone following a method no doubt which they consider to be desirable/acceptable ... fashion?

Bill quoting Batty: I do not understand what you mean by slips, on the bottom of the drawer we put a wearing piece, which ran on the runner for the drawer it ran the full lenght of drawer at on 2 sides, this was only a rubbed glue joint fixing in place, this wearing piece was tenon sawed all most thro but no quite, it was cut every 21/2 to 3 inches at approximately at a 30 degree angle, it was important the saw cut did NOT go all the way through, I was given to understand by doing this the wear was less, never did understand how this was supposed to wear better, but we always did it anyway

I wonder how much we do is because we follow instructions what to do rather rather than why we need to do what we do?

Regards from Perth

Derek

Re: English Dovetails

#9

Re: Slips

Brian Holcombe

Economical in the sense that they're getting the absolutely maximum volume out of that drawer. The remaining space allows for the wear slips.

Fashionable maybe, but I assume that in an age where practically all furniture was made by a shop for a client that one could request to make the drawers as deep as possible for a given dimension. I am speculating that they were made by client request and with the warning that the grooves would show.

As a customer if I had to have every piece of furniture either inherited or custom made I think I'd get quite specific about what I wanted.

Re: English Dovetails

#10

doubtful

Bill Tindall, E.Tn.

I poke into a lot of antique furniture, every chance I get. Maybe the very highest end is different but what I see was made to be functional as efficiently as the maker could make. What I find is that if it doesn't show it is made as quickly as possible.

This piece was modestly made. The cockbead was scraped on the drawer, not applied, for example. I am sure the middle class family that bought this piece to put their socks in could not care less about the groove in the drawer showing. The client for this piece buys at Ikea now days, and spends a greatly less fraction of their disposable income doing do. But in 1720 there was no factory furniture.

These drawers were made quickly. I expect that what we see is this maker's quick way of making a functional drawer. It is doubtful the dovetails are made for looks. Alan Batty told me how easy it was to assemble a drawer with tiny pins. In the woods they used, the pins can be driven into the undersized dovetail sockets like nails and the drawer locks in place without clamps.

Re: English Dovetails

#11

Re: doubtful

Derek Cohen (in Perth, Australia)

Bill, I speak for experience here. The slim dovetails are not easier or quicker overall.

What is easier is marking out the tails (one line). Sawing one angle is as easy as wider tails, but sawing the adjacent side is a little harder since there is less registration for the saw. The only easier part is removing the waste from the tail as there is less. One does need narrower chisels with minimal lands as you cannot skew them to reach into corners.

The pins are much more difficult to excavate as the slim divide between the pin sockets is fragile and easy to damage. Paring requires more concentration and this takes more time.

I doubt that anyone would saw slim dovetails as a time saver unless they had a way of excavating the pin sockets efficiently and safely.

I really do not know if your friend is referring to the same design. I would dearly like to know what he does to make this method easier.

Regards from Perth

Derek

Regards from Perth

Derek

Re: English Dovetails

#12

Alan would disagee

Bill Tindall, E.Tn.

Keep in mind that Alan was required to make a quota of 6 drawers per day at the factory he worked at in the early 50's. What these factory workers found fastest in mahogany and white oak may not be what we amateurs would find fastest in the woods we use with the experience we have acquired.

The tail waste was not removed by chisel. This skinny waste was simple sawed away with three saw cuts, followed by one paring cut at the base line, as reported by Alan. That's efficient. It was Alan's view that skinny dovetails was all about efficiency and not at all about fashion. Try to sell some middle class family a place to put their socks for more money because the hidden dovetails are dainty and one might come to agree with what Alan told me.

Re: English Dovetails

#13

I repeat ..

Derek Cohen (in Perth, Australia)

Bill, I said it is not the tails that take more effort and time, but the pins. You only report what Alan mentioned about the tails, and nothing about the pins.

Regards from Perth

Derek

Re: English Dovetails

#14

Illustration

Derek Cohen (in Perth, Australia)

If you start with this tail board ...


.. you will require this pin board ...


... to achieve this ...


Clearing the waste at the corners of the pin socket - which are a result of the slim tails - is a delicate task. There is no room for error.

Regards from Perth

Derek

Re: English Dovetails

#15

Illustration

Bill Tindall, E.Tn.

Alan said they cut pins first. I suspect someone that made 6 drawers a day had no problem making small pins. (Those that did swept the floor :)) These would be made in easy to carve mahogany leaving the waste removal in the hard to chisel white oak done largely by sawing.

Believe what you will. In case interiors, I believe a shop selling to middle class customers will be doing what they did for economy. In a related situation Virginia furniture usually features overcut half blind dovetails and slightly overcut full dovetails at drawer backs. It made waste removal quicker, I was told by an expert in this furniture. Apparently, clients cared less about what the inside of a drawer looked like, focusing concern on outward appearance and cost.

Again on a related topic, the inside arc of the English bow front drawers in this antique shop were not refined, even though the outside of the case work was refined. In some pieces there was no attempt to remove saw marks, yet the outside of the case was refined. I believe the fretting over interior surfaces in case goods is a modern phenomena driven by cost is not a factor studio furniture standards. As amateur builders we can choose to emulate the studio standards or those of a 1750 cabinet maker trying to make a living selling to farmers and merchants, or somewhere in between.

Re: English Dovetails

#16

Re: English Dovetails

Charlie

Allan Batty, the very famous British woodturner, died on July 11, 2016.

Can you clarify who your Alan (one "L") Batty is?

Re: English Dovetails

#17

That Alan Batty

Bill Tindall, E.Tn.

I spent two days with him some years ago when he visited the US and then corresponded with him on drawers after the visit. I kept the correspondence so I didn't have to rely on memory.

It was the best two days I ever spent with a woodworker. While known as a turner, he worked early in his career in a furniture factory building drawers.

Re: English Dovetails

#18

Agree...

John in NM

The discussion jogged my memory of an old FWW article that mentioned using a scraper blade and mallet to clean up those corners around the pins. I believe it was done in the saw kerf, before the waste was removed - but I wouldn't swear to that.

This would work extremely well in mahogany, and I could see a guy cranking out drawers on a factory floor using this kind of method.

Re: English Dovetails

#19

Re: Agree...

Derek Cohen (in Perth, Australia)

The discussion jogged my memory of an old FWW article that mentioned using a scraper blade and mallet to clean up those corners around the pins. I believe it was done in the saw kerf, before the waste was removed - but I wouldn't swear to that.

This would work extremely well in mahogany, and I could see a guy cranking out drawers on a factory floor using this kind of method.

Hi John

Many years ago now (it seems), Tage Frid used a bandsaw blade to hammer into the kerf and deepen it in the corners of the tail sockets.

I developed this idea several years ago into a "kerf chisel". It excels in deepening the kerf at the corners.


Article: http://www.inthewoodshop.com/ShopMadeTools/KerfChisel.html

I am not sure how commonplace is this method, and whether Allan Batty would have used a tool such as this. I have doubts.

Nevertheless, it is an excellent way to facilitate removal of socket waste (just be sure to add a clamp across the board when using the method). But "cranking out drawers" is not how I would describe the process - one still needs to remove the waste, and that does take care.

Regards from Perth

Derek

Re: English Dovetails

#20

The thin blade technique

Bill Tindall, E.Tn.

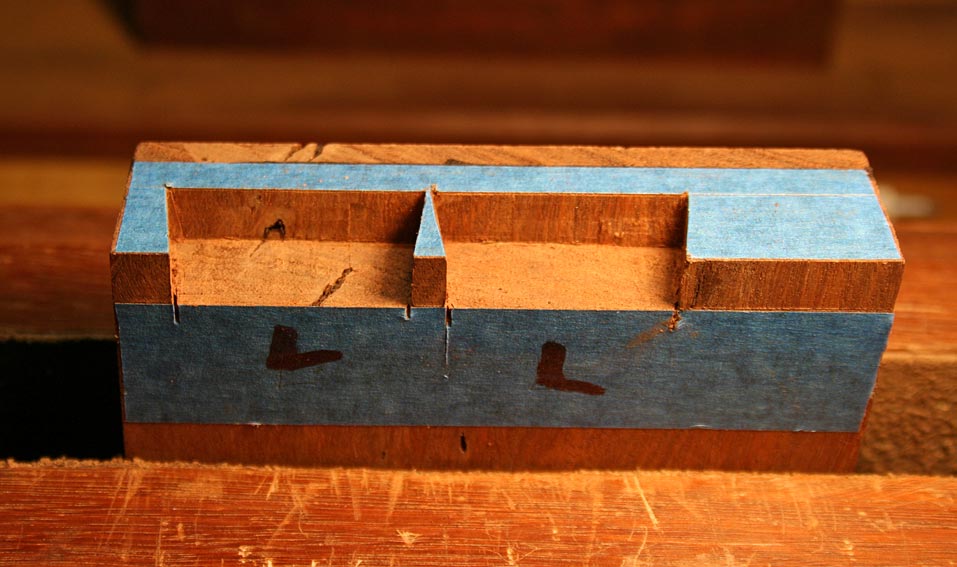
Some indeed use it. I tried it and abandoned it as not providing much benefit. After getting rid of the easy to remove waste by whatever means, I use a router, one is left with that pesky angular piece as seen in the first picture.


I find it easy to just turn a chisel on edge (chisel at in the right side) and shave away at this piece until I reach the saw kerf. Once I expose the saw kerf I now have a reference surface to guide the finish shaving that removes the last of the waste........except for another pesky bit that invariably sticks in the back corner. Some would reach for a skew to get it but I usually just wedge a chisel edge back there and pry it loose. The whole of this process is not more than a minute and would not be aided by driving a thin thing into the saw kerf.

Re: English Dovetails

#21

Re: The thin blade technique

Derek Cohen (in Perth, Australia)

I find it easy to just turn a chisel on edge (chisel at in the right side) and shave away at this piece until I reach the saw kerf. Once I expose the saw kerf I now have a reference surface to guide the finish shaving that removes the last of the waste........except for another pesky bit that invariably sticks in the back corner. Some would reach for a skew to get it but I usually just wedge a chisel edge back there and pry it loose. The whole of this process is not more than a minute and would not be aided by driving a thin thing into the saw kerf.

Bill, the only way you will appreciate that it is not as easy to remove the waste from sockets divided by a slim tail is to try this for yourself. If you do what you suggest above, I guarantee that you will destroy the tail.

Regards from Perth

Derek

Re: English Dovetails

#22

A problem I will never face

Bill Tindall, E.Tn.

It should be apparent from all I have posted that I don't like the looks of dainty tails. Furthermore, they don't offer me an efficiency advantage because I use soft drawer sides that are easily chiseled. I don't enter contests and I don't sell in galleries. I don't regard the inside of a drawer to be a place to make a fashion statement. My drawer philosophy is to minimize risk and time in making and maximize function. So, I will never face the challenge of not damaging dainty pins when building a drawer.

That said, the pesky fibers that can remain in the back corner after paring the socket side offer little resistance when sheared off by the prying action of the chisel, at least in the woods I use. I have no need for the skew chisel I was told I needed to do half blinds.

All of which illustrates the point that in woodworking recommendations, context is essential. Change the wood, construction style, skill level, etc. and the recommendation or concern may become irrelevant.

The people that actually build stuff on this Forum do a good job of providing context. It is up to the observers to use this information wisely in their work.

Re: English Dovetails

#23

Rough on chisels

Brian Holcombe

That technique may well work but it's a bit harsh on your chisels. A fishtail chisel eliminates all that.

Re: English Dovetails

#24

Re: Wakefield-Scearce Galleries *LINK*

Hank Knight

Bill,

I assume you are referring to Wakefield-Scearce Galleries in Shelbyville Kentucky. For those who have not been there, you should follow Bill's lead and go there if you are ever even remotely in the area. They always have a fascinating stock of English antique furniture, better than any I've seen in Charleston or anywhere else short of Christie's. I first visited Wakefield-Scearce in the he 1960's and have been back many times. It is always a delight and I never fail to come away with a head dull of ideas. Here is the link to their web site. Check it out:

Hank


Wakefield-Scearce Galleries

Re: English Dovetails

#25

Re: A problem I will never face

William Duffield

I agree. London pattern dovetails do not provide the structural integrity needed to secure the drawer front. When someone overloads the drawer and it binds, the temptation is to pull harder. This often results in the total failure of the pins as the drawer front pulls off in your hands, which then need to be rebuilt. When I make this repair, I make the new pins thicker, and recut the tails to fit. For chopping out the corners, I usually just use a narrower chisel, usually 1/8". The nicks at the back of the socket don't weaken the joint, and they're never visible. They're not nearly as ugly as oversawing the sockets that "everybody does" to minimize chopping the waste. If the aesthetics bothers you, instead of buying a pair of skew chisels, just buy two extra 1/4" chisels and regrind the bevels at complimentary angles that match your dovetail gauge.