New WoodChat!
Home Articles Forums Gallery Marketplace Videos

WoodCentral Forums

Knowledge You Can Build On — Est. 1998

Reach the woodworkers who ACTUALLY BUY

Before the drawer blades ... (lingerie chest)

Posts

Before the drawer blades ... (lingerie chest)

#1

Before the drawer blades ... (lingerie chest)

Derek Cohen (in Perth, Australia)

The cabinet carcase is now complete and together as a dry fit.
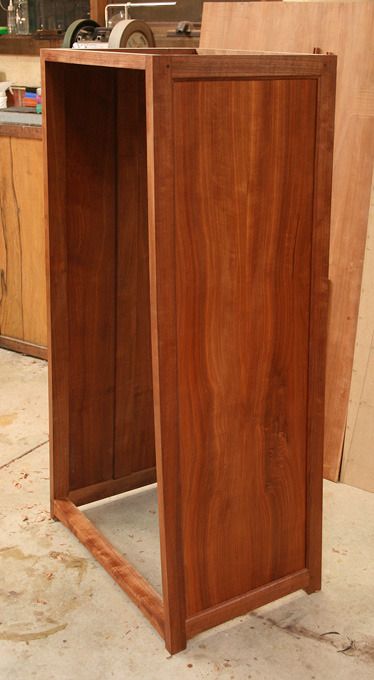

You cannot see the curve on the front elevation in this photo, but it is clearer in the documentation ..
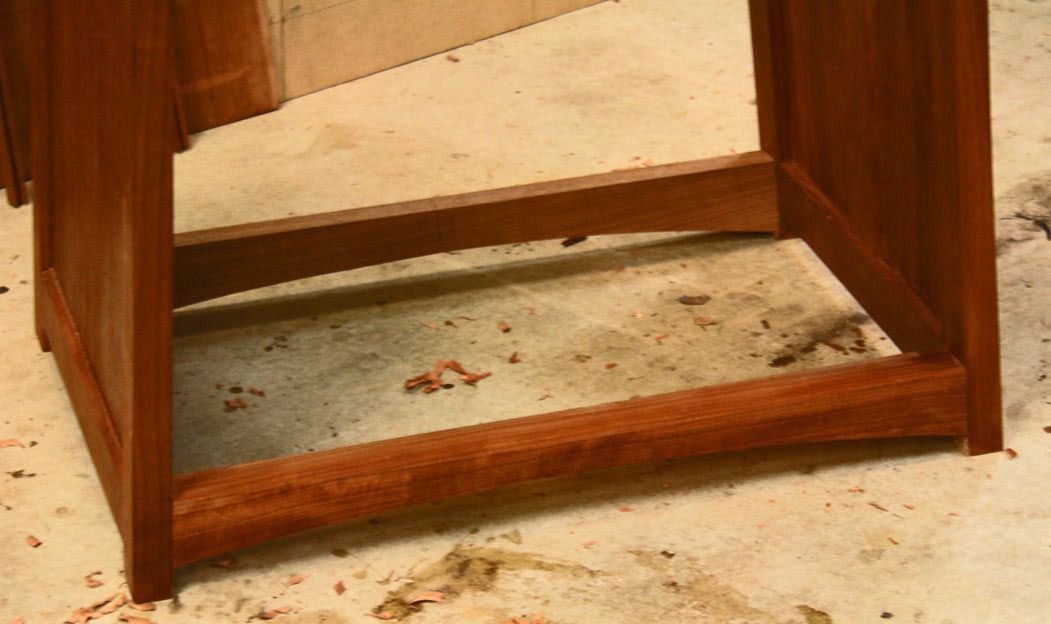

It had been my intention to post the carcase with completed draw blades – this would have been the next stage in any cabinet with straight sides. However it became increasingly apparent that, as a result of the many curves, this build is a tad more complicated, and I am have been left wondering whether I would ever get to be in a position to build the drawer blades as something else kept cropping up! It was a case of “I’d better to this before I get to that as it will not be possible later. And on and on ..

It is possible – and indeed I like to hear the opinion of others here – that the sliding dovetails for the drawer blades could be marked and formed from inside the completed carcase. I am now seriously considering this method. Indeed, I cannot see an alternative. The carcase could be dis-assembled and assembled repeatedly for work to be checked, carried out, and then checked again. However the latter will cause wear on the joinery, with resulting loss of tautness and accuracy.

Let's hear your thoughts on constructing the drawer blades. The front and rear are planned to be sliding dovetails (as has so much of this construction so far).

Here is the build in detail: http://www.inthewoodshop.com/Furniture/PreparingForTheDrawerBlades.html

Regards from Perth

Derek

Re: Before the drawer blades ... (lingerie chest)

#2

Re: Before the drawer blades ... (lingerie chest)

Brian Holcombe

Looking good. I think you're on the right track with the sliding DT's. They will offer a lot of integrity and will help to maintain the curve along the sides.

I'm assuming the drawer blades will not be visible with the drawer closed and therefore will be stopped ahead of the front of the cabinet by the thickness of the drawer.

I think housings will help as well, they make the cutout more straightforward and will help maintain perpendicular as the dovetails come together. A housing it will eliminate having to cut a front shoulder since it will be created by the housing.

Re: Before the drawer blades ... (lingerie chest)

#3

Re: Before the drawer blades ... (lingerie chest)

Brian Holcombe

Sorry Derek, I think I misinterpreted your question. I thought your were questioning the joinery but I see you are concerned with cutting them out with the cabinet assembled?

I found on my recent builds that it was worth the added difficulty of working in the assembled case/structure since you're working around very exact tolerances at this point.

Re: Before the drawer blades ... (lingerie chest)

#4

Re: Before the drawer blades ... (lingerie chest)

Derek Cohen (in Perth, Australia)

Thanks Brian

With the typical cabinet, especially curved sided such as a bombe, the front sliding dovetail enters from the face frame of the cabinet. With this cabinet, since the interior is not flat as it is a frame-and-panel, I plan to form the housing+sliding dovetails from the inside of the frame. An advantage of this is that I can add on the curved front section (as I did with the top rail), and this will hide any errors.

Strategies to ensure that the opposing housings are coplanar?

Regards from Perth

Derek

Re: Before the drawer blades ... (lingerie chest)

#5

Re: Before the drawer blades ... (lingerie chest)

Brian Holcombe

A curved or flexible story stick might do the trick.

Makes sense to add the curved section after, then you can fit the shoulders after the DT's have been seated.

Re: Before the drawer blades ... (lingerie chest)

#6

Re: Before the drawer blades ... (lingerie chest)

roger lance

Derek......the idea of making a curve story stick is a possibility......with the stick length initially set for the top drawer and then the stick itself cut down to the next drawer etc and so on.....that gives you an orderly lay out with any minor correction to be made with a little hand tool work.

Re: Before the drawer blades ... (lingerie chest)

#7

Re: Before the drawer blades ... (lingerie chest)

Derek Cohen (in Perth, Australia)

Hi Roger and Brian

I had better clarify.

I have already marked out the position of the drawer blades. I did this after rebuilding the sides. Both sides are marked, front and back. A square edge along these marks provides a precise positioning of the lower side of the drawer blades. This part is not a problem.

For reference, the drawer blades are going to be 19mm (3/4") thick (lingerie is heavy! :) ). The marks are for the lower side of the drawer blade. All I need to do is mark it a further 19mm to establish the position of the housing. Again, this is not a problem.
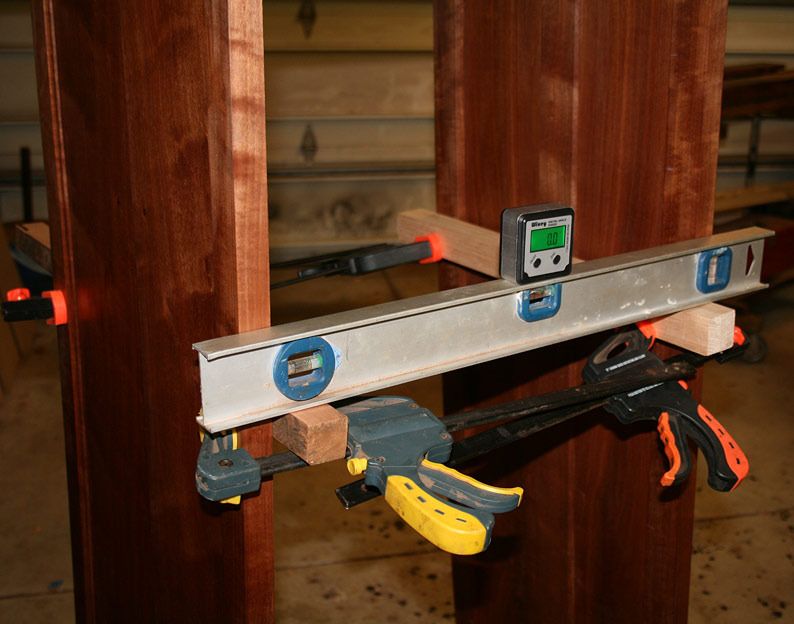
I do not have any difficulty establishing where each drawer blade must run. However, I need to build a guide to ensure that they run coplanar with each other in the horizontal. This is more complicated because the sides curve, and a housing needs to be planed/formed at a curve (and remain coplanar across the width of the carcase - not the depth of the carcase).

The dovetails will be single-sided, that is, be flat on one side. Straight side up or down? I have recommendations both ways.

Sliding dovetail at front and rear, and joined with a blade that is M&T into each.

Regards from Perth

Derek

Re: Before the drawer blades ... (lingerie chest)

#8

Re: Before the drawer blades ... (lingerie chest)

Brian Holcombe

IMO, straight side up.

I'm on the same page, or so I think. I would probably just cut a sacrificial board, clamp it at your existing marks and use it to knife in the lines. I suppose you could use it as a saw guide as well.

Re: Before the drawer blades ... (lingerie chest)

#9

Re: Before the drawer blades ... (lingerie chest)

Derek Cohen (in Perth, Australia)

Hi Brian

I am not sure if I have made it clear.

Where the complication comes from is fitting the front sliding dovetail from the inside of the carcase. Fitting from the outside one one can hold the cross section of the drawer blade against the front and mark from it. But how does one do that from inside the carcase? Will the gap formed by the panel offer enough space? I think any if this would be impossible (no reference angles) if the sides were not linked, and why the carcase must be assembled beforehand. I could avoid these complications by working from the ouside, but I want to avoid marking the front of the legs.

Does this make sense?

Regards from Perth

Derek

Re: Before the drawer blades ... (lingerie chest)

#10

Re: Before the drawer blades ... (lingerie chest)

Brian Holcombe

Certainly. it's going to be difficult to mark from the inside, maybe you'll need to use a scratch awl rather than a knife, not ideal but you'll have some marks to work with.

I would want to cut it out with something like an azebiki saw so that I could get a good depth of cut and cut while sighting from the back of the cabinet.

Are we on the same page? Lol, hopefully so, by this point :)

Re: Before the drawer blades ... (lingerie chest)

#11

Re: Before the drawer blades ... (lingerie chest)

Brian Holcombe

also, these are going to be blind on the outside of the cabinet, correct?

Re: Before the drawer blades ... (lingerie chest)

#12

Re: Before the drawer blades ... (lingerie chest)

Derek Cohen (in Perth, Australia)

Hi Brian

Yes, blind at the front and through at the rear.

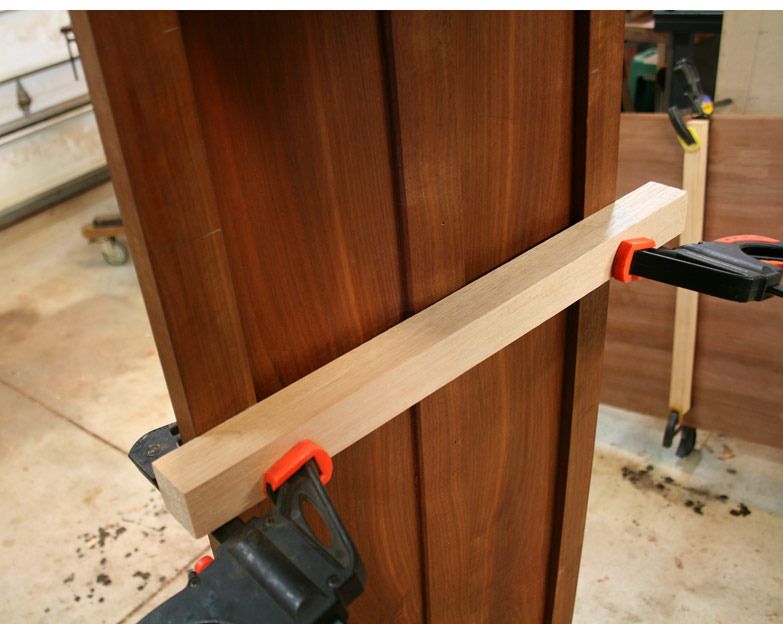
Getting inside the assembled cabinet is not difficult ..


If this board was planed to a complimentary angle, it would be a good guide for housings.

It could be calculated from this ...


Regards from Perth

Derek

Re: Before the drawer blades ... (lingerie chest)

#13

Re: Before the drawer blades ... (lingerie chest)

Brian Holcombe

How much thickness are you working with?

Are you cutting the housings first or the blades?

IMO I would cut the blades first, so that you can just transfer marks and cut freehand. I can understand the guideblock for the housing, but you'll be making a new guideblock in this case for every drawer (or changing the angle as you go), which seems a bit laborious in such a shallow housing.

Re: Before the drawer blades ... (lingerie chest)

#14

Re: Before the drawer blades ... (lingerie chest)

Derek Cohen (in Perth, Australia)

How much thickness are you working with?

Are you cutting the housings first or the blades?

IMO I would cut the blades first, so that you can just transfer marks and cut freehand. I can understand the guideblock for the housing, but you'll be making a new guideblock in this case for every drawer (or changing the angle as you go), which seems a bit laborious in such a shallow housing.

Hi Brian

I plan to cut the housings first. They will be very shallow - just enough flat area to register on from the inside (where there is 130mm - 7 1/8" - clearance between the leg and the reinforcing to the panel), and long enough to fit the end of the blade (a curved face will be added afterwards). The length of the front blade will be sized such that the base of the dovetails register on the flats. Then they can be marked out and cut.

The leg thickness above the panel (for dovetailing) is 10mm (about 3/8"). I estimate that the housing will remove about 1-2mm, and the dovetail will then need to be about 5mm (about 3/16") deep. The angled side faces down, the straight side faces up.

The legs are 45mm wide. The curved drawer face will be 22mm (about 7/8"), sitting inward of the outside edge by 1mm, and will butt against a stop which leaves a 22mm long sliding dovetail (the rear dovetail can be about 35mm long). The front and rear drawer blades will be 50mm (2") wide.

The drawer is similar to this ...


... but the sides are shaped into the curved sides of the case.

Regards from Perth

Derek

Re: Before the drawer blades ... (lingerie chest)

#15

Re: Before the drawer blades ... (lingerie chest)

Brian Holcombe

Cool, I'm very interested to see this part coming together. I have an approach in my head, but the best part of these build threads is that I can see a completely different approach.

I'm sure you've come to the same conclusions as I have on thin panel construction, it gets very interesting very quickly since every part is relied upon for strength in addition to other functions.

Re: Before the drawer blades ... (lingerie chest)

#16

Re: Before the drawer blades ... (lingerie chest)

Derek Cohen (in Perth, Australia)

Hi Brian

These panels may be thin, but they are rigid and strong. The biggest problem is that they do not leave much room to add joinery, and so one must choose joinery carefully.

I have made one change to my last post, above, which is a result of realising that the width of the front sliding dovetails will not be wide enough for my liking. The advantage of having time between shop time makes it possible to reconsider build plans. So ...

The legs are 45mm wide. I plan to add on a 25mm wide filet behind the leg to extend this width. The curved drawer face will be 22mm (about 7/8"), sitting inward of the outside edge by 1mm, and will butt against a stop (2mm needed for the Tip On), which leaves a 45mm long sliding dovetail at the front. The front and rear drawer blades will be 50mm (2") wide.

If I build and install the drawer blades from the top down, then there will be enough space to angle the forward section in from the space in the panel.

Regards from Perth

Derek

Re: Before the drawer blades ... (lingerie chest)

#17

Solution to the dovetails

Derek Cohen (in Perth, Australia)

A simple solution for cutting the dovetails occurred to me.

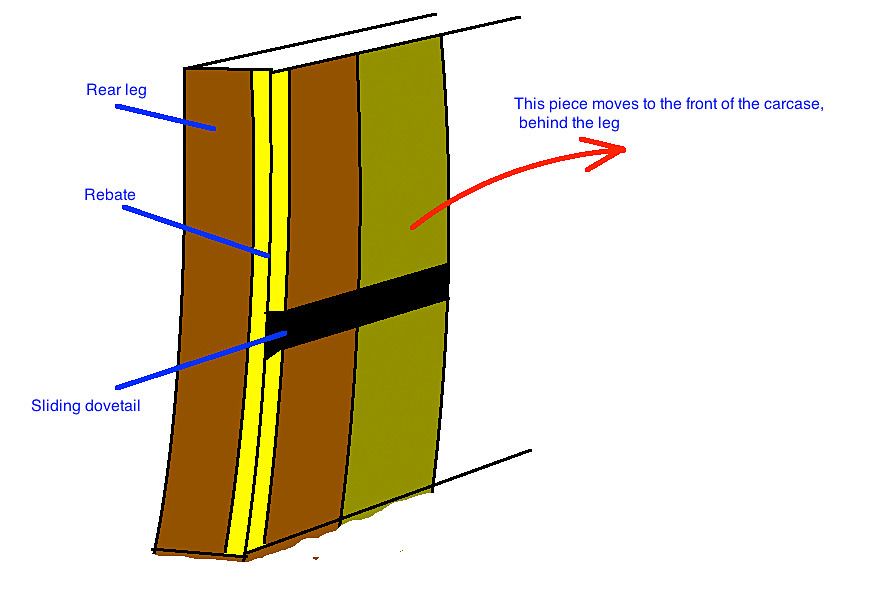
I have planned to add a filet strip behind the front leg to lengthen the sliding dovetail for the front drawer blade. What I shall do is clamp one on each side and inside the rear leg, and then mark and saw the dovetails from the rear (the rear was always going to be marked and sawn from outside).

Here is the side again (the rear rebates have yet to be cut):


The rebate will be 6mm deep, which is also the depth of the dovetail. Once the dovetail is sawn and the waste removed, the clamped filet can be moved and glued behind the front, as planned. This will ensure that both front and back are coplanar.

Both sides are done at the same time.

The drawer blade is made to fit beforehand, and dovetailed. This is made doublt width (100mm wide), and then ripped into two pieces - one for the rear and the other for the front.

So, in effect, the front slidijg dovetails are fitted from the outside of the rear of the carcase.

What do you think?

Regards from Perth

Derek

Re: Before the drawer blades ... (lingerie chest)

#18

Re: Solution to the dovetails

Brian Holcombe

I think I need to see a visual, I'm a little lost as to what you have in mind.

I'm in the same boat, it's good (mostly) for the process to have some time to think about your projects in between woodworking sessions. It's helped me on this recent go-round with the bed because I did not fully plan it out as I usually do, so a lot of it was figured out on the go.

Re: Before the drawer blades ... (lingerie chest)

#19

Re: Solution to the dovetails

Derek Cohen (in Perth, Australia)

Hi Brian

All the work is predicated on keeping the front of the chest free from evidence of dovetail sockets on the front legs. The sockets for the front sliding dovetails are to be made from the interior (rear of the leg frame).

The plan is to dissemble one last time to complete the rear rebates, drill the screw holes in the upper panel, and then glue the lot together. As it stands, everything is square - amazingly so for a dry fit.

But parts move, and dovetailing for the drawer blades is vulnerable to movement. I just cannot see how they can be done accurately with the sides apart. All work on the sliding dovetails must take place with the chest glued up.

The strategy is simple ...

Measure the rear drawer blade for a fit, and saw the half dovetails at each end.

Working only at the rear of the chest, mark the dovetails within the rebate on both sees. Now saw/chisel the sliding dovetail in the rear leg and the front fillet at the same time.

When all the sliding dovetails and saw blades have been completed, move the front fillets to the front legs, and complete the sliding dovetail sockets there. The fillet will act as a template for the remaining socket.

As mentioned earlier, the drawer blade at the rear will be double width, so that, when ripped down the centre, the other half will become the drawer blade for the front.

Imagine this is the rear of the chest ..


And this is the strategy ...


Regards from Perth

Derek

Re: Before the drawer blades ... (lingerie chest)

#20

Re: Solution to the dovetails

Brian Holcombe

Thank you for that, while I've been clean on the goal I was not exactly clear on what you were planning with regard to ripping in half the fillet.

Makes perfect sense, since it will be cut and aligned on the back then transferred to the front.