New WoodChat!
Home Articles Forums Gallery Marketplace Videos

WoodCentral Forums

Knowledge You Can Build On — Est. 1998

Support WoodCentral when buying things you need

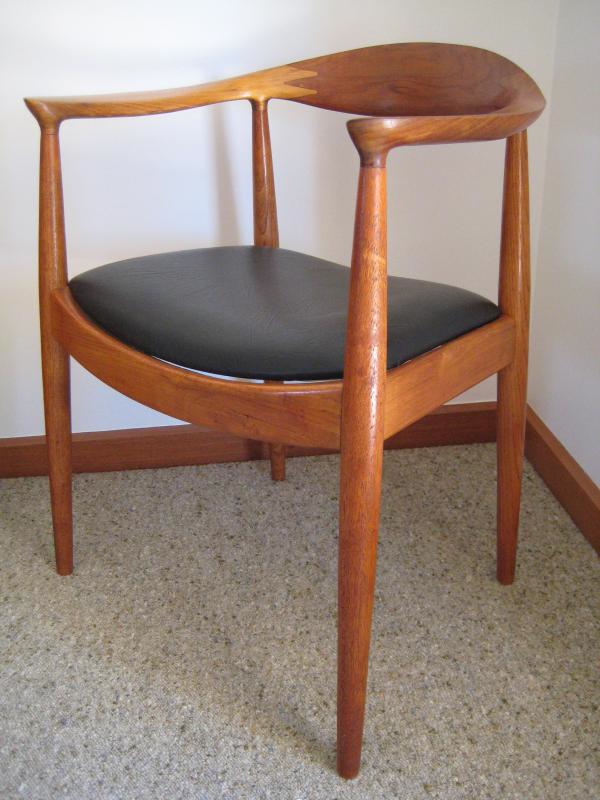
The Chair - close but no coconut

Posts

Re: The Chair - close but no coconut

#2

Re: The Chair - close but no coconut

Larry Barrett

Derek

I believe the 3/16 RJ auger does exist. I do not have one, but am quite sure I have seen one. Inquiries to dealers will likely turn one up.

You say "I do not see any point in working from the outside towards the centre since the sides will be carved away and the centre will be left." I take your point, and if this could be done with high confidence the final shaped joint would also be perfect.

But looking at the chair, it seems to me that it is the leading edge of the joint that is completely exposed on the top (and presumably the bottom) of the joint. The end of the joint (whether round or pointed) is 'mostly' in the center and only some of the outside is cut away, although I suppose that this will depend on how much excess you start with.

If this is so, then you might have acceptable success if you did drill, and saw, from the outsides in. It might be a useful experiment to make a complete joint including final shaping to see how it turns out.

Re: The Chair - close but no coconut

#3

Re: The Chair - close but no coconut

William Duffield, on the Cohansey

Keep practicing. Can you try clamping your guides to your saw blades with something with a better grip than your neodymium magnets? I realize that you might not be able to use a back saw, and you might need to make a pair of guides from steel instead of wood to keep the saw plate from flexing.

BTW, I like your drill guide. It's a lot more practical than trying to find and restore and old post drill.

The problem I have with pointy finger joints is the same problem metal casters encountered before they invented fillets. Forces on the joint are greatly concentrated where two surfaces come together at a point. Making a rounded surface significantly spreads out and diminishes the force, which is especially important if you don't want to split the wood along the grain lines. Of course, that's what makes wedges, froes, and splitting axes work, and sharper is better, if you want to split the wood.

Re: The Chair - close but no coconut

#4

Re: The Chair - close but no coconut

Bruce McCrory

1) Are the back and arms still in "square" form, in order to follow the present practice regime.

2) The "by hand", or "by machine" conundrum is odd to me. You have already band-sawed the gross shapes of the parts. Why start contriving hand tools and jigs when machines have been used already. If it is that important, just unplug the drill press and operate the chuck with a bow.

3) When cutting fingers, the backsaw blade is warping due to shear flexure against the guide. I do those not-straight cuts all the time because my arm arcs instead of swings, like a pendulum. As in 2), above, cut the fingers with the bandsaw.

4) Let's return to the fingers and backsawing. Why all the manipulation to target a predrilled hole? Do the good and presumed freehand sawing first, followed by shaping the termination. Clean with a gouge and not resort to waling on Chuck with a bow.

Re: The Chair - close but no coconut

#5

Re: The Chair - close but no coconut

Sgian Dubh

Derek, I haven't really had the time to make further suggestions since I contributed in another thread some days ago. Also, you seemed to be getting plenty of suggestions from this forum, and a couple of others where you've posted. I didn't think I could anything useful to all that information, and I wondered how keep up with it all!

It seems to me that your experiments have followed some of the suggestions I made. Primarily what you seem to be doing much as I suggested is working off flat reference surfaces that are either square to each other, parallel to each other, or at known angles to each other. What is different to what I expected is that you are marking the mating pieces individually before you do any cutting, as opposed to the common practice in marking and cutting dovetails where you execute one part and transfer the marks from the cut part to the other part prior to cutting that.

It rather reminds me of cutting what I call the double twisted dovetail, which has a Japanese name that I don't know. That too is marked on both parts prior to cutting, and getting that right is crucial to creating a gap free joint.

Anyway, at this point I don't have any advice, and I think you're in the best position to judge what to do next. After all, it's you doing the work and basically you're in a situation where all you can do is practice until you get it either right, or good enough. Personally I really think this is a joint that would be set up to do on machines, probably even for a one-off, because I suspect that was likely the intent in the first place. That would also give me the set-up to replicate the joint, perhaps even for paying clients if I felt so inclined. But even though I think that I also think you're right to attempt it by hand simply because that's the way you want to try and achieve success, and this I assume will be just as you say, a one-off. Slainte.

Re: The Chair - close but no coconut

#6

Re: The Chair - close but no coconut

BrianMonumentCO

I wonder why you expect to hit the exact circumference of the hole.

The back saw does not strike me as a precision instrument.

I wonder if a japanese pull saw would do better......

But my main idea/point is;

Why not aim for a secant, ie parallel to the tangent yet entirely inside the hole.

Then pare to the line. And just kiss the tangent of the hole.

Re: The Chair - close but no coconut

#7

Contrary opinion

Wiley Horne--So. Calif.

Hi Derek,

If I ever wanted to consult with someone on doing the impossible, it would be you! For sure. My hat is off for all your effort.

It strikes me that the rounded finger joint is inferior to the pointy finger joint. The Japanese make certain scarfs with long fingers, and they don't round them, they point them. I think I can find a picture somewhere of a northern European joint similarly--I saw it once in a book from my son.

The pointed finger joint has more long grain in the join, and everything here depends on the quality of the glue join.

And honestly, when you have to jig the handtools at every step in order to replicate a machined joint, there are bragging rights ('I did it by hand'), but it's a far cry from traditional use of the tools such as you showed very admirably toward the end of the current post in sawing the pointed finger joint.

I encourage you to consider the joint best suited for hand tools, the pointed finger joint. I'll be glad to post a couple pictures of traditional joints (mostly Japanese) of this type, which are pointed finger.

Whatever you decide, my hat is off to you. For what it's worth, I think Brian's idea of cutting in the waste, and paring to the line, is the way to go, if you stick with the round-fingered joint. After all you have a knifed line to pare to. Intuitively, it seems like there should be a way to match up and pare both the mating pieces together, using a paring block.

Wiley

Re: The Chair - close but no coconut

#8

Re: The Chair - close but no coconut

AlanWS

Cutting purposely to one side of the line and then adjusting would be my approach as well.

If you have a model that fits well, you can use that to help fit the joint. Rubbing your model against the workpice to burnish or transfer pencil will show where to pare. It does not sound like your style, but one could even glue sandpaper to an accurately cut model, and use that to fine tune a joint.

Re: The Chair - close but no coconut

#9

Re: Contrary opinion

William Duffield, on the Cohansey

Maybe we should start addressing Derek, "Good Morning, Mr. Phelps,"

I think David Pye's paradigm shift of "workmanship of risk" vs. "workmanship of certainty" is a more appropriate way to judge Derek's approach to this problem than hand tools vs. power tools.

Perhaps the biggest risk here is Derek's decision to start with an extremely limited amount of acceptable raw material. Following that decision, any use of power tools means that the final, fatal error happens a lot faster, and with no hope of recovery.

Re: The Chair - close but no coconut

#10

Re: "workmanship of risk vs. certainty"

Tom

In general I think those terms apply to aesthetic/creative risks. You decide to use some kind of gouge that has a lever attached to it, rather than a lathe. The risk is not that you will blow it up, which could happen with either, the risk is that the gouge/lever thing has less limited geometry, and more options to create forms with Pye's "diversity". It has been a while since I read the book, but I always thought (maybe wishfully), that the ideas where an overlay from En-soi Pour-soi in existentialism where authentic action and in-authentic action are compared. These are not better or worse, but different modes of being. You can make a sad workmanship of risk item, nice try. Or a masterpiece of melted dovetailhood, that is simply impeccable workmanship. Value judgements are somewhat beside the point.

When thinking of these kinds of thing, I do a check to see if the idea stands up to professional practice. Pros can do either risk or certainty, within their area of mastery. It doesn't make sense to assume they are wasting a lot of analytical time on issues of success they haven't considered since their early apprenticeship.

But I think none of this applies here. This is a copy of someone else's work. The risk is that the effort will fail to be sufficiently constrained by someone else's ideas. Not really what Pye was talking about. It is a gutsy skill stretching, gut checking piece of work for any of us, but that is because we suck.

Re: The Chair - close but no coconut

#11

Re:What is the objective, I am loosing track...

Tom

There is nothing wrong with a moving target, but I am feeling mission creep. I can't sensibly suggest what aspect you should value/pursue, because you can reassign the objective at any time. The current methods do not strike me as more interesting than using the existing tools in most of our shops. I would rather see you drill some holes on a drill press than display a wide range of jigs. It doesn't mater to me how you do it, but if it isn't something I could see myself doing and others also, it may be missing the original point.

The basic hand tool method when you can't practically go straight to the line, is to creep up one it. I like my point rounding tool, I like a drill press, and I like the idea of an acute side cutting plane. If something of that sort can't be made to work it seems like a stunt. I think that the regular splice does come with some problems. The benefit is that it does not have the stop effect that rounded ends have. This make errors less obvious. But I have made a lot of these splices on bows and bad things can happen with the points also. It is like the other side of the lake... Maybe the fishing actually is better...

Another option is to look into Chinese chair rail joinery. At one point I thought of the sides penetrating the back like an arrow, secured by two wedges. As they do the timber scarfs. The problem is that without the narrow continuity of the Chinese chair, the pieces of wood required would be pretty enormous. And it would look too different.

Are you familiar with John Alexanders drill press? It uses a bit and brace, and a level, and it can drill pretty accurate holes if you prefer a hand tool in that role.

Re: The Chair - close but no coconut

#12

Re: The Chair - close but no coconut

Derek Cohen (in Perth, Australia)

1) Are the back and arms still in "square" form, in order to follow the present practice regime.

2) The "by hand", or "by machine" conundrum is odd to me. You have already band-sawed the gross shapes of the parts. Why start contriving hand tools and jigs when machines have been used already. If it is that important, just unplug the drill press and operate the chuck with a bow.

3) When cutting fingers, the backsaw blade is warping due to shear flexure against the guide. I do those not-straight cuts all the time because my arm arcs instead of swings, like a pendulum. As in 2), above, cut the fingers with the bandsaw.

4) Let's return to the fingers and backsawing. Why all the manipulation to target a predrilled hole? Do the good and presumed freehand sawing first, followed by shaping the termination. Clean with a gouge and not resort to waling on Chuck with a bow.

Hi Bruce

1. Yes, the arms and back have reference areas - all areas where they are to be joined have been left square.

2. "By hand" essentially means that all joinery and shaping is to be done with handtools. I used a lathe to turn the legs, but I consider this a handtool since I had to manipulate a chisel to form the shape. The only power tool (Appentice :) ) was a bandsaw, which was used to rough out the rough sawn timber.

3. I think that you are partly correct - that I probably flexed the saw plate. In retrospect I think that the clamp also twisted the guide slightly at it was at near the side of the board. More on this in my follow up.

4. Why the drilling - I will explain in my follow up rather than write this twice.

Regards from Perth

Derek

Re: The Chair - close but no coconut

#13

A glimmer of light at the end of the tunnel ..

Derek Cohen (in Perth, Australia)

I need to explain why I have been so bloody minded about persevereing with the drilling and sawing strategy.

The arms and backrest are being shaped in a different way to the legs and stretchers/rails. The front and rear rails were shaped to fit the legs because I could not be sure of the angle of the mortice and tenon joints. The M&T joints are also internal joints and any gaps could be filled with the epoxy used to glue them together.

By contrast, the arms and backrest are known angles, however their joinery is on the outside where it is visible. The joinery here must be spot on. The connecting sections were purposefully made square and oversize. They will be joined and then shaped (in contrast to the legs, which were shaped and then joined).


In spite of being as careful as I could in squaring the square end sections, I realise that there will be some deviation, or that I should assume that there is some deviation for a worst case scenario. Consequently, I must find a way to saw the joinery from one reference side. In my mind, working inwards from two sides will create errors, even if they are small. This will lead to gaps. If the joinery is perfectly square from the reference side then it should not matter what the opposite side looks like: the parts will fit, and the outsides are going to be removed anyway.

The ability to drill perfectly square from the reference side is one example. This was demonstrated to work reliably. The irony is that the jig I made will drill a hole with greater accuracy (for the purposes here) than the best drill press could!

The ability to saw to the circumference of the hole is important because the wood is too hard and too thick to file to shape, and anyway I have always sawn dovetails to the line, never deliberately played "safe" and left room to pare away waste. I believe in this instance that, with a guide, I should be able to saw to the optimum spot (melding into the edge of the hole). Not only that but, done from the reference side, it should allow for a square joint all the way through the work piece.

Some terminology at this point: I am not sure what to call the finger joint parts. The joint is sort of like a dovetail, but tail and pin does not apply here. Why do I care? Because the joint I have been practicing will have a counterpart, that is, a "male" finger that fills this "female" section. Both end in a round. And the fingers are also separated by a round.

I returned to the workshop this afternoon for a little more practice. First I tried carving the finger, that is, marking it out and paring from both sides. It was quickly apparent that this was not going to work and was a LOT of effort.

I had an idea about the errors that occurred previously. What was in common was a saw cut to the one side of the guide and the guide was positioned at the side of a board. My thought was that the clamp I used was pulling it over slightly at that spot because it could not be centred on the guide. I simply used a different clamp.

With everything else exactly as before, this is what I achieved ...
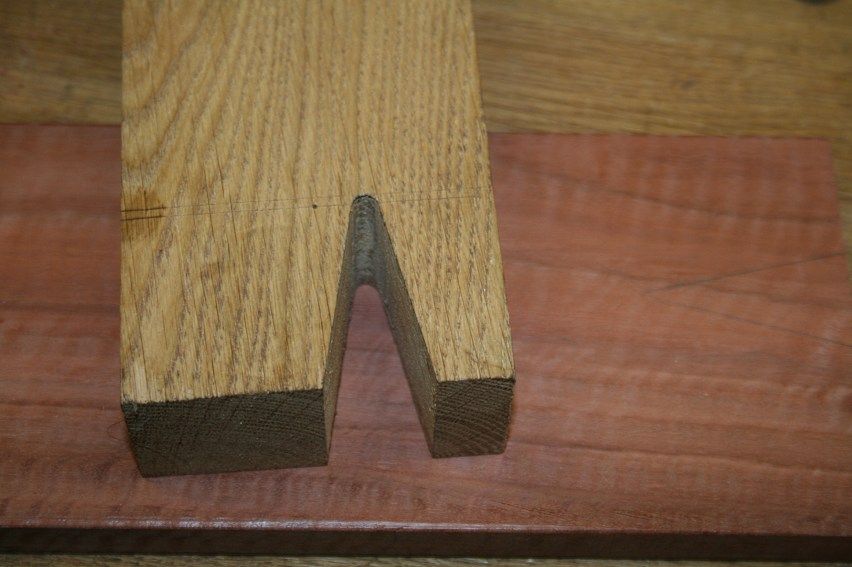

Other side ...
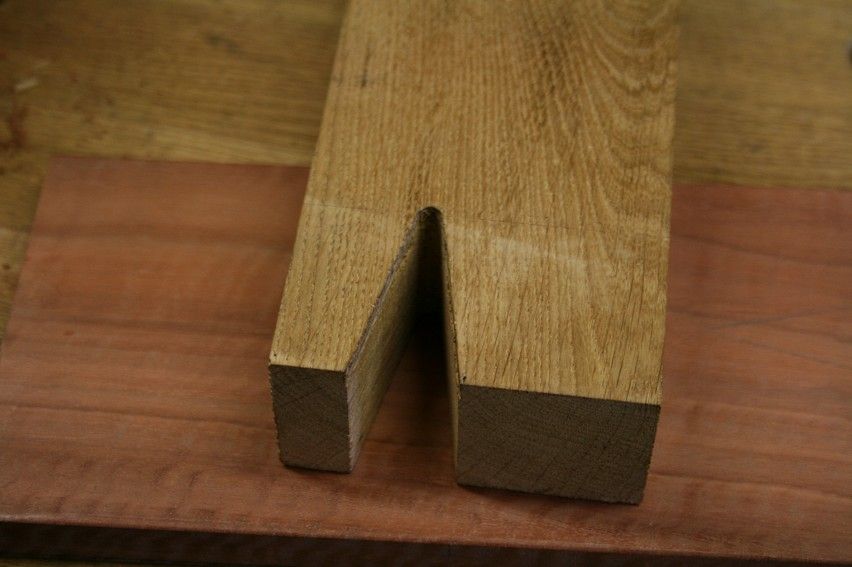

I was very happy with this. All that was needed was a little cleanup with a 3/16" round chainsaw file.

There was time to try a male finger. All I had to hand was a small piece of Jarrah waste. This was just enough.

I covered the Jarrah with blue tape and marked it from the female finger (this is how I plan to match the arm and backrest, as if it was a dovetail joint - another reason why the reference side must be able to create the non-reference side). The guide was clamped to the Jarrah and the sides sawn out. This left a pointed end, which was shaped with a file ...
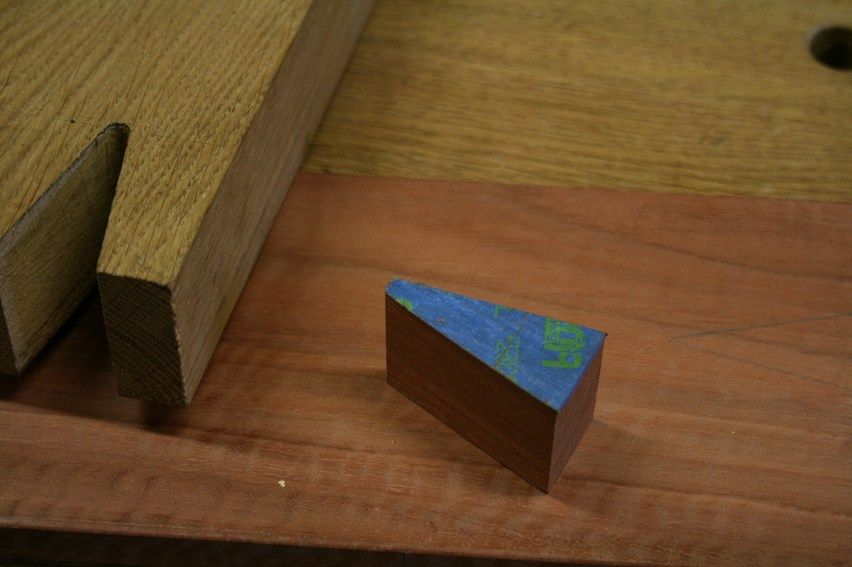

I had deliberately sawn the male finger a fraction oversize. This was rasped to fit (just needed a few strokes) ...
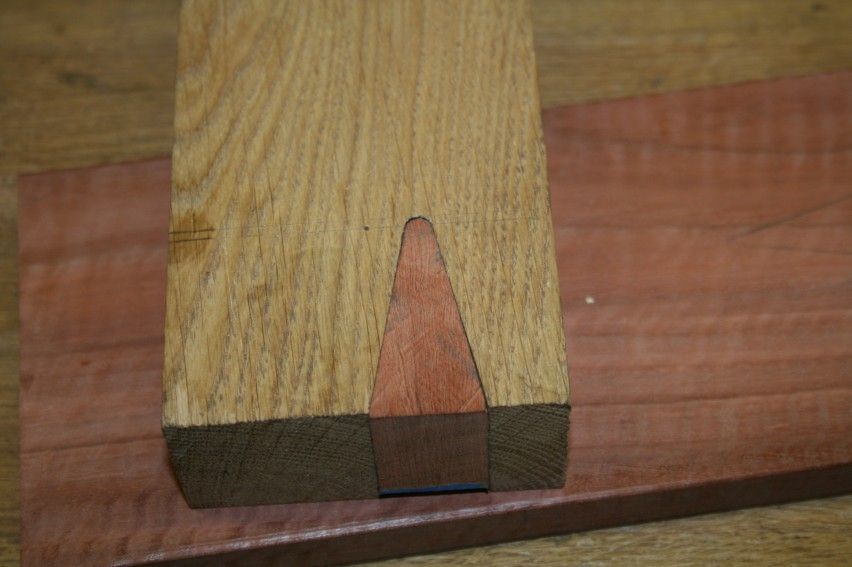
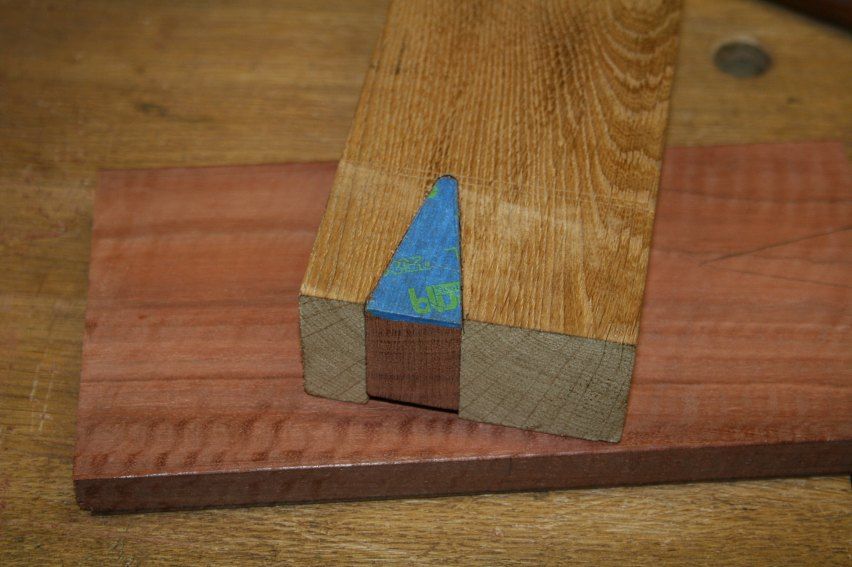

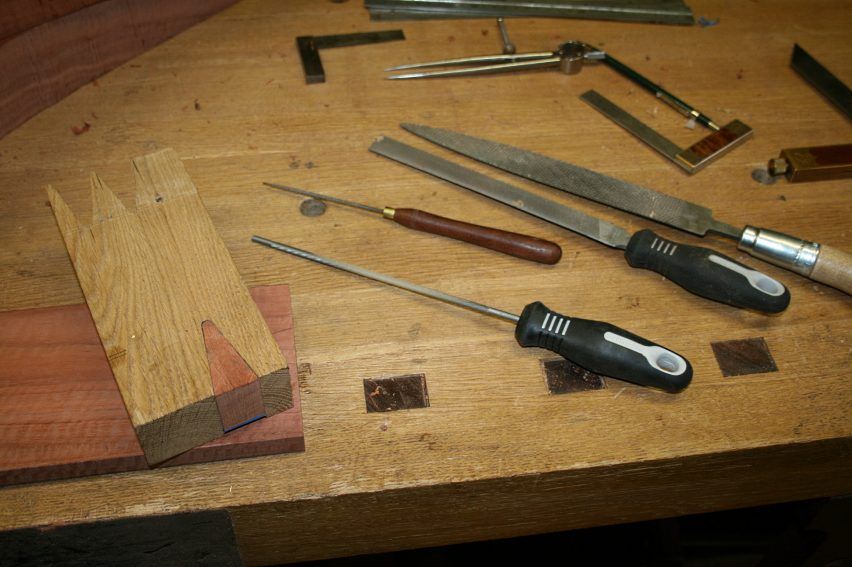
Tools ...

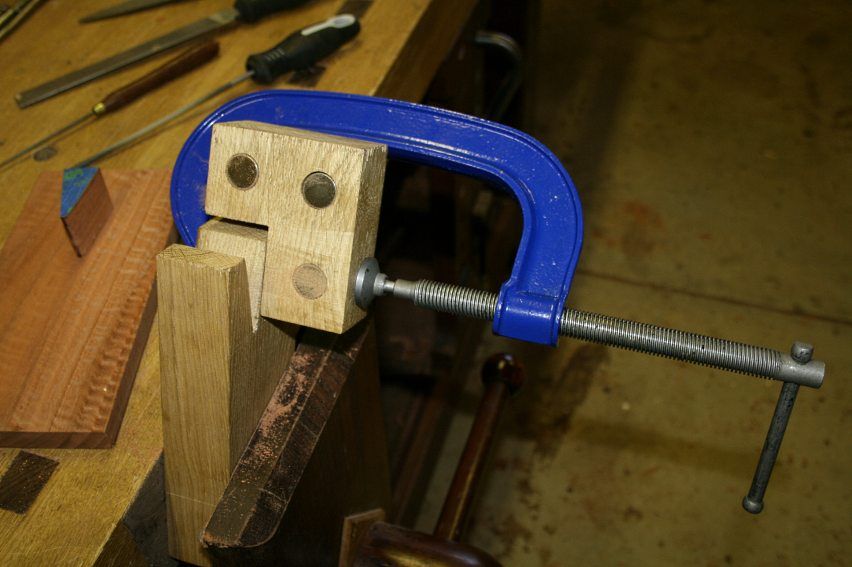
And the Record clamp that helped ..

A few more practice runs are needed before the real thing.

May I have your opinion about working from a single reference side?

Regards from Perth

Derek

Re: The Chair - close but no coconut

#14

Re: Contrary opinion

Derek Cohen (in Perth, Australia)

It strikes me that the rounded finger joint is inferior to the pointy finger joint. The Japanese make certain scarfs with long fingers, and they don't round them, they point them. I think I can find a picture somewhere of a northern European joint similarly--I saw it once in a book from my son.

The pointed finger joint has more long grain in the join, and everything here depends on the quality of the glue join.

Hi Wiley

See if you can did up the pics - I'd like to see them.

... For what it's worth, I think Brian's idea of cutting in the waste, and paring to the line, is the way to go, if you stick with the round-fingered joint. After all you have a knifed line to pare to. Intuitively, it seems like there should be a way to match up and pare both the mating pieces together, using a paring block.

In theory, yes, but the practice of matching edges with hard and thick wood makes it much less likely to work well enough. I have attempted to explain my view here in the post below. I am interested in your thoughts.

Regards from Perth

Derek

Re: The Chair - close but no coconut

#15

Re: Perseverence

Joanne in Point Pleasant, PA

I, for one, am glad you are so 'bloody-minded' about persevering with the rounded finger joints. I mostly 'lurk' here on the Hand Tools board, and I have been following your chair posts with great interest. While I like Japanese forms and joints, I see all curves on this chair and think the pointy finger joint would look very out of place here. Others can quote you the geeky details of joint strength and long grain/short grain. I look at the overall form and consider your point in undertaking the project. You are challenging yourself. Have at it! I am glad you are not putting down that gauntlet.

You inspire me to go out into my shop and use more hand tools. I am building a buffet for my mother and this weekend I completed the dovetails on the three drawers. I cut them all by hand (front and back). I have cut dovetails before, but this time, I think I felt more confident and just cut. My cuts were much straighter and the dovetails fit (not perfect, but better that usual for me!) with little adjustment. They are not as fine as yours, but they will work. Thanks for all of your excellent posts and pictures.

Re: The Chair - close but no coconut

#16

Re: "workmanship of risk vs. certainty"

William Duffield, on the Cohansey

I see your points. I think you have found important ideas in Pye that I have missed (or forgotten). It has been a long time since I read his books as well, and will need to read them again. There is also a good chance that I don't have your background in the philosophers that would allow me to get a more than superficial appreciation of his concepts.

Re: The Chair - close but no coconut

#17

Re: Perseverence

Derek Cohen (in Perth, Australia)

Thank you Joanne.

Isn't it just wonderful when the impossible becomes possible?!

One of the joys of cutting dovetails comes when you plane the rough, glued surface, and the crisply contrasting woods leap out.

Please post some of your pieces here. You will inspire the next person.

Regards from Perth

Derek

Re: The Chair - close but no coconut

#18

Re: The Chair - close but no coconut

Paul in NJ

Hi Derek,

I would get rid of the sawing guide. I have seen your dovetails and you can saw to a line. The trick is to mark the lines. I would approach it just like dovetails. Mark a baseline all around on four sides, mark the angles on one face, and then drill the holes. Scribe the perpindicular lines down the ends and then connect the angled lines from the holes on the opposite face to the lines you just scribed. Now saw the fingers out without a guide, let the force be with you Luke.. I mean Derek. You can cut them from both sides and meet in the middle just like sawing out the corners of a large tenon. Next use this piece to mark the fingers on the mating piece. What I would do different from normal dovetail practice is mark both sides of the joint, front and back, and connect them together. Saw like the previous piece.

I have faith you will be succesful, congratulations on your progress. I would be more worried about making the arm to post joint. What was the designer thinking leaving that stub of short grain on the arms. It would be so much better, in my opinion, to just lengthen the posts a bit more.

Good luck,

Paul Dzioba

Re: The Chair - close but no coconut

#19

Clint Searl

Re: A glimmer of light at the end of the tunnel ..

Clint Searl

It could never be, but if I had reached this point in your journey, I think I'd be well into the phase of loathing the Chair, questioning my motives for even starting, let alone continuing this Sisyphean labor, regardless of the bloviations of David Pye.

I wish you well, and look forward to your success.

Re: The Chair - close but no coconut

#20

I'm with you....

Bruce, a MN Galoot

Derek's hand skills are obviously a step or two ahead of mine, but at this point I would just shoot for a cut as close as I could get it and keep adjusting with paring chisels and rasps. IOW, the joint doesn't have to be perfect right off the saw.

As for additional wood, it's not really necessary. It's not necessary to cut a new piece when adjustment takes only a 1/16" or 1/8" difference in length.

If he wants to hit the line first time out of the chute, he should get a CNC router.

Re: The Chair - close but no coconut

#21

Re: Contrary opinion

BrianMonumentCO

Derek,

Your last post, the one this post responds to proves that indeed you are engaged in "craftsmanship of risk vs certainty". While I did not read Pye, I see that your target project is chosen in two areas of risk.

The first area is in the construction of a chair you haven't made before with some difficult joinery.

The second area is that the construction is to be implemented in a very hard wood.

From a project risk perspective, implementing the chair in a softer hard wood would be safer.

An alternative safe prospect would be to implement something simpler in the very hard hard wood.

You are also increasing the risk be using hand tools.

As I read the project, the ability to make the finger joints hinges upon the ability to make each finger which resembles a wedge with perfectly flat surfaces. This suggests either power tools or sawing and paring to the line. Making the matching part appears to require the same angles and a perfectly flat surface as well.

The pix in one of the earlier threads show a machine used to make these cuts. It was a power tool.

I have no doubt that you are a highly skilled craftsman. Good luck.

Re: The Chair - close but no coconut

#22

mountain out of a mole hill

Mark Hennebury

Derek,

I don't understand all of the fuss it is a simple and forgiving joint;

mark them, drill, saw, and trim to fit.

You cant really screw this joint up... its a taper fit.

So if at first its a bit off, you just pare a bit until it fits. It is not like a dovetail joint where if you cut off too much you cant correct it. This joint, once you cut it you can clean it up with a chisel and a sanding block and could keep tweaking it until its perfect.

Re: The Chair - close but no coconut

#23

Re: Three things

Tom

- There are joints that fit right off the saw, plane, etc...

-There are joints that require some work to get the pieces to the point where they have the right shape. So an example being scrafs with negative space that could be partly sawn, and then some parts would need to be chopped, and some chraftspeople prefer to use a chisel to finish them all to a polish. But it is still a straight march to a shape that when achieved the parts can be put into place.

-Then there are joints that need to be let into each other. An example being inletting stocks. There are examples of other types also.

In the last case, it can get pretty frustrating going back and forth, over and over again making often tiny adjustments, and this all assumes the parts can clearly be defined with the changes that need to be made, as with blacking. The more fingers, in this case, the more points of interference can actually be responsible for whatever seems to be the blockage to the next improvement in fit. So yeah, they can be let further in, but it would certainly be preferable if there was another way.

Re: The Chair - close but no coconut

#24

Mountains and Molehills

Derek Cohen (in Perth, Australia)

Hi Mark

It all depends on the perspective one has.

Looking back on dozens of similar completed joints would make it seem simple and fuss-free. Looking forward at your first is daunting and confusing.

Regards from Perth

Derek

Re: The Chair - close but no coconut

#25

Re: Mountains and Molehills

Mark Hennebury

Hi Derek,

I have seen your previous work over a period of time, so i know this is not a problem for you to do, so i guess i have been a little confused:

First off .. this is a straight forward and very forgiving type of joint with open tapers, much easier than dovetails or parallel finger joint types; those joints if you are undersized on one cut the joint is ruined, so its a one shot deal. These tapers will fit even if you cut them wrong, you can correct it, so it should be fairly easy to do, The hesitation is just a mind block that's all you have done fare more difficult than this.

The second thing that has me confused is the jig thing... on the one hand you say that you want to do this by hand, which comprises of marking out drilling and sawing, chisel cleanup. it relies on your hand eye co-ordination etc. otherwise referred to as your skill.

That's the challenge; taking the control with you own co-ordination and judgement.

When you spend all the time making jigs to hold the drill, and saw and chisel, you have removed that personal control, the hand-eye co-ordination...the skill, from making it. The skill is now in the jigs that you have made.

Nothing wrong with that but you might just as well use machines like you table saw, shaper etc... because that is the way that i work when i use machinery to cut a joint, my skill is in setting up the jigs so that every cut is perfect.. that any chance of error has been removed, because my goal is simply to do the best joint possible. I don't care whether i cut it or the table saw cuts it as long as it meets my goal of the best that i can do.

You have said that your goal is to do it by hand, but your seem reluctant to commit and do it, and are making all sorts of jigs to do it for you.

I would like you to take the plunge, jump in;

Drill it... by hand, and eye,

Saw it, with your hand skill.

You can do it, i am sure.

You must be willing to take chances to grow.

Cut it by hand and you will do a great job and feel a lot better for having done it.