New WoodChat!
Home Articles Forums Gallery Marketplace Videos

WoodCentral Forums

Knowledge You Can Build On — Est. 1998

100+ Wood Species + Full-Shop Services: Lumber, Veneer, Tools & CNC. Everything in One Place.

Marking mortices (Part II)

Posts

Marking mortices (Part II)

#1

Marking mortices (Part II)

Derek Cohen (in Perth, Australia)

The other day I received an email inviting me to purchase the latest one-time tool from Woodpeckers, a mortice and tenon centre gauge ..


Here is the link to their website for those interested: http://www.woodpeck.com/ottmtcenterpwwp.html?et_mid=643179&rid=237299788

My first thought was that this was brilliant - what a great, quick way to mark a mortice (or tenon) in the centre of a stretcher. Then I looked at the price ($150), and that one had to pre-order now for 5 months time. I put away the credit card.

I still think that it is a terrific idea, and I must admit that the concept haunted me for some days. Today - Sunday - I decided to build my own version. So I looked around the workshop for something to cannibalise.

I found an old dovetail marker that had never worked and had been tossed into a drawer ...
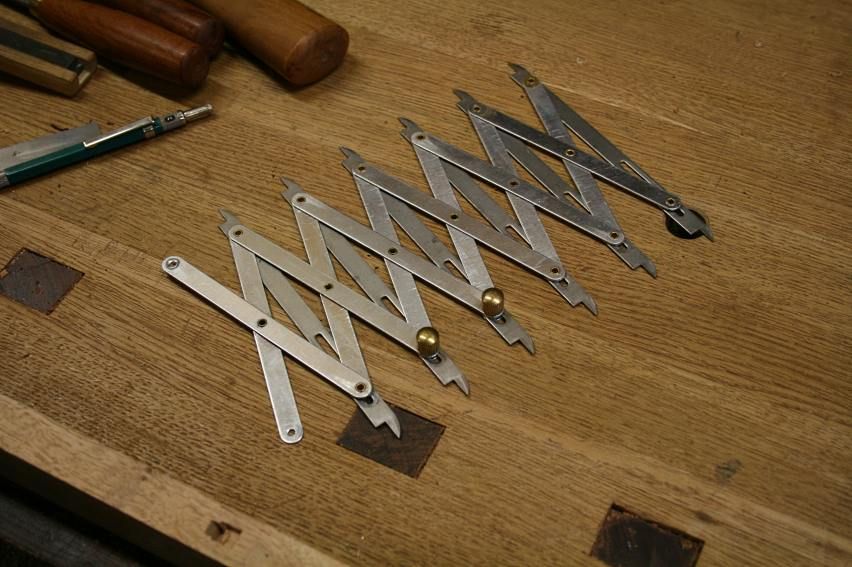

This is the centre gauge I built ...
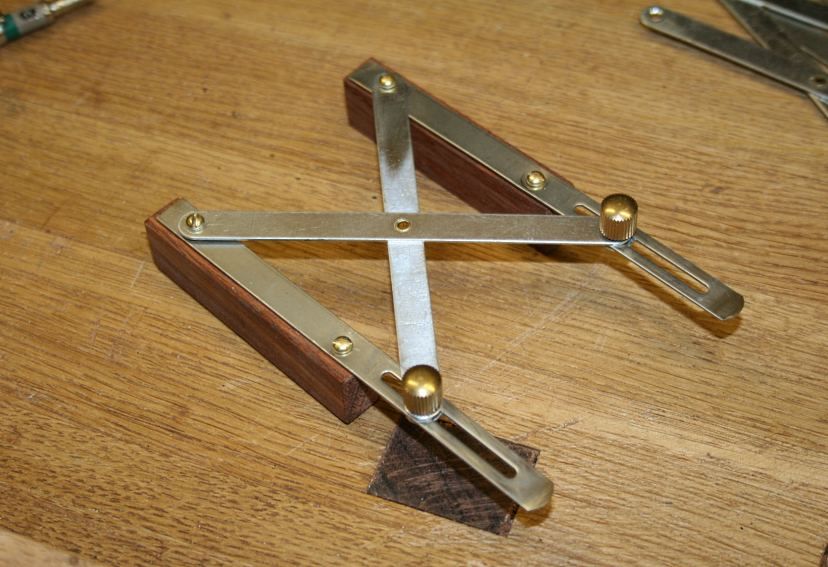

It slips over the stretcher this way ...
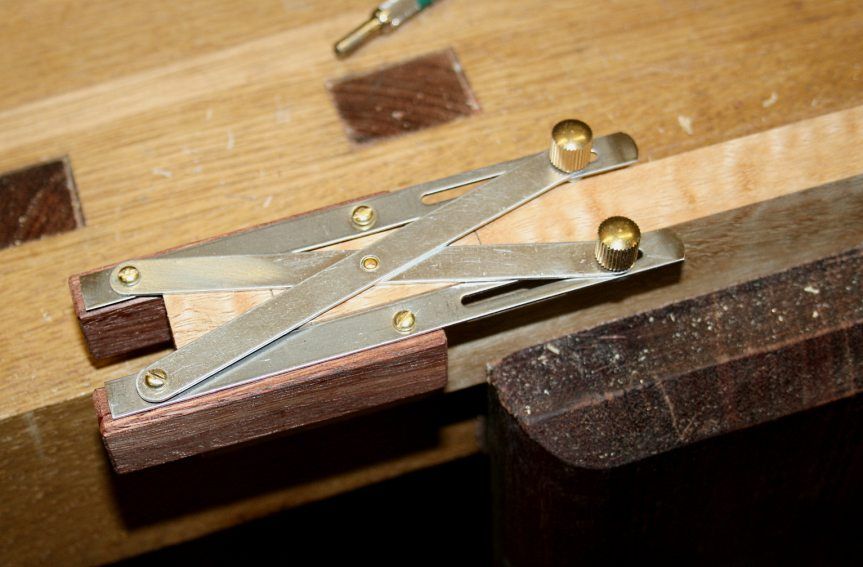

Marking out for a 3/4" wide stretcher calls for a 1/4" wide mortice. This one will be 2" long.

Step #1 is to mark off the 2" length (with room to avoid blowing out the end) ...
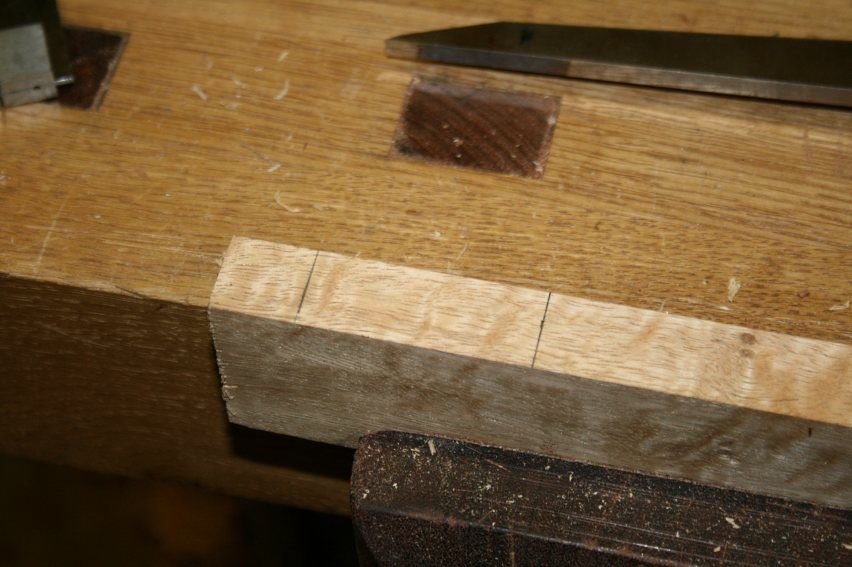

Now place the centre gauge between the two end lines (anywhere, it is not critical). Set the 1/4" mortice chisel against the centre, eyeballing it square ...
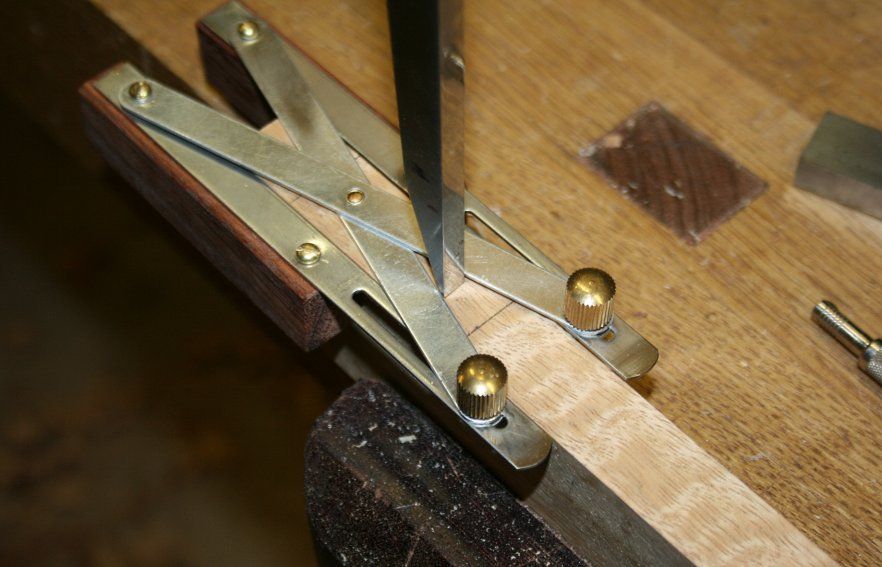

Press done hard so that you leave a clear imprint of the chisel ...
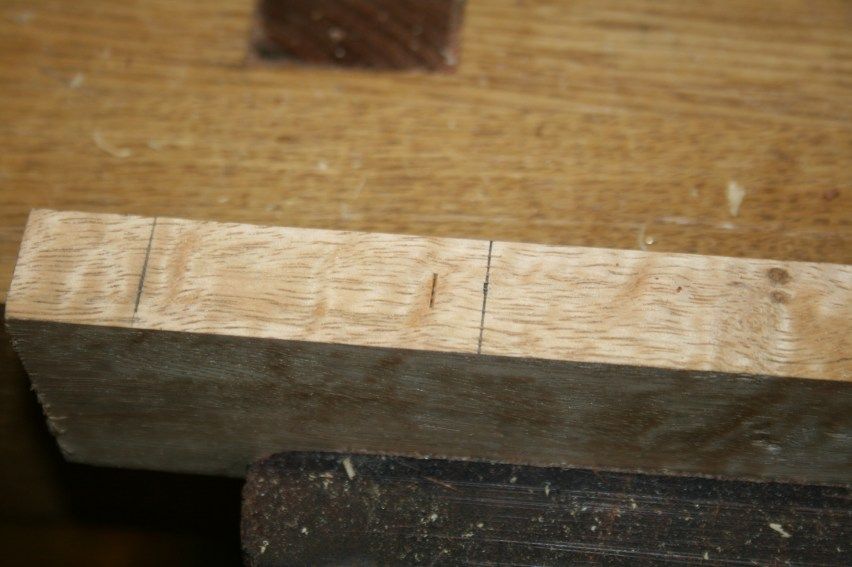

Now you have a choice - either use two single blade cutting gauges to mark each line individually (you will need to set these aside for the tenon) ...
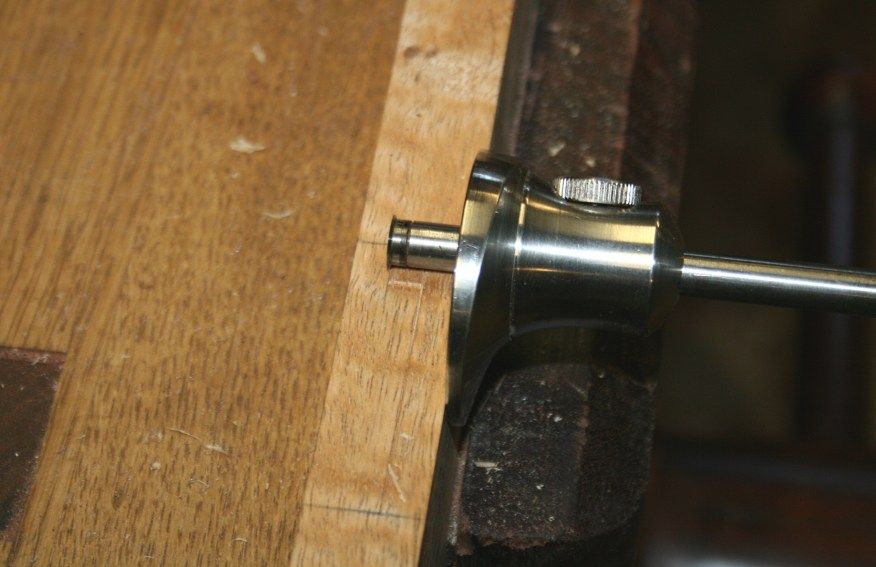

... or use a mortice gauge, aligning the blades with the outer edge of the imprint ...
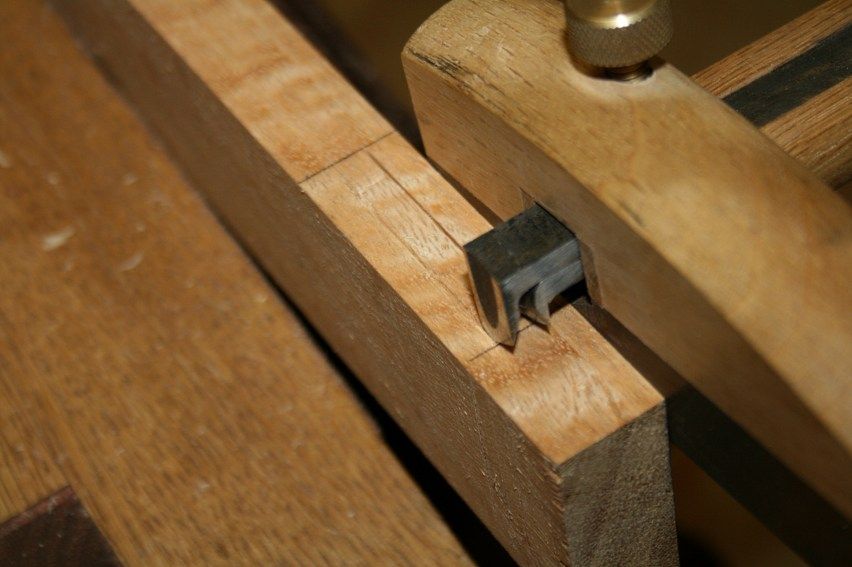

It has never been critical to centre the mortice, but this method does speed up the process (even though this is all a bit tongue-in-the-cheek). Is it accurately centred? I did three or four. None were perfectly centred. Some error creeps in. It does not matter. As long as you use the same gauge(s) and score from the reference side, each mortice/tenon will be marked at the same distance from the sides.

Regards from Perth

Derek
Re: Marking mortices (Part II)

#2

Darrell in Oakville

Re: Marking mortices (Part II)

Darrell in Oakville

My first thought when I saw that new gauge was that it was not for hand tool users, but rather for power tool users. Those of us who mill everything to exact thickness using machines will be able to utilize a centered mortise. Those who work by hand and understand that joinery is laid out off of reference faces without having to have perfectly thicknessed stock will not be able to use this new gauge.

When you gauge from the reference faces, all the errors are thrown to one side (typically the unseen side) where they will not matter. Or at least that is the plan.

Is this an example of a solution looking for a problem?

Darrell

who needs to clean up the shop and get started on those closet doors.

Re: Marking mortices (Part II)

#3

Re: Marking mortices (Part II)

roger lance

Derek....love your version of a mortise marking aid.....Woodpecker does make some great tools but costly and you have to be prompt in ordering them as they may not be available for long.....yours reminds me of the St. Peter's cross that BenchCrafted has for their leg vises although on a different scale.....I've been gathering the hardware to make my first project of the season....a panel gauge....which I should have ready to show in a week or so....I find making a little tool or a jig is a good way to get back in the shop.

Re: Marking mortices (Part II)

#4

Re: Marking mortices (Part II)

Derek Cohen (in Perth, Australia)

Hi Roger

Same here. I am waiting on the delivery of a chair that I plan to measure before I build a version of it. I've cut the wood, cleaned the shop ... can you tell I'm a little restless :)

Regards from Perth

Derek

Re: Marking mortices (Part II)

#5

Re: Marking mortices (Part II)

don stephan

Thanks for stimulating some good thought, and I admire your cleverness with the Aussie centering gauge. I'm wondering if in fact there is some tongue in cheek here.

Your observation about checking square on stock is extremely helpful, and I suspect I have made that mistake many times.

Re: Marking mortices (Part II)

#6

Re: Marking mortices (Part II)

Tom

I wouldn't go quite that far. The mortises often show, and in such cases, I have not noticed a cavalier tendency to let them fall where they may for lack of a few seconds centring a gage that may even have been left set for that one purpose alone. But your method we share, it works just as well when the mortises are centred as not. Also, one can normally eyeball it close enough that it won't show. Or eyeball it, reverse the gage, eyeball the difference. then it will be as centred as a centring gage would provide, and probably quicker. This is a method I use a lot whether measuring or not. I throw down a mark, then I look at it again, and put the second mark where it needs to be. Very fast and accurate. So in a sense it could be a hand vs machine thing, since if you work a lot by hand, you quickly develop the ability to call it close to a line.

Re: Marking mortices (Part II)

#7

Re: Marking mortices (Part II)

Derek Cohen (in Perth, Australia)

When you gauge from the reference faces, all the errors are thrown to one side (typically the unseen side) where they will not matter. Or at least that is the plan.

Is this an example of a solution looking for a problem?

Hi Daryl

I think that I said the same things. This was an exercise in marking without measuring. The result is the same.

The thing is we often do aim for a centred mortice, or as centred as we can get it. Think of all the frame-and-panels you have made. This tool would not be used for offset or double mortice-and-tenon arrangements, such as in a door. It is actually a pretty useful tool. Its downside is that it is another tool, and all of the time we do not actually need it. It is not a solution for a problem-that-doesn't-exist, but it is an aid for those who want to mark out centred mortice-and-tenons. Now that I have made it I shall use it. If I did not have it I would not miss it.

Regards from Perth

Derek

Re: Marking mortices (Part II)

#8

Re: Marking mortices (Part II)

Tom

I like your version better Derek. I like the way yours goes directly to the placement of the actual chisel. I have one of those dovetailing gizmos, which is probably another reason why I wouldn't splash out on more gizmos now.

Re: Marking mortices (Part II)

#9

Re: Marking mortices (Part II)

Tom

One thing this tool might do, that would support Darrell's preferred approach, if not his commendable simplicity of kit, is that if one wanted to mark a baseline from a face (the edge of the mortice). All one would need to do is place a full width spacer on the "reference face". This would then combine to offset the scribe by one half the spacer width. With a sufficiently regular chisel, the chisel itself might be used directly as the spacer.

One problem solution thing about spacers is that if you look at the design of the scribe. The base offsets to the fore and aft of the center point. One might expect the average use of such a device to be on stock that is none too thick (or wide). But one would want the device to handle thicker stock also, guaranteeing that the offset contact points will overhang the end of the stock and lose bearing. Of course one can get 3 point contact, which may be enough, but spacers could also support contact points that overhang the stock into the air.

Re: Marking mortices (Part II)

#10

Re: Marking mortices (Part II)

William Duffield

I've looked at the ads for all of Woodpecker's offers, and always decided I had no desire to buy them, any of them. I either already had a tool or a process that did the job better, and usually for less money or for no money, or the Peckerhead tool served no useful purpose at all. Mortises should be referenced off a reference face, not some arbitrary center point which only has a basis in aesthetics, not for structure. Your mortise gauge should be set directly from the width of your mortice chisel, not some arbitrary gauge width, which won't match any of your chisels. The few times when you need the mortise centered, it takes very little time to set the mortise gauge close, turn it around and measure it from the other side, and readjust it, splitting the difference. After you've got it set, you use your familiar gauge just like you always do, instead of fiddling with a new gizmo that doesn't handle or work the same as anything you have ever learned to use. Also, the pecker tool has multiple parts to drop and lose, and read the numbers and units off of. The length of the mark you can make is limited by the linkage, unlike a traditional mortise gauge, which can traverse the end of a table top, or the length of a leg post or the end of a panel in one fell swoop. Also, you have to reverse the position of your marking knife and the angle you hold it to mark from the alternate side of the gauge bar. If you have a single bevel knife, as they show in their illustration, it doesn't work at all, unless you swap knives. When marking mortises, it cuts with the bevel on the outside, instead of inside where it belongs. This gizmo has "Dumbnocity" written all over it.

As I have recently recommended, you would do yourself a great favor by getting the Veritas dual arm mortise gauge instead.

As to your tool, Derek, it looks like it would work fine for marking centers, but I don't think I would want to use it for laying out mortises and tenons. You might even make it more useful by drilling a couple more holes in the bars, so you could also use it as an octagon gauge.

Re: Marking mortices (Part II)

#11

Re: Marking mortices (Part II)

Derek Cohen (in Perth, Australia)

Hi William

For all the reasons you outlined, the Woodpecker gauge falls short of being a well-designed tool.

Darrell made the observation that it is designed with power tool workers in mind. I agree. It is designed to work on boards that have been machined to be perfectly parallel - otherwise the lines created from the template will be off. The gauge I designed avoids this trap. It does not create a reference line, only a reference point.

Mortises should be referenced off a reference face, not some arbitrary center point which only has a basis in aesthetics, not for structure. Your mortise gauge should be set directly from the width of your mortice chisel, not some arbitrary gauge width, which won't match any of your chisels. The few times when you need the mortise centered, it takes very little time to set the mortise gauge close, turn it around and measure it from the other side, and readjust it, splitting the difference. After you've got it set, you use your familiar gauge just like you always do

Yes, I said the same. I mark the line width using the actual mortice chisel (I've shown this on other occasions as well). This is used to set up a cutting gauge from the reference side, as shown in the pictures. Thereafter all marks - for mortices and tenons - are scribed from the reference side only, which is the traditional (only!?) hand tool way. Consequently, it does not matter if the other stretchers vary slightly in width - scribing from the reference side with the same gauge leads to identical markings. The advantage of using the aid I have posted is simply in finding a close-to-centre position for the chisel.

As I have recently recommended, you would do yourself a great favor by getting the Veritas dual arm mortise gauge instead.

Why? Do you mean use one because it is a good gauge or instead of the marking aid I built?

I assume you mean the former (see you additional comment below), however I have a couple of Japanese mortice cutting gauges, especially a Kinshiro that I love using.

I know you do not mean the latter, but it is worth repeating - the marking aid only finds a centre band (which is more complicated than finding a centre spot). It does not replace a marking gauge. It is not indicated for off-centre mortices.

As to your tool, Derek, it looks like it would work fine for marking centers, but I don't think I would want to use it for laying out mortises and tenons. You might even make it more useful by drilling a couple more holes in the bars, so you could also use it as an octagon gauge.

Good ideas there. The centre of the cross pieces has a hollow rivet. A pencil through this scribed a perfect centre spot across the width of a board. I have tested this by flipping the gauge and marking from the opposite side. Could be useful.

Just to explain the circumstances of the gauge: the idea was sparked by the Woodpeckers tool, but born out of restlessness as I waiting for glue to dry on another project. It was not a serious tool, but I was intrigued with the idea. As it turned out, there is some merit in having this tool to use. However I would not buy one or make another one. At least it has initiated some interesting comments.

Regards from Perth

Derek

Re: Marking mortices (Part II)

#12

Re: Marking mortices (Part II)

William Duffield

it is designed with power tool workers in mind

Workers? Maybe machinery feeding monkeys? Even when using power tools and machinery, best practice is to find, mark and use reference surfaces (usually the show face and the inside edge of the frame) for all layout and for indexing against the machinery's fences. A good example of this practice is illustrated in a recent FWW article by Steve Latta titled Doors that Stay Flat. That practice should apply whether you use your try square to directly check the edges of your boards or to align the fence of your power jointer fence. It should apply whether you are using a marking gauge and mallet and mortise chisel or even a Festool Domino. The need to find the "perfect center" of the edge of a board is a Normite falacy.

Do you mean use one because it is a good gauge or instead of the marking aid I built?

Yes. :) Your tool works well for finding the center, but your illustration of placing your mortise chisel between the steel linkages makes me a bit uncomfortable.The reason I like the Veritas gauge is that the ends of the beams opposite the blades can be placed against the flats of the chisel to set the gauge for both marking mortises and for marking tenons, keeping all the cutting edges away from possible contact with other pieces of steel. I suppose the Kinshiro could be adjusted the same way if the lengths of the knives were precisely machined. Otherwise, don't you still take the risk of damaging the points of the knives by collision with the sides of the chisel? I don't know, because I have very, very limited (and unsuccessful) experience with a Japanese mortise gauge. (Maybe I can ask Wilbur to bring one to tomorrow evening's meeting and show me how to set it up.)

The centre of the cross pieces has a hollow rivet. A pencil through this scribed a perfect centre spot across the width of a board…

I agree, your tool is an interesting exercise, and it does real and useful work. I would like to note one limitation: The parallel, straight fences limit its usefulness to marking straight boards. If you want a similar tool for fairly accurately marking tapered or even curved stock, you could replace the fences with round pins. You could even simplify it further by mounting the pins directly to the central arm and doing away with the articulated linkages altogether. Such a tool does have limitations. First, it gets less accurate as the pins are spaced further apart and the arm becomes less perpendicular to the direction of travel of the pencil. Second, it requires a lot more dexterity to use, to keep the pins against the sides of the stock, perhaps more skill than it would be practical to teach to our hypothetical "straw monkeys." :) Instead of just squeezing it, you need to apply a twisting motion to keep both pins registered. If I were to make one like that, I think I would want to improve it by making a series of pairs of threaded holes to mount moveable pins, so I could use it on different stock thicknesses.

Regards from the Cohansey

William

Re: Marking mortices (Part II)

#13

Re: Marking mortices (Part II)

Steve Altman

William, I think the meeting isn't until next week...

Re: Marking mortices (Part II)

#14

Re: Marking mortices (Part II)

William Duffield

Thanks, Steve. I figured that out, but not until after my first inquiry to Wilbur on the subject. He will bring a mortise gauge to the meeting. I expect I'll see you next Wednesday, at dinner before the meeting.

If anyone else is interested, visit cjwa.org, or contact me directly if you are interested in gathering for dinner beforehand.

Re: Marking mortices (Part II)

#15

Re: Marking mortices (Part II)

AlanWS

In the same tongue-in-cheek vein, why not use a self-centering dowelling jig for this purpose? You have previously suggested that drilling a hole at one end of a mortise is handy to provide space for chips. By drilling that centered hole before layout, you'd also be able to mark from it.

I don't have such a dowelling jig, nor do have one of your thingys. It'll probably stay that way, but I always enjoy reading your stuff.

Regards from Wisconsin