New WoodChat!
Home Articles Forums Gallery Marketplace Videos

WoodCentral Forums

Knowledge You Can Build On — Est. 1998

Urban Salvaged Hardwood Slabs, Milled In-House from Rare Trees. Shop Unique Walnut Stock.

Table top

Posts

Table top

#1

Table top

Joe in a Cleveland suburb

Hello.

I'm just curious how the hand tool guys do this.

Suppose you just glued up 3 Walnut boards for a table top. The boards were about 3/4" thick.

The glue-up went well, but there are some slight ridges where the boards meet even though you used cauls

and so on. There is also some (hide glue) squeeze out to scrape off as well as power planer marks to remove.

But overall, the soon-to-be top is relatively flat.

The new top still needs to be cut to final length and width but, how would you, as a hand tool guy, remove the

small ridges between the boards before applying your finish?

You don't really want to hit it with a sander of some sort, so would you go at it with planes?

What would your next step(s) be?

So, in short, how do the hand tool guys prepare a table top after glue up for finishing? What is your process?

Thanks.

Re: Table top

#2

Re: Table top

roger lance

Normally we would take the top to a large commercial shop and run it thru their Time Saver wide belt sander like Norm had.

Re: Table top

#3

Re: Table top

Tony Wilkins

Try plane followed by smoothing plane if you so desire. Take off the glue with a lesser chisel before getting your planes.

Re: Table top

#4

Re: Table top

Wiley Horne--So. Calif.

Hi Joe and all,

The first thing I do is nothing. Other than lightly scrape off the glue residue after a couple hours. Wait a day before levelling the seams. Why? After gluing, the wood is wet at the seams, and has expanded. If you level the seams right away, so that the joints are even when wet, you may have little depressions along the seams tomorrow when the joints dry and the wood shrinks back to normal. DAMHIKT.

There are two other preliminary things, before and during gluing. One is to orient the boards so that the grain is lying the same direction at each seam, provided the figure and lay of grain permit it. And then mark it with arrows to show planing direction. This simplifies levelling later, because you don't have to contend with wrong-way grain at the seams. But there are times when you have grain reversals no matter what, or the figure won't cooperate. For me, that's what Konrad Sauer's panel plane is for--there are other solutions, but you absolutely do not want tearout at the seams. It's the worst place. That's also why there can't be any tearout when edge-jointing--sure as little green apples, the tear will be the edge on the appearance side >( .

The other thing--if I'm starting with planed lumber (roughsawn is different), and particularly planed lumber near final thickness--is to go to a lot of bother 'micro-adjusting' the seams during clamping to avoid losing 1/32" or 3/64" because of mismatches at the seams. If rough sawn, then I skim both sides just enough to make decisions on figure matchup, but leave as much meat on the wood as possible; flatten one side and joint edges; then glue up with the flattened sides together and the skimmed sides together. Then plane to final thickness, seams and all, after the glue is dry a day. I have a deathly fear of going under thickness, is the reason for this approach. (This is also the reason you want fore planes and jack planes not to tear out.)

Bottom line: I plane to level, subject to the above.

Wiley

Re: Table top

#5

Scrapers

Bruce McCrory

Sounds like you surfaced the boards already. In that case, scrape to remove sharp ridges and planer marks after a few days. Sanding will dull any chatoyance the walnut surface has, and scraping is easier than sanding.

Depending on table size, 3-quarters is about as thin as you want. So, if there are undulations that develop from warping, consider them part of the hand do-dads.

Re: Table top

#6

Re: Table top

GolfSteve in Calgary

Remove dried glue blobs with a chisel.

Remove the high spots on one side with a handplane until the piece sits flat without rocking.

Flatten the other side with a handplane; check that there is no twist with winding sticks, and this is now the reference face.

Mark the desired thickness onto the board using a marking gauge held against the reference face.

Plane the other side up to the reference line. Now you have two flat, parallel faces.

Trim to size and plane the edges square.

Easier done than said. It doesn't take long if you did a decent job during the glue-up.

Re: Table top

#7

Re: Table top

Frank D. in Montreal

No need for it to be parallel to the other side. It basically just has to be flat to the eye; the shinier the finish, the flatter is has to be. Hand scrapers can leave depressions that don't look good under a finish that will be scrutinized. I'd use a scraper plane, or a cabinet scraper if I didn't have any margin for lost thickness.

Re: Table top

#8

Re: Table top

Winton

I got a question for you power tool guys . . . How do you fit your glued up table across your power jointer to flatten it and through your lunch box power planer to thickness it ?

Jussss Yoking.

See, now this is where I always get in trouble with questions like :

Where have your been ? Don't read magazines ? Where can you learn "woodworking" without learning WOODWORKING ?

Am I that old ?

Step 1 go to library get books on woodworking 101 and read them.

If you are still with me :

I would never make a table top using rough boards that thin unless it was a little candle table because after glue up there is the flattening and leveling and the making of the uniform thickness and even then. Soooo I would start with thicker boards,

Partly tung in cheek but since they don't visit my shop I have to ask :

What are planer marks ?

Sand paper what's that ?

Here is where I dismay the old hands . . . I would use a scrub plane to QUICKLY level the surface THEN the try plane what have you.

This three board table of yours is like three feet wide and four feet long ?

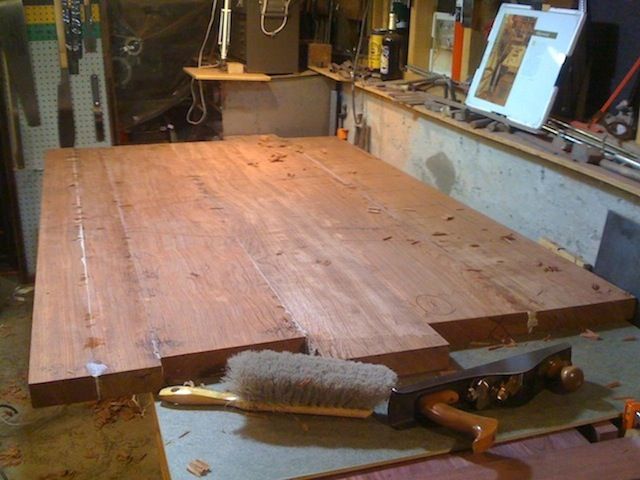
may be over doing it there but I am still shell shocked with how hard the table in the photos was to level without that Bob send the scrub plane.

As far as the grain orientation clue that is quite valid generally speaking however the table in the photo has rowed grain, reversing grain and the boards were glued up in the direction that made the table look best and blend the figure best . . . planing be damned

AND

then the table top was so large I had to plane from both directions depending on which side I was standing on because I couldn't reach allllll the way across the table So that I could plane in the same direction all the way across.

Here is where the importance of REAL sharpening and edge geometry begin to pop out of the woodwork as it were. Sharpening geometry, blades and planes chosen for the specific wood being worked. Generalities and buzz words need not apply.

At this point leave the local library, buy all the large issues of Fine Woodworking and read them. Quick, do it now, do it before you make another project.

You think I am kidding don't you ?

Back to the table . . .

Winding sticks have been mentioned see step 1.

Big O' Starrett straight edge tells me where things need to be cut flatter.

Thickness gauge to scribe a line to plane second side to (some where in there cut off raggedy ends so you can thickness gauge the ends. In these photos the protruding ends were a last minute grain improvement and also helped to give a hand holt for moving this monster). (this bubinga was pushing two hundred pounds and by my self)

Scrub cross grain to near final thickness, remove scrub tracks and flatten, planing parallel to the grain with jack, jointer, try plane , finish plane with cambered blade and wide mouth . . .

It doesn't really matter as long as you use the straight edge to tell you where to plane.

Then finish plane with tighter mouth and almost no camber on the blade.

On second thought don't hold your mouth tight it just wastes energy and makes you look silly for the magazine article photographer.

If done right that finish plane will put a near shine on the surface and no scraping or any other abomination needed. See photo with reflection all the way across the grain; there is no finish on yet just bare planed wood. That is to say wood with no finish, not wood planed by a bear.

Next three photos are with finish. Clear finish; no stain etc. I couldn't help including a couple of more photos of the wood close up. Pretty but due to no talent of mine; nature did that !

[URL=http://s801.photobucket.com/user/noydb1/media/OhgodwhathaveIgotmyselfinto22-55-05_zpsef6de5d2.jpg.html][/URL]
[URL=http://s801.photobucket.com/user/noydb1/media/Gettinbetter.jpg.html][/URL]

[URL=http://s801.photobucket.com/user/noydb1/media/GoingfasterthanIthoughtitwould-1.jpg.html][/URL]

[URL=http://s801.photobucket.com/user/noydb1/media/IMG_1169-1.jpg.html][/URL]

[URL=http://s801.photobucket.com/user/noydb1/media/IMG_1229_zpsa7073aa9.jpg.html][/URL]

[URL=http://s801.photobucket.com/user/noydb1/media/IMG_1230copy_2_zpsfcd2fc82.jpg.html][/URL]

[URL=http://s801.photobucket.com/user/noydb1/media/Blacksgoldanddepththereissomuchmorethereegdeepredveinsveines.jpg.html][/URL]

Re: Table top

#9


Re: Table top

#10

Re: Table top

Joe in a Cleveland suburb

Winton wrote:

"Where have your been ? Don't read magazines ? Where can you learn "woodworking" without learning WOODWORKING ?"

I've been doing this for quite a while. I have a decent library of woodworking books including all my FWW magazines from many years as a subscriber (not to mention I pay for the on-line membership as well).

I've also been here on WoodCentral since Badger Pond ended. Heck, I've even been to Ellis' house and shop.

I've made numerous table tops and prepared them for finishing using hand tools/planes and so on. This isn't totally new to me.

I was curious to see what some others do to see if it was similar to what I do.

Lastly, I was trying to spark some conversation.

Thanks to all for the replies.

Re: Table top

#11

Re: Table top

Lars Parrington

hi joe,

i just finished making a 3' x 8' walnut table. the top was glued up from 4 boards which had been run throuh the jointer and planer to final thickness. i carefully clamped 1 joint at a time, so it took 3 glue-ups to complete the top ( A+B, C+D, AB+CD). no cauls or biscuits used, but i got the boards aligned pretty well, with generally much less than 1/32" ridges between boards. i did align the grain direction in all the boards, but i don't think it is that important to do so.

i glued with titebond 3, and scraped off most of the squeezeout with a cruddy paint scraper. i often try to scrape that glue after ~60 minutes, but in this case it was pretty much rock hard by the time i got to it. i was careful and a bit lucky and it didn't take any wood with it.

then i went straight to a #4 plane and smoothed the entire surface, working only along the grain. i was not trying to flatten the top, but just removing the machining marks and leveling the joints. the glue had dried overnight at this point, maybe 16 hours. i had the plane set to take ~2 thou thick shavings, with the chipbreaker set maybe 15 thou back from the edge of the blade (for no tearout regardless of grain direction).

in order to get rid of all the glue and fully level the joints, i had to take more passes with the plane in the areas over the joints then in the area between joints. thus, there is a danger of making noticeable grooves along the joints. however, the finely set plane prevents that from happening. if a groove is being formed, the plane stops cutting and it becomes necessary to take some passes to either side of the joint before continuing to plane directly over the joint.

after the table was assembled, i went over the top with 220 grit random orbit, followed by 320 grit hand sanding. then stained with a dilute bark brown dye, and applied an oil finish. i considered leaving the planed surface as the final surface, but the sanded finish both looked and felt nicer on a test piece. the dark drown dye was employed both tomake the wood a bit darker and to protect against sun bleaching (the table is going on a porch with lots of south-facing windows).

any non-flatness that resulted from my planing method was visually undetectable. however it might well have shown up with an high gloss finish, so there you'd probably want to start with a coarser plane, working diagonally across the surface to get it truly flat, as others have mentioned. i would probably do that anyway on a small table top. however, that would have been a pretty unwieldy task on a piece this big (50% larger than my biggest workbench).

best of luck with your table

Re: Table top

#12

Re: Table top

Winton

?

aaaah

?

Hmmmm

?

I have now idea how to respond to all that.

Thanks for . .

I'm sorry I . . .

Ok I got it together; how about some photos for us to look at of your process in action (and from every one else with tails to tell).

i.e.,

What is a waste of effort? I admit to wasted effort through farting around trying different things.

What is essential to know ?

You are perhaps setting your self more in the power tool group so I assume a big hand held belt sander is your first choice (I have a top of the line Bosh but still prefer the hand planes but not trying to make money).

Re: Table top

#13

That was a reply from me to Joe

Winton

Once again I couldn't edit post but i am making progresson in that respect. I went and changed my profile thingy and got set up so i can't edit posts with the desk top or the iPad.