New WoodChat!
Home Articles Forums Gallery Marketplace Videos

WoodCentral Forums

Knowledge You Can Build On — Est. 1998

Have a question? Ask Woody!

Cutting Dovetails

Posts

Cutting Dovetails

#1

Michael Donaldson

Cutting Dovetails

Michael Donaldson

I cut my dovetails tails first. Everything I have ever read or seen has said that after transferring the marks to the pin board after the tails have been cut, you should saw on the waste side of the line you just made. My problem is that whenever I do that, even though I only leave a hint of the line, the joint is too tight (I've even split my tail board once trying to...um...persuade the joint together). I always end up having to do a lot a paring and fitting with a chisel to get the joint together. With my current project, I decided to saw right on the lines on the pin board, breaking every rule. The result was a near perfect fit right from the saw. Did I misunderstand the rules? Or am I doing something else wrong?

I am a firm believer in doing what works and there not being a wrong way to do something, but I am starting to teach my daughter to cut joinery and I don't want to lead her astray. For me, saw on the waste side of the line for the tail board, and right on the line for the pin board. But every other teacher I have ever seen says cut on the waste side of the line for both tails and pins. What ever shall I do?
Re: Cutting Dovetails

#2

Re: Cutting Dovetails

Brian from Monument

If the technique you have described in your most recent effort works then use it.

Yet the basic technique appears to be

A. mark with a sharp knife against the tail piece onto the pin piece

B. cut on the waste line

C. trim with a chisel if necessary.

Some would say that it has to fit on the first attempt and that trimming is not necessary.

Trimming is necessary if it doesn't work and more force does NOT make things fit.

Re: Cutting Dovetails

#3

Jack Guzman from Maine

Re: Cutting Dovetails

Jack Guzman from Maine

Michael you have hit on the hardest part of cutting dovetails. It is all in how you interpret the line.The thickness of your line,how you hold the pencil or knife to the side of the tail and how you see the line as you cut it.If your tail sides are perfectly straight and you mark with a sharp knife exactly on the edge of the tail side,then cutting to the waste side of the line with the side of the saw just slicing the line you should get perfect pins. But,there are too many variables, being human,so you must interpret the line in your own way. Practice is what makes perfect dovetails.---Jack

Re: Cutting Dovetails

#4

Re: Cutting Dovetails

John Pappas

Take extra care to chisel the baseline accurately. If you are 'fat' there the wedging effect will give the impression that you didn't saw on the tails correctly. Hope this makes sense. Try a test.....pare the base line, not the tails, and see if things fit right.

Re: Cutting Dovetails

#5

Re: Cutting Dovetails

Derek Cohen (in Perth, Australia)

I cut my dovetails tails first. Everything I have ever read or seen has said that after transferring the marks to the pin board after the tails have been cut, you should saw on the waste side of the line you just made. My problem is that whenever I do that, even though I only leave a hint of the line, the joint is too tight (I've even split my tail board once trying to...um...persuade the joint together). I always end up having to do a lot a paring and fitting with a chisel to get the joint together. With my current project, I decided to saw right on the lines on the pin board, breaking every rule. The result was a near perfect fit right from the saw. Did I misunderstand the rules? Or am I doing something else wrong?

Hi Michael

Cutting on the waste side is correct ... however you need to be sure that you are doing just that!

How much leeway you allow yourself also depends on the secondary wood you are using. If you were joining a hard and a soft wood together, then the soft wood will compress, and you may have the luxury of a little more forgiveness of the fit being tighter-than-desired. On the other hand, if you are joining two hard woods, then you much be dead on .. or else! :O

The first thing to determine is whether you are marking where you believe you are marking, and how thick the line is.

I transfer marks with a very fine marking knife. It leaves a razor line. I ensure that the line is right against the tail wall. I know that is I cut against this line then the joint will fit snuggly.

Two strategies here: very sharp blade and one that will track the sidewall of the tail without difficulty.

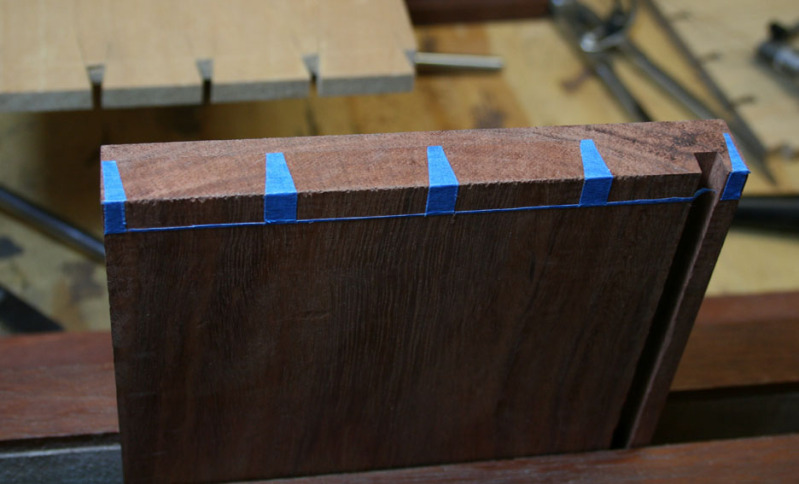
I add a third strategy: I use blue tape and this leaves a very clear line for sawing.


Link: http://www.inthewoodshop.com/Furniture/HalfblindDovetailsinJarrah.html

Undercutting the baselines prior to paring them is also important ...


Regards from Perth

Derek

Re: Cutting Dovetails

#6

I'll go out on a limb here...

John in NM

Someone is sure to take issue with this! :D

The problem is basic lack of practice (and I say that sharing the same problem with you! :D )

According to some, dovetails in antiques were a functional joint, not a "boutique" feature (I happen to agree that this is likely, but do not have the historical chops to back it up). It is not hard to see that the period craftsman would quickly get enough practice to cut them quite well with no paring.

Today, we hobbyists do not hone our skills to that degree over a short time, as most of us do not work 40 hours a week at this, let alone the much longer work week of a pre-industrial craftsman.

I would say you are stuck with paring unless you practice a lot. I would suggest either making a lot of dovetailed tool boxes or utility boxes out of oak, poplar, whatever, or make a big chest of drawers (accepting imperfections in the functional joints), or get used to paring until you can saw just so for an attractive joint on your boxes (you're making boxes, right?)

Bear in mind, I saw oversize and pare, I see nothing wrong with it. I'm just not willing to commit the time to practice for the few times I need dovetails lately. I'd love to change that, but have to accept that my time is limited and I have a lot I wish to do.

Re: Cutting Dovetails

#7

One more thought.

John Pappas

I attended a dovetail presentation by Graham Blackburn and he made this point. After you have used the tails to mark the pins, do this. Look at the would-be pins. You can see the pencil line on the pin. Therefore, if correctly cut, you will still see the pencil line after you make the cut. Really makes sense.

I also believe the need for a thin pencil line or marking knife mark is overstated. The "edge" of my "wide" pencil line is in the same relative position as your thin line. Exactly... And, the edge of my wide saw kerf is ,likewise, in the same relative position as a thin kerf.

Again, the baseline is as critical as the other two lines of the triangle.

Re: Cutting Dovetails

#8

Michael Donaldson

I think I've figured it out

Michael Donaldson

I mark the pin board with a knife registered wight against the tail. Then I fill in the knife mark with my pencil so it's easier to see. After reading all the comments, I looked at how I saw and realized that I am splitting the pencil line, but I am cutting just to the waste side of the knife line. Thanks for the input, after reading everyone's remarks, it finally clicked.

Re: Cutting Dovetails

#9

Think Knife wall

Ron Harper

I know you like Paul Sellers. I was watching episode 2 of the tool chest last night. He treats the knife line marking the pins like any other knife wall. His first joint in this episode was very tight indeed. Even he had to pare a little

Re: Cutting Dovetails

#10

Re: Or you could do it the easy way

Tom

Remember that how tight the joint is depends on how far back you cut the tail board scribe. So one option to get on the line is that if your "head yardage" always gets you too tight, just over mark the baseline of your tails, and you will be dead nuts every time.

Of course we would prefer to be on the line doing what we think we are supposed to do. What I do on maple and softer wood is I mark with a pencil. I use an HB, and I rub one side against sand paper till tit has an eliptical point. I mark with that flat against the wood, then I split the line, and it is dead nuts. So that is an option, a slightly wider pencil line that you split will give you a little offset.

On super hard materials I knife, and I split the line with the left tooth of a japanese saw. I mostly use an Independence saw to saw DTs, but for this I use a J. A J. saw cuts two parallel tracks in the wood, and you can run one side right down the line. That fits for me.

My overall point is that you need to find what works for you and how you see and feel the job. It's head yardage. In golf or shooting sports, if you eyeball a range and it comes back 150 yards, then you grab your 150 yard club, as proven on the range, then you hit the shot, and it is ten yards long. You needed to have pulled your 140 yard club. You can try to learn how to see 150, but it normally works better if your 150 head yardage is actually 140, to change how you label your clubs. You don't have all that big a problem if you always saw a little too tight, just adjust the baseline, but if you saw inconsistently, then you need to work on that.