We value your privacy.
We use cookies to enhance your browsing experience, analyse site traffic, and personalise content.
By clicking “Accept all”, you consent to our use of cookies. You can also choose
“Essential only” or learn more.
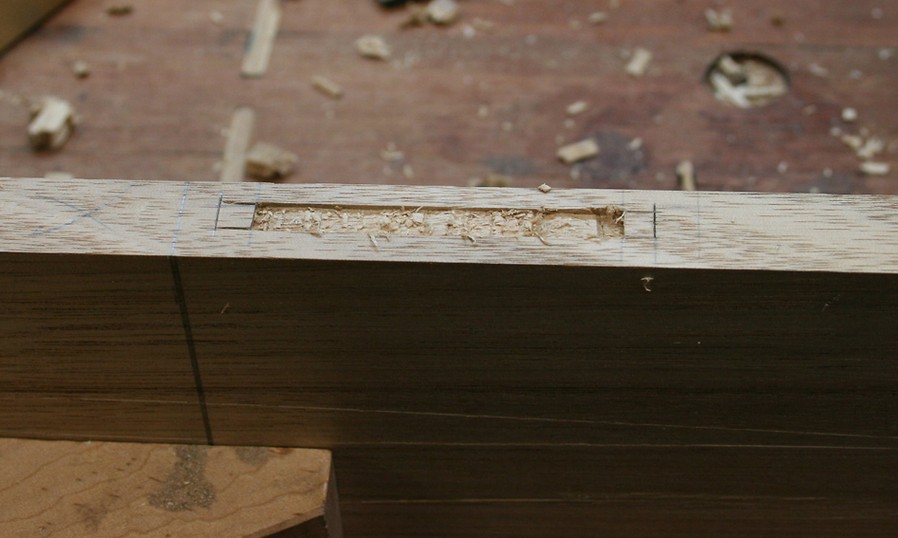
I am making a craftsman style end table with slats let into the rails. The slats are shoulderless tenons and thus the mortises need to be neatly cut. I first tried laying out the mortises with my cutting gauge. The gauge is a Hamilton. The cutter would not follow a straight line on the red oak. I had similar problems with a straight edge and utility knife. I then tried a forstner bit, but the bit slipped off the centerline because of the coarse grain. Finally I cut a groove on the table saw and filled in the spaces between the slats with little blocks. I think I should have been able to cut neat mortises, even with the coarse grain. Any suggestions for the future are appreciated. Jerry
This may sound counterintuitive, but if your cutting gauge is really sharp, the blade sometimes has more of a tendency to wander due to the underlying grain than if it was duller.
Your issues with the Forstner bit come with the territory with the coarse grain. Next time, you could either punch a center mark with an awl or use a smaller diameter Forstner bit to give you some room for error.
But I think the biggest issue is your original design, with the slats being shoulderless tenons. If those slats had even a small shoulder, you wouldn't have to be so careful with your mortises, and it's far easier to make a clean shoulder than a clean mortise.
A boatload of issues combine here to make this a difficult task for you, Jerry. Best for marking would be mortise gauge or a marking gauge. I would not use the cutting gauge going with the grain. Red oak is difficult to mark out because the gauge wants to follow the grain, and even if nicely marked it is hard to see the lines. Someone without lots of experience would be better off with white oak or another wood. And as Wilbur suggested tenons with shoulders would be easier to make neatly. Many Arts and Crafts designs were designed to be made by machine in factories; all these mortises are a lot of work for not much effect.
Yes, a craftsmen with experience could make very neat mortises. However since most of these slats are not really structural, I would be tempted to plough a shallow groove and fill in like you did.
A couple of observations from my paltry marking experience. When you were using either the gauge or the marking knife, were you trying to mark it out with one go? With the grain against you (figuratively), it's much easier for even my puny little arms to make 4-5 passes beginning with almost no pressure and slowly building up each time. An awl might work better than a knife as well as a pin gauge working better than a cutting gauge. The better you can get the knife lines working as a 'polished track' the better luck I've had. Just my 2 cents from a little reading and a lot of early mistakes.
Thanks. My past issues with a router in a table result in a "jump" of some sort and getting out of the track. Maybe I need more practice and start with a shallower cut. I seem to be able to do more damage faster with a powered router. I will admit to being stubborn about being able to cut clean mortises by hand. For what it is worth, I had similar problems with a dedicated mortising machine when building a morris chair.
I do agree with Wilbur and Warren that shouldered tenons would be the thing to do. It's a very high skill operation to make a perfect mortise, even under ideal conditions.
However, I think you will want to analyze what went wrong with the cutting gauge; otherwise it may end up in a corner forgotten. Cutting gauges are complex creatures, though they look simple. I suggest you replicate this problem in a piece of scrap project oak and analyze
why the gauge is not tracking:
1. The way the beam is fixed in its housing: is the beam pivoting a little under load? It only has to deflect a little in its housing to get the cutter tracking at an angle. The Hamilton gauge relies on a tight fit of the arm within a dovetailed housing. I don't think this is ideal, because tight fits are not as effective as a design that crowds a looser-fitting beam into a corner of the housing. However, in the case you described there would have been a short throw, so it's hard to imagine the beam deflecting.
Indication: If the beam is deflecting, this would cause the blade to wander away from you initially, because the beam would swing backward, orienting the cutter outward for a moment, and the cutter would then try to push the trailing edge of the gauge fence off the work, and will also try to rip itself loose from its fastening. Which way does the blade wander first? And can you feel the gauge fence leaving the work, if you replicate the problem in slow motion? And is the blade remaining fixed tight, or is it yanking its screw loose?
2. The way the knife is beveled and oriented: is the knife pulling the gauge fence up against the work or pushing the fence off the work? It's a single blade cutting gauge isn't it? Is the knife single beveled or double beveled? If single beveled, is the bevel on the inboard side? If the bevel is on the inside, then the knife will be pulling the gauge fence against the work, and it should track, esp. if you start with light passes. If the bevel is on the outside, then the knife will be pushing the gauge fence away from the work, and it's very hard to fight--essentially the grain will win this fight.
Indication: Is the first deviation of the cutter inward, toward you? This is what would happen if the cutter forces the gauge fence off the work? Or can you feel the fence getting pushed off the work?
3. Light starting passes. This has been cited by at least 3 people above me in this thread, and I think this is a very important comment, along with the recommendation to use shouldered tenons.
Keep in mind that this is a machined joined, made with a router. Having said this, I do have a suggestion how to do it by hand. I must warn you that it will be a lot of work, but can be done. This is a bed I built in Jarrah about 10 years ago. The mortices were partly router and partly chisel ..
Firstly, you need a cutting gauge that will create a deep, clean line. My vote goes to a Kinshiro-type. These have a broad fence for good registration, a flex-free blade that can be made sharp enough to shave with, and the blade can be orientated to stay on track and minimise any wandering with the grain (pull the fence against the side of the stretcher).
I was spoiled by Wiley, who sent me this amazing Kinshiro (on the right). You can buy a cheap version (on the left) ...
... I modifed one into a single cutter (on the left), which may offer more control here ..
The reason for being particular with the gauge is that you want control and a fine, deeply scored line. Start off very lightly, barely creating a mark, as the wood fibres are severed, so you build a deeper kerf, and this will help prevent the line wandering with the grain.
The aim is to get these lines as deep as possible. I run a sharp, thin knife in the kerf to deepen them.
Then you want to lower the top of the mortice-to-be by removing the upper layer. The following is just an illustration but not how I would recommend for you (since the illustration is for a shoulder, which can deal with a ragged edge) ..
I would undercut the scored lines across the grain (similar to preparing a dado) ..
Go as deep as you can. Keep the sides perpendicular. What you achieve here is what is going to be seen later.
Once this is done you can begin chopping out the mortices.
Once all is done, plane the top to clean up any broken edges. The result should be good
One more bit of advice ...
I built this bed as a surprise for my wife when she was away for a couple of weeks visiting her mum. It came to the point when I had to glue it all together. Since it was too large and heavy to lug into the house once assembled, I did so in the livingroom - something you can only do when She is away! The joint were tight, tighter than I anticipated as there were many to go together simultaneously. At one point I began to panic that the glue would go off first. Fortunately I had a enough long clamps to pull it together in time. It all went "pop" into place, and I could not believe the luck of how it looked. The point is, assembling this type of construction requires planning, and the tightness of individual joints is additive.
About 10 years ago I made bunk beds for my boys and had about 65 slats to do with no shoulders. I was modifying a plan that I got from Rockler. The plans suggested to do it the way you ended up doing. I, instead, used a mortise chisel. It was a lot of work. I used a Veritas wheel gauge and marked out only one side. My chisel's width determined the other side. I used a Stanley small router plane to flatten the bottoms of the mortises. I used no glue in the glue up. Instead, after the glue up, I used Lee Valley's Chair Doctor Glue in any gaps in the mortises. The majority of them closed up completely. This glue causes the wood to swell up. They are still tight, despite the fact my son likes to absent-mindedly kick them while he lays on the bed and reads. I used a mixture of hard and soft maple; it's what I had on hand. As others have already said, you need to start marking lightly, especially with open-grained woods such as red oak. And a center punch will go a long way in keeping drill bits in line. I used the chisel with only hand power at first to define the walls. Derek's post has some great advice on this. I'll not be doing a project like this again, if I can help it. But I did end up getting a lot of experience towards hand mortising.
And a good tutorial. I'd never thought about the undercutting--but I can see where that would remove any remaining strength from the cross grain fibers, plus deepen things a little and let you see better.
The only remaining risk I see is that if the mortise chisel is not sharpened square, it could twist in the cut when struck and ding the sidewalls. Solution: sharpen square, or use the next smallest size mortise chisel and pare to the side walls already established. Lot of work compared to a shouldered tenon.
Derek mentioned planing off the top of the rail to clean up the mortises. This means I should take an oversize rail, cut the mortises, plane the top and then cut the rest of the rail to size. I don't always think to do the most difficult operation first.
It sounds like your gizmo is just designed to make mortises for little stub tenons, substandard construction. I was going to ask how long it took to make a mortise in oak that was 5/16" wide, 1 1/2" deep, and 1 1/2" long, but seems that this is way out of the range. I don't know how much time the machine saves, if any, but I can't imagine how many thousand mortises it would take to pay it off.
The maximum depth the larger Domino (DF700 XL) will cut is 70 mm. (about 2-3/4"). The maximum depth for the smaller DF500 is 28 mm (more than an inch) for 8 and 10 mm. thick tenons, and less for smaller tenons. That's not as deep as you use for some joints, but much more substantial than stub tenons or biscuits. You certainly can't use them for making a Philadelphia Chipppendale chair (round cornered loose through tenons would be just WRONG ), or for timber framing.
I need to go out to the shop and do some "time and distance" measurements, because I'm curious too. Lots of factors are involved in judging the efficiency of a "system," especially one as well thought out as Festool's. In addition to the actual chopping of the mortise, there is operation setup, layout, getting the tools out and putting them away, cleaning up afterwards, and even security. Some of these advantages (and the resulting efficiency numbers) are much more important for job site operations than for working in a shop environment. And, as with many advanced tool systems, there is the savings in years of training needed to achieve technical competence and avoiding wasted time and materials due to errors.
It's very complicated to calculate where the break-even point might be, especially with differences is labor rate and shop rate, the extreme cost differences between different joinery hand tools that people think they need to do accurate work, where you are doing the joinery and what types of items you are building. It would be even more difficult to assess differences in work satisfaction and "peace of mind."
It sounds like your gizmo is just designed to make mortises for little stub tenons, substandard construction. I was going to ask how long it took to make a mortise in oak that was 5/16" wide, 1 1/2" deep, and 1 1/2" long, but seems that this is way out of the range. I don't know how much time the machine saves, if any, but I can't imagine how many thousand mortises it would take to pay it off.
The maxim "Don't judge a book by its cover." comes to mind when I read a response to the DOMINO like this. And this is a lot of folks' impression of what it actually IS - and what it CAN do
The DOMINO is a revolutionary handheld power took - that looks like a biscuit cutter - but it definitely is not.
Let me provide a simple example of an application for the DOMINO
Now let me ask - How long would it take you to layout and cut just 42 the mortises in the top and bottom rail? And how much additional time would it take you to layout and cut the 42 matching tenons for the vertical boards?
With the DOMINO, it took less than 10 minutes to cut the 42 mortises in the top and bottom rails - all done with them clamped to my workbench. The mortises in the top and bottom vertical boards took twice that long - because they are quite long and have to be turned around to go from one end to the other.
So, in an hour I could do TWO of these things - and everything lines up and fits pretty close to perfect - with no layout except for pencil lines for the center of each vertical board.
Now lets look at a more familiar application - table legs and apron joints.
Each apron part has TWO loose tenons on each end, four per apron x 4 = 16 mortises and 16 tenons to cut (if you go with traditional mortise and tenons rather than loose tenon joinery)
Each of the bottom stretchers has a loose tenon on each end - so add four tenons or four mortises for loose tenons.
How long would it take YOU to layout and cut 20 mortises - and 20 tenons? I'm betting in that time, I could cut twice as many tenons - per table - and get all three tables' legs and aprons cut.
Here's another familiar use of M&T
Going the traditional route - these paneled doors would take 20 mortises and 20 corresponding tenons - or - 40 mortises if you go with loose tenon joinery. Now consider that all these mortises are to be done by a very novice woodworker who didn't know what a mortise OR tenon was. How long do you figure it would take you to layout and cut all this joinery?
Of the five hours spent on this phase of a floor to ceiling, raised panels doors, cabinet - close to three hours was spent deciding how to cut up the boards to be used for the panels. And a fair amount of time was spent deciding on how to break up thespace for the doors . So that leaves about an hour to do the 40 mortises, which comes out to about a minute and a half per mortise. Were I to have cut them it'd be more like 20 seconds per mortise.
Now that's just the doors of this floor to ceiling cabinet. You still need the back and sides - also with raised panels.
Starting to get an idea of how useful the DOMINO can be?
This thing is no "gizmo". At just $10 an hour for my time, it paid for itself in about three weeks, assuming 40 hours per week. Cut that time in half if you figure your time is worth $20 an hour ; )
Yes, I know that half the appeal of building things is the Doing - the finished piece being the other half. But after the first 10 mortises have been cut, the fun of DOING starts dropping off - the remaining 20 or 30 mortises can be just drudgery. And I'm pretty sure that we all have ideas for a piece - but rule it out because of the time and effort required to actually MAKE it. But if the time and effort could be cut in half, or by a quarter - then the piece MIGHT get made.
My mileage does vary. At the $10 per hour figure you suggest, a small mortise and tenon joint, such as could be replicated by the machine, would cost about 67 cents to make by hand. A thousand such joints would be under $700.
If you buy the machine @ $900 and a thousand dominoes @ $164 and add the labor to use the thing, you are well over the hand tool amount. Maybe two thousand joints is the break even point.
The applications you suggest seem inspired by biscuit technology; we don't usually use so many little tenons in traditional work.
Apologies for this late reply to Warren who wrote:
My mileage does vary. At the $10 per hour figure you suggest, a small mortise and tenon joint, such as could be replicated by the machine, would cost about 67 cents to make by hand. A thousand such joints would be under $700.
Let's check the math. At $0.67 per Mortise AND Tenon - at $10 an hour - you'd need to make 15 mortises and 15 tenons each hour for close to three hours to do 42 M&T joints. That's 2 minutes per mortise and 2 minutes per tenon - including the layout?. If you want to make $20 and hour, cut those times in half - a minute per - and work at that pace for close to three hours. AND - if you make the M&T joints right - NOBODY WILL EVER KNOW - except you.
Now let's look at going with Loose Tenon M&T joints - the mortises cut using the DOMINO - for the "little ones" or with the DOMINO XL (for "real ones")
It takes about 10 seconds to cut a mortise and move to the next one - so 20 second per pair of mortises. That's 6 per MINUTE as opposed to your 0.25 mortise or tenons per minute. The DOMINO is therefore 24 TIMES faster. Even adding the $0.25 per loose tenon cost - if you BUY them as opposed to making your own as stick and cutting off what you need - the price per joint would be $0.32 at $10/hr labor cost - vs your handcut cost example of $0.67. So the DOMINO would save youat least $0.35 per joint, or $350 per 1,000 joints - and would free up the person working at $10/hour to do things that WILL be seen - or that require considerable skill - like triple mitered corners and the complicated joinery found in Chinese and Japanese furniture - the stuff that power tools CAN'T do.
If you buy the machine @ $900 and a thousand dominoes @ $164 and add the labor to use the thing, you are well over the hand tool amount. Maybe two thousand joints is the break even point.
If you had to do a Cost Benefit Analysis to justify a tool acquistion - you'
d be working with two handsaw - one rip, one cross cut, one dovetail saw and maybe one carcase saw, one set of bench chisels, a mallet or two and maybe a half dozen or so handplanes, perhaps along with a marking knife and maybe a marking gauge. OK, so through in a mortise chisel or two. Would it be safe to assume that these are the only handtools you own - not counting perhaps a brace and set of bits?
Now if you make furniture because you enjoy the making, especially the tedious repetative stuff, and the end result is icing on the cake - and don't make a living making furniture - Neander Away - and more power to you, assuming the power doesn't come from a wall outlet.
For me, it's the working out HOW and selecting and prepping the wood - that's fun. And once I've learned how to do something by hand and get decent at it, if not pretty good at it, the fun level drops off considerably. That said, I really enjoy grinding shellac, disolving it in alcohol and then french polishing - for hours. And beading and cock beading along with carving and shaping are kind of fun to do - but not for hours on end. But then I don't make furniture for a living - and I have time and enough disposable income to Buy & Try - then write up what I've found and share that info with other woodworkers.
The applications you suggest seem inspired by biscuit technology; we don't usually use so many little tenons in traditional work.
No, the exteme examples I provided were inspire by Loose Tenon Joinery - which is what the DOMINO does extremely well. The fact that it LOOKS like a biscuit cutter is probably the biggest obstacle the DOMINO has to overcome.
I'm assuming that you think a 1/2 thick, 1 or inches wide tenon that's 2 1/2" long is a "little tenon". And that you assume that you can't use 2 or even 4 smaller tenons to get the same strength.
And one of the reasons loose tenon joints aren't used in "traditional" work is because it's very difficult to cut mortises - in END GRAIN - but very easy to do with a plunge router, and even easier and quicker and more accurately with the DOMINO.
What the DOMINO does is flatten the learning curve - and bring loose tenon joinery within the reach of newbies and intermediate woodworkers.
Even the Quakers adopted some modern technology of their time. I believe the bandsaw idea was a Quaker idea - a Quaker woman in fact. Quaker's had no problem making "traditional" furniture using water power either?
A small point, but that would have been the Shakers, not Quakers, and it was the circular table saw blade, not the bandsaw, that Tabatha Babbet is credited with inventing. You can see two very early table saw examples at Hancock Shaker Village. Curiously, instead of one saw with both a miter fence and a rip fence, they built two saws, one dedicated to ripping and the other to crosscutting.
When you calculate cost per joint of the Domino loose tenons, they're not quite as expensive as your examples, because you save a little on cost of the rails and stiles because they can be cut a little shorter. For the rails you don't need an integral tenon, and for the stiles, you don't need to cut them extra long and cut the ends off after forming the mortises and assembling the joints, because the Domino puts a lot less strain on them than chopping the mortise with a chisel. Also, for the same reason you can modify the rule of thumb of making the mortise one third the thickness of the stock, and thicken the mortise a bit. This can result in a stronger joint in the same thickness of wood, or the same strength joint in thinner stock, and thus lighter and less expensive wood. Of course, it depends very strongly on your particular application whether the bashing of the mortises with chisel and mallet or the stresses in use contribute more to potential failure.
When I can't use my Dominos, I sometimes clamp the stiles in a handscrew to support them while chopping the mortises.
If you had to do a Cost Benefit Analysis to justify a tool acquistion - you'
d be working with two handsaw - one rip, one cross cut, one dovetail saw and maybe one carcase saw, one set of bench chisels, a mallet or two and maybe a half dozen or so handplanes, perhaps along with a marking knife and maybe a marking gauge. OK, so through in a mortise chisel or two. Would it be safe to assume that these are the only handtools you own - not counting perhaps a brace and set of bits?
It looks to me that you could not fault my analysis so you are trying to discredit me by suggesting hypocrisy. Maybe I am the wrong guy. I have two handsaws, one rip, one crosscut, one tenon saw, one sash saw, one carcase saw , and a dovetail saw, all the saws I have ever owned. I have only ever owned five bench planes, all in current use. These are not the only tools I have; I also do carving, turning, moulding, fretwork, etc.
You're absolutely right about Shaker not Quaker and circular saw blade rather than bandsaw blade.. The point I was trying to make is that even "traditional" makers used new technology - or invented it - if it did the job better and more efficiently.
M&T vs Loose Tenon M&T joinery - in terms of joint strength - is an issue that's been flogged to death. There doesn't seem to be any real world difference in terms of strength. Loose tenon M&T joinery does require less wood - that will be visible - since the true integral tenon isn't necessary. Makes for easier " figuring" since you don't need to work out the "visisble lengnth" PLUS ""2 x tenon lengths. And if you make a mistake cutting a true tenon in the wrong place - it's either shorten everything related - or make new parts. With LOOSE TENON M&T - if you blow the location of a mortise - plug it with a loose tenon and some glue - wait a while, cut off the plug - and try again. It's like having an UNDO button ; )
But discussions on Real M&T vs Loose Tenon M&T do point out a limitation of working exclusively with handtools. Yes, end grain CAN be mortised. But if you were to do that for table leg to apron joints and stretchers to leg joints as well - in order to use loose tenons - you'd be an old man by your 5th table with stretchers ; )
The router made loose tenon joinery far more practical and doeable - even by an intermediate woodworker. And combined with purpose built or adjustable router jigs even a relative newbie can cut and use loose tenon M&Ts. With the DOMINO - and absolute newbie can do and use loose tenon M&T joinery.
Don Williams www.donsbarn.com gave a very interesting presentation on the transition from hand tools to power tools at last weekend's Woodworking in America conference. He pointed out (and I assume has definitive documentation) that the circular saw blade was invented in Holland around 1575. Of course, at that time it was much larger coarser than would have been used on a table saw (which Tabatha Babbet is credited with perhaps inventing some time in the 19th Century) and would have been used for sawing up logs, but not preparing parts for building furniture and baskets.
Regarding the "UNDO" button, I've had to go even farther than that when repairing some kitchen chairs originally joined with dowels. The dowels broke, pulled out, or failed in mixed mode; I sawed them off flush; I punched new, larger mortises over them with the Domino, glued in loose tenons where the new mortises were in inappropriate places; sawed the patch tenons off flush; punched mortises in the appropriate places; glued up the chairs with the Domino loose tenons.
I've also used the Domino for other, non-joinery, functions. It makes great shelf pin mortises and the tenons work very well as movable shelf pins and cost less than commercially available shelf pins. I've cut rows of ventilation holes in cabinets and tool bases with it as well.
It looks to me that you could not fault my analysis so you are trying to discredit me by suggesting hypocrisy. Maybe I am the wrong guy. I have two handsaws, one rip, one crosscut, one tenon saw, one sash saw, one carcase saw , and a dovetail saw, all the saws I have ever owned. I have only ever owned five bench planes, all in current use. These are not the only tools I have; I also do carving, turning, moulding, fretwork, etc.
Hey, I responded to the original post - suggesting looking into the Tite-Mark carbide wheel cutting marking gauge for scribing layout lines for mortises in hard, opened grained wood when scribing WITH the grain. And given the application of the job - a fair number of slats into rails using shoulderless tenons, I suggested the DOMINO as a solution.
I wasn't the one who called the DOMINO a "gizmo" or mention "little stub tenons" or "substandard construction". You asked "how long it took to make a mortise in oak that was 5/16" wide, 1 1/2" deep, and 1 1/2" long" and I responded that with the DOMINO XL - the big brother of the DOMINO - it would take no time at all (under 10 seconds).
I didn't raise the question of Cost Effectiveness. But since it was raised I pointed out that, in time saved to do other things, it could pay for itself in three weeks of mortise cutting - at $10 an hour, half that if at $20 an hour.
I did try to correct your misconception of what the DOMINO is and what it CAN do and does. - noting that it is definietly NOT a biscuit cutter.
Your response got into the Cost Effective side - with assumptions for time per Mortise and cost per mortise - handcut vs DOMINO cut. Being one trained in engineering and math and taught by Jesuits who teach you to question EVERYTHING - I checked your assumptions and they seemed questionable - so I challenged them - with quantified specifics anyone can check for accuracy.
The response accused me of trying to discredit your analysis by suggesting that you're a hypocrite. I did discredit your analysis - and the assumptions it used, but the idea of acquring tools and machines - without having to justify getting them was more of a general statement applicable to most hobbying / amateur woodworkers - not necessarily you specifically. As for hypocracy, that was not my intent. How you took it is up to you though.
With the exception of the cross cut and rip cut handsaws my saw tote has what you have - plus three or four Japanese "pull saws" - because they work better, for me, for some cuts than do push saws. I've also got a few handplanes - both metal and wood (thank you Steve Kinght) I'm pressuming that you forgot to mention a set of bench chisel and a mortising chisel or two - hard to make furniture without them - if you work exclusively with handtools. Since you carve I'm going to assume you have gouges and sweeps, etc, along with a mallet or two. And since you also turn - add another 3 or 4 gouges and chisels at the least - one perhaps even a scraper. Fretwork requires at least one more type of saw - a fret saw of course - and probably spare blades, in assorted TPI. A jeweler's saw and jeweler's saw blades are probably also in your hand tool inventory . When it comes to doing molding and molding planes I'm guessing you've got a half dozen or more molding planes - they tend to proliferate.
So, as I said in an earlier post - you're mileage may vary - and your's clearly does
Everyone's entitled to their opinion - but not the facts. I have experience with handtools, though probably not as much experience with them as you do. I, on the other hand, have experience with the DOMINO, which you clearly do not. And the DOMINO, like any other tool, takes a bit of time to get to know and learn to use well - though nowhere near as much time and experience as most non-tailed handtools.
When one judges a book by its cover, one often misses a good read.
I appreciated Charlie's original post. Found it interesting, though not nearly as interesting as his incredible exegesis of Chinese joinery of days gone by.
But Charlie, context is everything. Not the obvious context that this is a handtool forum, because we frequently talk about machine stuff--it's OK. But the context that the Domino sets all other M&T methods in the shade. Well, you could convince me that in contexts like Stickley furniture and shoji screens that it's untouchable. The steam hammer did kill John Henry.
But there are those doing restoration of antiques or historically significant pieces; those doing period reproductions; those seeking to emulate that wonderful Chinese cabinet you showed--for whom the Domino is not the right tool.
There are others like myself, who enjoy using hand tools and forget about the time (and the times) and enjoy the moment. I understand you enjoyed just such an 'in the moment' experience with the Domino, which is why you wrote about it in the first place. I'm happy for you. Really. But it's not universal. I get as much joy out of my Japanese chisels, as do others from their oval bolstered mortise chisels, as you do from your Domino.
In other words, what's is worth to win? What's been won?



 ), or for timber framing.


