We value your privacy.
We use cookies to enhance your browsing experience, analyse site traffic, and personalise content.
By clicking “Accept all”, you consent to our use of cookies. You can also choose
“Essential only” or learn more.
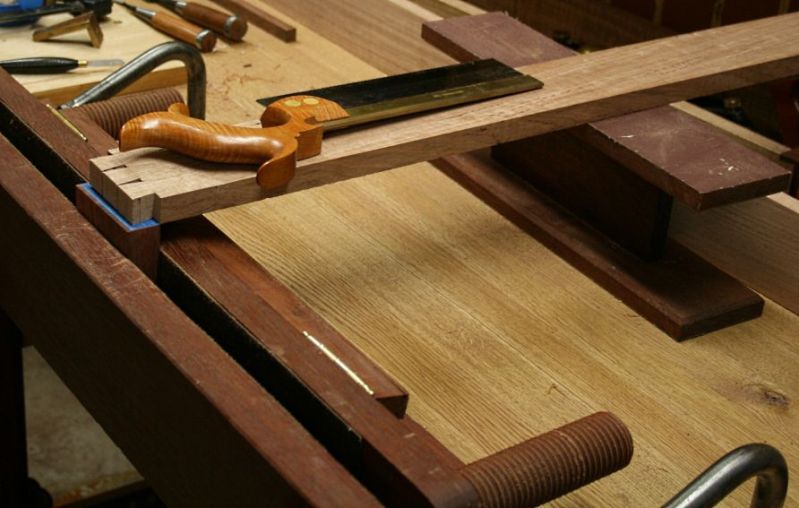
Kept thinking that I needed to order some 8/4 maple to build a Moxon vise with the Benchcrafted hardware. Yesterday I had the revelation/crazy thought of using the extra 8/4 walnut boards I have left over from the Shaker table I'm working on (bought it for leg stock). Is the walnut hard enough to use for the double screw vise? Any reason I shouldn't use it?
I would not prefer it for the screws, I think it would be softer than I would want. Probably fine for the jaws. I would guess the issue is stiffness there. You could compare the modulus of elasticity numbers. Lets' say maple is 30 percent higher, you can take the cube root of 1.3 and add that to you walnut thickness dimension (depth of jaw). Not real engineering, but close enough. Better still is to deflection test two scraps under a light load and plane away the maple until it deflects as much as the walnut does, then apply those dimensions to the walnut. Just get, say, two tongue depressor sized samples of different woods. Support them over a span, lay something like a pipe evenly over them. Plane away the maple until the pipe is level, kind of deal. Takes less time that for either of us to write about it.
Similar ideas to those for the jaws could be applied to figures obtained for shear parallel to the grain for the threads. Beef up the dimension for the walnut, from a know sample size for a stronger wood. In that case I would imagine increasing the circumference in direct relation to the factor would be all that was needed. Again, better than nothing. The tensile strength of any reasonable threaded piece should be ample.
Of course, none of that is really necessary, probably any reasonable dimension will work fine, but so will getting the realish numbers, and it sets up a way of working and thinking that can be helpful over time.Whether one makes adjustments to part size or not, one is still making a WAG, just a passive one.
Walnut will work fine for that application. As Tom points out, it dents easier than hard maple and it's not as stiff, but it shouldn't have any problems holding the
Benchcrafted nuts. The only potential problem you might find is marking it with a pencil for layout, but I haven't seen anyone mention that they do that. Usually dovetail layout is done directly on the stock you are sawing, not on the vise jaw.
Your price/performance ratio vs. purchased hard maple weighs heavily in favor of the walnut, unless you have a better use for the walnut.
Well, since it's such nice wood, now you will need to carve something fancy into the face, where it won't get in the way of the work the vise needs to do. For example, some acanthus leaves would do fine.
If you need some patterns, and a Google search of Acanthus and Carving doesn't satisfy you, here is a free book to download (just click on the .pdf file in the box on the left titled "View the book"), with almost 19 Mbytes of drawings.
What do you think of the pros and cons of the bevel you have on the front jaw of your Moxon vise? Obviously, it provides clearance when sawing half blind sockets and for sawing to layout lines across the end and front of the pins or tails. This becomes more important with thinner stock to dampen vibrations. OTOH, you lose the capability to use the top of the jaw as a horizontal surface to register the chisel for trimming the bottoms of the pins and tails. Not so important, I guess?
I'm trying to decide whether to put the bevel on mine, but I realize that once I've cut it, I can't go back, and my jaw is not tall enough to allow me to flip it over.
I think the bevel is needed..provides the clearance when sawing for half blinds...and I don't generally register the chisel against a block when paring, just pare to the scribe line. If needed, you can always rest a caul on the chop and pare to that...
Having said that, creating the bevel and the assciated lambs tongue was the most time consuming part of the build! Still, I wouldn't be without it.
What do you think of the pros and cons of the bevel you have on the front jaw of your Moxon vise?
Hi William
I felt strongly enough about this to write about it on my website.
.... I think it is a big mistake bevelling the Moxon chop. I struggle to see the reasoning in doing so. It is a bad move.
I think that it is to make space to hold the saw more vertically (so as to follow two lines at once). But if you need to do this it says that your board is probably too low in the vise, or the vise is too low for your bench.
The flat edge of the front chop is a valuable guide when clearing out waste with a chisel. If you bevel it, you will lose the reference surface.
I use my chop this way ..
Lift the height of a board when sawing. It should not vibrate if thick enough ..
Nice clean, level floors ..
Secondly, I think that you may add a problem if you add a bench behind the Moxon vise.
In addition to sawing, the Moxon is used for transferring the tails to the pin board. To avoid slicing up the chop with a marking knife, the pin board needs to be raised up at least 1/2" above the chop. A bench behind the chop will place the boards in line with the top of the chop. Eventually it will be goodbye chop ...
To make raising the board easier and secure, the tail board needs to be supported at this height. One of the fixtures I introduced some while ago was the "I-beam", which has sandpaper as non-slip on both sides...
To set the pin board at the ideal height, one needs a suitable spacer (of, say, 1/2") ...
I got tired of putting the spacer in a safe place, so I attached it with hingers ..
All fair points Derek, but from my perspective I don't often need or use a reference surface in paring the dovetails. As far as laying out the marks, I lay a caul on the rear chop, raise the top of the board in line with that and also have a "mini moxon" board which sits on the rear of the bench and when needed is the same height as the moxon and can bridge wood across the two.
In use, I feel having the board low in the vise when sawing is a big advantage and that is where the bevel comes into play.
Now, I don't feel so strongly about it that I feel one solution is "right". It depends on the way you work. If you pare to a reference surface, then you may prefer to omit the bevel.
The bench on bench add-on has been the best addition to the moxon. I can use hold fasts to easily secure work when marking or paring. It is sized to hold legs on top for inlay work. I am 6'3" and it brings work to a comfortable height.
Pins first or tails first....double iron or single.... Close chipbreaker or closed mouth....bevel chop or no bevel....micro bevel or flat back....water stones or oil stones....Bevel up or bevel down....And so on.......
These are all choices that people can make for themselves and input in making choices is great, however it gets tiring when people, and there are many who do, post as if there us only one solution or choice or proper method. It is why I seldom post, although I read the forum most every day.
Derek, I find most of your posts contain useful info and I enjoy reading them... Here we just have two different opinions, both based on our use and experience.
Thank you both for the input. It doesn't make my decision any easier. This may prove as difficult as pins first vs. tails first.
Derek, Your half inch flip up stop and I-beam are a great idea. My Moxon is constructed more like Roger's, so there's no room for the stop. But I don't have a real problem with that, as I use my #3 Bailey smoother for that purpose, and there's no way I'm going to misplace that. That means my I-beam must be the height of the vise plus the width of the bench plane, which is the same mental and measurement and construction exercise as yours.
The only problems remaining with my I-beam are where to stow it when I'm not using it and whether I can figure out another use or two for it. Single use appliances get my goat, and the bigger they are, the bigger the goat.
I agree with Roger that the bevel is essential for sawing half blinds, but only in some cases, and is also useful for starting tails when sawing them from the pins. The case where the bevel is needed is when the thickness of the drawer stock is much less than the thickness of the chop, because this is where clearance is needed and vibration is the worst. For full size drawers it's not a problem, but when building jewelry boxes, lap desks, spice chests and tea caddies, the vibration has to be controlled.
I could make a chop that I could turn over for the small work, but the one I have isn't high enough, and is already as heavy as I can easily manage. The problem here is that I have built my Moxon to accommodate chest sides up to two feet wide, and that requires a long and thick chop.
While composing and writing this response, I think I have come up with a compromise that will work for me. [We need a light bulb emoticon here.] Chests are almost always made with through dovetails, and efficiency begs gang sawing them tails first, so I don't need a full length flat top on the chop. Small, delicate drawers are just that: If the stock is thin, it is also narrow in proportion, so I don't need a full length bevel on the chop, either. This solution does leave me with more questions than answers. How long do I make the bevel? Do I put it at the left end or the right end of the chop?
I'm going to have to think some more about the I-beam. Can I make it fold up when I'm not using it? Can I find a place to stow it? Can I find other uses for it? It has to be taller than Derek's because my Moxon, like Roger's, is built into the front of my Bench-on-Bench. That makes the I-beam less stable, so I either have to make its base larger, or worry about securing it when I'm using it. Should I use a holdfast? Should I add some dogs to its bottom that will drop into the row of dog holes on the back side of the bench? Can I arrange something simpler that I can clamp in my face vise? Should I put wheels on it? (This last question is tongue-in-cheek, but Roger should be able to figure out what I'm thinking. I noticed the two dog holes at the far end of the bench in your picture, above.)
In the long run, the biggest question is, could I remove the old Columbian vise from the end and replace it with the Veritas wagon vise like Roger's? It would certainly make the bench a lot lighter and more mobile, but would I lose some essential functionality?
A free plug for the guys in Rob Lee's Skunk Works:
The bench on bench add-on has been the best addition to the moxon.
You've got it backwards, Roger. You build the bench-on-bench first,
then you add the Moxon vise to it. That way, you eliminate the rear chop.
Then Lee Valley reinvents the wagon vise, and you realize your Moxon/Bench-on-bench doesn't need to be so heavy that it has lost most of its mobility.
But, for now, I'm stuck with the antique cast iron vise, so I came up with another solution to the mobility problem. I added wheels. This might help Tony too, as he noted he is moving soon.
Note the additional use of holdfasts, that make the wheels removable. To make sure they stay put, add some dogs to the carriage, aligned with dog holes in the bench. I have good reasons for guessing the dog holes in the end of Roger's bench are for the same purpose:
The wheeled carriage is easy to build. I started with some scrap baltic birch plywood, 3/4" birch dowels, a pair of worn out in-line skate wheels, 5/16-18 all-thread, four nuts and four washers, screws and glue. The only out-of-pocket expense was some 1/2" o.d. aluminum tubing. I cut two channels in the BB with a half inch core box bit with the forked-tail routah, and screwed and glued it all together.
That is a wonderful joinery and detailing bench! Really the very thing. Coupla questions: (1) It's in the middle of the floor--do you go around and use the non-Moxon side, or do you tend to do everything from the Moxon side? (2) How much skew can you get in your Moxon vise? Enough to seize a tapered leg? (3) Do you use this setup as a permanent installation, or do you take the superstructure off and use the maple substructure for planing, assembly, or whatever?
In the interest of those who might want to do something like it, could you comment on the Moxon screw assemblies--what do they consist of, where sourced, etc.?
They charge $149 for the hardware only, or $399 for the hardware and both jaws. That's a lot of money for a couple hunks of maple. If you want to design and build one from scratch, I have found that cast iron wheels and acme all thread are not essential. My hardware cost me about $12 for 3/4-10 NC all-thread, nuts and washers from the Borg., and you can figure out your local cost for 6 board feet of 8/4 hard maple. The Benchcrafted vise is very well made, and works superbly. Installation instructions can be found on their website, which will give you all the info you need to design and build your own.
The bench-on-bench/Moxon vise is designed to come off of the joinery bench. If you will examine the photo of Roger's bench-on-bench closely, you will see an F-clamp beyond the far wheel, and in front of his face vise. This holds the Moxon vise down to his bench top. There is probably another clamp somewhere that you don't see, because it helps a lot to use two clamps.
If you look at the pics of mine on the associated "Mobile" posting, you may be able to figure out that, under certain circumstances, the rear jaw is not really necessary, and that you can alternately use holdfasts to clamp it to your regular bench. Holdfasts have the advantage that they give you a clear vertical working surface, but extending the lower rear clamping board beyond the ends of the chops can provide the same clearance.
Whether you can clamp a Federal table leg in the Moxon depends on how long you make the holes in the front jaw and how far apart you place them. A more important point is that there is no provision for preventing vertical racking of the vise jaw, so IMHO, I would say no, you would not be happy using it to clamp a tapered leg. The Moxon vise is designed for cutting and fitting dovetails. You can use the Veritas wagon vise, with the rotating dog or with the regular dog and the row of dog holes to clamp a Federal table leg in the wider top that we have built onto the backs of our vises.
I have to run an errand, but will be back this evening, to dig out some photos of my bench-on-bench, the installation of my Half-a-Moxon, and also Steve Latta's Bench-on-bench (which is very well adapted to decorating Federal table legs), if you are interested.
I do hope Roger will provide a brief rundown of how he uses his joinery bench. Your analysis makes me think that the main benefits of the Moxon vise, compared to say an LV twin screw, are (1) that it does dismount, and (2) it puts the work up in your eyes, and you decide how far up.
It somehow did not occur to me that the Moxon doesn't control vertical racking, and therefore can't be used to grip sticks lengthwise up at the top. (Makes me appreciate the LV twin-screw even more.)
If you have photos handy of your half-Moxon and bench-on-bench, and Steve Latta's bench on bench, i'd love to see them. Honestly, I'm not having difficulty with work-holding right now, just find it a fascinating topic.
The Benchcrafted version has the screw stationary and the hand wheel moves. That acme thread is always sticking out and is ready to bite you. On the original Moxon the screw is attached to the head or handwheel and there is a fixed nut in the rear jaw. Sometimes the original is hard to improve on:)
Sir William answered the sourcing question...Benchcrafted!
(And I've not yet had a problem with the fact that the acme threads stick out, but there is always a first time!
The whole assembly sits on the bench top at the front edge, secured either with one or two holdfasts, or one or two clamps. The holdfast is what I generally use and they can bear down on the understructure at most any point.
The front chop is made so that the lower face is a bit lower (1/8 or so) than the rear chop and understructure. With the vise closed, slide it on to the bench and back until the front chop hits the edge of the bench. The edge of the bench and the rear chop are now in the same plane.
At my shop, the assembly sits clamped to a fixed bench which is adjacent to my primary bench. It is fully functional in that location for almost all work. This leaves the primary bench free for other purposes. If I am doing an extended session on the Moxon, or if I have a piece which will extend front to back greater than the space on the auxiliary bench allows, then I move it to my primary bench.
Last week I was demonstrating inlay and banding for 9 days at The League of NH Craftsmens Fair at Mount Sunapee... We work on benches generously loaned by The Homestead Woodworking School, but they are smaller Sjoberg style benches and leave a fair bit to be desired with respect to work holding. I took the Moxon and was very content!
Primary use is for me is for dovetailing. I cut tails first... I have a pair of matching cauls I use, in the same manner as Sir William uses the plane, when transferring marks. In fact, I have dovetail angles, and common spacings that I use marked on various faces of the cauls.
I made my vise so that I could secure most any case side between the screws.
The Benchcrafted hardware shines when doing multiples...i.e., many drawer sides... Bring the chops together securing the work, adjust one wheel so that it is secure. After that you are leaving that wheel alone and just spinning the other... And a simple flick of the wrist provides enough force to secure the workpiece. Process becomes quick and relatively effortless.
There is some vertical racking, but not much. I do secure some work in just the upper section of the vise and have had no issues.
There is not enough horizontal play to secure tapered legs well, but I fasten those on the top of the work surface between the bench dogs or planing stop and the dog on the veritas inset vise. I made the bench on bench long enough to hold most any leg.
I bored several 3/4" dog holes in the bench surface which work well with the holdfasts.
As I do use a lot of thinner material in boxes, and smaller drawers, Sir Williams comments about the bevel on the front chop are exactly on point. His idea of only putting the bevel on one end or the other is certainly a interesting and valid concept.
I do a fair amount of inlay work, and the height and design of the bench on bench was designed around that. The fact that this entire assembly can be secured to any flat surface (table, workmate, auxiliary bench, etc.) makes for a very versatile setup. As I said, in use in my shop, it is at home on a separate work surface, provides full function, and leaves my main bench for other work.
Whats right for you depends on what you do and how you do it, as well as your work flow, shop space, resources, and so on...
If I were redesigning this set up today, I'm not sure I would change anything... It works really well for me and for the work I do. It is a bit heavy, so I may adapt Sir Williams mobility kit!
Here is a view of the bench area of the new shop, and there is much to be done still, but you can see where the Moxon normally lives... On an auxiliary bench, where all functions work fine... I move it to the main bench when needed.
The Benchcrafted really is a significant improvement on the original Moxon. The original always has the screw handles sticking out the front of the vise, where they are just as much in the way as the Benchcrafted handwheels, and in some implementations I've seen, as much as 6 or 8 inches, which is much more likely to snag you. The Benchcrafted cast iron handwheels are about 1-3/8" thick, and my homemade bloodwood handwheels are 1-3/4" thick. As long as you leave access to the back of the rear chop of the Moxon to get a Crescent wrench on the nut, you can retract as much of the Acme all-thread into the vise as you want, so the excess thread doesn't catch on anything.
In the case of my bench-on-bench, I can just as easily remove my Moxon, using the same technique. For any dovetailing session, I adjust the amount of all-thread I need for the boards I'm going to work on that day, and tighten the rear nut. The all-thread doesn't even protrude beyond the front surface of the handwheels. The only time I run out more thread is if I'm (rarely) cutting dovetails in thicker stock. I usually set it up with a 1" gap between the chops when the all-thread is flush with the front surface of the front nut. If I need to alternate between 4/4 and 1/4" stock in one session, only 3/4" of thread is exposed when holding the thin stock, and most of that is protected by the handwheel.
You will have a problem with the Benchcrafted handwheels if you attempt to minimize the projection of the all-thread. If you spin them too vigorously, the handwheels will come off the end of the all-thread and drop on the floor, because they are threaded all the way to the rear surface. My wooden handwheels are designed so that that doesn't happen.
Behind the nut that is set in the wheel is about an inch of unthreaded bore, of the same diameter as the all-thread. When the handwheel reaches the end of the all-thread, it is still supported, and does not fall. You should be able to fix the problem with the Benchcrafted vise hardware with an 11/16" diameter O-ring.
My cheap 3/4" diameter hardware is 10 threads per inch (3/4-10 NC), so at the end of the day it takes about twice as many rotations to remove my all-thread from my bench-on-bench than Benchcrafted's 3/4"-5 or -6 TPI Acme thread. It also takes a lot more turns to install it at the beginning of a dovetailing session. There is a fix for that, too. I sawed a slot in the end of the all-thread to fit a large flat-bladed screwdriver bit, and I chuck it in an electric drill. An even better solution is to drill and tap a hole centered in the end of the all-thread and install an Allen head set screw, and use a matching Allen head bit in the electric drill. The bits also work in an egg beater, of course, but that takes two hands out front, so you may drop the nut and the crescent wrench during disassembly. If you don't want to disassemble the whole thing and you have enough clearance between the legs, just take off the wheels and the chop and run the all-thread in until it's flush with the front surface of the rear jaw and stationary nut. But, then you need to figure out where to store the wheels. I found a place on the wall of my shop where I can hang the whole vise, with the handwheels attached, by the all-thread.
If you want to build your own Moxon vise that performs better than mine, and don't mind spending some more money on the hardware, you can buy Acme all-thread and matching acme nuts from suppliers such as Enco, McMaster-Carr, etc.
Matching nuts are on the next page, and 75,000 PSI stainless all-thread on the page after that. I'm more than happy with the way mine works, but maybe that's because I haven't been spoiled by the Benchcrafted hardware. I did polish the all-thread so the nuts don't hang up on any burrs left by the manufacturing or by rough handling in the bins at the Borg. I use 12" long all-thread, which opens to about 7". Benchcrafted once offered 12" long all-thread as well, but have since limited their offering to 8", and they claim their jaws open to only 2", which is sufficient if you limit the vise to cutting dovetails in 4/4 stock, its intended purpose. My rough calculations show it is more like 3". Of course, we don't know the full extent of its applications back in the 18th Century, and we don't know what new uses you may find for it. You get 9 8" shafts out of a 6 foot bar, but only 6 12" shafts.
I probably don't need to mention another difference between original and modern implementations: The original uses wooden threads, while the new ones use iron and steel. Both the handle and the nut of the wooden implementation are fragile, and subject to wood movement. If you add handles, to give you extra purchase (not needed with handwheels), you have two more things to snag and damage the hardware. Of course the new ones can rust, but for a substantial additional investment, you can buy stainless steel hardware. You can purchase new wooden hardware from Lake Erie Toolworks.
Bob Lang at Pop Wood, Craftsman Plans and ReadWatchDo has another approach to the problems we are discussing here. For starters, it is an alternate approach to the I-beam, but also, in its very simplistic (maybe elegant) way addresses most of the problems the bench-on-bench and Moxon vise are designed to solve.
All they need are a few dog holes. When you're not using them, just stack a bunch of them in the corner. When the GIT's come over, they can play with them, and you don't need to worry whether they are drilling holes in them, hammering nails into them, or painting them when you're not watching.
They're also a great way to experiment with bench height for the different uses you might want to put them.
What I have gathered out of this discussion is that the Moxon vise, at best, is the center of a joinery bench system. This became focused (in my mind, at least) by Roger Myers' engineered 'back bench' for work support and work holding. Derek did similar things, and clearly your own efforts are toward making the Moxon part of a larger system.
Roger has 'hived off' his Moxon so that it is a freestanding joinery bench, if I understand his latest photo. Joel's version at 'Tools for Working Wood' has a built-in clamping platform for work support and work holding, directly behind the rear jaw:
What are the options for extending the usefulness of Moxon? Fit the Moxon back bench with a clamping device to hold work horizontally? Precision insert for Moxon, to provide a dead flat jig for sawing tenon shoulders, or dovetail paring surface (as shown by Derek)?
Re: Moxon: Systems Approach to a Meta-bench? *LINK
William Duffield
Wiley,
That's one of the more difficult questions I've tried to answer here. I'n not sure anyone who has designed one of these benches actually took a systems approach to its design. I know I didn't, and I used to be a systems engineer for a few major telecommunications companies, so my design methodology just naturally does that. Maybe, that's why I like Festool so much, because their tools and storage are obviously integrated into a very smoothly working, reliable and efficient system. Of course, Chris Schwarz took the systems analysis approach to Workbenches, From Design and Theory to Construction and Use, but he didn't address the design of another specialized bench that you would attach to your main joinery bench.
I'm still not even sure what to call it, or if all of the ones I've seen and analyzed should even have similar names. I'm not sure even how to categorize the different designs. This has been one major hurdle that has kept me from organizing my thoughts and these designs into a coherent article or series of articles and trying to get it published.
The ones I have seen had their origins in a few very different core ideas, and have had different features and sets of features added, mostly ad hoc, to meet the immediate needs of their designers, builders and users. Some have started with the basic idea of a large hand screw, clamped to the top front corner of the joiner's bench. This is the idea illustrated by Felebien and Moxon, and developed in two different directions: one path led to the face vise, and the other to a vise specifically for holding boards for sawing dovetails. Note that Felebien's illustration, published in 1676, doesn't even indicate that a face vise, leg vise or even a crochet had been developed at that time. It also doesn't indicate whether the vise is to be mounted to the front face of the bench or to its top, and subsequent illustrators may have gotten it wrong. An excellent analysis is presented by Stephen Shepherd in Full Chisel Blog:
The other path to mine may have started as a short saw bench, simply set on top of a low joiner's bench, with a vise and methods for securing it to the joiner's bench added later. One outlier design for a dovetailing bench, by Shannon Rogers, started from the ground up, totally avoiding the idea of securing it to the top of a low joiner's bench. I'll return to this one later. I hope to get to several other specific designs and implementations, with illustrations, before I'm done with this description.
Choosing a name is further complicated by the fact that so far I've seen no convergence in preferred dimensions. There is no conventional wisdom about how high, how long, or how deep it should be, or even the height or constitution of the platform on which it is mounted. That said, I have variously called mine a bench-on-bench, an auxiliary bench (or the Loxahatchee Toolworks proprietary Loxilliary Bench™, a Latta bench, a Moxon bench, or perhaps the best fit for the whole genre, a meta-bench.
The only reason I call Shannon's an outlier is because the "meta-" prefix doesn't fit. For similar reasons, attaching one directly to the top of a set of Noden Adjust-a-bench legs doesn't fit, and I haven't seen one built like that.
Most of the contemporary meta-benches I've seen have either started with the Moxon and gone no further than extending the depth and/or length, or have started with a Latta bench and have not tried to add a Moxon vise to it. Most people who have started with the Moxon have started with Joel's plans, and either added that style of hardware to it, or have added the Benchcrafted hardware. There may be many others out there who have, like me, added the Moxon to the Latta bench, because I've shown mine in several venues in the Mid-Atlantic region, where it has been well received even before I added the Moxon vise. I even passed my original hardware on to another woodworker when I upgraded my handwheels, but my original hardware, with the handles attached to the threaded rod, have been dumped in the bottom of a drawer.
More options and enhancements to come later. Stay tuned.