dovetail box question
Jerry Gibbs
I am making a box with through dovetails. I want to capture the bottom in a dado that is not exposed. Is there as assembly problem or trick at glue-up when you cannot slide the bottom in from the side?
Knowledge You Can Build On — Est. 1998
dovetail box question
Jerry Gibbs
I am making a box with through dovetails. I want to capture the bottom in a dado that is not exposed. Is there as assembly problem or trick at glue-up when you cannot slide the bottom in from the side?

Re: dovetail box question *LINK*
craigd
I recently made four boxes with captive bottoms (plywood glued into slots on all four sides). I actually rabbited the bottom so it was flush with the bottom of the box. I used a Lee Valley box slotting router bit to cut the slots (since they are stopped).
Yes there is a trick (if the slots are stopped): glue the bottoms to the pin boards first, then glue the sides; if no glue, the pin boards need to "attached" (tape?) to the bottom. Otherwise, you can't get the bottom on (well, you can but you won't be happy). A dry fit makes it pretty obvious.
If the bottom is a good fit, it makes glue up easy, as everything is forced into square as it is assembled.
Box-Slotting Bits
raised panel style
Jerry Gibbs
The bottom will be a raised panel of solid wood. It needs to shrink next winter, so gluing is a problem. It will also be loose, so the box will not be self-squaring.
Re: dovetail box question
Derek Cohen (in Perth, Australia)
Hi Jerry
1. Make the stopped groove (a "dado" runs across the grain  ) by first drilling a hole at each end then chisel and router plane away the waste ...
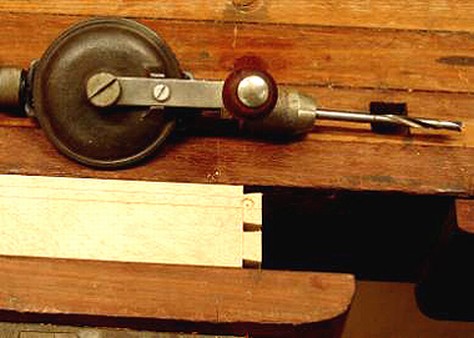

2. Fit three sides together, slide in the base panel, and then connect the fourth side - just ensure that the fourth side (it will have tail ends) can be slipped on without adjusting the other sides!
Regards from Perth
Derek
Re: dovetail box question
Don Stephan
One response to a similar question a year or two ago suggested making through dadoes on all four pieces and then gluing filler plugs to "stop" the dadoes.
On smaller projects one could temporarily clamp the sides of the box together, make a groove with a router rabbeting bit, then unclamp and extend the ends of the grooves with chisel and mallet.
Finish the bottom before assembly
Bill Houghton, Sebastopol, CA
In fact, a lot of folks recommend finishing as much of the inside as you can, using painter's tape to mask off areas where you don't want finish. But it would be particularly important for the bottom, so that the finish resists the glue. You might even, once you've done the finishing, wax the edges of the bottom near where the glue might touch, as a further resist.
Re: dovetail box question
cstanford
It's actually easier just to make the box with half-blind dovetails and run the bottom groove in the lower tail. The short end boards are the tail boards, side boards are the pin boards of course.
Re: dovetail box question
Joe shelton
This looks to me like the right answer.
Joe
Agree with basic approach,
Wiley Horne--So. Calif.
even if you decide to use half blinds as Charles suggests so you can plough the grooves straight through.
There is a tradeoff between leaving expansion room in the grooves, versus your desire that the bottom not become exposed at the edge. For example, if your grooves are 3/16" all around, you might say you have X + 3/8" total room in one dimension and Y + 3/8" in the other. If you size your bottom to be X + 1/4" by Y + 1/4", then there is 1/8" expansion room in each dimension, but also if the bottom slides all the way into a corner, you still have 1/16" cover on the sides away from that corner. And likewise, there is some forgiveness if the bottom shrinks in dry weather.
Nice going on getting to the finish line!
Wiley
Re: dovetail box question
Sgian Dubh
You might consider mitring the corners to hide box bottom groove. Raise the first half pin socket 2- 3 mm above the groove. It's a standard methodology commonly used where through dovetails are employed. The image below indicates the general appearance of the mitre, pins, and tails. Slainte.

Expansion/contraction of bottom
Patrick Gibbons
It has been my experience that with something as small as a box that the bottom does not have enough seasonal movement to require a large gap in the grooves. A slightly-loose-fitting bottom is generally enough. I have glued plywood bottoms with no problems.
Re: Expansion/contraction of bottom
Charles Stanford
Yep, this time of year I'd probably put a bottom in that went all the way groove to groove. It'll be rattling by December.
Regional differences
Bill Houghton, Sebastopol, CA
For those new to this stuff: there are differences around the country in when wood expands/contracts seasonally. Almost all of the literature, and much of the online commentary, assumes that what's true in the Midwest and snowy East Coast is true everywhere: wood expands in the humid summer and shrinks in the dry winter.
On California's North Coast, and no doubt in other areas of similar climate, summer humidity is low, but winter is damp. Wood, if it's going to shrink, will do it in the summer; and it will pick up moisture and expand in the winter.
It's important to know what the seasonal patterns are in your area when deciding whether to fit panels and other such pieces tight or loose. Don't automatically trust the literature, unless you live near the author.


