What are you working on....
Bill Tindall
Time for our twice a month feature. I am working on installing molding and if I don't screw it up tomorrow I will post the result.
Est. 1998 — 27 years of woodworking knowledge
What are you working on....
Bill Tindall
Time for our twice a month feature. I am working on installing molding and if I don't screw it up tomorrow I will post the result.
Re: What are you working on....
Bill Houghton, Sebastopol, CA
Trimming out some of the exterior trim on our remodel. My son talked me into putting, on the wooden chimney, the 11" wide (12" nominal, actually 11-1/4") frieze boards that the original part of the house has. Around the post-war additions, the frieze boards tend much narrower.
Mitering 11" wide boards to fit a structure that has but a vague resemblance to straight and square has sure been fun. I finally gave up on measurement, and am temporarily installing the boards, marking them, then laying out the cuts from these marks. And I'm still having to re-cut stuff sometimes (probably the incompetence of the layout).
Hand tool content: oh, yes. No way could I be doing these kind of oddball cuts on a power saw. My old Disston crosscut saw ($2 at a yard sale) has been serving me well, as has the Workmate on which I'm clamping the boards.
I've been reminded of some of my lessons over the years, such as cutting on two lines. I'm laying out the cuts on both faces and both edges of the board, and cutting into the show face, so that, if my cut goes astray, it'll be buried inside the miter. And I'm cutting on two lines, along the show face and along one edge, to establish a kerf that, so far, is pretty accurately on the lines.
I will try to post some pics; but am running too fast to take in-progress pics, as I'm trying to get this remodel dried in before my wife's surgery next week.
Re: What are you working on....
Howard Pollack
A dovetailed box in hardwood. An exercise in cutting flawless dovetails and fixing the errors... Howard

Mitre planes
craigd
Still in the mitre plane groove. The back one is a mitre and the front one is a block with a "arts and crafts" hammered texture. What is unusual about these is they are tool-less adjustable: insert the wedge with hand pressure, adjust the blade, lightly tight the screw and your good to go. There is a lever cap buried in the wedge that operates independently of the wedge. It really works well.
Re: What are you working on....
Bruce, a MN Galoot
I just finished a picture frame for the better half of my household. All dimensioning work consumed electrons, but miters and all detail work were done by hand. I just can't extol the virtues of my relatively new-to-me MF Acme Langdon miter box enough. While the miter saw blade needs some tweaking, that saw produces amazingly accurate cuts. I also have to crow about my block plane, the snazzy LV version. It gets put to every single use there is, including being pressed into duty as a make-do miter plane in conjunction with a shuting board.
The saw cuts show me that my sharpening skills need some honing, too.
WOW! Mighty nice work, there, Craig!
Bruce, a MN Galoot
Sometime you're going to have to post how you go about this. Those are really nice.
Re: Mitre planes
Derek Cohen (in Perth, Australia)
Hi Craig
Your mitre plane is absolutely stunning! Please give us a run down how you textured the cheeks. Very gothic. The wedge/screw is something that Terry Gordon also does on some of his planes and spokeshaves.
Regards from Perth
Derek
Re: WOW! Mighty nice work, there, Craig!
craigd
In process! These two planes are being built to provide the photos documenting the process.
LV block
Jack Guzman from Maine
I've been looking at those for a long time.If I had a store nearby I would have bought one by now on impulse. However,I just can't justify the purchase. My stanley 65 and 18 have been all I've ever needed.---Jack
Re: Mitre planes *pic*
craigd
Thanks!
The texture was done with two different size ball pien hammers to give different size craters. I blued the sides and used steel wool to lighten the tops to high lite the pattern. I was attempting to mimic Arts and Crafts style hardware.
I'm pretty this wedge system is different from Terry's (it looks like he uses the wedge as a lever cap). I'm using the wedge as a wedge and have placed a steel lever inside the wedge to press the cutting edge against bed (I'm using old not-so-nice blades).
furry tabletop
Jack Guzman from Maine
Just finished a bowback windsor and ready to start on the next chair but meanwhile I have a table to refinish. This piece sat for years in a dusty space. The dust has formed into furry clumps all over the surface. I tried murphy's oil soap,mineral spirits and alcohol. Nothing seems to loosen this stuff's grip on the finish. My next step will be stripper.I just wanted to try to preserve some of the stain if possible. It can't all be fun.---Jack
Re: LV block
Bruce, a MN Galoot
Mine was a gift for a milestone birthday. Otherwise, no...
The 60.5 that I've used for 50 years has been pretty good, but the LV is darn near a mini smoother.

Re: Picture frames
Moses Yoder
I use mostly power tools to make frames for my wife's cross stitch but they could just as well be made entirely with hand tools, it would just take longer. The piece we just entered in the county fair had a judges choice award on it when we checked to see how it did yesterday. Of course the frame is only 25% of the overall, but it helps I think 
Blanket Chest
Ron in Sterling, CT
I finished the construction of a blanket chest for my son this past week, and completed the staining this weekend. Now just have to put on the top coats. Pictures to follow when completed.
Ron
on the topic of pictures
Bill Tindall
I find in progress pictures as much interest as a shot of the final product, especially when the in progress pictures show construction details.
Re: Mitre planes
Bruce Mack
I'm finishing a home for a cat friend who adopted the staff and visitors to a nearby historic house. It's my 4th feral shelter. Wind baffles, tile flooring, fiberglas insulation and folding roof with rubber gasket. With a heated water bowl and nearby dry/wet food replenished frequently, the little guy should have a cozy Minnesota winter 
Whoops, meant to post it under the main heading. No miter planes were hurt in the making of this shelter.
adding the molding
Bill Tindall
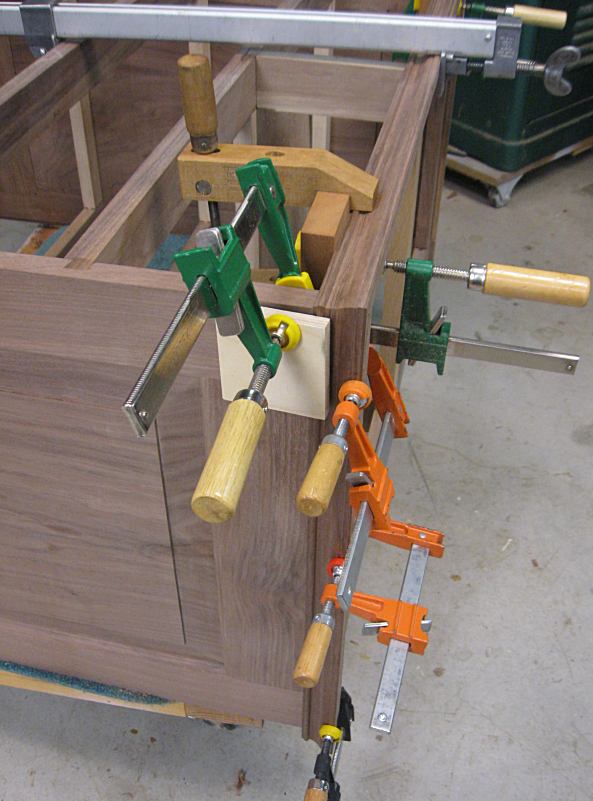
I have an embarrassment of clamps but they all get used for one task or another. In an ideal world flat straight molding would perfectly lay upon flat case side. When the world is less perfect clamps make it so.
I this case I clamp the front molding in position and nibble away at the side molding till it fits perfect. Then I drive three brads along the case side and cut the heads off to leave a 1/8" projection which becomes my locating "dowel", to borrow a trick from machine shop practice. Once these brads are pressed into the molding back they reliably and reproducibly locate and keep from moving the molding piece while it is permanently bradded and glued into place.
When it comes to installing parts that show reliable trumps speed in my shop. Others with more confidence may employ faster means.
Misapplying paint to my Anarchist's
Chuck Nickerson
toolchest. Finishing is always a bear for me.
I need this thing done and filled with tools.
Fantastic work, as always
Re: Writing a Report, Cursing a Kitchen Job
William Duffield
Yesterday, I attended a SAPFM Delaware Valley Chapter meeting at the Allentown Woodcraft store. It was a two hour drive, each way. It was my job to take pictures, take notes, heckle the presenter and write a meeting report for the SAPFM Forum. Although Steve Latta was giving the presentation, I'm afraid that none of my notes and pictures should end up here, because Steve was demonstrating joinery techniques for the table saw. I will need to modify some of my jigs, appliances, and techniques to incorporate the refinements Steve demonstrated. At least there is no impetus to replace my table saw, which is the same as the one in the classroom at the store and the same as most of the ones Steve uses at Thaddeus Stevens, where he teaches cabinetmaking.
Speaking of appliances, I'm also building a panel for a dishwasher door. The old panel doesn't fit the new dishwasher  . The client's kitchen is in the "primitive dairy barn" style, constructed completely from reclaimed SYP barn siding about 40 years ago. The client had no more of the siding, as his old barn had a huge tree convert it to splinters in a tornado a few years ago . Luckily, the building that is now my shop, which was built around the turn of the century, was also constructed from salvaged parts of an older building. During the conversion from garage to shop, I needed more headroom over the bench area, and removed some of the ceiling and saved it. The attic floorboards had been barn siding, with the weathered side down. They're full of splits, checks, knots, nail holes (from both round and square heads), cupped, twisted, and covered with dirt and spider detritus, etc. , in other words, perfect for this application
  . Of course, nothing in the kitchen cabinets is square , the plumber who "installed" the dishwasher was a hacker , and the engineers who designed the Bosch dishwasher had nary a care for ease of installation . Getting the finish to match was relatively easy, since every door and drawer front and face frame was a different shade. A lot of medium brown and red brown TransTint dye followed by dark walnut Watco matched at least some of the doors perfectly and most of them closely. The only things left to do are to install some threaded inserts in the back of the panel for the hanging bolts, complete the fitting of the panel and apply Watco to the surrounding face frame (that I needed to make square) and to the flooring. The template for hardware location was not to scale , the hardware they provided was grossly inadequate , and Bosch has different ideas about the structure and placement of the toe kick . I think the client also wants me to plug an old utility hole in the floor that now shows in front of the toe kick. The client bought this particular dishwasher because the controls are in the top of the door, and therefore the dishwasher is totally invisible when installed, and because it is very quiet (maybe it's not doing much washing ).
And, by the way, a useful tool
Bill Houghton, Sebastopol, CA
More hand tool content: some years back, I picked up a Stanley miter square* at an estate sale. At the time, it was an "oooh, shiny pretty!" buy. But I've found it dynamite for the kinds of work I do. You can get to the same place with an adjustable bevel, set to its "t" configuration, and then angled at 45 degrees; but the fixed nature of this tool makes it handy. And it's way better than the 45 degree side of a combination square; longer baseline on the stock, and the beam running in both directions means you can draw your 45 whichever way you need to.
Picture of a similar square below; but mine's got a cast iron stock.
*This term has amused me since I first read it in an introduction to tools book. Sounds like "crooked straight line." But it's the standard term.
My, Sir William...
Bill Houghton, Sebastopol, CA
...you're having a time with the  faces and the
  faces, aren't you?
Sounds like interesting work.
Re: My, Sir William...
William Duffield
I really like the clients a lot. They've been friends of ours for many years, and they really appreciate the work I do for them, but I think they like their rustic kitchen decor just a little too much, and it's just a little frustrating to make stuff that matches, when if I had to do more, I'd rather be making kitchens like this one.


We did this one ten years ago. Only part of the cabinetry is my work. Someone else did the granite, and someone else did the cornice, which had not been carved, antiqued and installed yet in these photos. Note the over-the-top fluted quarter columns and ogee bracket feet.
Re: What are you working on....
rononkokomo
Glued up taboret today. Cut a 26 inch transitional down to 16 in and put a 10 in radius camber on the iron. Going to audition it as fore plane. Honed a couple of paring chiels to 20 deg.
Some pics of the chest
Ron in Sterling, CT
Here is a pic of the chest during construction. Dovetails are hand cut.

And here is a pic of the completed chest awaiting final sanding and finishing.

Ron