Re: Better pic
craigd
As it used to work and now doesn't, I have no idea but I'd throw a washer under the swivel (between the blade) so the screw doesn't bottom out and see what happens.
Knowledge You Can Build On — Est. 1998

Re: Better pic
craigd
As it used to work and now doesn't, I have no idea but I'd throw a washer under the swivel (between the blade) so the screw doesn't bottom out and see what happens.
Chipbreaker is too high on the blade
Steve Elliott
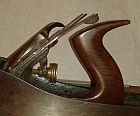
I think GolfSteve has it right, the chipbreaker is set too far up the blade. The chipbreaker screw should be further down under the lever cap, not right under the screw. With the chipbreaker too far back, the front of the lever cap pivots down too far, causing the lever cap screw to seem too short to tighten the blade.
That makes sense as well.
Derek Cohen (in Perth, Australia)
Revisiting the pictures of my Spier, the lever cap screw makes contact higher upthe chipbreaker.

So Ron, is the levercap screw actually resting on the chipbreaker at all?
Regards from Perth
Derek
(Message Deleted by Poster)
Solution
roninkokomo
I put a nut from a 3/8 in bolt immediately under the end of the screw and everything snugs up perfectly and my beloved smoother is taking gossamer shavings in cherry that I can read thru. I am still puzzled
Ron. Who is going to start on an Arts and Crafts chair side table in cherry tomorrow.
Thanks for all the input
Re: Solution
Derek Cohen (in Perth, Australia)
Hi Ron
Here is your image (your address was mangled, hence it would not show up) ...

The issue remains the same as before. All you have done is effectively lengthened the screw so that the end of the lever cap connects the chipbreaker. This is not a solution. I still think that the end of the chipbreaker is where the problem lies. Find another one and try it out as is, or bend it to increase its height.
Regards from Perth
Derek
Re: No play at all
bridger
look closely at the CB. you'll see the ghost imprint of where the screw used to land. move the CB down on the blade until it lands there again.

another thought
Jack Guzman from Maine
Ron,
Everything else being the same as before when it fit,is it possible that the infill has shifted back a tiny bit? Not having ever seen one of those close up it's a wild guess.---Jack
Re: Solution
roninkokomo
Derek,
I have the chip breaker down to within a sixteenth of the cutting edge. Are you suggesting that I need more curl in the end of the chip breaker? If so, how do I do that? And why did that become an issue while the plane was sitting on a shelf not being used?
Ron
Re: another thought
roninkokomo
Jack.
I see no sign of any movement. This is really a puzzler
Ron
Re: another thought
Bruce, a MN Galoot
Ron, as I've been following along, it occurred to me that maybe some parts, mostly the blade and cap iron assembly, got swapped without your remembering it. Did you rob Peter some place along the line?
Nope
Tried that no joy
Re: Let us try this
Kees
The screw resting on the chipbreaker nut just looks totally wrong. How can you adjust the iron like that or use different chipbrealer settings? Are you sure this chipbreaker belongs in this plane?
Re: Let us try this
TomD
And further, the makers name is shielded by the screw assembly. All these parts are parts that do not change their length or position due to wear etc... Yet, they are the parts that if they were changed would produce the problems we now see.


