We value your privacy.
We use cookies to enhance your browsing experience, analyse site traffic, and personalise content.
By clicking “Accept all”, you consent to our use of cookies. You can also choose
“Essential only” or learn more.
In response to Bill Tindall's "Building Anything?" question a week or so ago, I posted a few photos of some new handwheels I was turning for my Moxon vise. (see link for description and photos).
Today, I finally finished them, and replaced the old maple wheels. The new wheels perform as much better as I had hoped, and then some.
Here is one wheel of a matched pair, bloodwood, 5" diameter, sanded to 220 grit, scraped with card scrapers, and finished with walnut oil applied with a grey ScotchBrite pad. Turning and finishing the bloodwood is a bit of a challenge. You have to take very light cuts and sharpen your gouges several times per wheel, even if they are CPM-V3. The long, wispy red shavings from the gouges are now stuck in every spiderweb in the shop. I also went through a stack of card scrapers.
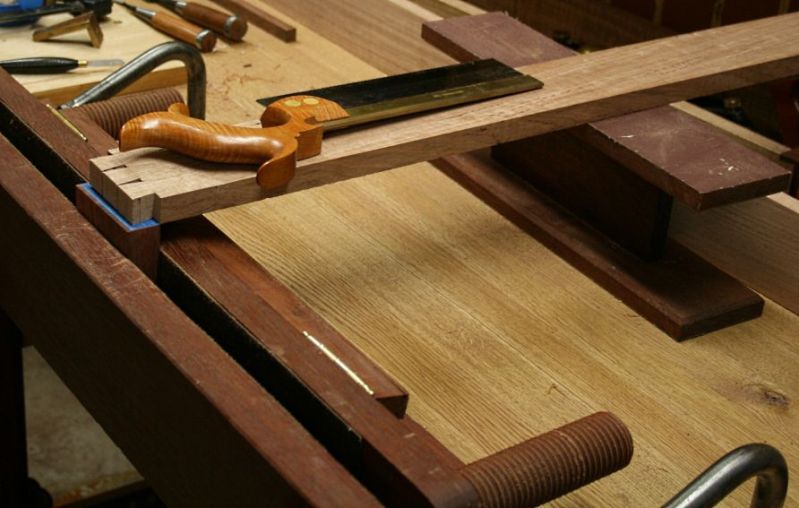
The next steps are to saw some tails and pins and take some photos to show just how well the Moxon vise/Loxiliary bench combination works, and figure out what to do with the old handwheels and the mounting hardware kit that goes with them.
…and write up a description of the construction and assembly of the vise itself. I already have photos that I will post with the description.
Those wheels, especially in the context of the wood contrast, look amazing. I wish that I could turn like that!
I look forward to hearing about your experience with this design. In my mind there is an issue with the chop lying in the same plane as the bench. When transfering marks from tails to pins you are at risk of scoring the chop. The top of the chop is a useful rest when paring on the horizontail, such as the floors of half-blind pins. This advice is aimed at those who bevel the top edge to create a platform for sawing. Just lift the work instead.
My recommendation is to use a spacer to lift the workpiece when setting the height of the board that is clamped in the chop, and when transfering marks to the pin board.
My aplogies if this appears as a criticism. It is not one of your work, but of the design, which is used by many others. This may inspire some discussion in this regard.
No apologies needed! Critiques of anything I do are always encouraged. Only by critically analyzing our designs and our implementations of them do we improve upon them.
I've read your referenced article, and have thought long and hard about it. It is reasoned, well written, well illustrated, and inspirational. I think I've got most of a solution to the very real problems you describe, but I was hoping to wait to comment until I could set up, mark and chop some half blind and through dovetails on the vise, and prove to myself that my idea really works well enough to promote it with photos and a process description.
You've let the cat out of the bag, so in the meantime, I'll let everyone here think about it, with the caveat that I'm not yet convinced mine is a complete or even a good solution to all the problems you have addressed. First, the holes in the chop for the vise hardware are offset vertically. Simply flipping the vise chop over drops its top surface by about the width of a large shoulder plane. Of course, using a hand plane on its side (in place of your ingenious flip-up support hinged to your bench-on-bench) is the classic solution to the problem. It would be easy to saw a bit more off the chop if I decided I needed a higher step. I wouldn't be able to use a permanently attached flip-up stop on mine, because I use it for more than dovetailing, I need to be able to transport it, and it is ambidextrous, so it can be used from the back side by right-handed woodworkers, simply by attaching the Moxon vise to the other side.
Note that my solution is really only practical with fixed screw threads and loose hand wheels. You have to be able to spin each hand wheel off with a twist of the wrist and catch it in one hand while the all-thread continues to support the chop, then set the hand wheels down, flip the chop over, place the hand wheels back on the ends of the all-thread and spin them down tight. It takes less time to do it than to read the description. Another feature of my design, that the threaded nut doesn't go all the way through the wheel, allows me to spin them off with little risk of dropping a wheel (or the chop) on the floor, because the wheel still has an inch of support when the threads are disengaged. (See sketch on yellow pad in previous thread, which I need to update with the dimensions of the new wheels.) I don't think the Benchcrafted Moxon handwheels have this feature.
I also have the option to chamfer one corner of the chop if I decide I need clearance for sawing out half blind sockets. I have four corners to work with, and will still have one flat, square surface for paring as you demonstrate in your photo.
The next issue is the rear support for long boards. For short pin boards and tail boards, the top of the Loxiliary Bench on Bench is wide enough to support small boxes and most drawer components using just a holdfast, but I am afraid I will need to build an I-beam to support the far end of boards the length of a blanket chest or carcass component, and it will need to be significantly larger than yours, because my bench is taller, and that results in storage issues when it is not supporting dovetailing. If I can figure out other uses for it, all the better. Maybe it needs some dog holes and a tool tray. I'll build mine from 4/4 poplar, not from a hunk of steel I-beam, like yours.
I'll have some better ideas after I've had some more experience with it. The first project planned using it for dovetailing will be a box to store a pair of Veritas joinery planes, blades and accessories, but that is far from an "acid test," especially since the box will have through dovetails. Next on the list is dovetails in stock thicker than the chop offset, which will also be interesting, but I'm not far enough along in that design to have decided whether to do through or half blind dovetails, and one of the boards may end up longer than the height of the Loxiliary bench.
All sizes are nominal, and can be adjusted based on the dimensions of the available stock. These dimensions assume 8/4 (nominally 2" thick) stock, 5" x 5" square. The finished sizes of the pair of wheels I actually manufactured were 4-7/8" ø x 1-15/16" high.
This thread is a great illustration of the value of this place. Thanks Guys, for being willing to share what you have learned. Makes the road a little easier for the rest of us.
That is a very curious etching. I seem to remember another etching showing the Moxon vise hanging on the wall when not in use, which of course implies that it is removable when not in use. (I'm not sure about this, for example the device hanging next to the door in Roubo's Plate 11 is not clear enough to make out what it is.) Moxon's description describes attachment to either the top of the bench or the front of the bench. When attached to the top, the reasonable position would be with the front face of the rear chop aligned with the front of the bench top, and I think that's what he is saying. The position shown, however, raises some issues: What is the method of attachment? It seems that a single holdfast in the front of the leg and holding the rear jaw would let the left side of the vise too easily drop and would not permit the jaws to close on narrow stock. And, where do the ends of the screws go? Are holes drilled in the front of the bench to provide clearance? If it were permanently attached where Moxon shows it, it would be at the wrong end of the bench for a right-handed joyner (and I assume all joyners were forced to be right handed in Moxon's era). Of course it could not be attached at the left end of the bench, since the crochet (rather blurry in the etching, but there) would interfere. Positioning it nearer the center of the bench allows you room for a stack of stock to one side and your tools: dovetail saw, mallet, marking gauges, chisels, coping saw, coffee cup, etc. to the other side.
There are other issues with attaching it to the front of the bench. This position doesn't provide the ergonomic advantage of decreasing or eliminating the need to stoop to effectively saw to a pair of lines on the front and top of the work. Since there is no support for the bottom of the stock being sawn, the board has a greater tendency to vibrate, especially if extended well above the top of the vise, and this can have an adverse effect on the sawing.
Personally, I find the height of the traditional Moxon vise on top of a traditional joiner's bench to be too low to relieve my back pain. I find that attaching it to the front of an auxiliary bench of Steve Latta's design (on which mine is based) which raises the top surface to near elbow height, to be much more comfortable.
Those wheels, especially in the context of the wood contrast, look amazing. I wish that I could turn like that!
It was completely a case of "form follows function." I chose the bloodwood first for its density. Other than some lignum vitae, which wasn't wide enough and is prohibitively expensive, it's the densest wood I had in the shop, or could find regionally. Second, I have an 8/4 board in this species, which is wide enough to implement the design that I knew worked from using the hard maple wheels. Another advantage of the bloodwood is that it takes a very good polish, which is essential if you are going to spin it up and slow it down with your fingers. You don't want a wood that is going to splinter. Hard maple and dogwood are the other two species that I have in stock that best meet this requirement, but my seasoned dogwood is too small. I also need something that is going to keep its circularity over time, so it must be both stable and well seasoned to start with. A species I have in stock that meets the thickness requirements and comes close in density is purpleheart, but it utterly fails in the splinter department, and it moves a lot. The color, figure, and colorfastness are just icing on the cake. If the æsthetics had been important, I would have taken a lot more care in setting the nuts.
I'm not so I'm all that good at turning. I know I'm not particularly fast at it. But it is, let's say, therapeutic, especially when I'm having trouble concentrating on more complicated tasks. Most of the turners I know wouldn't put up with turning something with the properties of seasoned bloodwood, because the gratification of a finished product takes so much more time and effort than turning green wood or more cooperative species.
This is an example of the gossamer bloodwood shavings that come off my gouges. I am ecstatic when I get shavings this thin from my planes, but not when I'm trying to hog off material at the lathe, and the oily tropicals stick to everything.
This plate from Felibien may be what you are thinking of.
I find the height of the traditional Moxon vise on top of a traditional joiner's bench to be too low to relieve my back pain.
You may be using a different posture than I, Bill. I use an upright posture when cutting dovetails. I stand straight and saw at about waist level. I see many guys lean way over, some with the saw rather near their cheek, which would be hard on the back and kind of cramped for the arm as well. Here is a video of Chris Schwarz showing a posture that I think is quite common today.
Searching for Félibien, Google found this very pertinent thread, along with better pictures and analysis. In case you've forgotten, the whole thread is well worth reading.



 I'll build mine from 4/4 poplar, not from a hunk of steel I-beam, like yours.


