New WoodChat!
Home Articles Forums Gallery Marketplace Videos

WoodCentral Forums

Knowledge You Can Build On — Est. 1998

THE WOODRAT IS BACK!

japanese plane making

Posts

japanese plane making

#1

Bob

japanese plane making

bob

I know there are seminars in Calif. on making Japanese planes (Dai)and a collection of photos on the Daiku Dojo web site but are there any DVD's or books which explain the technique to make the plane body. I have seen the you tube video but the explanation is fairly limited.

Also. what is the title of the Inamoto book on Japanese Tools? Is it "Japanese Tools"?

Thanks,

Bob

Re: japanese plane making

#2

Re: japanese plane making

Howard Pollack

Japan Woodworker has a 2-3 page diagram/description of how to do that. It costs very little. -Howard

Re: japanese plane making

#3

Moses Yoder

Re: japanese plane making

Moses Yoder

How can you put the accumulated knowledge of thousands of years in 2-3 pages? Just wondering.

Re: japanese plane making

#4

Re: japanese plane making

Howard Pollack

You can't, but you can make a dai that works. -Howard

Re: japanese plane making

#5

Re: japanese plane making

wilbur

I think you're thinking of Toshio Odate's book, "Japanese Woodworking Tools: Their Tradition, Spirit, and Use". In it, he has a good description of how to make a dai for a Japanese plane.

This is a project I'll be trying myself for the first time soon. But having rehabbed and fitted a number of blades to bodies, I think the actual skill needed to achieve a good fit between the two is on the same order as fitting a mortise and tenon joint, except that you have to do all the work on the mortise. Meaning that I'm sure anyone here can do it.

Re: japanese plane making

#6

Bob

Re: japanese plane making

bob

You are correct, this is the book I was thinking about and thanks for your help.

Bob

Re: japanese plane making

#7

Re: japanese plane making

Pam Niedermayer - Austin, TX

Yes, anyone here can do it, assuming a few basic tools and some Kashi (Japanese white oak) or Hon Red Oak or Live Oak. It certainly helps to know how the layout will go.

Bob, I learned from Inomoto-san at Harrelson's (Hiraide) about 9 years ago, and would not have wanted to stumble through on my own; so I'd recommend attending an Inomoto-san session, it only takes a couple of days. Please tell him Pam-san said hello.

I also think Jay van Arsdale is a very good teacher who has great classes at Lanier Community College.

Pam

Re: japanese plane making

#8

Re: japanese plane making

TomD

I did the same course but I made my first plane in that style about 1980. I certainly picked up a lot from the seminar, but making mortised planes is relatively simple, and mostly the hold back for me was just that it didn't seem as predictable as resaw methods. In fact if you don't want to mortise a Japanese plane, they can be made by resawing wood or assembling it also. These days though I would groan if I had to do a resaw and glue plane, though I can knock one out in 45 minutes. Mortised planes are even faster, at least the rough out is.

The most useful trick I learned from the seminar, and I don't normally think of myself as this stupid, was that the way you get the angles correct is by laying them out, and then cutting them from both ends, mouth, and top of ramp. It is sorta the way you would make the end of a 2x2 square to the sides if you had to do it with a chisel. First you overcut it like one of those square bungalows with a hip roof, then you pare the peak off. In this case you overcut the ramp from both sides and then pare it flat.

There is an elegance to the real way in which the plane is laid out, but it is also pretty intuitive. You basically have to use the blade itself to lay out from a line drawn at you primary angle. So if the plane is to be 40 degrees draw that line on there, then hold the blade under that line and sketch the blade taper and bevel below the main line starting about a third up the line. you want the initial fit to be well short of the mouth. The final fit will be reached by blueprinting the blade to the plane. Other than that, if you have a decent tuning article, you should be able to get the job done.

Don't get too carried away with the details first time out, if they seem likely to elude you. These planes work great, and are very robust designs. Minor errors, will not ruin the plane. I even made a Clark and Williams jack plane Japanese style, and it works great, and if I did it again, I would change a few things, live and learn.

By the way Larry William's video on making molding planes is excellent, and helps a lot with basic strategy and the work itself. Part of the whole hand tool thing is seeing someone do it in a way that really reduces the whole thing to some pretty straight forward steps.

Re: japanese plane making

#9

Re: japanese plane making

Pam Niedermayer - Austin, TX

There were several things non-obvious to me: 1) making sure to accommodate the back of the blade's concavity; 2) shaping the sole; 3) laying out the lines (real important when starting the bottom of the mouth); 4) that the right woods were kashi and hon red; 5) that I really needed a 2-lb hammer; 6) what a landing was and how to build it and why I might not want to; and 7) how to tune it, what with all the hits from back and front. Of course, that class we took was my introduction to plane making.

Pam

Re: japanese plane making

#10

Re: japanese plane making

TomD

The bevel side of the blade's concavity didn't come up for me during my early efforts since if one uses ink transfer it happens naturally. I have often wondered why they make the bevel side concave. I have heard a few explanations and none of them make sense. It finally hit me that if the back of the blade was concave like that, it made it much easier to pare the bed with a chisel, since one is always removing a thin facet at a given radial point. I have seen articles where Chinese makers were using floats to make their planes, but I have yet to see such a tool in the Japanese repertoire, though it may exist. I guess it would still be easier to work a curved surface with a float. Just a thought.

Re: japanese plane making

#11

Re: japanese plane making

Pam Niedermayer - Austin, TX

I doubt the concavity is because of dai making convenience, but certainly don't know why it is, most likely something to do with forging and strength. That said, I sure love every opportunity to use the Tasai ultra thin push chisel.

How exactly did you use an ink transfer process in dai making?

Pam

Re: japanese plane making

#12

Distinction Between Western & Japanese Planes

Tom Colligan

Pam, I remember your 'report' on Badger Pond after you to Inomoto-san's class.

Would anyone distinquish between the two styles of planes? What's so unique about Japanese planes?

I've make a Krenov style laminated plane and also have Jay Van Arsdale's DVD released about 18 months ago. I just don't pick up one the advantage of the one style over the other. Could anyone shed some light? Tia, Tom.

Re: japanese plane making

#13

Bob

Re: japanese plane making

bob

My first attempt:

I forged a tapered blade (not concave) and used a piece of oak to make a small plane(Kanna). I just had the photos from Jay Van Arsdale's site to guide me.The roughing out was very quick and if I was a little better making the ramp for the blade ears to fit into, it would not have taken an hour. I did not blueprint the blade ( is that done with layout die to see marks where the fit is tight?) but the fit is very tight and the blade generally extends square to the sides or may be a little skewed but a few taps take care of that.It does not need a wedge to stay in position which is good because I dont understand the chip breaker layout.

I got the bottom dead flat and then scraped a little from the area behind the blade and just behind the front edge to just in front of the blade.I had touble with the chips jamming in the corners until I ground the corners of the blade back. I did a lot of fiddling and the plane is useable but nowhere near what I hoped or want.

Based on your descripption,I did not lay out the angles correctly. I marked a 45 deg line and then placed the blade on the top of the line and laid out the line which established the width of the mouth.

I am sure that was not the only issue but I think I am pleased with my first attempt. I would appreciate any other advice anyone can give to tune up some more.It seeems I either take a full width chip that is too thick and sometimes jams. When I tap the balde back for thinner cuts, I dont get a full shaving.That implies an edge out of square but I was very careful with the grind so I dont know what else I can do. It also takes me many taps to get the correct adjustment. Either too much blade or too little or many taps that dont move the blade.The tapping can be frustrating.

The work is fun but frustrating because I am guessing at what is right/wrong.

I would love to attend a seminar but I am in Wi.I have not even seen an actual Japanese plane,yet(excluding my attempt).

I did actually make a practice piece first and I made the grooves that hold the blade a little loose so I needed a wedge. I just fashioned a woodwedge and drilled a pin because I dont understand the chipbreaker set up that is now used on Kanna. I really struggled with getting the chips to clear on the practice piece until I shortened the throat by increasing the throat angle and then opening the throat more to accomodate chips.

The Van Arsdale tape would be helpful but it sems to be more about tuning than making a plane. Is there a plane making DVD someone can recommend.

Thanks,

Bob

Re: japanese plane making

#14

Re: Distinction Between Western & Japanese Planes

wilbur

The main differences between a Krenov style plane and a Japanese plane are:

1. The blade of a Japanese plane is tapered from back to front, and is made with a laminated construction of a very hard layer of steel backed by a softer layer. Blades made for Krenov planes typically are not laminated or tapered (see Ron Hock's Krenov plane blades, for example), although you could certainly repurpose an older western laminated plane blade that you might find in a wooden plane for this purpose.

2. The plane blade in a Krenov plane is held in by the wooden wedge. In a Japanese plane, the blade is held in by side mortises that match the wedge shape. There is a chipbreaker in many Japanese planes that sits in the same spot as a wedge would in a Krenov plane, but the blade does not rely on the chipbreaker to hold it in place. You could take out the chipbreaker and the blade would not come out.

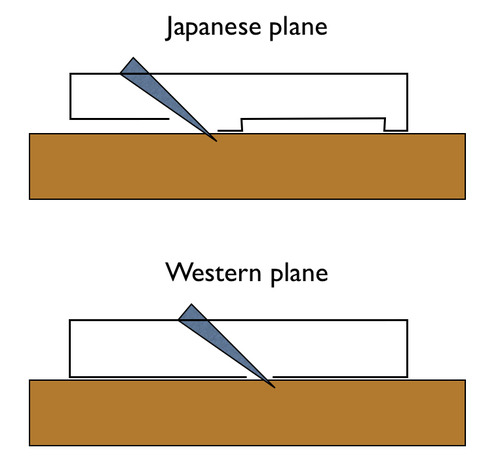
3. Sole configuration: a Krenov plane has a flat sole. A Japanese plane has a very shallow hollow in the sole, so that the very front of the plane and a small area in front of the mouth are the only parts of the sole that touch the board. Here's a schematic diagram that hopefully will make this more clear. The hollow in the Japanese plane diagram is exaggerated, and in practice is on the order of 1/64" deep or less.


As far as advantages? I love using Japanese planes. Having said that, I don't think that the advantages of Japanese planes over a Krenov style plane are huge. Ergonomically, the pull stroke is easier in some ways. The thickness of a Japanese plane blade makes it really easy to sharpen without relying on jigs. Both types of planes can leave an excellent surface.

Re: japanese plane making

#15

Re: japanese plane making *LINK*

wilbur

I don't know of any Japanese plane making DVDs. But from your description, you seem to be on the right track for the most part.

How far down can you push the blade into your plane body before you have to start hammering it to advance it? I set up my planes so that hand pressure can get the blade to within 1/16-1/8" of the mouth.

I also did a writeup on tuning and setting up a Japanese plane. That may help.


Setting up a Japanese plane

Re: japanese plane making

#16

Re: japanese plane making

TomD

I don't think you can prove it, in part because it seems that they don't specialize in those descriptions. There is nothing about blacksmithing that would lead to a concavity like that, even casting would put it in 3d, rather than 2d. I assume it is ground in. most of the visible surfaces are ground. It does function to make fitting by chisel much easier, so why would that not be the purpose?

Ink is used to fit the blade to the ramp. The teacher used pencil, but remarked he normally used ink. Ink is just a big mess with a bunch of beginers. And pencil worked pretty well. I have since also tried dry erase markers.

Re: japanese plane making

#17

Re: Distinction Between Western & Japanese Planes

TomD

1) Blades. These are better, I have yet to read even a biased anti Japanese tools, or stupidly inaccurate review of blades that didn't come to the conclusion Japanese blades are better. But I would set this aside, because Japanese planes don't depend on their blades exclusively, you can put those blades in western planes as people have been doing for at least 30 years.

2) Pull stroke, this is major. In fact, pulling or pushing is only part of it, what contributes to plane performance is that the major power in a Japanese plane comes from the infeed side, and on western planes it is generally from the outfeed side. An exception might be something like a cornice molding plane that uses a rope tied to the outfeed end of the molding plane. If you want to anchor a boat to a beach, which would be more secure? An anchor or a nail of similar size with the rope tied to it at ground level. The anchor obviously because the stock causes the bit to be continuously burried, if I sank the anchor, and then tied the rope to the spike, not the stock, it would not be self-seating. This is why a japanese plane, even a dull one will keep cutting, and yet can be very light in weight.

There are other advantages to the pull stroke. I don't believe it is bio-mechanically superior. But it is superior in certain situation, like planing seated. I think there is also an understanding in that plane culture, that fast planing creates a "sharper" cut. If you move the plane faster it increases the cutting power, and this is emphasized in various aspects of the plane.

3) Blade retention system. There are a number of advantages here. Japanese planes are the only ones I am aware of where there is nothing above the blade, 100% clearance above the cutting edge. There are certain other designs where the escapement is not adversely affected by clutter, a Krenov plane would not be an example of that...

Another advantage of the system is that, newbie efforts aside, it is the fastest from which to remove a blade, and the blade returns accurately to the position it previously occupied. For this to be the case, the blade has to be accurately cut in.

It does not adapt as well to different condition. Your smoothing plane should really just be used for that. But for serious users, they are probably already there.

If you use a single blade it can't drop through the plane and land on your foot. :)

4) The chip breaker is adjusted independently from the main blade. This is very useful, but since chip breakers are out of favour these days, I expect there are fewer people celebrating this fact today than previously. I do not use the breaker much, but I do believe they can be useful.

5) Sole wave pattern. This may exist in part in order to allow the blade to be driven in further, without distorting the sole, but it also plays into making it simple to adjust the plane to dead nuts flat. One thing that irritates me about slavish acceptance of complex mechanisms in woodworking is that people seem unwilling to accept how accurate wooden tools can be. Be they violins or wooden planes. It is far easier for the woodworker to shape a wooden device, and the Japanese plane is very cleverly designed to make that possible.

There are other details, perhaps I have described the main ones. Many of these features can be added to a western plane, which led to my C&W Japanese style jack plane. Not probably a sufficient improvement over the normal version, but it can work.

Re: japanese plane making

#18

Bob

Re: japanese plane making

bob

Wiley,

Thanks so much for the great article. I need to check the wind,loosen the fit because the blade is at least 1/2" away using hand pressure.I also need to make the ramp. I will advise on my progress.

Can you describe your process for cutting the mouth. It seems like the first 1/8 or so cut into the ramp side of the mouth has to be at 90 deg to the sole or the ramp will have a feather edge that will bulge or crack when under blade pressure. It should not affect the bedding angle or chip clearance because it is on the back side of the mouth.

I think the trickiest part is cutting the "ear grooves" which hold the blade in place.I have a hardware keyhole saw and the set makes it hard to get an accurate sharp cut. I also dont have a tool to get into the groove except a screwdriver sharpened to a chisel shape. I plan to forge a few tools and make the tweaks noted above.

Regards,

Bob

Re: japanese plane making

#19

Re: japanese plane making

TomD

There are several different kinds of mouth. What I do is make the opening parallel or slightly more than parallel to the upper blade, or perpendicular to the sole. So if you are using a single blade, you can have the opening parallel to the blade, or you can open it up to be a little more open. I will also just cut them perp so that the mouth doesn't open a lot if the sole wears. If you have a sub-blade the parallel angle will be a lot more open, since the sub-blade will tend to block the escapement.

Re: japanese plane making

#20

Re: japanese plane making

Pam Niedermayer - Austin, TX

Tuning must be done, regardless of who made the dai, so if you know how to tune you're done. I'd say buy a cheap Japanese plane and see how they did it; but if it's new, you'd still have to tune it.

I'd say it's worth it to take a class with someone of the stature of Jay or Inomoto. As far as traveling, just do it. I flew to MA from Austin to take the Hiraide class, and I would have driven if necessary.

Pam

Re: japanese plane making

#21

Re: japanese plane making

TomD

It was a great experience, but I don't think there is any more need to go to a seminar like that than there is to go to a seminar for any other plane or tool. The second or first Japanese plane I made back in the 80s took shavings of 3/10000 or 4/10000. It was a loose affair with a native hardwood body. I think these planes have been held back by the use of a lot of Japanese terms for which there are comparable English terms and an attitude towards their many differences, rather than their similarities.

I just ordered a book on Japanese plaster. I was not encouraged by the quality of the writing in the pages on Amazon, but hope it will be useful regardless. The first pages start by establishing the name for plasterer in Japanese and setting out why it should be used given how different the Japanese trade is. And I thought "here we go again..."

Re: japanese plane making

#22

Re: japanese plane making

wilbur

Hi Bob,

You're welcome! I'm glad you found it useful.

I should point out that I'm not Wiley, though. My name's Wilbur, but I'm flattered to be confused with Wiley. Wiley Horne knows a lot more about this stuff than I do and is a much better woodworker than I am. Too bad he hasn't been posting more here lately. He would have a lot to add to this discussion.

As far as cutting the mouth goes, I haven't tried that myself, yet. That is going to be something I will be trying soon. I've tuned up and rehabbed enough old Japanese planes to make me think that I know what I am doing. Making a plane body from scratch is another thing.

From my tuning and set up experience, though, I agree that the ear grooves are the hardest part to deal with. You need an accurate saw that can get into that area, and a chisel narrow enough to work the groove all the way to the bottom. I've picked up a 1.5 mm chisel just for this purpose.

Re: japanese plane making

#23

Re: japanese plane making

Pam Niedermayer - Austin, TX

No, it's not necessary to attend a seminar to make Japanese planes; but it's the easiest way, and fastest to great plane making. On your own, you tweak this and that, not really knowing what makes a difference and what doesn't; and there are so many variables. It's circular. In fact, it was my efforts to tune a Japanese plane that convinced me to attend the class.

Pam

Re: japanese plane making

#24

Bob

Re: japanese plane making

bob

Wilbur/ Pam,

I did some of the tweaking you suggested and have seen a very nice improvement in the performance of the plane. I reworked the bedding so the blade is not so tight. I assume this lessens the bulge,if any, behind the blade. It also makes adjusting the blade somewhat easier.

The cut out on each side of the blade opening was also a great tip. When I conditioned the bottom, I missed this side area and the cut outs eliminate the high spot on the side of the blade.I reconditioned the bottom again and also reground the blade to be more square across the width. I dont get super thin shavings yet but the plane is a pleasure to use.It is only 6-7 inches in length and the effective cutting edge is a little more than an inch and a quarter. I guess this would be considered a block rather than smoothing plane.

I forged this blade and it is approx. .250 at the thickest end. maybe this is not enough for the super fine shavings because of vibration? About 1/4 in.from the front of the backside of the blade is dead flat but I did not spend a lot of time getting all areas of the blade flat. I am not sure the blade is bedded as well as it could be, but I assumed the tightness meant the blade was being held properly. Because the bevel is down and rests on the bottom ramp of the plane, I guess I should make sure the top of the blade is dead flat. I know I cannot take off too much metal without affecting how well the blade is held in place. Any additional thoughts are appreciated.

Regards,

Bob

Re: japanese plane making

#25

Re: japanese plane making

TomD

"Wilbur/ Pam,

I did some of the tweaking you suggested and have seen a very nice improvement in the performance of the plane. I reworked the bedding so the blade is not so tight. I assume this lessens the bulge,if any, behind the blade. It also makes adjusting the blade somewhat easier."

Any bulge shouldn't be a problem because that part of the plane isn't in contact with the wood, and even if it were, as with my western version, it would have been tuned with the blade at full depth, or with a shim so you get that engagement without having to lower the edge all the way.

Some of my blades are so loose after years, I adjust them by hand, but post seminar, I learned to set new planes at least, much harder. he virtually beat them in like a 6" spike. And I suppose it is also one of those things where you can't add it back as easily. If it is relatively tight you just drop it in, then you give is a few taps and it bottoms out at the perfect point. Harder to do if it is loose because too much depth is perfectly possible.

"I forged this blade and it is approx. .250 at the thickest end. "

Cool! That should be enough with smaller blades. Japanese blades aren't all that thick at the low end, the upper end is beefy.

"maybe this is not enough for the super fine shavings because of vibration? About 1/4 in.from the front of the backside of the blade is dead flat but I did not spend a lot of time getting all areas of the blade flat."

Bevel or non-bevel side? Either way, on the more mechanically made blades, other than the hollow, the rest of the surfaces are flat. That is a simple approach and works well enough. One needs something consistent or it will be impossible to print it in and have it a correct fit at more than one depth, or properly supported. The art level baldes, or decent blades are longitudinally convex on the bevel side. meaning they are thinner along the midline than the edges.

There is a curve. This means the ramp of the plane will be higher in the middle than the edges, and when you look at the line the ramp makes with the top of the dai, it will be a curved line. This is what i argue makes it easier to fit by chisel, as is their style.

"I am not sure the blade is bedded as well as it could be,"

I hate to admit it, but getting a really even blueprint is not happening, and is not necessary to high performance. It is amazing how little of the surface will be inked. I had a plane a while back I kept going back at the fit, and it was forever before I got a line of ink on the ramp within the abutments. Still worked great. Indeed when you go for bearing surfaces on cast iron machinery ways, you get very little actual contact, and you don't want it.

" but I assumed the tightness meant the blade was being held properly."

I don't think you can count on that, it can be wedged on three point. Endgrain is really hard, tons per square inch hard.

"Because the bevel is down and rests on the bottom ramp of the plane, I guess I should make sure the top of the blade is dead flat."

Huh? Are you talking about actual support to the bevel, as some go for, but I don't personally buy that much, or the whole surface engagement of the bevel side of the blade? And how does this relate to the side you want to flatten. Flattening the hollow side (whether you put one in or not) Is job one, I personally would not try to get away without that, you don't need a hollow, but if that surface doesn't have consistent bearing it will make life more difficult and wear more likely.

Indeed if one could, a good way to process would be to ensure the top of the abutments were really flat and coplanar before you moved on to other areas of fit.