Herculean mortise/tenon joint fitting operation
wilbur
Last time I posted about my workbench build, I was getting ready to make 8 mortises to receive the double tenons at the top of my workbench legs. I got the last of my 8 mortises finished yesterday, and have been working on the fitting. These mortises are all 1" wide, about 2" deep, and will be how the legs are secured to the benchtop. That exercise gave me a lot of practice trying various methods of making a mortise.
By the way, I never did buy that router I had been considering.
There were three main methods that I used:
1. Chopping with a 1" wide mortise chisel, like I did with the mortises for the leg stretchers. This is the most satisfying for me, because afterwards I can go around saying, "Yup -- I used a 1" wide mortise chisel to cut a 1" wide mortise 2" deep and 5" long." The problem is, the usual response to that is, "What are you -- nucking futz?" 
The other problem that I had was that the Douglas fir seems to have become much harder in the time it took me to get around to this step. It seemed to go much more slowly than when I made the leg mortises for the stretchers.
2. Chopping a narrower mortise along each side of the 1" wide mortise with a 1/4" mortise chisel, and then wasting out the middle. Also satisfying, but not as satisfying as using a 1" mortise chisel. It was surprisingly easy to clear out the waste with a regular chisel.
3. Drilling out most of the waste with a brace and bit, and paring/chopping the remaining waste. This was the least satisfying of the options, but it was the fastest. I used a squared up scrap piece of wood as a guide when paring/chopping to help me make sure the sides of the mortise were square.
Regardless of which method I used, I learned the importance of clearing out the chips when making a mortise. Even the drill and pare method slowed down quite a bit when I let the mortise fill up with shavings from drillng and paring. To help me clear out the chips, I used that time honored hand tool -- the shop vac.
In any case, from here on out, making the more normal sized 1/4" wide mortise and tenon joints used in furniture are going to be a piece of cake in comparison.
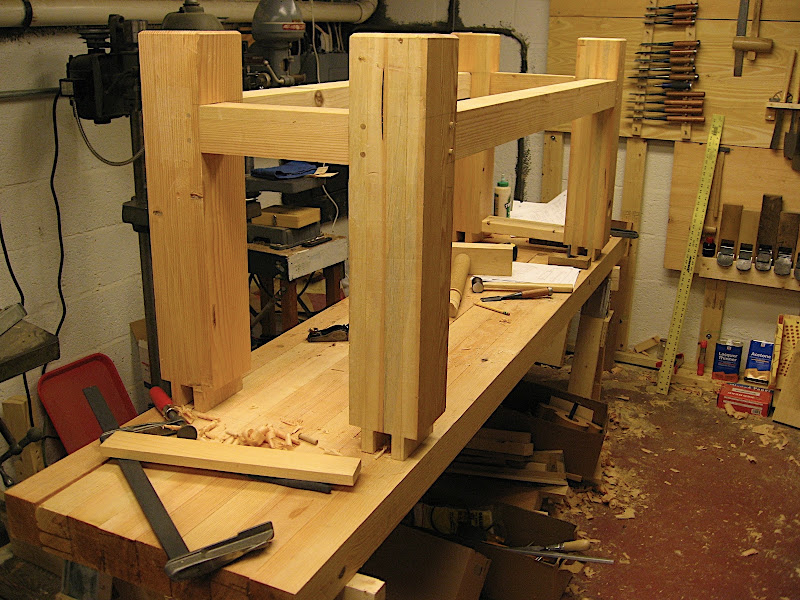
This picture of the tenons on the top of one of the workbench legs being inserted into the mortises in the workbench top should illustrate what I'm up against with fitting the mortises to the tenons. Multiply this by four to get the full effect.

Because my base is already assembled, I have to fit all 8 mortise and tenon joints simultaneously. Basically, the way I've been going about it is to drop the base into the mortises, marking out the parts of the 8 mortises where it looks like the fit is too tight, and then paring out the mortise at those spots. I started out by trying to adjust the tenons, but fitting the base, marking the tight spots, moving the base out, and rolling the base on its side so I could get at the tenons got old quick.
It's going faster now that I've learned that I can be a bit more aggressive with adjusting the tenons and mortises. On this scale, I don't think that I'll need 0.005" precision, especially since the joints are going to be drawbored, and I expect gravity to be on my side in keeping the top stable when the workbench is finally done. Besides, I know what the fit was like in the leg mortises for the stretchers, and since I had to redo the two stretcher joints thanks to my screw up, I got a real good look as to how much good glue contact you can have with what might look like a sloppy M/T joint, but is actually much tighter than you might think.


 .

 ?


