Home Articles Forums Gallery Marketplace Videos

WoodCentral Forums

Knowledge You Can Build On — Est. 1998

Abingdon, VA – Tree Cutting & Portable Sawmill

Workbench taking shape, then two steps back

Posts

Workbench taking shape, then two steps back

#1

Workbench taking shape, then two steps back

wilbur

>I've made some more progress on my workbench. I finished the assembly of the base, and put it on top of the benchtop to mark out exactly where I should cut the mortises to hold the benchtop to the legs. This is really the first time I really have an idea of the size and scale of my workbench.
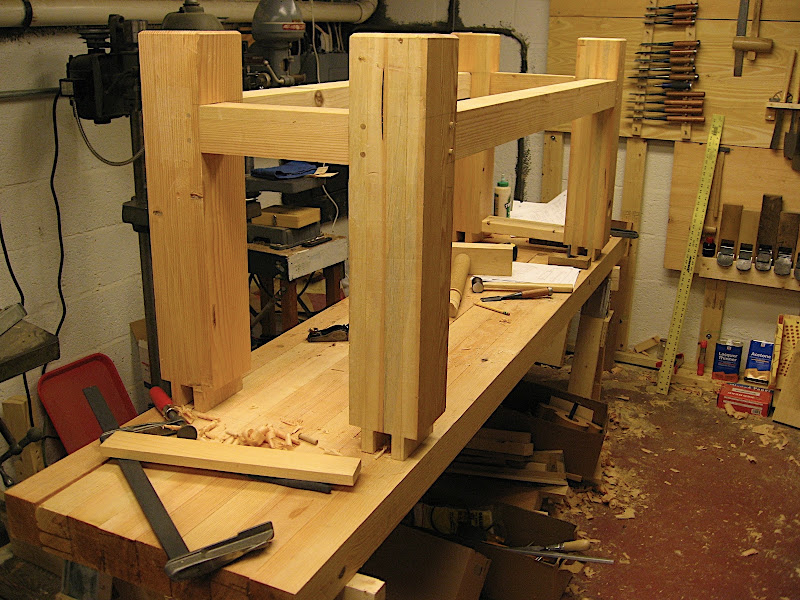

I knew that at some point I was going to hit a snafu with this project, and apparently that time has come. The stretchers are all held in with drawbored mortise and tenon joints, and although I swear I test fit everything twice, when it actually came time to glue the stretchers into place, the very last stretcher bound up and stopped about 3/32" short of fully seating into the leg. This resulted in a little bit of a twist in that leg compared to the others. Of course, what I needed most right then was a couple of 5-1/2' long clamps, and the longest ones I had were 48".

I wouldn't care so much, except that this was the leg that makes up the leg vise, and this is the one leg that really needs to be square and flush with the front of the benchtop. In the picture, it's the far leg on the right that's a bit out of square, and it's the joint it makes with the long stretcher that has the gap.

If I set the base so that this leg is square, the other legs will be off enough so that the mortises for the top of the leg in the opposite corner will be too close to the edge.

If I set the base so that the leg vise leg is a little out of square, the hole that I already drilled for the leg vise screw and the slot for the parallel guide will be out of square with the front plane of the benchtop, which will make the vise not work correctly.

I thought about attaching the base so that the leg vise leg is out of square, planing down the face of the leg vise so that it is square with the base, filling and redrilling the hole and the slot for the parallel guide. But given the amount of work that seems to be, I'm more inclined to just cut the stretchers off, and redo the mortise and tenon joints. To maintain the length of the stretchers, I would cut a notch in the stretcher and make a large loose tenon to fit. Besides, if I do the patch job of filling and redrilling the hole and parallel guide slot, I'll think about it every time I use the bench.

I'm pretty ticked off that this happened, but I'd love to hear suggestions on what to do.

Re: Workbench taking shape, then two steps back

#2

Stephen Shepherd

Re: Workbench taking shape, then two steps back

Stephen Shepherd

>Wilbur,

Sorry to hear of your difficulties, I presume you didn't use hide glue?

Take that fancy saw of yours and cut off the stretcher and put in loose tenons.

You should make up some clamp extensions for gluing situations like this, they are simple hooks made of wood.

Stephen

Re: Workbench taking shape, then two steps back

#3

been there, done that

Bill Tindall

>Fortunately it was on things easier to fix. Having been there and done that I always dry fit, with clamps, any assembly before glueing. That way the clamps are at hand and adjusted should they be needed. Every few years I test this "rule" and find my shortcut results in a problem.

I suspect you could drill and steam the joint and then bring it together with a clamp. Curiously, this same thing happened to someone else I once talked to and the steaming is what they did. Such huge M&T's just can' t be relied on to go together with hand pressure.

Re: Workbench taking shape, then two steps back

#4

Re: Workbench taking shape, then two steps back

wilbur

>Stephen, I know you'll be horrified to hear this, but I'm using Titebond III, mainly because that's what I have in the house right now. Besides, the joint was drawbored, so loosening the glue would not have been enough for disassembling the joint.

Anyway, I can't wait to get this project done so I can paint the base with milk paint. ;)

Re: Workbench taking shape, then two steps back

#5

Re: Workbench taking shape, then two steps back

John Aniano in Central NJ

>Wilbur,

Sorry to hear of the mishap on the bench M&T joint. Probably some small bit of wood or a shaving got stuck in there and kept it from seating fully. As I read your post I thought "Wilbur needed a very large mallet to drive that joint home" - did that idea cross your mind at all? You mentioned not having a big enough clamp, but sometimes a bigger hammer works quite well...

John

Re: Workbench taking shape, then two steps back

#6

Re: Workbench taking shape, then two steps back

charlie belden

>In general, adapting the design to compensate for a problem

that has been created - usually leads to even more adapting

down the road. Sometimes it's better to just bite the bullet

and fix the mistake before continuing on. You'll probably be

using this thing for a long time, and Kluged Fixes often annoy

one for years and years.

In general, leaving a means of recovering if something goes

wrong is a wise and prudent thing to do - and obvious - once

one boxes oneself in the first time. Draw boring the M&T

joint probably wasn't necessary - but if used - bore all the

way through the mortised part so the pegs CAN be driven

out if necessary. Given the size of the M&T joints, I suspect

they would serve no real need - and - while decorative - do

complicate things if something goes wrong - which they often

do.

I take it that it was one of the long stretchers that bound

before fully seating. If you were working with really hard

to come by wood - in the sizes you're using - going to great

lengths to steam the joint and try and loosen the glue

enough to be able to get the joint to seat would be worth

it. That doesn't appear to be the case here - so - why not

cut off the long stretchers and have another go at it?

The second time around usually yields better results

than the first attempt - as just about anything.

While it may be a nice challenge to build a real workbench

with "real" joinery - and beefy ones at that - making

parts of everything an integral part of somethihng else

- when it doesn't have to be can make for head aches.

On the other hand, if you go modular, errors are

compartmentalized - and thus don't affect anything

else outside that compartment. If the double tenons

on the tops of the legs are to go into mortises in the

underside of the bench top - you've created a potential

"challenge" for yourself unneccessarily. The weight of

the bench top - with a single "bullet peg" on each end

of the bench sitting in a hole in something attached to

the top of the leg - will keep the top from moving

left/right or fore/aft when working on it. And unless

you have a long overhang - and sit or jump up and

down on the end of it - the top isn't going anywhere.

While I sympathise with you - your problem could

have been avoided - and it can be fixed without a

great deal of additional work - given the total

amount of time and effort you will invest in the

WHOLE bench by the time it's done.

I guess it's Fix It - Or Forget It and Move On.

Re: Workbench taking shape, then two steps back

#7

Jack Guzman from Maine

Re: Workbench taking shape, then two steps back

Jack Guzman from Maine

>Wilbur,

The way I see it,you only have to cut off one end of the base. Cut one end only of each long stretcher. Instead of using loose tenons,could you shorten the base? What I mean is,after cutting the stretcher square at the end create a new tenon. Then clean out the mortise to fit the new tenon. Your tenons needn't be very long so you'd only be shortening the base by that little bit.---Jack

Re: Workbench taking shape, then two steps back

#8

Re: Workbench taking shape, then two steps back

Wiley Horne--So. Calif.

>Hi Wilbur,

I agree with Stephen. It fits with experience--everytime I try to make do or rescue something I messed up, I put a ton more work into it, and am far less satisfied, than if I had just remade the part, redone the work, and made it right. It won't take you long to make this good, in the big scheme of things.

I think you won't have to disturb the good left end of that stretcher. After you saw through the right end tenon, it shouldn't do that much violence to offset the stretcher that critical 1-1/2" so you can clean out the original mortise and make the new mortise for the floating tenon. Then pull the assembly apart just far enough to reinsert the 'second end' of the floating tenon (don't forget the glue :), and clamp it all together.

You can hook two clamps together to make a longer clamp. I know this.

Wiley

Re: Workbench taking shape, then two steps back

#9

Re: Workbench taking shape, then two steps back

Marv

>Wilbur,

Here's what I would do....I would saw off both stretchers, clean out the mortises in the legs, do a mortise in the end of both stretchers and make a tenon long enough to go into the two mortises.

Marv

Re: Workbench taking shape, then two steps back

#10

Re: Workbench taking shape, then two steps back

Paul M.

>Another option... if you have not already mortised the top to take the tenons for the legs, then you can cut off the two long stretchers and create new tenons on the ends. Your base will be 2 inches or so shorter. But I don't think that would be a big issue unless you were planning on filling the space between legs with a tool chest like I did.

It is a real bummer that you need to think about such measures. It is a truly wonderful looking bench. I do wish I would have incorporated a leg vise into mine.

Re: Workbench taking shape, then two steps back

#11

shorten the base

Chris Friesen

>I agree with the others that suggested cutting off the right trestle assembly and redoing the joints. You have plenty of length so you could just re-cut the tenons on the long stretchers. Might be a bit awkward though, so it might be simpler to just use loose tenons.

The other option would be to plane the front of the leg flush with the edge of the bench and make the leg vise face parallel to the bench. It wouldn't travel exactly perpendicular to the edge of the bench, but it would still work just fine. I'd be worried about racking in this case though...might fill the gappy joint with epoxy for racking resistance.

I'm curious, why didn't you take two shorter clamps and clamp the pads against each other to get the extra reach you needed?

Re: Workbench taking shape, then two steps back

#12

Re: Workbench taking shape, then two steps back

R.J. Whelan

>Wilbur,

I had a similar experiece with a dining table a few years ago. The legs and stretchers were not as beefy as yours are, and my problem was a tenon that was about 3/32 too long (didn't notice during the dry fit).

I had gotten to the same stage as you: glued and pinned (not draw bored in my case) and only noticed the error after the glue had partially cured, when I was checking for square.

Here's what I did:

1. Drilled out the pins

2. Cut a mortise on the face side of the leg (as if I had originally chopped a through mortise) - this exposed the end of the tenon.

3. Injected steam into the joint to soften the glue.

4. Drew the joint together with clamp pressure

5. Installed new pins from the inside of the leg (off set from the originals by about 1/2"

6. Installed new "dummy" pins in the original holes

7. Inserted a "faux" tenon end in the mortise cut to expose the tenon.

8. Cut seven more "faux" through tenons.

9. Prayed that the client would not object to the design change (they didn't).

10. Vowed never to touch a glue bottle before dry clamping and checking for square.

One other hint: I have four heavy duty pipe clamps (Pony brand); with these I have sets of 4 pipes with lengths of 2, 4, 6, 10 feet. I don't use the long ones often, but when you need them, you realllly need them.

Good luck with your bench .... rj

Re: Workbench taking shape, then two steps back

#13

Pony clamps

Bruce, a MN Galoot

>the nice thing about the pipe clamps is that you can thread both ends and then get connectors to make REALLY long pipes and thus clamps. I routinely clamp 8' long pieces.

Re: Workbench taking shape, then two steps back

#14

Re: Pony clamps

R.J. Whelan

>Bruce,

I used to do it that way too. I made a bunch of money on a commission a few years back and treated myself to the long pipes ... :D

Re: Workbench taking shape, then two steps back

#15

Re: Workbench taking shape, then two steps back

Chris Friesen

>"If the double tenons on the tops of the legs are to go into mortises in the underside of the bench top - you've created a potential "challenge" for yourself unneccessarily. The weight of the bench top - with a single "bullet peg" on each end of the bench sitting in a hole in something attached to the top of the leg - will keep the top from moving left/right or fore/aft when working on it."

In a Roubo-style bench, much of the racking resistance comes from the massive leg-to-top joints. The lower stretchers contribute as well, but probably wouldn't be sufficient by themselves.

On my own bench he racking resistance comes from stretchers that are 2" wide and 8" high. In this scenario it would work just fine to have the top sit on bullet pegs.

Re: Workbench taking shape, then two steps back

#16

Re: Pony clamps

Bruce, a MN Galoot

>Long pipes wouldn't really be that expensive, but I need them so infrequently that the couplers work okay for me.

Re: Workbench taking shape, then two steps back

#17

Re: Workbench taking shape, then two steps back

les winter

>Is the leg diagonal to the twisted one square enough? Can you not rotate the base so the back is in front, drill a new vise hole and put a plug in the old vise hole?

I built a similar bench and had my problems. But if you solve this, I think you will be well pleased with the result.

Good luck.

Les

Re: Workbench taking shape, then two steps back

#18

Re: Workbench taking shape, then two steps back

wilbur

>Thanks for all the input, everyone! I think I am going to cut off the stretchers and redo those joints. That will shorten the base by 2-3 inches, which will be fine.

I'm going to start by just cutting the offending stretcher and seeing if I have enough flex to just redo that joint, although I'll be surprised if I do. I had this wacky idea of cutting off a short length from that stretcher, redoing the bad M/T joint with a short piece, and then splicing in a length of stretcher using a keyed scarf joint -- something like this:


But that would involve making three joints (1 M/T, 2 scarf joints), whereas cutting both long stretchers would mean redoing two M/T joints.

To address some of the questions/comments that came up:

If the double tenons

on the tops of the legs are to go into mortises in the

underside of the bench top - you've created a potential

"challenge" for yourself unneccessarily.

The design of a Roubo style workbench calls for the legs to be mortised directly into the top. Besides, I'll gain something just from the experience, as well as the experience of fixng this mess up. So I don't see this as an unnecessary challenge, as long as I get some experience out of it.

You can hook two clamps together to make a longer clamp.

I had heard that too, but in the massive panic/flail that I was doing when things were going badly, I did try to hook together a pair of F-clamps that I have, and it wasn't happening for some reason. I'm going to get me some 6 foot pipe clamps.

Can you not rotate the base so the back is in front, drill a new vise hole and put a plug in the old vise hole?

I thought of that, too. That would work, except that I did take the time to put the legs and long stretcher that looked better up front, and every time I would look at the bench in the future, it would just irk me. Given that this bench is something I will use every time I go into the shop, it's worth it to me to make it look good as well.

Re: Workbench taking shape, then two steps back

#19

Stephen Shepherd

Go with the wacky idea

Stephen Shepherd

>That would be a great joint to show off and like you say you gain the experience.

Stephen

Re: Workbench taking shape, then two steps back

#20

something to consider

Bill Tindall

>If you "patch" the stretcher and the patch is where you will see it you will be reminded of this episode every time you use the bench. For psychological reasons I would fix this problem in a way that would not be "seen".

I would begin by seeing if I could heat/steam the offending joint and pull it together with a clamp, preferably a big one with Acme thread. I don't recall what glue you used but hide or PVA loose their shear strength quickly upon heating and a few hundred psi just may pull it together. That failing, the cut it off and shorten it seems the best option for long term satisfaction.

Re: Workbench taking shape, then two steps back

#21

Re: something else to consider

Pam Niedermayer - Austin, TX

>And if you do what Bill suggested, assuming you cut all the length wise stretchers the same length, the most likely problem is that it's the mortise that's not cut deeply enough. Then you can cut a through mortise from the side opposite the stretcher. After all is adjusted, you can then patch the mortise, fill it in.

Pam

Re: Workbench taking shape, then two steps back

#22

Re: something to consider

wilbur

>How do you heat up a joint? All I have to use is a hair dryer, and no real way of injecting steam.

Re: Workbench taking shape, then two steps back

#23

Stephen Shepherd

what no espresso machine?

Stephen Shepherd

>Those produce a lot of steam, just take it down to the local Starbucks.

Your hair dryer is capable of the heat you need 145 degrees (F), however wood is a good insulator, and given the size of the wood here it would be difficult to get the actual joint hot enough to make the glue thermoplastic.

I think the loose tenon is probably the best, keeping the stretchers almost their original length, although the scarf joint is very good looking. If I were to let all that I have done that wasn't perfect bother me, I would have given up woodworking 40 years ago. Those 'mistakes' are part of the learning process and a constant reminder not to do that again.

Stephen

Re: Workbench taking shape, then two steps back

#24

Re: something to consider

Marv

>Wilbur,

It could be, your M/T was such a close slip fit, the glue sealed it before it bottomed out and air was trapped inside. If by chance this is the case, you might be successful in drilling a hole from the opposite side and if there is a gap inside at the end of the tenon there will be space for the steam to penatrate the joint. As you inject the steam, apply your clamps to pull it together. I've never steamed a joint to losen it, so I'm not sure it will reglue itself once the joint is pulled together. You might end up with a weak joint. I think I would consider using a Lag Bolt and counterbore the head deep enough for a plug to hide it.

When using Titebond, you need a certain amount of clearance because Titebond will set almost immediately, preventing any slippage. A slip fit is too tight. It has to be just a little on the loose side. The glue will cause the wood to swell, hence the need for some clearance.

Keep this in mind no matter what method you use to do the repair. It is possible for the same problem to reoccur. I would drill a small hole through from the opposite side, maybe 1/8" dia. into the mortise to let any trapped air escape. Use a fat toothpick to plug the hole.

I still think it would be easier to do the repair if you saw off both stretchers and redo both joints. I just don't see how you can re-cut just one side unless you use a floating tenon.

Marv

Re: Workbench taking shape, then two steps back

#25

How do you heat up a joint?

Wiley Horne--So. Calif.

>I think Bill is talking about straight heat--doesn't require getting steam to the joint. You can use a heat gun--pretty cheap tool but useful sometimes, like now. It works exactly like a hairdryer, but is hotter.

Bill has a really good idea IMO. If the tenon is too long for the mortise, then you've lost a little time and own a heat gun. But this could turn out to be a $20 perfect solution.

Wiley
