Home Articles Forums Gallery Marketplace Videos

WoodCentral Forums

Knowledge You Can Build On — Est. 1998

100+ Wood Species + Full-Shop Services: Lumber, Veneer, Tools & CNC. Everything in One Place.

Japanning

Posts

Japanning

#1

Japanning

Michael Brady

>I want to be able to re-japan plane bodies and parts, and go beyond what engine paint can deliver. I have read the articles here and other places and have assembled some basic materials. Here is what I have on hand: asphaltum powder, spar varnish, boiled linseed oil, turpentine, japan drier. I would appreciate any suggestions and recipes from any of you who have actually done the process. I am particularly interested in baking vs. cold application; preferring to not get involved with the baking process, if possible. I know drying times can be long for the cold process, but at least you can see what is happening. Some trials with baking have yielded bad results such as dull finish and crazed finish. I'll thank you in advance for your input.

Re: Japanning

#2

Stephen Shepherd

Re: Japanning

Stephen Shepherd

>The first thing you need to do is get the asphaltum powder into a liquid state, mix just enough linseed oil and turpentine to the powder to make it a thick paste and well incorporated, this may require heating it up a bit.

Then mix it with spar varnish, usually equal parts or a bit more spar varnish. I would recommend McCloskey's Man of War Spar Varnish in Gloss.

It is ready to apply. Make sure your surfaces are clean, I etch metal with a clove of garlic which does an excellent job at etching metal. If it is too thick add some oil and a bit of turps.

The japan dryer is tricky and can cause the japanning to be dull if you use too much. It can also effect the adhesion if there is too much dryer.

Place the object in a dust free area with plenty of air circulation. I sometimes 'stove' asphaltum varnished pieces by heating them up to 220 degrees (F) for an hour then allowing it to cool. I don't do this right away but wait for a day or two before cooking.

Good luck.

Stephen

Re: Japanning

#3

seeking the grail *LINK*

woodburnbob

>The link below is to a post from me in 2007. The image is one of the sample "recipes" from the book. If you search the WC message archives, you'll find about 75 hits on "japaning" and 22 hits on "japanning". Your mileage may vary. I believe the later is the correct spelling, by the way.

Many, many folks have asked your question over the years, both here and on the old Badger Pond. The total collected answers would be very eclectic and informative. No doubt there are similar perennial occurrences on all the other relevant forums as well.

Everyone has advice; you'll be lucky if you only get 5 competing suggestions from your post. In the end you're likely to experiment a lot, mostly have sticky failures, have nothing that really looks like a mint Stanley japan job, and move on to something else, like Christmas shopping. But hope you report back on all of it.

The really fine japaning recipes of old were kept quite guarded as proprietary secrets (and so were the industrial processes to a lesser extent). I suppose it is the hubris of the age that leads us to think that with the right paint recipe we'll get the "right" look and performance.

What amuses me most is reading from those who were living and working in the 'golden age of japanning" that helpful advice was freely given by those in the know to any curious novices or dilitantes who asked. The advice & recipes was always purposely corrupted, sort of like telling gold seekers the mother load is in Rhode Island when it's in California. The advice being worth substantially less than was paid for it. A cunning method of trying to remain "competitive", to use a modern term.

BTW, I dislike the look of re-paints of any kind...only because they can be so easily recognized from a mile away.


img

my 2007 post

Re: Japanning

#4

Re: Japanning

Derek Cohen (in Perth, Australia)

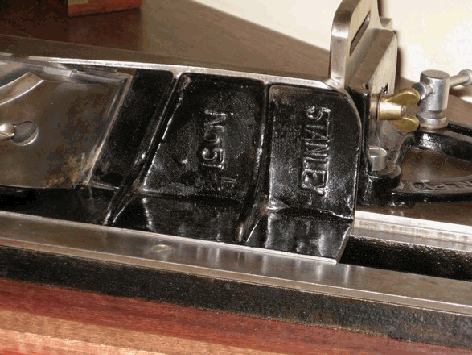
>A cuple of years ago, when I was restoring a Stanley #51/52, Stephen suggested a recipe of half asphaltum and half marine varnish. This is applied cold and will cure in about 2 weeks.

Purchase asphaltum from an art supply store.

The mix works. It looks, feels and tastes like jappaning.

When applying, keep in mind that several thin coats are better than one thick coat. It looks dark brown initially, but ends up black.

Keep in mind that it is self levelling if used on a flat surface. If may leave runs if used on a vertical surface. So do one surface at a time.

To speed up drying time I left the pieces in the midday sunshine (that may be a little more difficult for some at this time of the year heh ..heh). But just be patient. At the end of two weeks it had cured hard. And a couple of years down the track with frequent use, the japanning has proved to be durable.


Regards from Perth

Derek

Re: Japanning

#5

WAG Japaning . . .

steve mackay

>Got it from oldtools@taconic.net. six bucks (i think) a pint. And a pint goes a LONG way ! Baked it in the kitchen with no oders or smell. SWMBO didn't even notice (whew !). I've got the baking/curing schedual if you need it. You ARE right too. This stuff has an entierly different look than paint. Plus you're being faithfull to the tool. Neat.

Re: Japanning

#6

Re: Japanning

Michael Brady

>Thanks, guys. Excellent info and photos. I'm going to start with Stephen's recipes, as I have all of the ingredients already, The clove of garlic etch is really interesting! I have some steel bar that I will use for test pieces, and will document and photograph the results. Later, I will do a plane body to fully test the method. This plane body will be going through its fourth refinish.

Re: Japanning

#7

scott grandstaff

Japaning . . .

scott grandstaff

>I didn't mix my own. Got mine from Bill Gusftasson back when he was mixing it for us.

1/2pint goes a long long way! I've done a number of tools now. A baker's dozen or so??

Its very thick and like Derek says, do each surface horizontally, let it set for a couple hours before going on to the next.

I like 2 overall coats.

After 2 more days drying, you bake.

Low oven, 250 for an hour, let cool all the way off.

Bump to 300, ditto. Don't forget the cooling between baking. Also it will be fantastically fragile between the first and second firings. Watch it!

Bump the thermostat to 350 for one last round and bake for the last hour.

There is some small smell involved but I have got away with it multiple times so it can't be that bad.

It comes out unbelievably rich, glossy and hard. Unreal beautiful if you did it right.

It comes out so gorgeous that whatever plane or other tool you put it on had better have been otherwise mint or it'll look like a pig in a wedding dress!

Same as if you'd hired George Barris to custom paint a badly dented Vega.

I find if I knock back some of the gloss here and there, with med s/c it looks more like good++ condition, as it should, on most tools.

You can also do this exact same baking regimen with ordinary engine enamel or rustoleum from a spray can if you want.

You can spray/low bake/cool, spray/low bake/cool to build coats.

Then bake as usual for the last two firings.

You'll never live long enough to build up as many coats as it would take to match real japanning, but it cures a whole lot harder than air drying ever could, and looks mighty rich.

The worst drawback in this routine? It really does have some smell involved (not horrible to me, but there is no denying)

so send her/him to the movies??? Double feature ought to do it.

yours Scott

Re: Japanning

#8

Thats the guy.

steve mackay

>

Re: Japanning

#9

Re: Japanning

Michael Brady

>An update on my japanning adventure: Mixed up a couple of half-jars of japan finish using asphaltum powder, turpentine, BLO, and marine spar varnish. I added a dash of japan dryer also. My first batch was too thin, but worked on a small test piece, with two coats. I have to be honest; the result was no different than engine paint.

The second batch was maple syrup thick and went on a stripped plane body rather nicely, using a 1/2" brush. On a plane, you could see the embossing showing through, which is that classic japanned look. It went downhill from this point, however. I put the plane into a 200 degree oven for about 45 minutes. After cooling, I applied a second coat of my thinner blend and baked it. As with some sparay paionts, the second coat reacted with the first and I got serious wrinkling of the finish....back to the stripper. At this point, I'm not sure if the whole effort is worthwhile. I think to refinish a block plane lever cap, or so, yes. As some have pointed out, the finished result will still look 'redone", so why not use the modern spray enamels and get good results each time? I'm pretty careful in buying vintage planes to get 90-100% original finishes anyway. I would never consider redoing any of those. For the occasional resurrection of a junker tool, paint is fine, along with redone or new wood, etc.

One last thing. I might try using some thinned japan finish in a small spray gun. Being able to control the build-up of the finish would be key. I also would avoid the baking step altogether and perhaps utilize a heat lamp instead.

Re: Japanning

#10

Sorry I'm late to this thread.

Scott Burr in Ben Lomond CA

>I've used Pony Tools japanning on a few planes with good results. This is a no bake product but, takes 30 days to fully cure. I found a few days in summer on my deck speeds the process up.

Re: Japanning

#11

Want real bullet proof protection?

Bob Hackett

>Make friends with a powdercoater.

For other nonhistorically correct rust proof coatings see Bob Smalser`s articles here on WC.His approach may not be factory but it sure works here in the salt air of the Maine coast.

MB