WoodCentral Forums

Est. 1998 — 27 years of woodworking knowledge

Finally finished my bench 1/3

Posts

Finally finished my bench 1/3

#1

Finally finished my bench 1/3

Paul M. in San Diego

>I built my workbench over 5 years ago, but I've finally completed it. I just made and mounted the tail vise, so it's done! I've wanted to post pictures for a while, but the gaping hole where a tail vise should have been was something that I new had to be fixed first.

To give Adam some credit, working with just a stop on one end has increased my planing skills. But there are sometimes especially when working on a wide board that I don't want to have to reposition the work continually so that I'm planing directly towards the stop. I've rigged up pieces of wood in my hold-down and face vise to capture a board so it won't rotate when planing in a direction that's not exactly to the dog, but that wasn't much fun either.

The top is 2.5" hard maple, and the legs and stretchers are made from doug fir 4x4 posts. The lower sled feet are made of cypress, as I wanted rot and bug resistance since it's sitting on a garage floor.

A couple of years ago, I added 2/3 of a tool box. I've left the other 1/3 as open storage, and I think I'll make a deep drawer for the bottom to store 10" long molding planes vertically. That way, I can look down in the drawer and see the profile. I don't have lots of molding planes yet, but I'm working on that. ;-)

The tool box is shop-grade maple ply, with solid maple facing. The drawers have electron-eaten dovetails, since I didn't have enough confidence to handle hand-cut at the time. I'll do the next ones by hand. I added false fronts on the drawers so the entire face is clean maple. Finished with shellac.

The bottom drawer was made extra wide so that I could use it for plane storage. I wanted to put my jointer plane in diagonally so that it could fit. You can see it in the partially open drawer at the bottom. I've dropped planes off of stacked piles when they didn't have a real home, and I've had some rust on me in my garage. I haven't had any rust problems now that I oil them with Camelia oil and put them away after using in their drawer.

More to follow...


img

Re: Finally finished my bench 1/3

#2

Finally finished my bench 2/3

Paul M. in San Diego

>This picture shows an interesting feature. I knew from the beginning that I wanted a tool box, and I wanted to maximize the area allowed. But I also wanted to use the top of the box to store clamps to keep them close at hand. I also didn't want the bench to rack, and I was worried about the integrity of a bench with two pairs of 4" stretchers instead of one 8" or 10" stretcher as most benches have.

I solved the problem by making the shoulder ends of the upper stretchers to be 8", and then cut them down in the middle to allow easy access to the clamps. The mass of the tool box combined with the stability of these stretchers make this bench quite solid so I don't have to dance along with it while flattening stock.

There are about 20 of the german red-handled cheap clamps in there (various sizes), along with 5 aluminum bar clamps. The latter are what you see in the picture. It's great not having to go far for clamps.

One more....


img

Re: Finally finished my bench 1/3

#3

Finally finished my bench 3/3

Paul M. in San Diego

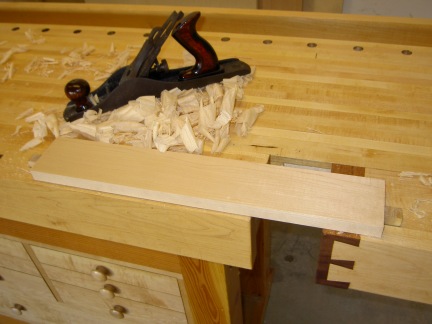
>After completing the end vice, I planed off 5 years of abuse, glue, and finish splats and gave the entire bench-top a fresh coat of oil. After a very short wait (less than an hour), I had to try it out. I recently resurrected this formally "barn fresh" #5 for a friend of mine, and it works pretty good huh?

The end vise was made primarily from the plans in FWW162 about a year ago. I thought that they made more sense than the ones in Landis' book. The dovetails were made by hand, and they look great in this 40Kbyte reduced picture. Actually, they don't look too bad in person either. I had a thick chunk of mahogany lying around, and it worked perfectly with the maple to make vice faces.

You can also see a row of round dog holes along the back of the bench. I wanted to be able to clamp irregular objects via triangulation, so I put these in. They work great with the hold-down and for holding up a telescoping arm lamp. I haven't used them for their intended purpose much though. I also have a row of round dogs in line with the face vice. The front dog holes are square. And all dogs are wood, so I don't trash my plane blades (been there, done that!).

Finally, you can see that I went the tool tray route. My bench is always against a wall so I can't use the back side. And that tool tray has prevented so many 3' drops to death that it's worked great for me. I highly recommend a tool tray if you don't use the back side of the bench.

Thanks for looking!


img

Re: Finally finished my bench 1/3

#4

Re: Finally finished my bench 1/3

GolfSteve in Calgary

>Great looking bench, Paul. (I'm a bit excited about benches at the moment - I'm buying the wood for mine tomorrow).

Cheers,

Steven

Re: Finally finished my bench 1/3

#5

Re: Finally finished my bench 1/3

Steve knight

>very nice. but 5 years? I thougth I could procrastinate (G)

Re: Finally finished my bench 1/3

#6

Re: Finally finished my bench 1/3

Derek Cohen (in Perth, Australia)

>Paul

That is a beauty! I will be storing pics of this for when I finally get it together to build my next bench.

In the grande scheme of things 5 years is not long. I built my current bench about 12 years ago and "outgrew" it about 5 years later. It is worth the time getting to know what you want and need.

I agree about the tool rest. My bench also sits against a wall, and the tool rest (similar to yours) is a lifesaver.

Regards from Perth

Derek

Re: Finally finished my bench 1/3

#7

Nice bench!

Bob Hackett

>I`ll be putting that in the files for future reference.Sounds like you put alot of thought into it,it sure looks like it too.

BTW-nice job on the plane restoration too.Your friend will be thrilled to get it and put it to work.How many hours did you say it took at the wire wheel?;^)

Mainely,Bob

Re: Finally finished my bench 1/3

#8

Jack Guzman from Maine

Re: Finally finished my bench 1/3

Jack Guzman from Maine

>Nice job Paul,

I've been looking at pictures of bench tool drawers for ideas for my own. Yours are pretty close to what I had in mind.

I have the veritas large face vice as my end vice and it's pretty much useless. I'm thinking about other solutions for the end but all I have is vague ideas so far.I use my small face vice almost exclusively. Not sure how much trouble adding a tail vice would be. I like a leg vice but wonder if putting it on the right side would be creating an obstacle.

Sorry about the ramble but your pictures provoked the thoughts. Thanks for sharing.---Jack

Re: Finally finished my bench 1/3

#9

Steve Kubien

I wish...

Steve Kubien

>I had built some serious tool-storage into my bench. Of course I can retrofit something but the thought of adding another project to my long list is rather discouraging.

The bench looks great. I really like the small shelf for clamps. That a great idea.

Question...Where did you get the holdfast? Is it one of the lower cost imports which isn't forged? If so, how do you like it. I want a couple for my bench but I have heard bad things about some of the imported-to-North-America models. Provide a link if you can.

Thanks for sharing and enjoy the bench!

Steve Kubien

Ajax, Ont.

remove the _9 to email

Re: Finally finished my bench 1/3

#10

Re: Finally finished my bench 1/3

Don Thompson, Cutler Ridge, South of Miami FL

>That is a beautiful bench, Paul. I still have not put together a nice bench, and I am going to save your photos as a design reference (you have pushed me towards a tool trough!).

Re: Finally finished my bench 1/3

#11

Re: Finally finished my bench 1/3

CBT

>Great job. You've made a bench to last several lifetimes.

Re: Finally finished my bench 1/3

#13

Re: Nice bench!

Paul M. in San Diego

>Heh! No wire wheels here!

Just a scrape with a utility knife blade to get off the largest crud accumulations, followed by a brillo-pad in the sink session. Rinse well, and bake in the oven at low temp to get all the water out. Then some fettling, and a wonderful plane has returned from the ages.

Re: Finally finished my bench 1/3

#14

Re: I wish...

Paul M. in San Diego

>Question...Where did you get the holdfast? Is it one of the lower cost imports which isn't forged? If so, how do you like it. I want a couple for my bench but I have heard bad things about some of the imported-to-North-America models. Provide a link if you can

The holdfast is the standard Jorgensen on that was produced about 5 years ago. I'm not sure they make them anymore. I think I got it from Highland Hardware at the time, but that could be an errant neuron.

It works great with only one problem. I put the row of dogholes along the back of the bench just above the back stretcher for the bench. The holdfast has a very long shank, and it bottomed on the stretcher before it met the benchtop. Hello Mr. Hacksaw! The holdfast doesn't quite have the vertical capacity that it once had, but it still will hold well up to about 4" in thickness.

Re: Finally finished my bench 1/3

#15

Very nice...

Scott Burr in Ben Lomond CA

>5 years, well I'm into mine 2 years and still have nothing completed (just the vices). Procrastinators unite! Great bench.

Re: Finally finished my bench 1/3

#16

Excellent ideas!

Wiley Horne--Glendora CA

>Hi Paul,

Putting heavy ends on those upper stretchers was a great idea. I believe Ian Kirby did something similar. However, one thing you didn't mention, but deserves praise, is the bracing afforded by packing that rigid drawer section between the upper and lower stretchers. That shearwall at the rear of the drawer section, combined with the flush fit against the stretchers and legs, isn't gonna let anything move.

The drawer sizing and depth gradation is outstanding! Which brings up a point: I believe the time you took to think the whole design through was well spent. You really do have to use a bench a good while in order to figure out what really works for you.

Very studly tail vise! Wiley

Re: Finally finished my bench 1/3

#17

Re: Finally finished my bench 1/3

Murph

>Paul,

Looks beautiful! Five years looks to be worth the wait.

Question for you...do your support members extend out and under the tray on the back?

Murph

Re: Finally finished my bench 1/3

#18

Re: Excellent ideas!

Paul M. in San Diego

>However, one thing you didn't mention, but deserves praise, is the bracing afforded by packing that rigid drawer section between the upper and lower stretchers. That shearwall at the rear of the drawer section, combined with the flush fit against the stretchers and legs, isn't gonna let anything move.

As much as I love praise, I believe this is somewhat misguided. I made the tool box to *slide* into the bench, so I made it ~1/4" shy in the side and top dimensions. The tool box adds mass to keep the bench from dancing across the floor, but not much rigidity. The rigidity is entirely from the stretchers.

Re: Finally finished my bench 1/3

#19

Re: Finally finished my bench 1/3

Paul M. in San Diego

>Question for you...do your support members extend out and under the tray on the back

The support members only support the benchtop itself. The tool tray is just 1/4" plywood rabbeted into the back of the bench edge and into another piece of maple in the back. It didn't make much sense to extend the supports under a thin sheet of plywood.

If you look at the 1/3 picture, you can see that the ends of the tool tray are continuations of laminated boards (behind the main benchtop). They have a ramp towards the inside of the tray so that shavings and dust can be easily swept out. These tapered ends are also rabetted to capture the bottom of the tray. I've seen plans for sliding or removable tray bottoms to open them for cleaning, but I just made mine permanently captured and easy to clean.

Sometimes I want to clamp things down to the bench, and this tray can get in the way of those operations. In those cases, I'll clamp a long 2x4 across the underside of the bench, which gives me a rigid piece to afix a clamp to another 2x4 across the top of the piece (sorta like a clamping caul). The sliding tray bottoms would have helped with this, as you can clamp directly through the tray to get to the underside of the bench. Like most things, you balance the plusses and minuses and it's never perfect.

Re: Finally finished my bench 1/3

#20

Jim in Burlington Ont.

Re: Finally finished my bench 1/3

Jim in Burlington Ontario

>Very inspriational and that gives me 3 1/2 years to finish the tail vise also. I mounted it twice and never looked right.

Re: Finally finished my bench 1/3

#21

Steve Kubien

Re: I wish...

Steve Kubien

>Thanks Paul. I just ordered a pair of them.

Steve K

Re: Finally finished my bench 1/3

#22

Re: Finally finished my bench 3/3

Mark S. in Chalfont, PA

>Hey Paul,

That is one nice bench. I started mine about 2 weeks ago. If it comes out half as nice as yours I'll be happy.

Good luck with it,

Mark

Re: Finally finished my bench 1/3

#23

Re: Finally finished my bench 1/3

Lee H

>I am green with envy, what a great bench. I built one last winter but cheaped out with a laminated plywood/tenpered masonite top. Planning to replace it with maple. NICE job.

👍 This page answered my questions

Your vote helps other woodworkers quickly find the answers and techniques that actually work in the shop.