WoodCentral Forums

Est. 1998 — 27 years of woodworking knowledge

A Simple Pair of Seven-Foot Oars

Posts

A Simple Pair of Seven-Foot Oars

#1

A Simple Pair of Seven-Foot Oars

Bob Smalser, Seabeck, WA

>These are for the wedding-gift sailboat to the oldest son, so the family consensus is that store-bought oars or my cruder, painted workboat oars won�t do�I�ll have to bite the bullet and finish something in�ugh�brightwork. The yacht-finish masochists among you should be pleased.


I pick a couple weathered 8/4 X 6 old growth Western Red Cedar planks off their stack. Tight grained and clear stock I milled from a sunken log I salvaged 4 years ago. These rift-sawn planks were milled to be door stock for the new house�but I can spare a couple for a good cause.

Why cedar? I have it on hand, and mast-grade Sitka Spruce, Port Orford or Yellow Cedar�all much stronger and more appropriate than WRC�are 8 bucks a BF. I have some good Doug Fir�but it is ugly finished bright, IMO�.and doesn�t plane as crisply as the others. I can do some things to the cedar that will make it adequately hard and strong for this application.


Well�after planing off the weathering�the chalk line shows I picked one wrong plank. A butt log board I couldn�t overcome the taper in�and if I rip it straight there is a pin knot in the way and insufficient stock remaining for the blade. Fine for a door panel or an oar blade�but no good at all for an oar loom. I can go back out in the rain and muscle around a few thousand pounds of planks to find a better one, or I can make do. I decide to make do. An edge joined blade will take longer to do but will be stronger, eh? A joined oar also gives me the option of orienting the stronger edge grain to the moment of effort in the loom�like in a baseball bat�while using the face grain pieces on either side of the loom to minimize the chances of the blade splitting. That option is useful when making an exceptionally light oar�which these are not, and I don�t use it, as I want these oars to have some spring during use.


The first step in laying up the oars is to joint the fence edge and rip my looms from the straighter 8/4 plank�and there is zero movement after the rip, which tells me the stock is perfectly seasoned. If it were otherwise, I�d have to go find other stock. I rip a 16th oversize and joint all the faying surfaces on the jointer for a good layup.


I rehearse my glueup�


�glue up using Elmer�s Poly and leave it overnight. Why poly and not epoxy? Well, in the old days, we woulda used Plastic Resin Glue, which in edge joining�a joint not hard on glue�is also more than adequately strong. Even with perfectly jointed edges, it will take a bunch of clamping pressure to bring 8/4 stock into a good joint�poly loves high clamping pressure while using epoxy under those circumstances may starve the joint of glue. The soft cedar soaks up glue, so I use a lot of glue on all mating surfaces, and let it soak in a while before clamping, keeping a wet surface.


This next step looks silly, but works. Because of the softness of the cedar, I�ll epoxy in a Purpleheart spline into the oarblade tip. It�s a crossgrain glue joint, but cedar is exceptionally stable and epoxy exceptionally flexible. In the process, I�ll use the heat gun to thin unthickened epoxy, flowing it deep into the end grain of the blade tip�.as much as the wood will take�followed by thickened epoxy and the splines, which are cleaned with acetone first, as Purpleheart is oily.


And the resulting assembly is allowed to cure.


Now I�m ready to mark my centerlines, stapling my face pattern to one of the glueups and cut it out. I like the pattern found for ash and spruce oars in Woodenboat Issue # 127 (Nov �95) and modify it for weaker cedar by increasing the scantling size a bit. My looms will be sided 2� X 1 7/8� tapering to 1 �� X 1 ���with a 5 inch blade width. For easy storage, I make patterns in two pieces on a long table and line them on the stock with a straightedge.

Continued�

Re: A Simple Pair of Seven-Foot Oars

#2

Part II

Bob Smalser, Seabeck, WA

>

After cutting out with the saber saw, I square and fair the edges with hand planes and spoke shave. You�ll always see two planes in my pics�the #3 is set coarser than the #4, which is set for a very fine shaving and is used in finishing. A #5 is used ILO the #3 for longer oars. Oars are best cut on a band saw, but you don�t really need one�just remember that the least precise your saw, the farther you should cut outside your lines�especially on curves�to be finished square to the line with hand tools with no unpleasant surprises when you turn the stock over and discover where your blade wandered.


I then use the cut and faired stock as a pattern for its mate.


The side profile or taper pattern is applied and marked on both sides of each rough oar�


�and the power jointer set up to machine the tapers. Set the unplugged jointer to take a 16th, then index the oar against the cutter head where the penciled taper first shows a 16th on the blade side of the loom. Make a tick mark on each oar indexed against the edge of the jointer fence as your starting point.


Turn the jointer on, open the guard using a push block held in your right hand and align the tick mark on the oar with the fence edge using your left. Then lower the oar face onto the cutter head gently with a forward motion, and push it through bearing down with the push block in your right hand.


Repeat using that 16th distance between pencil line and oar face each time, and you can taper the faces in about 8 passes per face so cleanly that they need no further work with the hand plane. Do a few dry runs, first, of course�. as machines can�t hear you cry.


I make an 8-Siding Gage (http://media5.hypernet.com/ubb/ultimatebb.php?ubb=get_topic;f=1;t=009685) , lay out my tapered, square looms into octagons for planing�.


�and rough out all the bevels with draw knife before finishing them with the plane and spoke shave. Very fast and efficient�but practice both using the drawknife in all 4 of its modes and reading grain before committing expensive stock to it. (http://media5.hypernet.com/cgi-bin/UBB/ultimatebb.cgi?ubb=get_topic&f=1&t=009003&p=)

Continued�

Re: A Simple Pair of Seven-Foot Oars

#3

Re: Part III

Bob Smalser, Seabeck, WA

>

I finish the beveling with planes and spoke shave. I prefer to face plane the blades first to their penciled tapers, followed by spokeshaving the transition to its lines�


�leaving the looms for last. My final planing is a light swipe with the #4 to remove any remaining pencil lines. The oar button and leather will be 30 inches from the end of the handle, and I make an abrupt transition there from 8 sides to 16 sides and finally to an oval using spokeshave alone all the way to the transition. I prefer my loom ends to remain 8-sided�I wouldn�t want my oars confused with something done in a factory.


I�m careful to stay on the outside edge of my lines when beveling�and the end result is a more pleasing (and stronger) 5-7-5 ratio than a true octagon. The left oar has been drawknived but not planed�note that I rough out the handles beforehand so a slip won�t take too large a chunk in that critical area. The right oar has been planed fair and clean.


Then I finish the handles with rasps and 60-grit paper, and then sand the oars with 60-grit on a sanding block�careful not to round over any edges.


After the rough sanding, I wet the wood to raise the grain using a damp towel, also raising any scratches and dents�and finish sand with 120-grit, easing all edges gently so they hold finish better. Raising grain between grits minimizes scratching, and removes all the fuzz that can telegraph through your finish the first time the oar gets wet.


WRC is a bit soft and splintery for use as an oar, so I encapsulate the finished oars in epoxy prior to spar urethane varnish. I simply brush on thickened epoxy heated to 110 degrees with a heat gun and allow the wood to soak up all it will take of it. Messy, and downright ugly to sand afterwards, as the wood usually off gasses some, making bubbles tedious to sand out�.but a rock hard and strong surface to varnish over. It doesn�t turn cedar into spruce, but these oars will likely serve a long time.


And after a couple coats of urethane on their way to 6 or so�they are reasonably straight, fair and suitable for service.


Re: A Simple Pair of Seven-Foot Oars

#4

As usual, an outstanding contribution!

Mark Harrison -- in Sydney, Australia

>

Re: A Simple Pair of Seven-Foot Oars

#5

Re: A Simple Pair of Seven-Foot Oars

Paul in NJ

>Bob,

That was an excellent article. You have a flair for writing and could write professionally. I have one question though. You write about using heated epoxy so that it thins and penetrates better. Heat makes the epoxy cure faster and would make the working time much shorter. Do use a special hardener to slow things down? Please explain this further as you have my curiosity aroused. Thanks for sharing.

Paul Dzioba

Re: A Simple Pair of Seven-Foot Oars

#6

Re: A Simple Pair of Seven-Foot Oars

Bob Smalser, Seabeck, WA

>I brush it on before heating and brush it in as it thins....plus I don't do anything really big that way ebcause its a monster to sand.

Use the green 3M no clog paper found at paint stores.

Re: A Simple Pair of Seven-Foot Oars

#7

Another epoxy question.

Don Thompson, Cutler Ridge, South of Miami FL

>Great article.

Why do you coat the epoxy finish with poly?

Re: A Simple Pair of Seven-Foot Oars

#8

Re: A Simple Pair of Seven-Foot Oars

William R. Duffield on the Cohansey

>You've written a very useful and timely article. I have one very small point regarding your octagon gauge. When laying it out, instead of dividing it in thirds, you should use the ratios 1 - 20.5 / 2 : 20.5 - 1 : 1 - 20.5 / 2 or 0.293 : 0.414 : 0.293

Also, I like to use wedges to hold the pencils in place.

For any engineers who are contemplating making the octagon gauge, note that as long as the bearings are made from rather small diameter nails, and the gauge is not much larger than the diameter of the stick, this is reasonably accurate. However, the farther from perpendicular the gauge runs, and the larger the diameters of the bearings, the less accurate the gauge becomes.

Next week, I'm planning to starting to work on replacing the schooner's jib club. I've got a 16' long 5"x5" piece of old growth longleaf pine, that I have to make into a 3" diameter spar. Not nearly as elegant or as complicated as Bob's oars, but I'll be using some of the same principles and tools.

Re: A Simple Pair of Seven-Foot Oars

#9

Re: Another epoxy question.

Bob Smalser, Seabeck, WA

>UV protection...epoxy deteriorates quickly in sunlight.

Re: A Simple Pair of Seven-Foot Oars

#10

Re: A Simple Pair of Seven-Foot Oars

Bob Smalser, Seabeck, WA

>Numbers make my head hurt....I like to coach doing it by feel and what pleases the eye. That's where 5-7-5 comes into it...the traditional shipwright's spar ratios.

But a big spar is one thing and a small, 2" loom is another...how you treat your pencil lines as I've shown can alter the piece dramatically.

This copy of an articulated spar gage from Mystic Seaport Museum is on my list to make next winter...you are welcome to download it and do the same:


img

Re: A Simple Pair of Seven-Foot Oars

#11

Ratio question for Bob and William

Angelo in Cornwall, NY

>Ok guys, the math part of my mind has taken a vacation. I get the 5-7-5 ratio, but how do I apply it to the piece I'm wothing on? Divide the width by 17, and then use the multipliers of 5/17 and 7/17?

I'm needing to make some pole saws for a tree pruning friend and he wants octagon poles....of sitka spruce no less.

Re: A Simple Pair of Seven-Foot Oars

#12

Re: Ratio question for Bob and William

Bob Smalser, Seabeck, WA

>All ya gotta do for 5-7-5 instead of 1-1-1 is plane to the outside edge of your pencil lines...draw a sketch of your spar in cross section that include the width of the pencil line and you will see it.

Use my method or that of a math-inclined boatbuilder friend to get to the same place:

"To make a scribing jig that will give you a great 8 side right through the tapers, figure a distance conveniently a bit larger than the largest square section that is easily divisible by 24.

For example: Assume a shape that expands from 1-1/2" at the heel to 2" at the partners and the tapers, but not evenly, to say 1" at the truck.

A distance of 2-1/4" is readily divisible into 24 units that are 3/32" each, so make a piece comfortably longer than that and drill it such that two nice round posts can stick down an inch or so with 2-1/4" clear between the inside edges.

Mark on center a spot 21/32" from each end (of the inside edges of your round posts) and stick through there whatever you want as a scribe. I like a fine nail but whatever.

You lay the stick across the spar stock at it's natural angle. This angle will decrease as you move from the heel up to the partners and then increase again as you move to the truck.

You'll be laying nice lines that put the lines 7 units from each end with 10 units between each. If you envision looking at the square end with your octagon drawn on the bottom there, and think about just the top edge for a moment, it will occur to you that the two diagonal sides to be planed away are the same as the part of the original face remaining. Each corner being planed off is a 45-45-90 triangle. The hypotenuse is the same length as what is supposed to be left of the original face. Hence the 7-10-7. Take one corner - lopping off two sides of 7 units each leaves a hypotenuse of so close to 10 units that you can't measure the error. Seven Squared plus seven squared (49+49) is pretty close to ten squared."

Re: A Simple Pair of Seven-Foot Oars

#13

As usual...

Bob Hackett

>There is nothing simple about your current presentation,even though listening to you makes it seem so.Thanks for including us in on yet another of your excellent projects.

I`m telling you Bob,there`s an editor somewhere just waiting for you to walk thru his door!

Mainely,Bob

Re: A Simple Pair of Seven-Foot Oars

#14

Re: octagons and simple maths

paul womack

>You don't need to get stock, draw circles, and the rest of it, if you can do (or remember) some trivial maths. The maths is (for once) easier and more accurate than the manual altenative.

USENET posting

BugBear

Re: A Simple Pair of Seven-Foot Oars

#15

Re: A Simple Tool (Long/Probably Boring)

Todd Stock

>The two tools I used to use for spars/other eight sided stuff was a marking gauge similar to that already shown (in my case, just a 6" scrap of mahogany with four nails in it - two large finishing nails for the outers and two clipped brads for the inners) and a shop-made octagon scale.

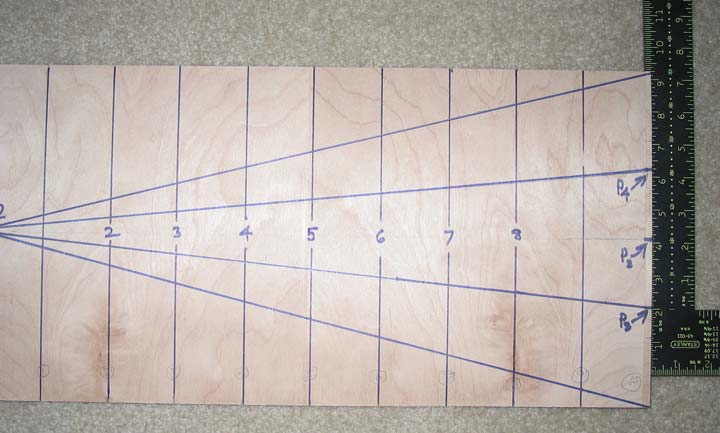
The later is easily site built with just a framing square, which has an octagon scale for just this sort of thing. The octagon scale on the framing square works by providing 1/2 the length of any side for a given size octagon, and is just visible in the photo (center of the vertical arm of the square...looks like a series of dots).

The octagon tool is easily made from a 10" wide by about 20" long piece of sheet stock (scraps of marine ply worked), and marked with the correct ratio of side distance for an octagon at one end.

Pick off the distance between the octagon scale's origin and and the '10' measurement (1/0 on a Stanley 45-011). Measure down and mark that distance from P2 to P3 and up from P2 to P4 (shot shows P2-P3 measurement).

Measure to the midpoint (5") of the left edge and run a line from this point to the right upper and lower corners, as well as to P3 and P4.

If you run a vertical every 2", you should be able to pick off the dimensions of any size octagon up to 10". Making the tool wider and longer provides additional accuracy, and laying out just the lower half would work as well.

The shot shows the layout, but I would use a marking knife or well-pointed pencil for an actual tool. Use a set of good dividers to pick off the distances and transfer them to your project.

Instead of using a framing square, you can use the 5/7/5 approximation already mentioned - just use some multiple of 17" for the vertical.

For more accurate work, or when you want to lay out larger octagons of a given side length (beyond the 67" limit of the square, or where the 1% error built into the 5/7/5 approximation becomes an issue), use a 0.7071/1/0.7071 ratio.


img

Re: A Simple Pair of Seven-Foot Oars

#16

Re: A Simple Pair of Seven-Foot Oars

William R. Duffield on the Cohansey

>I agree, Bob, measuring to three decimal points is way more precision than you need or would expect to hold to with the drawknife and planes or whatever suits your fancy. I've never seen a gauge for the next step, knocking off the corners of the octagon to make a hexadecagon, I thank anyone who makes spars should be able to do that part by eye, and then smooth it by eye and by touch.

That is an interesting tool, and very elegant as well. If you were making spars all day long, it would definitely be the way to go. I assume that the brass faces of the guides are aligned with the center of the pivoting shafts? That would keep it accurate over a larger range of diameters.

Re: A Simple Pair of Seven-Foot Oars

#17

Re: A Simple Tool (Long/Probably Boring)

Bob Smalser, Seabeck, WA

>Good one, Todd...I saved it and will try it some time.

Re: A Simple Pair of Seven-Foot Oars

#18

Re: octagons and simple maths

Bob Smalser, Seabeck, WA

>Thanks, Paul...saved that one, too.

👍 This page answered my questions

Your vote helps other woodworkers quickly find the answers and techniques that actually work in the shop.