WoodCentral Forums

Est. 1998 — 27 years of woodworking knowledge

Final touches on ball and claw

Posts

Final touches on ball and claw

#1

Final touches on ball and claw

Todd from San Jose

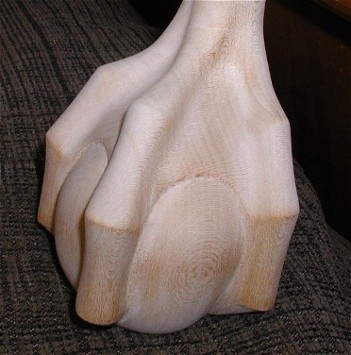
>I've nearly completed my first ball and claw leg, and would love to get some advice from the WC carvers. I've got it all smoothed out except for where the ball meets the webbing and claws. I haven't been able to get in there and smooth out the tearout and rough tool marks. Any suggestions? Would fine-file rifflers help? How do I get a fine (220+) finish in those nooks and crannies?

I was pleasantly surprised how fun it was. The ball isn't totally round, but I think only a fellow woodorker would notice. I really enjoy carving, a lot more than I had imagined. I used the Phil Lowe video as a guide, and used basswood to make this prototype. I'm going to make a Chippendale lowboy out of african mahogany now that I've learned how to do the legs.


img

Re: Final touches on ball and claw

#2

Cleaning up the concave areas

Wiley Horne--Glendora CA

>Hi Todd,

That's really a beautiful piece of carving. Looks most real. Hard to believe you worked straight from a video to that ball-and-claw.

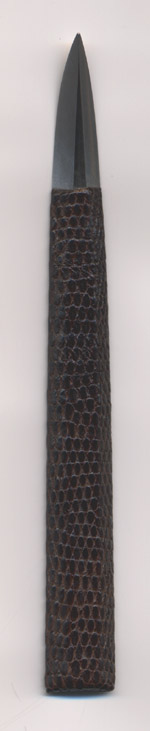
I have a suggestion on cleaning up those interior junctions where the web and claw meet the ball. John Aniano who posts on this site and is a violin bowmaker, has developed a small knife with a curved blade which is great for getting into concave places and scraping them clean. The knife is best used in a scraping mode for this purpose.

A picture of John's 'bamboo leaf knife' is attached. He shapes them from old files. That's lizard skin it's wrapped with. I finished a project recently which involved carving drawer pulls, and this knife was the only thing I could find which would get into the interior pockets and clean them up.

I'm sure you could make something yourself from a hardened nail or somesuch would also serve your purpose, but John's little knife is really a fine tool.

Wiley


img

Re: Final touches on ball and claw

#3

John's Web Site  *LINK*

Don Thompson, Cutler Ridge, South of Miami FL

>


John B. Aniano, Bowmaker

Re: Final touches on ball and claw

#4

WoW!!!

Tony - Memphis

>Mine doesn't look that good and Phil was looking over my shoulder! That's great!

Riflers are good and also scrapers. You can make a scraper that matches your gouge sweep to clean up.

Congratulations, that really is impressive.

Tony

Re: Final touches on ball and claw

#5

Re: Final touches on ball and claw

Alan Hamilton

>Todd,

Bravo! It's beautiful.

I'd be interested in more about the execution of the whole leg: everything from developing your design to finishing, and everything in between. It needn't be a book, but I'm interested in carving and I would appreciate the insights of someone who has acquired the knack.

Alan

Re: Final touches on ball and claw

#6

Jim in Burlington Ont.

That knife

Jim in Burlington Ontario

>That knife looks alot like the 3 sided knife used to ream out the holes of bowling balls. Usually about 10 dollars canadian.

Re: Final touches on ball and claw

#7

Re: Final touches on ball and claw

Ed Mulligan, Cape Cod

>Todd -

Great job there! From what I can see, no more work is needed. Try this: put the foot upright on the floor, back up a few paces, and look for your problem areas. Can you see them?

Ed

Re: Final touches on ball and claw

#8

Re: Cleaning up the concave areas

Todd from San Jose

>Thanks for the lead, I hadn't thought about using a knife to scrape it smooth. I'll contact him and check them out.

Todd

Re: Final touches on ball and claw

#9

Re: WoW!!!

Todd from San Jose

>Thanks Tony, it must have been neat to take his class. I had to do a lot of guesswork to fill in the blanks that the video didn't cover.

Re: Final touches on ball and claw

#10

Re: Final touches on ball and claw *LINK*

Todd from San Jose

>Hi Alan,

I probably did some things right, and winged it in other areas, so take what I tell you with a grain of salt. I took me about 20 to 25 hours total over the long weekend, I was going really slow because I was a bit cautious about taking this on. I found that if I carefully paid attention to how he held his tools and every word he said, it went very well. Phil Lowe's video was really great. I bought 7 gouges, a spokeshave, a rasp and file that he recommended. I basically watched a little of the video, paused it while I did what he said, then continued. Here's roughly the process:

1. I sketched a pattern for my leg, based on general proportions given by the video.

2. I created a template, and bandsawed to it. My biggest mistake was cutting over the line in a couple of spots- it took a lot of time to get this fixed during leg shaping.

3. I spokeshaved the leg smooth, where the spokeshave would reach, then sketched onto the wood the curve where the ball meets the claws and webbing.

4. I carved a cylinder the diameter of the ball, using a gouge that has a sweep the same diameter of the ball. Then, you chamfer the ends of the cylinder into large cones, then shape the ball.

5. Rough out the webbing. Without a model to refer to, I was winging this, but it turned out okay.

6. You then form each claw into cylinders, knuckle-to-knuckle. Then make each cylinder slightly concave, leaving the knuckles sharp.

7. Then form the talons into cones, and then shape them to final shape.

8. At this point, it's roughly in it's correct shape. You then clean it up, and try to make it proportional and aesthetic everywhere.

9. Now, round the corners on the leg with a rasp, then a file, from the ankle up. The video walks you through it. Then use a card scraper to clean up the file marks.

10. Then sand. The sanding very effectively removed all of the tool marks, to my surprise. I started at 80 grit, and worked through every grit to 220. I was careful not to sand the knuckles, trying to leave them sharp. They get slightly rounded from the occasional touching of sandpaper, which ends up just right.

That's it- it really wasn't that hard. I would encourage anyone to try it without hesitation. This is a practice piece, so I wasn't worried about making a mistake- that takes a lot of the stress off. I now can take on the real legs for the furniture with a bit more confidence.


Phil Lowe's video
Re: Final touches on ball and claw

#11

Re: Final touches on ball and claw

Todd from San Jose

>Thanks Ed, I did just that. From that distance, you can't tell that the ball isn't totally round, but you can still see the roughness at the ball to webbing interface. So I'm gonna try to clean it up a little before slapping on a coat of oil/varnish.

Re: Final touches on ball and claw

#12

Thanks Todd

Alan Hamilton

>

Re: Final touches on ball and claw

#13

Re: Final touches on ball and claw

Neal (San Jose)

>Where do you live? I'm near Bascom and Hamilton - I'd love to see that in person.

👍 This page answered my questions

Your vote helps other woodworkers quickly find the answers and techniques that actually work in the shop.