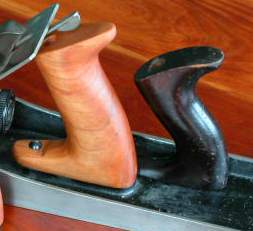
>Does anyone have a tutorial describing how to make replacement stanley totes and knobs? Any templates? I found a nice stash of beautful rosewood and would like to make some replacements. I can bandsaw out the pattern, but what other techniques are used? Router? Sanders? Files? With folks selling the replacement ones so cheap on ebay, it must be patterns and jigs, but how? Thanks
>Getting the hole for the tote rod at the correct angle and perfectly centered is the only hard part--even a drill press can wander over a 4 1/2" throw. I use a brace and start with slightly thicker stock than needed, mark the angle from an existing tote, and then drill. It will be a little off at the end, so the fix is to scribe the right offset from the hole at both ends, and scrub/level the waste. It's very straightforward to trace an existing tote onto paper and make any adjustments you want from there. The first one took longer, but at this point, it takes me about an hour from rough stock to ready for finishing.
Timing is everything, and I'm doing another this week--can take pictures if interested. The shot below is of one that I did for #8, sligtly larger and wider in cross section than the original.
>Informative link, Thanks Rolf. Even tho I don't speak, read, nor write German the pictures where more than adiquate to follow along and understand the process for making that tote. Very good photo essay indeed. While veiwing it I got to thinking once again that there are some things that are of Universal Language such as a Smile, Music, and Woodworking is definately one of them. Once whilst bumping along the streets of Toulon France I hapt upon a woodworking shop which I thought was an antiqure tool shop. Inside I go and starting "browsing and fondling" the tools much to the annoyance of the shopkeeper. Once he conveyed that this was his shop and not an atique store he got along famously. He demonstrated some tools, I admired the designs differences of the tools. Apparently these tools either belonged to his Grandfather or Great-Grandfather, I wasn't exactly sure, but they where old, and he obviously treasured them. I also got along well with the shop keeps in Italian woodworking shops. Yessir, woodworking is a Universal language in my book.
>Your pictures are excellent. One in particular caught my attention and I hope I didn't commit a crime by copying it and pasting it here so you might discuss it. The reason is that I've had some trouble doing what you are doing in this picture and wonder if you could give me a pointer on technique.
My files all have a bit of a convex surface on one side and concave surface on the other, even big thick 14" files. As I understand it, this is a given limitation of file design, hardening and tempering: all files are concave-convex to some degree.
Anyway, using a file for the purpose your photo illustrates, especially freehand, in my hands, doesn't give me a flat bed. This is especially true if I'm filing both the metal and the wood. The "flatness" standard I compare my work to is bluing a precision ground 1-2-3 block, which is advertised to be 0.0005" flat. I understand that once you fit/glue the infill, the metal bed and infill bed are less than perfectly aligned and something must be done about it. From the metal work on this particular plane, I assume you also have a vertical milling machine with an end mill cutter. I'm curious why you would use the file and not the end mill.
Could you talk about your file use technique and rationale a little bit?
>My approach is not to file freehand. I build the tote with the exact angle and square to the sides. This is a process which takes some time, because i take very carefully the cuts with a plane. Mounting the tote, checking, planing, mounting...., until it fits almost perfekt to the metal body.
Then I align the wooden and the metal body with a file, but i use the wooden body as a "guide" wraping a piece of paper around the file at the areas where the file touches the wood. If the wooden tote and the iron are almost perfect I remove the paper and file very carefully the finish, checking every time with a straightedge.
My files are also not perfekt, but I think that is no problem, because you can see with the straightedge where to file and remove material.
With these technic I got a plane with a very good performance.