WoodCentral Forums

Est. 1998 — 27 years of woodworking knowledge

Bench vise design

Posts

Bench vise design

#1

Bench vise design

Mitch

>I'm building a vise using a Record bench screw that is 1 1/8" thick. The maple moving jaw will be 6" tall and about 3" thick. It will have 1/2" thick steel rods on either side as guides. My question is: how wide can the jaw be before the clamping strength starts to diminish on the ends? In the last FWW shop issue there was a workbench that had a front vise made with a screw with a moving jaw that was 18" wide. How much wider could the effectively jaw be?

Re: Bench vise design

#2

Re: Bench vise design

Bill Houghton, Sebastopol, CA

>I will leave it to others to answer your engineering question, but will comment that 1/2" guide rods seem awfully light to me. I'd go to 1" rods - if that's manageable. The heavier rods should give the vise much more rigidity.

Re: Bench vise design

#3

Re: Bench vise design

Adam Cherubini, NJ

>Mitch,

I think that's a really bad design. Chances are that bench in FWW won't do what you would want it to anyway. You have to watch out for guys who build benches that don't really work.

To answer you question, you need that screw as close to your work piece as possible. The thickness of your jaw isn't the problem. When you clamp something off center, either side-to-side or up-and-down, the jaw wants to rack. Trying to stop that racking using heavy steel rods, probably won't do. When they are big enough so they wont bend, they'll wear out the holes they're in. You don't need much slop to make the vise unusable.

Here's my adviSe:

Stick with the traditional designs, or buy a new record 52-53. The record isn't a great design structurally, but its stout and relatively short. The connections are metal to metal precision machinings.

The traditional designs come in two basic flavors.

1) The leg vise- I recommend this simple design. Pair it up with some pegs and holdfasts and you have a very flexible and strong vise.

2) The twin screw- My twin screw has a loose fitting jaw. The trick is keeping the screws very very close to the top of the bench. With your record screws, you probably will not be able to lay a board on top of the screws and clamp it. The jaw will rack. Your work must be placed between the screws.

My screws are wooden. 1-1/2" threads with 3"-1/2" heads. In this case the heads push on the jaw. The tops of the heads are nearly flush with the top of the bench. This enables me to set boards on top of the screws, since the large heads will stop the jaw from racking. Moving the jaw in and out is easy. The screws are not connected in anyway to the jaw and the holes through the jaw are oversized.

You might be able to fasten a head of some sort on your screws to do the same thing. Otherwise you are forced to take the racking out where the screws pass through the vise. As these holes become closer to the screw diameter (tighter fit) moving the jaw in and out becomes more difficult, thus the veritas chain synchronized twin screw vise. (Yet another LV solution to a problem that never existed, but oh well.)

Lastly, with the traditional design, you needn't compromise. You can have both vises, as my bench has. Using the same screws in different holes, you can set up whatever you like. Check out Garret Hack's traditional bench on the cover of "The Workbench Book". Too bad the best looking and most functional bench depicted in the workbench book, isn't discussed. Good enough for the cover, but not good enough for a paragraph inside. Go figure.

Adam

P.S. Everytime we talk about workbenches, I get steamed at Scott Landis all over again. That could have been such a better book. Ditto for our beloved LV. They sure have a penchant for solving problems we don't have. My new favorite is the micrometer adjusting marking gauge! I think I'll make my next piece out of stock that is .7405" thick.

Re: Bench vise design

#4

Adjustable micrometer gauges

Pam Niedermayer - Austin, TX

>In all fairness to LV, Kingshott designed and used such a gauge, except it was a mix of the adjustments of the LV and a pin gauge. I haven't used either of these, still in the stone ages gauge wise; but I've long thought it would save a lot of time and putzing around to be able to get the setting close, then adjust slightly by screw to the piece, without having to take the gauge off the piece and guess again.

Pam

Re: Bench vise design

#5

Re: Adjustable micrometer gauges

William Duffield on the Cohansey

>A tweaker is fine, but you doesn't need a vernier scale :^)

Re: Bench vise design

#6

Re: Bench vise design

Mitch

>Adam,

Thanks for your excellent response. I'm trying to digest it. I've got a couple of limitations: first, I've only got one record screw. second, I can't afford the twin screw vise.

I've got an idea I'm trying to work through that is definitely non-traditional. I'm perfectly willing to fail, but I just want to play with it for a while. If it won't work, I'm happy to go the traditional route.

I'm intrigued by what you said about the screws being easy to remove so that you can set them up in different holes. I'm having trouble visualizing what you mean about the screw heads. Do you have any photos or drawings of your bench?

I agree about the Workbench Book. It has some great stuff but could stand an update.

Thanks again!

Mitch

PS: where in NJ are you? I'm in NYC.

Re: Bench vise design

#7

Yeah, OK, good point.

Pam Niedermayer - Austin, TX

>

Re: Bench vise design

#8

Jack Guzman from Maine

Question for Matt and Adam

Jack Guzman from Maine

>After reading this thread I wonder if your vice screw will work to power a homemade leg vice.I picked one of those vices up at a yard sale and they are very simple. All you need is a good screw and some large pieces of hardwood.

So question is--will this work for you?

sorry if this is a harebrained idea

Jack

Re: Bench vise design

#9

Jack Guzman from Maine

that should have read"Mitch and Adam"

Jack Guzman from Maine

>

Re: Bench vise design

#10

Steve Kubien

Hey Mitch, you can have...

Steve Kubien

>another vise screw. I've got one kicking around from a machinist's vise with an Acme thread which you can have for the postage.

Ping me at skubien@sargentcanada.ca if you are interested.

Cheers,

Steve Kubien

Ajax, Ontario

remove the _9 to email

Re: Bench vise design

#11

Well Adam...

Rob Lee

>...I've said in print before that I think micro-adjust marking gauges are not good value ...but we do listen to what customers want though (and have people to keep employed here) hence our reluctant production of a simple (and inexpensive) fine adjust version...

Whether or not you personally find something useful is one thing - but it's quite another to denigrate other peoples choices. To each their own..

My 2 cents....

Rob Lee

Re: Bench vise design

#12

Vise jaw racking

Adam Cherubini, NJ

>Rob,

I apologize if I hurt your feelings. I know you guys all work very hard trying to satisfy your customers. I think that�s obvious to anyone who�s chosen to buy anything from LV. Any criticism must sound like an ungrateful slap in the face.

But in the past, objective, analytical discussions here have helped manufacturers and users alike. We seem willing to endlessly discuss and analyze chisels or smooth plane performance. In my opinion, it�s high time the magnifying glass headed your way. I�ll pass on your wheeled marking gauges, honing jigs, and dozuki�s for the moment. This thread is about vise jaw racking.

Here are my concerns:

From the LV website:

This is the only non-racking full-width end vise on the market. You can clamp anything anywhere in the vise and the jaws stay parallel.

Is this a true statement? Anywhere? Really?

I like to joint narrow stock by placing it on top of my twin vise screws. The LV Veritas Twin Screw Tail Vise appears to react jaw racking (about a horizontal axis) in a very close couple where the necked down screw interfaces with the thrust plate. There must be a very tight toleranced hole there. I would think long term wear is an issue. I don�t know of any other vises that use this sort of arrangement.

I suspect the racking LV is referring to is the side-to-side motion (about a vertical axis). For what its worth, I think the two screws are far superior to the guide bars design for this sort of racking, but chaining them together doesn�t help you for this. In fact, it limits you to holding only parallel stock.

LV also refers to their twin screw vise as a tail vise. Traditionally, we never see twin screw vises as tail vises. There must be reasons why. A very basic operation most users will tackle is flattening stock. When we flatten stock we rely on long planes, and a flat bench. LV instructions discuss jaw sag and what to do about it. But just by reading the LV website, it appears this vise isn�t well suited for use as a tail vise. Besides the sag, you really have to push down pretty hard to begin the cut. LV�s twin screw vise offers no acceptable load path for that procedure. That really is the trick of traditional tail vises and the reason they are so very complicated.

I guess I�m trying to make the point that:

1) Workbench vises are complicated machines. Seems to me it takes either a few engineering degrees, or a few hundred years to figure them out. Although I have the engineering degrees, I went with the few hundred years approach.

2) That a vise is offered for sale, or that it was photographed by Scott Landis, has absolutely no bearing on whether the vise is useable in every instance or not. Most vises have strengths and weaknesses. I�ve attempted to point out two weaknesses with the Veritas twin screw vise.

Obviously, if the concerns I expressed don�t concern you, this may be a great vise for you. Otherwise, I hope Rob writes back to explain to us how these things work, or better perhaps, what they were designed for, what they are best at, and what they aren�t good for. If you are making your own vise like Mitch, I think you�ve got to consider all of these racking, and sagging issues, along with strength and stiffness.

Adam

Re: Bench vise design

#13

Re: Vise jaw racking (longish)

Mitch

>This has been a helpful discussion so far (if not a little too hot-toned) and has caused me, temporarily, to chuck the ideas I was working on. I want to thank Steve Kubien for the generosity and all-out good will of giving me a bench screw he wasn't using. The information on this site, Adam's wisdom on the topic, as well as Steve's generosity are inspirational.

Back to the topic at hand: Now (thanks to Steve!) I have two bench screws. I'm thinking of the following options: 1. build my own version of the twin screw vise (unless Rob Lee wants to send me a sample of the LV version! :) ) 2. build a one-screw end vise and use the other screw for a face vise.

I think my preference is to build a one-screw end vise (for holding stock to be flattened and edge-jointed) and somehow make it possible to remove the screw and use it, along with the other screw, to make a twin screw vise for dovetail cutting. This could be very complicated but that's ok by me as long as it is sound.

Can anyone tell me how to buy the slide hardware for end vises without having to buy the screw with it? I'm flush with screws all of a sudden.

Thanks, everyone.

Re: Bench vise design

#14

Re: Vise jaw racking

Frank Mutchler in Colorado Springs

>Hi Adam....put down that Blacksmith's hammer & take off your tinfoil hat...this is not a flame ;>)

Unlike you, I don't have an engineering degree so my opinions are simply that. I'm going to be installing the LV twin screw vise on a new bench in both the face & tail position. Notice the future tense (2 of them are sitting in there boxes patiently waiting)...I can't speak from experience but have considered the 'sag' factor and I believe it can be easily mitigated by using one or more threaded shims (for lack of the proper word, maybe pillow block??) to support each of the threaded vise shafts along their entire length. I think the screws should be extended about 6" or 8" to help by providing additional leverage surface. This should eliminate the racking you refer to in the vertical axis.

So far as clamping non-parallel objects, I believe the jaws can accomodate iregular objects by disengaging one of them from the sprocket.

These vises are relatively inexpensive and I don't expect them to compete with the Tucker class vise. A little tweaking seems to be the norm with just about every tool I've purchased.

So far as longevity, If I pay $170.00 for a tool and it gives me 10 yrs. or even 5 yrs. of service I really won't think about complaining. A vise is after all a tool and tools get used up.

Just curious, have you used the LV Twin Screw Vise for any extended period of time? Your opinions on modifications would certainly be welcomed by me, if not by everyone here.

Sorry, I like my LV sharpening jig and highly recommend it. I can think of a few improvements, but that's another thread ;>)!!

Re: Bench vise design

#15

Re: Vise jaw racking (longish)

Adam Cherubini, NJ

>Mitch,

I'm not sure I'd recommend a traditional sliding tail vise. I hope my post leaves you with the sense that this stuff is complicated and it could be that you end up with something that doesn't work at all.

As we discussed, the twin screw vises work fine as long as you are clamping something between them. As soon as you wish to clamp on top of them, the problems start. I described how I dealt with the problem. I'm hoping Rob or someone else will write back to discuss LV's approach.

Interchanging screws may be difficult since you only have two vise-screw nuts. (wasn't sure how to write that politely)

Using the screws and nuts you have, and because of their thrust plate/garters, I'd be inclined to focus my energy on leg vises. Leg vises are strong, and abundantly easy to make.

A leg face vise is fine for jointing (horizontal clamping) when paired with additional vertical supports (peg, deadman, etc). For drawer sides (veryical clamping), its plenty wide enough to support a drawer side vertically. For wider stuff you'd at least need a dead man.

For longer stuff that you want to clamp vertically (like a carcass side), a vertical leg vise is at a disadvantage. Placing the stock to one side of the screw (instead of on top) gets you into the jaw racking issue that lies at the heart of this discussion. One solution I have seen, is angling the leg vise so that long stock placed vertically can be clamped in the "sweet spot" and still pass the screw on its way down.

If we keep rotating this design until the leg is horizontal, we end up with the Nicholson bench vises in use at Colonial Williamsburg. While the jaw appears horizontal, the screw-tongue line is not. At CW, their tongues aren't bored for pegs. They place scrap wood at the tongue end. This is a fine solution that would work for any vise, but I find it inelegant.

If you experiment, you'll quickly see the leg vise's elegant superiority as long as you accept that pressure can only be applied along the screw to tongue line. That said, you can position that vise/line as you need to meet your requirements.

I would look carefully at the Nicholoson bench, and the French benches that proceeded them. Those are designs that worked.

Also, no reasons why a vertical leg vise wouldn't make an acceptable tail vise. You could even make it internal, with a dog passing through a slot in the bench top.

Adam

Re: Bench vise design

#16

Re: Vise jaw racking

Rob Lee

>Adam -

I really don't have anything to add - your opinions are certainly as valid as the next persons, and I really don't have any issue with criticism either...

If you re-read your postscript, it does come across as somewhat sneering...and that's really what I take exception to...you ARE making personal comments there- and that's hardly objective.

I have no idea if you've even seen or used one of these vises (based on what you've said, I suspect you haven't) - but basing an evaluation on catalog copy posted to a website is hardly the epitome of being analytical.

Feel free to point a magnifying glass anywhere - but I'd suggest a mirror first.

Cheers -

Rob

Re: Bench vise design

#17

Re: Vise jaw racking (longish) *LINK*

Jonathan Peck - N.Y.

>Adam said:

"For longer stuff that you want to clamp vertically (like a carcass side), a vertical leg vise is at a disadvantage. Placing the stock to one side of the screw (instead of on top) gets you into the jaw racking issue that lies at the heart of this discussion. One solution I have seen, is angling the leg vise so that long stock placed vertically can be clamped in the "sweet spot" and still pass the screw on its way down."

This reminds me of a recent posting on another forum by Ken Greenberg:

As some of you may have noted, I'm in the midst of (finally) reading

Aldren Watson's "Hand Tools - Their Ways and Workings". I highly

recommend this book to everyone. Even after messing about with

hand tools for ten years or so, there are all kinds of things I'm still

learning from Mr. Watson. Here's one that was so obvious that it

ought to be passed on, especially since it never occurred to me and

I never heard it mentioned on the list - explicitly, anyway.

There are often times when you want to secure a board in the vise

vertically, which means that it is held only on one side of the vise

jaws. Clearly, this is not good for the vise as it tends to twist it

slightly as the jaws are tightened. A better idea is to put a piece of

scrap on the opposite side to even the stress. But sometimes it's

just too much trouble to go look for one if it's not right on the

benchtop, and after a while you get sick of picking them up when

they fall out as the jaws are loosened to free the workpiece.

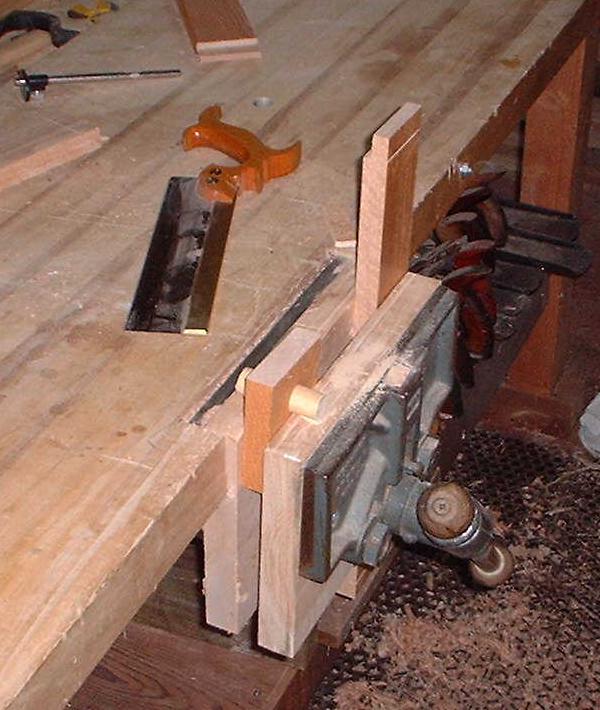
The obvious solution that Watson provides is to make a small block

of the same thickness as you commonly work on, and to secure it

with a dowel through the block. That way, it doesn't fall on the floor

when the vise pressure is released, and you're ready to move on the

the next piece, as when sawing tenon cheeks in a number of

boards. It's use also becomes obvious, and you're not likely to toss it

in the scrap bin when done and have to go looking for another next

time.

Since making M & T joints is an almost daily occurrence in the shop

these days, it only took me a day or so to grab a brace and some

3/4 inch dowel and make one of these. Here, it is in use while

sawing the tenon cheeks:

Just one of those things I should have thought about years ago -

hope it helps someone


sawing tenon cheeks

Re: Bench vise design

#18

Re: Bench vise design

Tim of San Leandro

>Wow!......

about as impassioned as the bevel up/bevel down camps....

I think the take home message is quite simple...there is no do it all one vise for everything. Just like anything in life, you gotta compromise. Pick a vise, buy it or make it. If it suits you and your work style...great. If not, start again.

Re: Bench vise design

#19

Re: Bench vise design

deanj

>As is said on a fun talk show here in the Twin Cities:


"You learn more here by mistake than elsewhere by design."

That can be taken may ways, but is oh so true!

-Dean

Re: Bench vise design

#20

Re: Vise jaw racking (longish)

Paul M in San Diego

>I made some vise separators for holding one end of the vise face open when clamping on the other side. I took a small chunk of 1/4" wood and screwed it to a 3/4" chunk at a right angle. The end result is an "L" made of wood. I did the same with 1/2" and 1". The right angle makes sure they don't fall through the vise. I made these out of about 2" square scraps nad marked them with a bold pen so I could easily find the size I wanted. They take very little room in my tool tray, and are always there waiting for me whenever I need them.

Re: Bench vise design

#21

Exactly right (long)

Wiley Horne--Glendora CA

>Hi Frank,

After using two LV twin screws for a coupla years, I totally agree with your assessment.

Your zero-clearance blocking above the screws will avoid any sag. There is no vertical play in the screws as they pass through the rear jaw. And play in the front jaw mechanism disappears as soon as you apply clamping pressure. So it really locks up solid. I just went and clamped a board in face jointing position and put my full body weight on the outside corner of the front jaw, and it did not move a hair. That's a 'load path' that works, but I do believe that the zero clearance blocking is important.

My experience is that Lee Valley's instructions to put a 3/32" vertical slope on the front jaw does offset all vertical play for purposes of clamping small pieces at the top of the vise. I have 8-1/4" deep jaws with almost 4" capacity above the screws, and the vise will tightly hold thin sticks for jointing. Not infrequently I joint thin pieces where the vise only has a 1/4" or less purchase on the board, and it gets a stout grip and won't slip.

I almost never clamp boards between the screws. On my end vise, there is 7-1/4" of clamping capacity between the screw and the front corner of the bench. When transferring dovetail marks from the tails board to the pins board, I clamp the pins board there because it's helpful to use the squareness of that corner to verify alignment of the boards. The light happens to be best there, so I clamp boards vertically at that corner--again, outside the screw--to saw tenon cheeks and dovetails. In fact, the best thing I like about the Twin Screw is the ability to clamp outside the screws without racking, and without having to shim the other side. OK, I did glue a 1" wide vertical shim on the far outside jaw face, and planed it down in a taper to where it built up the far outside face by 1/64". But that's all the monkeying around that was needed.

I also did not find it necessary to do that complicated captured-nut arrangement for affixing the rear jaw, but that's another opera.

Wiley

Re: Bench vise design

#22

Re: Leg vise -- no racking?

Jeremy Osner

>Hi Adam, I've never used a leg vise but it seems to me offhand like racking could be a problem -- isn't the screw located pretty far (vertically) from where the work is clamped? Or is there some kind of mechanism to counteract this?

Re: Bench vise design

#23

Bingo

Adam Cherubini, NJ

>Hi Jeremy,

The trick to the leg vise is its adjustable tongue. Mine is simply a thin board with holes in it. A peg through one of those holes counteracts the racking, and allows you to situate the jaw however you wish. I'll try to post a picture.

When are you going to come for another visit? We have some new tools for you to try.

Adam

Re: Bench vise design

#24

Re: Bench vise design

Adam Cherubini, NJ

>I truly am sorry for any hurt feelings. I certainly didn�t mean to offend anyone, though I recognize now, thanks to Jonathan, how my writing makes me sound so borish. I apologize for that.

That said, I stand behind what I�ve written, however insensitively it was phrased. I eluded earlier to LV solving problems I don�t have. I stand behind that. The wheeled marking gauge is a good example. LV considers it an improvement over the traditional approach, I respectfully disagree. That's a different conversation I'd be glad to have in another thread.

Unfortunately, and in my opinion, they�ve also created problems I didn�t have before. This isn�t personal, I�m simply comparing designs as we would block planes.

In the picture below, a near crushing force is applied. As you can see there�s no jaw racking because very little moment is introduced. The trick to this elegant design lies in the large screw heads. Notice that they are very close to the top surface of the bench. This allows clamping of very small stock.

I appreciate Wiley�s remarks. He�s found racking not to be a big problem. Whatever racking he sees, can be accounted for by angling the face of his moving jaw.

Both of us have to deal with the issue of jaw racking. I didn't make it up, its a real issue. The two designs simply handle it differently.

Please see next message:


img

Re: Bench vise design

#25

Re: Leg vise -- no racking?

paul womack

>Leg vices suffer from extreme racking laterally, but in normal use, it doesn't matter.

With regards to vertical racking they work well, since the pivot point is a VERY long way from the stress.

They could suffer from non parallel jaws, but the more complex version have a moveable lower pivot, which is what Adam describes.

As Adam says elsewhere, all the designs address different issues and have varying pros and cons.

BugBear

👍 This page answered my questions

Your vote helps other woodworkers quickly find the answers and techniques that actually work in the shop.