WoodCentral Forums

Est. 1998 — 27 years of woodworking knowledge

Simple but vexing design issue

Posts

Simple but vexing design issue

#1

Simple but vexing design issue

Mike Schwing from Md

>Hi all. Been a while since I worked with a flat woodworking project as I was bitten badly by the lathe bug.

I have a simple project/task, but just can't decide on the best way to deal with the wood movement issue.

My parents want me to build a table top for them out of something dramatic to finish off their newly redesigned kitchen. This table won't have food on it, but my problem isn't with the finish (Probably Waterlox).

I have found the perfect piece of outrageously quilted maple, and its thick enough to resaw and still have 1/2-5/8" finished thickness. This top will fit OVER an existing table top so thickness isn't really an issue anyway. I'd prefer this over resawing very thin and veneering as my veneer skills are minimal.

I would bookmatch this and frame it in wenge probably. The wenge frame is my issue. The top's dimensions are 36"x22" and the wenge border along the short dimension has me vexed.

My options as I see them;

Join them with 45 degree mitres, as a picture frame, and spline the joints with either wenge or quilted dovetail splines for effect, or just hidden splines, and hope the wenge doesn't separate from the maple when it expands.

Tongue and groove them and just glue them at the center and screw them from underneath at the ends with a screw that has a slot cut for movement. This would negate the movement issue but would leave a gap at the joints which will show during the winter.

Instead of a border, a decorative contrasting inlay border near the edge of wenge or walnut.

Others? Which method or combo of methods would you recomment? And, depending on the choice, it may or may not be an entirely hand tool project, only because I don't have the hand tools to cut a tongue and groove, yet. I had a complete Stanley 55 but I donated it to a worthy wood related charity for fundraising. Not that I would have been able to figure out how to use it anyway...

This will be built during summer when the wood is expanded.

Thanks!
Re: Simple but vexing design issue

#2

Re: Simple but vexing design issue

Ed Mulligan, Cape Cod

>Mike -

I'd make the breadboard end, but with a small change. Rather than butt the end pieces to the lengthwise pieces, do the opposite. Have the long pieces of wenge butt up to the breadboards. The long pieces would have a tongue too.

Ed

Re: Simple but vexing design issue

#3

Pegged and lapped miters on breadboard ends.

Sam Simpson

>

Re: Simple but vexing design issue

#4

Greene & Greene

Wiley Horne--Glendora CA

>Mike,

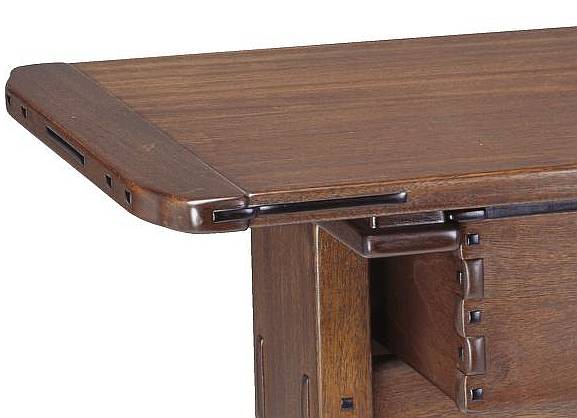
You might take a look at how the turn-of-the-century (last century) architects Greene & Greene used breadboard ends. They allowed the ends to stand proud of the long boards. The breadboard ends were screwed (not glued) into the tongues of the long boards, and the counterbores plugged with ebony. The screw slots were elongated to allow movement.

On some pieces, long ebony splines were used to decorate the discontinuity where the breadboard end stands proud of the long front. These splines were glued into mortises let into the long boards, and floated in the matching mortise extension in the breadboard end.

Here's a link where you can check this out. Note the kitchen table, which does not use the ebony splines in front, versus the server down at the bottom of the page, which does. Here's the link.

Wiley

Re: Simple but vexing design issue

#5

Greene & Greene spline ?s

miami

>Maybe I'm misunderstanding the shape of the 'long' ebony splines, but if they are glued to mortises in the ends of the long boards, why don't they themselves cause the same problem that gluing the breadboard directly into the mortises would cause?

And, what shape is that ebony spline at the end of the serving table? Rectangular, like a wide flat 'U,' something else?

What (if anything) does the long 'counterbore cover' on the end of the serving table cover? I asume the mortise in the ends of the long boards in the serving table are not mortised as deeply as the ebony spline makes it appear - i.e., several inches ... ?

Many questions, I know ... thanks in advance.

Clay

Re: Simple but vexing design issue

#6

Re: Greene & Greene spline ?s

miami

>I realized this will be a lot easier with a photo. Now that I look again, it appears to the a 2-part ebony spline? A spline and something else?

Clay


img

Re: Simple but vexing design issue

#7

Re: Greene & Greene spline ?s

Wiley Horne--Glendora CA

>Hi Clay,

Caveat: What I know about this joint is contained in an article by Alan Marks in Fine Woodworking, Sep. 1978, p. 43. His drawing and description is reproduced in the book 'Greene & Greene: Furniture and Related Designs', by Randell Makinson, Peregrine Smith Books, 1982.

The notion is that the primary movement will be the long boards shrinking and expanding tangentially, and therefore sliding along the adjoining face of the breadboard ends. The long boards are tongued, and the breadboard end is grooved.

G&G's thought was not to fight the movement, but rather to allow for it. They did this in two ways. First, the breadboard ends are drilled with oversized holes for the screws, and the screw seats on a slotted washer in the even-larger counterbores. So what's happening behind those ebony plugs is that the screw can slide or bend a little to permit lateral movement, without losing tension. In the photo, that long plug in the breadboard end is oversized for decorative purposes (I think).

Second, the ebony splines in front...The spline is a single piece, and is flared to follow the profile of the proud breadboard end. It is glued into a mortise in the long board, and the flared end of the spline floats loose in a deeper mortise or recess in the breadboard end.

The theory of the spline is that it can be sized so that, as the long boards move, it is never pulled all the way out of the breadboard, and it also never 'sinks into' the breadboard. So the joint always looks the same to your dinner guests. I have seen one photo where the calculations were off, and the spline did get sunken into the breadboard and looks like hell. Oh well.

Wiley

👍 This page answered my questions

Your vote helps other woodworkers quickly find the answers and techniques that actually work in the shop.