WoodCentral Forums

Est. 1998 — 27 years of woodworking knowledge

Cherry Tea Table

Posts

Cherry Tea Table

#1

Cherry Tea Table

Paul M in San Diego

>I've just completed a cherry tea table (a.k.a. candlestand). Much of the work was done with hand tools, as I harbor a deep fright of most power tools.

I took a veneering class at Palomar College about a year ago. I was so pleased with the sunburst I made, that I knew it needed to be made into a nice table.

This project contained lots of firsts for me:

o First veneered project

o First hand-cut sliding dovetails

o First significant woodturning project

o First work with curved and shaped components

o First project with a rubbed-out shellac finish

The first picture shows the profile of the table. I puzzled over the turning pattern for the column until I found a candle-stick that my wife made while playing around on the lathe. I liked it so much, that I copied the pattern on the column.

The legs were all cut and shaped by hand. I filed a scraper to the circular profile I wanted on the tops of the legs, but then found that a patternmakers rasp worked much better at getting the shape. I did use the scraper for the final removal of the rasp marks, and it worked well for that.

More pix to follow...

img

Re: Cherry Tea Table

#2

Re: Cherry Tea Table

Paul M in San Diego

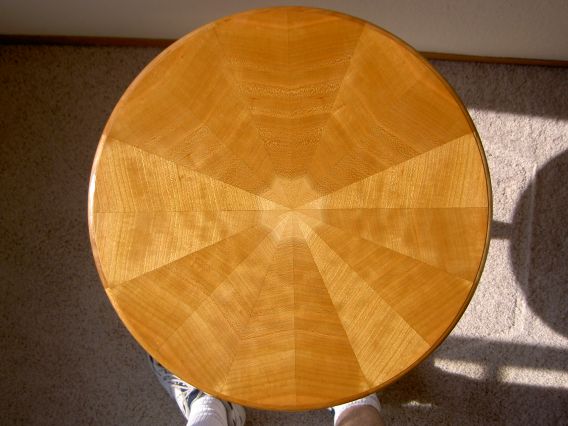
>Here's a picture of the sunburst on top. The center pattern is the sapwood, and I believe that the sapwood on Cherry stays white with age. The heartwood around the star pattern will darken significantly with age. The points in the center are not absolutely perfect, but they were among the best of the students in the class.

The substrate for the veneer is an octagonal piece of baltic-birch plywood. I made an octagonal 2" frame of cherry to surround the plywood, and trimed it flush to the top and bottom using hand planes. I then rough cut it to a circle on a bandsaw.

I used a vacuum press with standard yellow glue to adhere the sunburst to the substrate. I then used a nasty screaming monster (router) to shape the profile around the edge of the table. I just couldn't figure out a way to cleanly cut a profiled shape on a rounded table with hand tools without damaging the veneer. If anyone has suggestions for how to do this, I'm open for ideas!

The bottom was covered with cherry veneer, but I only did a 6-piece match on the bottom. I just wanted to cover the plywood, and that was the smallest number of pieces that I had that could cover the area.

The finish started with one coat of Liberon Furniture Oil for color. After this cured, I used super-blonde shellac for the top-coat. I must have used at least 12 coats of shellac on the top to fill the voids. I would brush on two coats, wait for it to fully cure, and then sand it down. Repeat until voids filled. The voids were primarily on the veneer joints, not on the grain of the veneer as the veneer was pretty tight-grained. I could have used a grain-filler, but my previous attempts with this were not as clear as this labor-intensive process.


img

Re: Cherry Tea Table

#3

Re: Cherry Tea Table

Paul M in San Diego

>A final picture shows the hand-cut sliding dovetails that attached the legs to the column. The column was glued up from 3 pieces of the same board, so the color match is pretty good.

The sliding dovetails were cut by first making a flat on the side of the column the size of the base of the leg. A trench was drilled into the column, and the sides were pared to the desired angle. I have a small depth gage where the depth rod can be tilted from the base and I used that to guage the sides.

The matching dovetail was made on the legs using a saw to define the sholder, a sholder plane held at an angle to cut the tail, and a chisel to clean up the bottom corners.

I made the dovetail only go 7/8 of the way up the end of the leg. The upper 1/8 was shaped using a chisel to match the curvature of the column. This didn't turn out perfectly, but it was acceptable in the end.

At the other end of the column, I created a very large single tenon. The tenon is the full width of the upper collar of the turning, and the thickness of the center board in the laminated column. The support piece between the column and the table is made of three laminated boards, and has a matching mortise to accept this tenon. The curved profile was shaped with a shoulder plane, as there was no veneer that I had to worry about damaging. I'm pretty pleased with how this matches the profile on the edge of the top. The mortise and tenon fit quite tightly, and no glue was used. If this loosens up later, then I'll peg it with a dowel.

You can also see one of the two screws used to attach the top to the mortised piece. I couldn't think of another way to do this without a fastener.

Thanks for listening! I rarely finish projects, and I don't have a lot to add to this message board, but I read all the messages and feel like I know most of you as friends. I started this project with a request for ideas to this board for constructing the sliding dovetails, and I wish I could remember who suggested the idea of flattening the column. It was a great idea that worked out well.


img

Re: Cherry Tea Table

#4

Re: Cherry Tea Table

Philip Duffy

>Well Done, Paul!

Beautiful work. Show us the next project. I appreciate the fact you shared the details of the challenges. Phil, formerly of Big Number1 @ 32nd St.

Re: Cherry Tea Table

#5

stunning work

Tom Sontag - St. Louis

>Beautiful work Paul. And a terrifically composed post too. Thanks for all of it.

Re: Cherry Tea Table

#6

Re: Cherry Tea Table

Scott Burr in Ben Lomond CA

>It looks great! Thanks for talking me (us) through the sliding dovretail process. That's something I need to work on. 12 coats, wow that's some work.

Re: Cherry Tea Table

#7

Re: Cherry Tea Table

George D. Huron

>That is a very beautiful table. I make my candle stands by flattening and dovetailing as well. I used to make the cleat that was screwed to the top round but now I would use one more like the one you used. It helps prevent the top from bowing.

Re: Cherry Tea Table

#8

Nice Work!

Jorge Casta�eda ~ East Penobscot Bay

>Paul,

It came out very well, both the woodwork and the finish are first class.

Thaanks for sharing it.

Jorge

Re: Cherry Tea Table

#9

Re: Cherry Tea Table

dave jeske

>very beautiful paul! Thank you for your detailed descriptions of the build process also. I would like to add this type of table to my wish list - wish I could find the time to do this project list that is!

dave

Re: Cherry Tea Table

#10

Thanks for the kind words

Paul M. in San Diego

>Thanks all for the kind words. I'm glad to have this forum available, as suggestions from this group got me through some of the tougher decisions in the process of this project. Talking about tools and their usage is a big part of this forum, but I particularly like seeing peoples projects and hearing the steps they went through to use hand tools on their projects.

My next goal is to start using some molding planes on my projects to add more refined profiles. That will add another level of learning and will also help lengthen my arms so that my knuckles drag further on the ground like they're supposed to. First of all, I'll have to do more than just watch that Todd Herli video.

-- Paul M.

Re: Cherry Tea Table

#11

Re: Thanks for the kind words

Maurice

>Paul - Great job on the table!! I'm in Carlsbad and keep telling myself to take one of the courses from Palomar. Now that I see the results firsthand, I need to kick myself.

Good chance I'll be moving to OC soon so maybe I'll try out Fullerton CC instead.

maurice

Re: Cherry Tea Table

#12

Re: Thanks for the kind words

Paul M. in San Diego

>Maurice,

Fullerton also has a good program. That's where most of the long-time Palomar College instructors have come from.

Either way you go, I encourage you joining a class. I've read lots of WW books, but it just doesn't sink into my thick skull unless I figure it out for myself or learn it first-hand in a class. Enjoy!

Re: Cherry Tea Table

#13

Re: Cherry Tea Table

Don Thompson, Cutler Ridge, South of Miami FL

>That looks very nice, Paul.

I have a question (I have never used veneer, so bear with me). After you glued the veneer to the bandsaw-cut top, you used a r**t*r to make the edge profile. Does one have any trouble routing the veneer, which, if I understand correctly, comes right up to the edge of the circle?

Re: Cherry Tea Table

#14

Thanks, Paul,

Frank Mutchler in Colorado Springs

>for sharing your work. It's a beautiful piece and your description is equally artistic. I agree with you completely in your comments re this community.

Re: Cherry Tea Table

#15

Re: Cherry Tea Table

Paul M. in San Diego

>Hi Don,

The r**t*r part was the scariest of all. That tool is the best test of how well you glued up your lamination. Any voids in the glue will spell disaster.

It's hard to see from the pictures, but the profile is just a simple quarter-round with a stepped shoulder. I used the stepped shoulder so that there would be a sharp edge to the end of the veneer which would create a shadow line where this joined the hardwood edging.

I got lucky, and there was no blowout in this process. I had the screaming beast mounted in my bench-top r**t*r table, and had several 2x4's clamped to the table to define the tangents of the circle to limit the amount that the bit could possible grab onto the workpiece.

If I decided to do lots of these, I would try to make a coopering tool to do this with a curved molding plane. But I rarely do anything twice, and it seemed silly to go through several iterations of tool development to do a one-off project.

Obligatory handtool content: The base of my bench-top vice-mounted r**t*r table contains my first attempts at hand-cut dovetails. They wound up passable. It's fun to have them around as reference to see that I have indeed progressed over time. And it's fun to have hand-cut dovies on a power-tool jig.

👍 This page answered my questions

Your vote helps other woodworkers quickly find the answers and techniques that actually work in the shop.