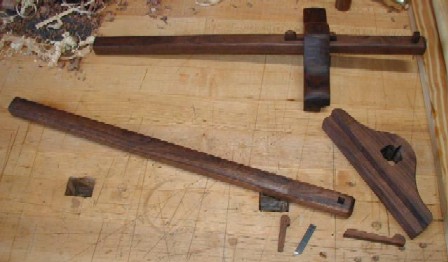
>I discovered that I have need of a panel gauge and I want to make my own. Dave Anderson was making one when I saw him at wood days in NH last fall. Dave, do you have any links or measurements that might help me? I don't know where to start.Anyone else? Thanks---Jack
>I hesitated to use the subject line Hi Jack since that seems to be happening to a lot of threads here recently.
The fence for the panel gage is 6"long and about 2 1/2" high. The thickness is slightly over a full inch. The beam is 3/4" wide and 5/8" high and 16" long. For stability, the beam should be quartersawn wood selected for no grain runout along its length. The shape should be whatever looks good and pleases you. For doing really large panels, I've also seen panel gages with fences as long as 8-10 inches though they are somewhat awkward to use. The same thing on beam length, longer is better for larger panels.
Here's a picture of some of the walnut ones being made last year.
I noticed the rabbet on the fence. I'm guessing that is where the fence rides the edge of the panel to keep from dragging the beam along the panel. Is this right?---Jack
>Often you find both faces of the rabbet lined with brass, for wear resistance. IOW, yes, the edge of the panel rides in the rabbet. Another enhancement you often find is a shoe, attached to the beam directly under the cutter, made from brass or lignum vitae or other wear resistant wood. Both of these keep the beam from dragging on the panel, especially if the panel has a little bow.
>I recently made a panel gauge based on one of Rob Cosman's that I had the pleasure of using. I've attached a sketch of the head of my gauge. It took me about 8-10 hours to make one of these including finishing. If I wasn't such a screwup it would have taken a few hours less less.
I was extremely careful to cut the mortise for the rod square to the face. Nevertheless, when I had finished machining the parts, the rod was not quite perpendicular to the face. Being a perfectionist, I tried to correct this by shaving a bit off the mortise. Of course, this just made things worse, so I shaved a bit off the other side of the mortise, which made things even worse, etc, etc.
I eventually determined that the problem did not lie with the mortise, rather the wedge taper did not quite fit into it's mortise perfectly. A bit of shaving to correct this, following by shimming of the rod mortise which was now oversized fixed everything up.
I used a Glen Drake scoring blade as the cutting edge. The blade is screwed into a recess on the end of the rod. I was quite disappointed in how long it took me to flatten the back of the blade - I must have spent an hour on my 1000 grit stone trying to flatten this dumb little blade.
A 1" long wear plate is located just behind the blade. It's purpose is to keep the rod from dragging on the work.
Cut the mortise for the wedge exactly the same size and angle as the wedge. I clamped an angle guide to the head to guide my mortise chisel.
Others have recommended a 6" length for the head. I used 8" as I like the extra overhang when you are approaching the edge of a board.
One thing that I really liked about Rob's gauge is how it fit into my hand, so I spent a lot of time getting the top edge of the head shaped correctly. I used a small spokeshave to round over the top edge and to develop a nice smooth curve that exactly fits my hand. I smile every time I pick this baby up.
Sorry I don't have a picture of the finished product (yet).
>I incorrectly labelled the dimensions of the mortise for the wedge.
The height of the mortise should be 1/4" (to match the thickness of the wedge).
The depth of the mortise should exactly match the dimensions of the wedge - in my case 3/8" on the face side of the head, and 9/32" on the back side of the head.
One other thing - I put the wedge on the same side of the rod as Rob had. This seems rather "left-handed" to me. You might want to experiment with putting the wedge on the other side of the rod to see if it is more comfortable.
>Hi Steve- I found that all of the original gages I saw had the wedge on the top of the mortise for the beam. This makes the tool "both handed". Nice job by the way and I'll be interested in seeing your pictures when you are finished.