WoodCentral Forums

Est. 1998 — 27 years of woodworking knowledge

drawknife/sharpening

Posts

drawknife/sharpening

#1

drawknife/sharpening

kees laan

>I've read the article about buying a drawknife by Todd (Hughes). You are sharpening with a big beltsander. Is it possible for you to explain how you do that or have pictures of the way you do it, which belts you use etc.

I have the beltsander/grinder of LV but I think it needs some modifications.

kees

Re: drawknife/sharpening

#2

Re: drawknife/sharpening

Todd Hughes

>I have a belt sander I made myself out of an old Hay elevator and some bought parts.Takes a 2 in X 72 in. belt and has [I think] a bottom rubber coated wheel that measures 12 in. across.I normaly use 36 and 220 grit belts.I use the belt sander for just the rough sharpening on a very dull or chipped draw knife and then finish up with a stone.Once my draw knife was sharp I don't think i ever used the sander again on it again instead just touched it up with a stone.Not much to tell about sharpeneing the draw knife on the belt sander, no jigs etc. I just run it along under the wheel using the 36b grit to take out any chips and then finish on the 220.I really dont like to sharpen things being held horizontal,[I was trained to sharpen with the edge verticle] but unless you have a draw knife whose handles come off you don't have much choice. I finish up with an oil stone I found in a box of junk holding the draw knife in one hand while wedging the other handle against somthing and then running the stone back and forth over the blade in a figure 8 motion....not much to it

Re: drawknife/sharpening

#3

Re: drawknife/sharpening

Ernie Miller Topeka

>I hold my draw knife like a fiddle and use a stone bach and forth. Watch the fingers as they can get cut easly. This way you can look down the blade and match the stone to the bevel angle.

Re: drawknife/sharpening

#4

Re: beltsander *PICS*

William R. Duffield, on the Cohansey

>Here are a couple of photos of Todd's belt sander. Maybe they are a little help, even though they don't provide any info on grits.


Re: drawknife/sharpening

#5

And...

Dan Donaldson

>If you play "Flight of the bumblebee", it goes REAL fast ;-)

Sorry, couldn't resist ;-)

Re: drawknife/sharpening

#6

Re: drawknife/sharpening

kees laan

>The bluegrass way or classic?

kees

Re: drawknife/sharpening

#7

OT - flying bumblebees

Bill Houghton, Sebastopol, CA

>When I was in high school, I had a friend who could play the major melody of "Flight of the Bumblebee" on sousaphone.

Conjures up really impressive bumblebees, let me tell you.

Re: drawknife/sharpening

#8

Re: drawknife/sharpening

Ernie Miller Topeka

>It depends if you are working on Queen Ann or rustic furnature.

Re: drawknife/sharpening

#9

Re: drawknife/sharpening

Greg B�tit, Vergennes, VT

>That's exactly how I do it, too. I touch my knives up with a hard arkansas every time I use them. That way there is a light coat of oil on the surfaces during the potentially lengthy periods of time between use.

Greg

Re: drawknife/sharpening

#10

LOL. Great one ;-)

Dan Donaldson

>

Re: drawknife/sharpening

#11

Now THAT'S a serious belt sander.

Don Thompson, Cutler Ridge, South of Miami FL

>

Re: drawknife/sharpening

#12

Re: drawknife/sharpening

George D. Huron

>I use a very similar technique but with a handheld belt sander ment to sand wood. I just use an 80 grit belt and clamp the sander in my vise belt side up. Then with the bevel down and the handles facing away from me, I grind the bevel (I use a spray water bottle to cool the blade periodically so as not to blue the metal). I use the belt turning into the blade. I have not cut a belt yet. This is for rough grinding. I then hold the drawknife like a fiddle and use stones to put a fine edge on the blade. Its pretty easy really. I use stones to hone a small back bevel on the blade as well. I tend to use the drawknife bevel side down (against the work).

Re: drawknife/sharpening

#13

Re: drawknife/sharpening

Russell Seaton

>I just began sharpening my two drawknives last night using the same method you are describing. 4x24 Makita belt sander turned upside down with 36, 60, 80, 100, 120 grit belts. Flattened the backs on both drawknives and ground the bevels down to 20 degrees. It took more than a fair bit of time to somewhat accurately grind the backs flat and the bevels down to 20 degrees. Not a 10 minute job for me. And I still have to hone the edges with stones.

I think my Greenlee drawknife was made to a higher standard than my W.E.T. Works drawknife. The back on the Greenlee was pretty flat to begin with and didn't take much time at all to get a consistent scratch pattern. The W.E.T. drawknife had a not so flat back and took a bit of grinding to get acceptably flat. The Greenlee came with a 30 degree bevel from the factory. Much too high. My Greenlee has never been used and has not seen a stone before. My W.E.T drawknife had its bevel reduced to 20 degrees already and it has been sharpened a few times.

Re: drawknife/sharpening

#14

Re: drawknife/sharpening

kees laan

>My countryworkshopsHK drawknife came with a bevel 25 degrees is also used beveldown.

It is a straight drawknife forged out of one piece of steel.

I never tried a curved one beveldown.

I also think that the bevel-degree is very important.

When I place a straightedge along the sharpened side it is not straight but works perfect. The more I think about this, the more I understand the way Tage Frid is sharpening on his video.

I've also the frencht-ype (arnaud) with the balltypehandel that came out of the box with a backbevel, nice to look at, but this one does't fit me. This one is not sharpened but polished I think.

kees

Re: drawknife/sharpening

#15

Drawknife Sharpening

Edward Damewood, Northern Alabama

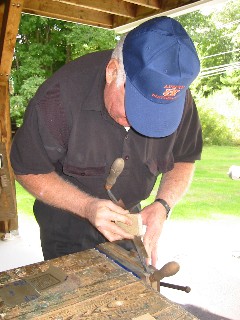
>For sharpening your drawknife, I would respectfully suggest that you clamp the knife in a bench vise so that you can sight down the edge, then sandpaper-sharpen it until it gleams like a mirror (where the cutting edge is formed, anyway). I would only use the belt sander where gross stock removal is required for initial flattening.

Once you have sharpened the knife well for the first time, you should only require touching up with fine sandpaper and/or a strop in order to keep it good and sharp. Here's my father working a drawknife blade on his first foray into sandpaper sharpening. His results were terrific -- put mine to shame.

ED


img

Re: drawknife/sharpening

#16

Re: Drawknife Sharpening

kees laan

>Yes that looks like I've seen Mike Dunbar doing that. Just ezy/scarysharp.

A very flexible system.

1000/1500 grit ?

thanks for the picture.

kees

Re: drawknife/sharpening

#17

Steve Kubien

Guards?

Steve Kubien

>We don't need no stinkin' guards!

Sorry, could resist.

Steve Kubien

Re: drawknife/sharpening

#18

Re: drawknife/sharpening

George Huron

>I actually put a slight backbevel on all of my drawknives using stones. I don't flatten the back. I do flatten the back on all of my chisels and most of my plane irons. If a plane iron is rusty or just hard to flatten, I put a back bevel on it too (no wider than 1/32 inches on a plane iron or shavings can jam under the chipbreaker. And I agree that using a belt sander is for gross metal removal and should only be done for initial shaping of the blade and when the bevel needs shaping (not frequently). A 20 degree bevel works for me.

Re: drawknife/sharpening

#19

Emulating Dunbar

Edward Damewood, Northern Alabama

>Yes, you've hit it precisely -- that aims to be the same method used by Mike Dunbar. If my understanding is correct, Mike uses hand tools primarily for their efficiency, not because they are quaint (i.e., he is not anti-power). Mike stresses speed constantly in his classes.

When it comes to hand tool preparation and use, you can sign me up for whatever Mike's doing. I'm not ignoring other methods, but I will look first to his experience, since he is a continuously-improving pro of 30 years. (That was not intended to sound snotty, so I hope that it did not.)

I have to say that I don't remember how fine my final sandpaper was, but I guess that it would have been either 1000 or 1500 -- I used the finest I could easily find locally. I did finish up with a cheap strop and some yellow honing compound obtained at WoodCraft. I was looking for a nice mirror finish and the disappearing edge, and the knife worked like a dream. I was just tickled with the results, and I think you will be, too.

Incidentally, I've never actually matched up the same grit levels as Mike suggests, but I just went with the concept and tried to have similar jumps in grade. I got my paper around town at a big-box store and an old local hardware store. I'll order some in bulk one of these days.

In a related vein, I also stopped fastening the paper to the glass (out of necessity) and found that to be a good way to work, though it takes more care to not destroy the paper. The only other note I can recall is that I did use a Sharpie to help see the low spots and cue the changing to a finer paper.

Good luck, and I hope this helps. Certainly, none of it is my own.

Re: drawknife/sharpening

#20

Re: MagicMarker vs. Sharpie

William R. Duffield, on the Cohansey

>The MagicMarker, with it's mortise-chisel-shaped felt tip, works much better for marking bevels for than a Sharpie. Application is a lot quicker and smoother, and the ink seems to adhere to the metal better, too.

Re: drawknife/sharpening

#21

Re: MagicMarker vs. Sharpie

Edward Damewood, Northern Alabama

>Thanks, William, that's a good point. (Ouch!) Now that you mention it, I do paint the blade by holding the Sharpie such that the long part of the ogive nose (the side, if you will) contacts the blade. A chisel-pointed marker would be both easier and faster -- I'll add that to my shopping list.

Ahem.

The voice of experience rides again!

Re: drawknife/sharpening

#22

Re: MagicMarker vs. Sharpie

Kirk in HMB, CA

>You can buy chisel tipped Sharpies, kinda oval shaped bodies instead of round. I found the magic marker ink wiped off too easy.

Much larger tip on the oval sharpie than the round one.

Or, go really nuts and get the industrial sized version, mark a plane bottom in 3 strokes (gross exageration (sp?))

👍 This page answered my questions

Your vote helps other woodworkers quickly find the answers and techniques that actually work in the shop.