WoodCentral Forums

Est. 1998 — 27 years of woodworking knowledge

Two under workbench cabinets with drawers

Posts

Two under workbench cabinets with drawers

#1

Two under workbench cabinets with drawers

Progress report: More or less finished. Here are some PICs.

The first cabinet has three drawers with hand-made half blind dovetails. The other drawer has through  doveails made with a Keller jig. I'll probably add a veneer so the look is consistent with half blinds throughout.

The drawers in the other cabinet were made with a half blind dovetail jig. So you could say that I chickened out. But But ... I made the jig! Ha,ha!

I still have to take off the temporary drawer pulls and figure out something permanent.

Also I think some kind of finish would be nice. What do you suggest for that?


Re: Two under workbench cabinets with drawers

#2

Re: Two under workbench cabinets with drawers


Re: Two under workbench cabinets with drawers

#3

Re: Two under workbench cabinets with drawers


Re: Two under workbench cabinets with drawers

#4

Re: Two under workbench cabinets with drawers


Re: Two under workbench cabinets with drawers

#5

Re: Two under workbench cabinets with drawers


Re: Two under workbench cabinets with drawers

#6

Re: Two under workbench cabinets with drawers

That looks like a useful cabinet. I like it.

Now that you have made drawers using several styles and methods, do you have a preference?


Re: Two under workbench cabinets with drawers

#7

Re: Two under workbench cabinets with drawers

I learned a lot from cutting the half blinds by hand, and they have the most elegant look. But I have to say that getting the half blind jig set up and working well was very satisfying. Once that was working right (and it takes some fiddling) the job wen MUCH faster. Something many may not think about is that, if you make half blinds instead of through dovetails at all four drawer corners, then you can cut the grooves for the drawer bottom panel  (easiest on the table saw) all the way through on all four drawer boards so long as the grooves in the pin boards are positioned inside a pin socket. Otherwise , for the tail boards you have to cut stopped grooves (unless you don't care about seeing the groove on the outside of the drawer.)

Probably the slowest part was fitting the drawers to the cabinet after they were assembled. I did that with hand planes. I learned a lot about hand plane blade sharpening and hand plane use. It's even tricky how to hold an assembled drawer for planning,  The drawers bind up until the last couple of plane shavings.  It's surprisingly delicate. If I had to do it again, I think I would carefully take a few light cuts first along the sides of the drawers on the table saw, and then use the hand plane.

I have to say that if I had to do this for a living, I would starve! My hat is off to those who can crank out real work in a timely manner!


Re: Two under workbench cabinets with drawers

#8

First is always slowest ... unless you are me.

I am always tweaking and never happy with what is done.


Re: Two under workbench cabinets with drawers

#9

Re: Two under workbench cabinets with drawers

in a traditional drawer the back only goes down to the top of the drawer bottom. One thing that does is allow the bottom to expand and contract more freely. The other thing is it allows a repair to the bottom or other drawer problems by making the bottom easily removable.

There are many ways to make drawers. I believe my tool cabinet drawers use the method you just suggested and no repairs yet...


Re: Two under workbench cabinets with drawers

#10

Re: Two under workbench cabinets with drawers

I see what you mean, and I did know about that. I chose to glue the bottom in grooves all the way around in that I used plywood. The biggest mistake I made, (and Roger reminded me early on) is that I made all the drawers fairly shallow. I knew better, and like an idiot, did it anyway because I was anxious to get on with it. Now I'm limited to what I can put in there. I have lots of small stuff, block planes, chisels, all kinds of stuff; but it would have been better to have some deeper drawers.


Re: Two under workbench cabinets with drawers

#11

Re: First is always slowest ... unless you are me.

About the only tweaking left here is what drawer pulls to use and perhaps what to do about a final finish to put on. I can't think of anything to adjust or whatever --except that one veneer layer to put on the one drawer front with through dovetails showing.


Re: Two under workbench cabinets with drawers

#12

Re: Two under workbench cabinets with drawers

Eliot.....you know I care about you and I want you to be happy with what you've accomplished......very few here have done what you've done and you are to be congratulated......but now, you know way more about making this kind of cabinet than you did just a few weeks ago......so, I'm going to play devil's advocate, if you do wish that you had planned more for larger drawers because some of the tools you have and want at your bench will not fit in these smaller drawers, then you could put the four best drawers you made in the best case you made and place that under your bench.....the other four drawers and case could be used for storage else where in your shop......and now, you could build a third case with a couple of larger drawers to store those tools that the thin drawers can't.....

you can call me some bad names if you want......just a thought.....


Re: Two under workbench cabinets with drawers

#13

Re: Two under workbench cabinets with drawers

Why should I call you bad names? I been thinking the same thing. But the other thing, the other thing ... is that I just turned 84 and don't have that many decades left! And this project wore me out! You're right of course; and I'll get around to making another cabinet with bigger drawers. If I listened to you in the first place, the project would be more useful.

But I'm pretty happy with it. It's very square, very strong, doesn't look bad, and holds a ton of small stuff; so I can get t\lots of objects off all those shelves and magnetic bars, etc.And they'll be right under my bench.

I'll tell you and the others that something useful happened though: I really did get to be a better woodworker. I can just feel it. Everything I do now I do with more care and precision. And I have more confidence.

An interesting story: I once took a three day course with David Ellsworth. And he was teaching at a lower level than what I had already reached. So I really didn't pick up any new techniques. But -- here's the thing --  when I got back home to turning, just about ALL my wood turning buddies, and friends , who knew my work said my turnings had noticeably improved.


Re: Two under workbench cabinets with drawers

#14

Re: Two under workbench cabinets with drawers

84 and cranking out projects! Congrats on completion. 


Re: Two under workbench cabinets with drawers

#15

Re: Two under workbench cabinets with drawers

Eliot......if you do decide to make another unit......make it as easy on yourself as possible......use that jig you made (I was very impressed with that)......

it is interesting that when you make something for the first time......and you go thru that struggle.....just how much more you know and understand after you complete the project.....you should feel more confident because you are more capable......I liked that you knew about using a scraper in making half blinds......your project was a success in many ways.


Re: Two under workbench cabinets with drawers

#16

Re: Two under workbench cabinets with drawers

Roger, thanks for the nice words. I do feel more confident; I learned a great deal. And yes, I'm inclined, if I make another one (not too soon though), I think I'll use pocket holes for the case and my-home made half blind dovetail jig for the drawers. Once I had that jig tuned up, there was a  kind of shop production thing going, and the drawers went much faster.

I believe I first saw Frank Klausz in a video use a card scraper for extending those kerfs. I just use a thin one and tap it in with a brass hammer. I believe Derek made one with a handle; and, of course Cosman sells something like that. What do you use, assuming that you do also? I know you like to make tools.

I'm actually tempted to try removing most of the pin waste with a small trim router, if I find more energy and cut them by hand again. I saw Klausz do that too, believe it or not. Would you do it that way?


Re: Two under workbench cabinets with drawers

#17

Re: Two under workbench cabinets with drawers

Eliot.....I treated myself to Cosman's X-Ten......making something probably would not be too difficult though......

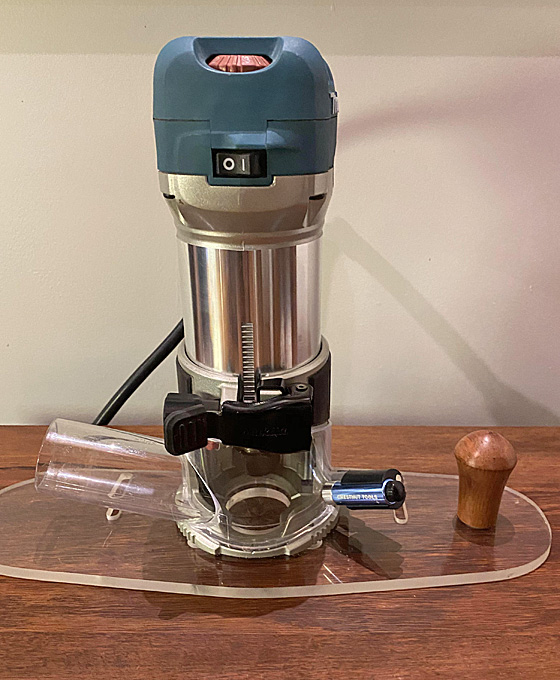
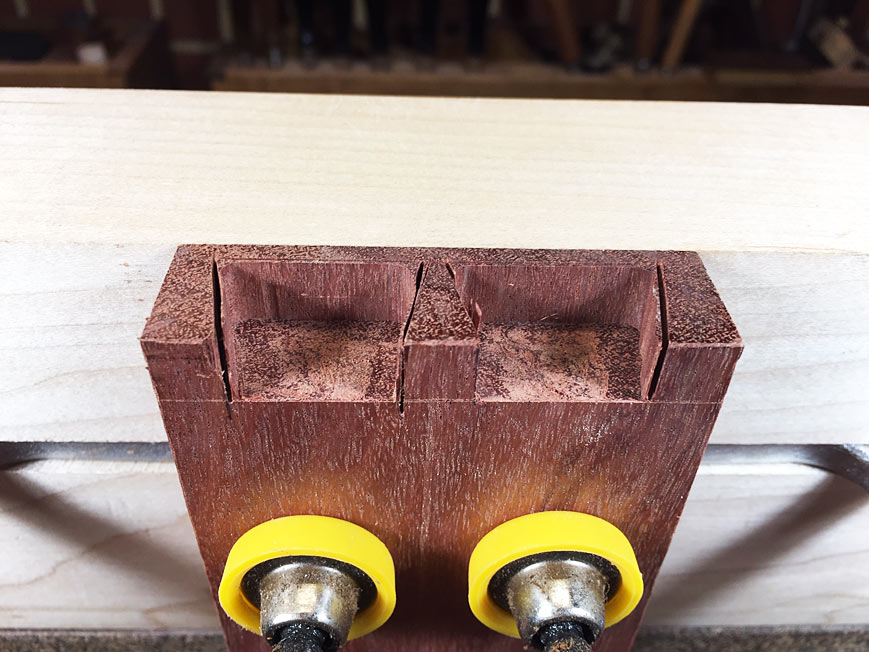
I do use a small router to remove half-blind waste on the pin board......I made a little jig to use with the router base that prevents the router from cutting beyond the base line......hope these photos are self explanatory......


Re: Two under workbench cabinets with drawers

#18

Re: Two under workbench cabinets with drawers

 With regard to the kerf extender, I believe I got away with just tapping in a thin cabinet scraper because I was working in very soft redwood. I suppose you have to hit that X-ten like you mean it for harder woods. Is that right? If so, I may have to break down and buy or make one. Given the cost, I'm surprised that you didn't go for making one; I've seen some of the stuff you have made. Really fine.

And something like your router set up is about what I had in mind. I even bought some little battery powered  Xmas-type lights that are on a kind of string in anticipation of doing something like that. The idea is to bunch up the lights around the inside of the router base and glue the tangle down with hot melt glue. I saw some video about it. I'm worried about seeing what's going on in there.


Re: Two under workbench cabinets with drawers

#19

Re: Two under workbench cabinets with drawers

Cosman has a video showing how best to use his kerf extender......incrementally seems to be an appropriate word to describe his method......so, no......you do not bang on it real hard......just place the tool about a ¼ of the length of the kerf and work it down with a number of smaller mallet strikes......then go in a little deeper to the ½ way mark.......and then ¾.......and finally at full depth......and use a clamp to protect the two outside half pins from splitting.......slowly......methodically......safely.....


Re: Two under workbench cabinets with drawers

#20

Peter......video help if you can......

see a YouTube video called Half-Blind Dovetail Kerf X-10 from Rob Cosman.......


Re: Two under workbench cabinets with drawers

#21

Waste removal

Roger and Eliot


Roger, we have had this discussion before with Bill and yourself (Bill does it the same way as you), and I repeat some of it here for Eliot and others to decide how they may take up this challenge. Just to note that I prefer to chop out the waste, but might again use a router if there were many drawers to do.

I orientate the pin board differently, and created a very simple "fixture" for this (simply a short 50mm thick backing board with a horizontal dovetail slot through the centre). The backing board provides support for a small router.


Here is the pin board clamped to the bench. The sockets have already been sawn and the kerfs extended to full depth ...


Orientated this way (your board is clamped flat to the top of the bench), the straight router bit can follow vertical socket sides ...

There is now minimal waste to remove ...

I have demonstrated my kerfing chisel on many occasions (as a tool, mine precedes Rob Cosman's by several years). Below is one video I made. Skip to the 39 minute mark (unless you are dying of boredom).

Regards from Perth

Derek


Re: Two under workbench cabinets with drawers

#22

Re: Waste removal

Derek......If you had 10 kids like Cosman, you probably would have made and sold your kerning chisel too (there's not a lot to do in Canada at night I guess).

A person should feel free to use whatever means they find effective at getting the waste out.....power routers, drill presses, whatever.......and vertical or horizontal......and not feel guilty about it because some of the most respected people in woodworking are doing the same.


Re: Two under workbench cabinets with drawers

#23

Re: Waste removal

Derek, I  can assure you that there is nothing boring about watching this presentation! What a joy to see it done so well!  And , and,... I can honestly say that the few hand-made half blinds I recently did myself were done in a very similar way --  just not with the same authority! I don't clamp the board vertically in the Moxon for the last cuts. I leave the board flat on the bench and use a small piece of plexiglass the same thickness as the lip to guide the chisel for the last few cuts, which are made in a horizontal direction parallel to the bench. You once told me that the most important part of doing a puzzle is to first look at the picture! Oh, and I will get a fishtail chisel right away. I was wishing I had one when I was doing mine. Thank you!


Re: Two under workbench cabinets with drawers

#24

Re: Waste removal

Derek......watched your video all the way thru......you are a master......it's a pleasure watching you and seeing the results......what you did there is not easy yet you're so productive.

Do you know about yellow automotive tape?......suppose to be a step up in the tape world from the blue painters tape......Amazon sells it as 3M Automotive Refinish Masking Tape, 06656......comes in various widths


Re: Two under workbench cabinets with drawers

#25

Re: Waste removal

A person should feel free to use whatever means they find effective at getting the waste out.....power routers, drill presses, whatever.......and vertical or horizontal......and not feel guilty about it because some of the most respected people in woodworking are doing the same.

Hi Roger, I do hope that you did not see my post as insisting that you, and others, use my method. Bill uses the same method as you did and swears by it. Hopefully, you did not interpret my post as competition. I'd rather delete it. It is just an alternative. There are just so many methods available to do the same thing. 


Regards from Perth

Derek


👍 This page answered my questions

Your vote helps other woodworkers quickly find the answers and techniques that actually work in the shop.