WoodCentral Forums

Est. 1998 — 27 years of woodworking knowledge

Sliding Home

Posts

Sliding Home

#1

Sliding Home

Hank Knight

The writing surface of the slant top desk I'm building is joined to the case sides with housed sliding dovetails. Bill Tindall told me that the joint should be sized loosely so it would go together easily. I'd already cut a snug joint when he gave me this advice, so I was anxious about getting the panel glued in place before the glue tacked and seized the joint. I've been putting this off for weeks. I finally nerved it up yesterday and attacked the problem - with Bessy parallel clamps.

[url=https://flic.kr/p/2gL9W6D][/url][url=https://flic.kr/p/2gL9W6D]IMG_4486[/url] by [url=https://www.flickr.com/photos/158680038@N03/]Hank Knight[/url], on Flickr

[url=https://flic.kr/p/2gL9Xb4][/url][url=https://flic.kr/p/2gL9Xb4]IMG_4487[/url] by [url=https://www.flickr.com/photos/158680038@N03/]Hank Knight[/url], on Flickr
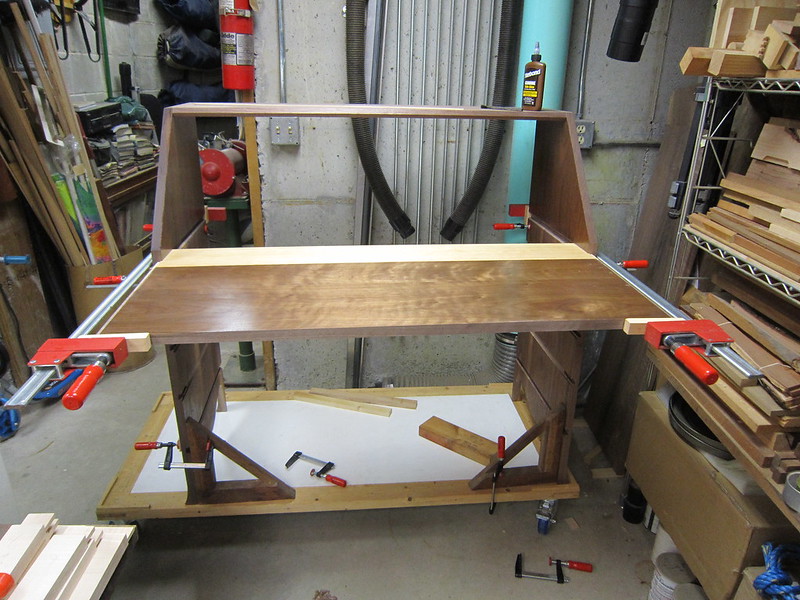
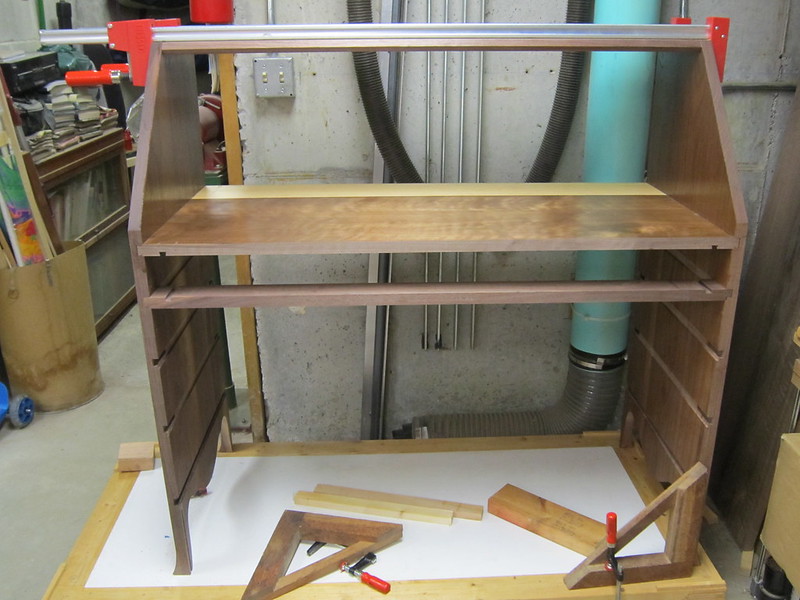
Inch by inch I cranked the panel into place. It slid into the sockets grudgingly, but nothing halted the progress. When I had it about 2/3 of the way in, I applied liquid hide glue to the rear 8" of the socket and the front 8"of the tail and cranked it home. It worked beautifully. Thankfully, everything ended up square. Whew! That's done.

[url=https://flic.kr/p/2gL9dch][/url][url=https://flic.kr/p/2gL9dch]IMG_4489[/url] by [url=https://www.flickr.com/photos/158680038@N03/]Hank Knight[/url], on Flickr
[url=https://flic.kr/p/2gLa2XD][/url][url=https://flic.kr/p/2gLa2XD]IMG_4491[/url] by [url=https://www.flickr.com/photos/158680038@N03/]Hank Knight[/url], on Flickr

[url=https://flic.kr/p/2gL9ZSw][/url][url=https://flic.kr/p/2gL9ZSw]IMG_4490[/url] by [url=https://www.flickr.com/photos/158680038@N03/]Hank Knight[/url], on Flickr
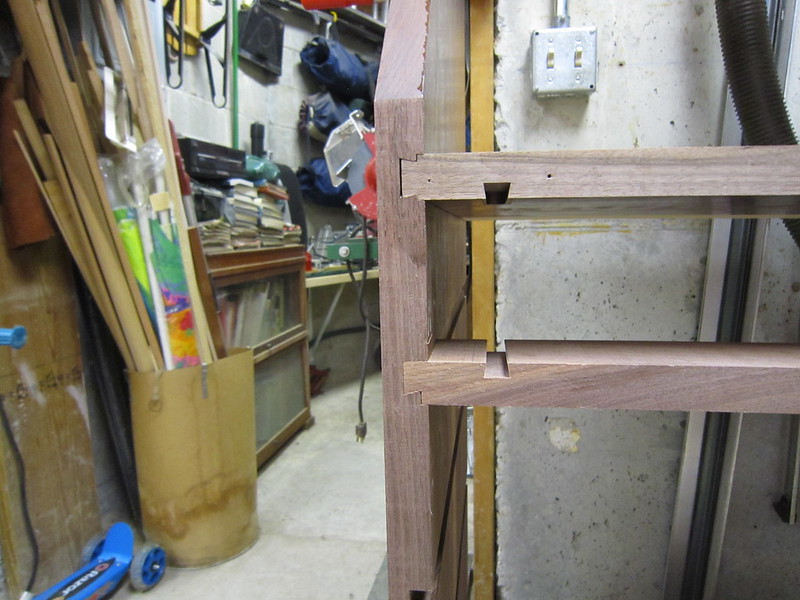
Before I ran out of gas, I made the two dividers that define the channel for the lopers (the pieces that slide out to support the drop front when its open). They're dovetailed into the writing surface and the top drawer divider at the ends of the top drawer opening.

[url=https://flic.kr/p/2gL9hot][/url][url=https://flic.kr/p/2gL9hot]IMG_4494[/url] by [url=https://www.flickr.com/photos/158680038@N03/]Hank Knight[/url], on Flickr

I've cut and fitted all the rest of the drawer dividers and the panel for the case bottom, I'll glue them in as soon as I recover from gluing in the writing surface.

Thanks for looking.

Re: Sliding Home

#2

Re: Sliding Home

Joe shelton

Clever. I hope someday to have the audacity to try something like that. Thanks for the nudge.

Re: Sliding Home

#3

Re: Sliding Home

E Phillip Smith

Very nice.

French feet are a nice touch.

Re: Sliding Home

#4

Re: Sliding Home

Hank Knight

Thanks Phil. I'm getting close to the place where I can finish the French feet. I can't wait. I'll post photos, assuming I don't screw them up!😄

Re: Sliding Home

#5

Re: Sliding Home

Bruce, a MN Galoot

Nice work. Bill T told me about the liquid hide glue trick on a sliding dovetail, and I slid a 24” joint together, glued the full length. It went in like it had been greased.

Re: Sliding Home

#6

Re: Sliding Home

Jim Dillon

Hank, love those dovetailed dividers. William Neptune in FWW 276, July/August had a special on creating those dividers. I can only aspire someday to try something like that. Yours is a classic example. I switched to Titebond liquid hide glue maybe 10 years ago and never looked back. Love its working time and ease of clean up. Thanks for posting. Jim

Re: Sliding Home

#7

Re: Sliding Home

Derek Cohen (in Perth, Australia)

The writing surface of the slant top desk I'm building is joined to the case sides with housed sliding dovetails. Bill Tindall told me that the joint should be sized loosely so it would go together easily. I'd already cut a snug joint when he gave me this advice, so I was anxious about getting the panel glued in place before the glue tacked and seized the joint. I've been putting this off for weeks. I finally nerved it up yesterday and attacked the problem - with Bessy parallel clamps.

Inch by inch I cranked the panel into place. It slid into the sockets grudgingly, but nothing halted the progress. When I had it about 2/3 of the way in, I applied liquid hide glue to the rear 8" of the socket and the front 8"of the tail and cranked it home. It worked beautifully. Thankfully, everything ended up square. Whew! That's done.

Hank, the desk looks GREAT! I like the design so far, and the craftsmanship is excellent.

Yes, hide glue does is nice and slippery, and will aid in sliding the parts together.

BUT there is something else that would have made this process so much easier - tapered sliding dovetails. For anything over 6", I will add a taper.

Regards from Perth

Derek

Re: Sliding Home

#8

Re: Sliding Home

Hank Knight

Thanks Derek, I can always count on you for an ego boost! I used tapered sliding dovetails on a hunt board I built several years ago; and you're right, they do make sliding the panel in place easier. I didn't think about that when I cut the joints on my desk. It would have made the process much easier. I won't make that mistake again.

Re: Sliding Home

#9

Re: Sliding Home

Hank Knight

Thanks, Bruce! Bill is a fountain of woodworking wisdom and he is very generous with his knowledge. He has helped me a lot on this project.

Re: Sliding Home

#10

Re: Sliding Home

Hank Knight

Joe, This is the most ambitious project I've ever undertaken, and I've thought more than once that I've bitten off more than I can chew. But I found that if I keep moving forward and solving problems one at a time, things get done. Jump in. It's fun! Maybe a little stressful at times, but fun.

Re: Sliding Home

#11

Re: Sliding Home

Hank Knight

Thanks, Jim. Bill Tindall posted his method for making these dovetailed divider joints a while back and described the described the jig he uses. He was kind enough to teach it to me, and it is a really nice process. The jig is the key. It's pretty simple to make and it makes repeatable half tails. Use the tail profile to mark the sockets that are then sawed and pared by hand. It goes pretty fast and makes a nice, clean joint. Search for Bill's post. If you can't find it, I've got photos I can send you or post if you're interested.

Re: Sliding Home

#12

alternative view

Bill Tindall, E.Tn.

Sliding dovetails are undeniably rewarding to make, and unnecessary. The challenge and reward of making them are a result of their greater complexity. If this complexity dissuades one from employing this joint where it is needed then don't taper.

The most valuable lesson I learned in the Headley shop was "proper" fit. Slidey joints need to slide together with no more than hand pressure. Thus fitted they will not seize during assembly, especially with "greasy" liquid hide glue. If the joint does bind, steady clamp pressure will coax it home.

The surface area of this kind of joint is typically huge. Given the nature of the stress on the joint in service, even the poor gap filling properties of the typical wood glues are more than adequate to keep the joint together. So don't fret the joint being fit too loose to be sufficient.

Re: Sliding Home

#13

Re: alternative view

William Duffield

Another effective, complementary, strategy is to slide them together about 90% of the way dry, put on the closing clamps, apply glue to the exposed ends of the joints (tails at one end and slots at the other end), and quickly slide it home with the clamps.

Re: Sliding Home

#14

Re: alternative view

Derek Cohen (in Perth, Australia)

Another effective, complementary, strategy is to slide them together about 90% of the way dry, put on the closing clamps, apply glue to the exposed ends of the joints (tails at one end and slots at the other end), and quickly slide it home with the clamps.

William, do you really mean this? Glueing both ends would prevent any movement. Movement is inevitable with changes of moisture in the air. I only add glue to the first quarter of the socket (in the case of a panel), which leaves it free to expand towards the rear.

Regards from Perth

Derek

Re: Sliding Home

#15

Re: alternative view

Sgian Dubh

"William, do you really mean this?"

I think he does. In Hank's case, the cross-grain orientation matches so expansion and contraction will be the same.

What you say does, of course, matter if the grain orientation doesn't match, or if you are joining a solid wood panel to a man-made board panel, e.g., a sliding dovetail used to join a solid wood carcase side to a plywood shelf, or something similar.

To be honest, my choice for Hank's joinery would have been a tapered sliding dovetail, something I think you mentioned earlier in the thread. It would have been that, or what I call an interrupted sliding dovetail. This is one where the shelf drops into the housing recess in the carcase side and only has to slide back 25 or 30 mm for a series of perhaps three or four narrow width dovetails to engage with a series of matching narrow width dovetail housings. It's a bit fiddly to cut, but works, and in all honesty I think the tapered sliding dovetail is probably easier to execute. Slainte.

Re: Sliding Home

#16

Re: alternative view

William Duffield

Of course, the only time you would put a spot of glue on both the front and back end of the joint is if the grain was running the same way on both pieces. If cross grain, you are correct. (When I wrote my previous comment, I was not paying attention to your table's specif construction details.) Put the spot of glue at the front of the joint, so all relative movement is at the back, where it is much less likely to be seen.

👍 This page answered my questions

Your vote helps other woodworkers quickly find the answers and techniques that actually work in the shop.