Home Articles Forums Gallery Marketplace Videos

WoodCentral Forums

Knowledge You Can Build On — Est. 1998

VPS-Level Performance. Fully Managed. No Hassle.

Cerused wood

Posts

Cerused wood

#1

Cerused wood

Elizabeth Avila Tirado

Hello,

I hope I'm posting this in the right place. I've watched youtube video's on cerused wood but I still have questions. I love to repurpose and give new life to furniture. Up until now I've always painted furniture using many different techniques. A friend of mine asked me to give new life to her dining table. Since it's a table I decided to paint the bottom as well as the chairs but I'd like to keep the top more natural since it will be exposed to more wear. I came across a blog showing a cerused table which led me to youtube which led me here. So I have questions I can't seem to find answers to. Hopefully someone here can help me.

I've removed the finish of the table and sanded it starting at 80 grit and working myself to 220. I've chosen to dye the wood using aniline dyes. From what I understand I'm supposed to first wet the wood then let it dry overnight. Then give it a light sanding with 600 grit paper.

1. I think I read somewhere I can use steel wool. If so what number should I use?

2. once I get my color where I want it, am I adding some sort of oil before I add the wax?

3. it is my understanding I must "open" the grain of the wood to receive the wax. Is that before or after the oil? also the video's show this being done with a natural bristle brush. The closest I can find is a horse hair shoe polish brush but it seems really soft. What alternative do I have? I found a palmyra brush... Will that work?

4. Once I buff out the wax what should I use to seal the table top? The only top coats I've used have been water based polycrylics.

I'd appreciate any and all help I can get.

Thanks!!

Liz
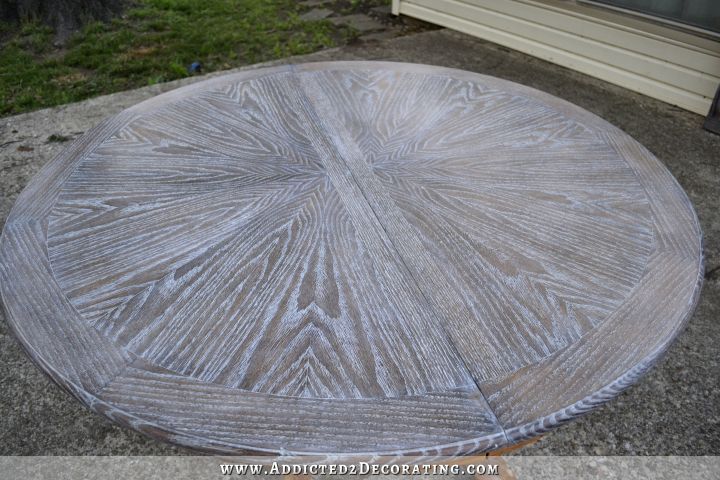

img

Re: Cerused wood

#2

Re: Cerused wood

Yonak

Hi Liz. I can't answer your question because I'm not really a "finish" guy. ..But I just want to say that sure is a pretty table top. That'll look nice when you get it in usable condition. Will it be used indoors or outdoors ?

Re: Cerused wood

#3

Re: Cerused wood

Elizabeth Avila Tirado

Thank you. I really like that style. Hopefully mine will come out somewhat similar haha. I plan to use this table inside.

Re: Cerused wood

#4

Re: Cerused wood

Dick Coers

Nothing sticks to wax, you can't topcoat it. Water based finish will not stick to oil. I prefer sandpaper to steel wool. The idea is to cut off the swollen fiber, not polish it. 600 grit is too fine, 220 or 320 will work. Depends on the species of wood on what you use to open the pores. Actually the whole process will depend on the species. Thie technique is usually reserved for ash, elm, or red oak. A soft brass brush works well.

Re: Cerused wood

#5

Re: Cerused wood

Elizabeth Avila Tirado

Could I use and oil based top coat?

I saw a tutorial here: http://www.ornamentalist.net/2010/12/ebony-limed-oak-step-by-step.html

In the tutorial she put shellac over the stain to seal the stain then started the liming process. She then finished it with clear wax.

If I choose to do this is this clear wax enough to protect the liming from drinking glasses and spilled food? I'm assuming the stain will be protected with the shellac.

Re: Cerused wood

#6

Re: Cerused wood

Dick Coers

I don't care for shellac as a top coat for a dining table. Some folks swear it will hold up to water under glasses, I've witnessed the opposite. How do you think wax will hold up? It's just solvent, some kind of petroleum based solids, and pigment. None of those would be my choice for a dining surface. It's time for you to make sample boards, DO NOT experiment on the table. Many finishing mistakes are made by buying lots of different products and hopping they are all compatible.

If I was doing it;

1)dye to color the wood if necessary

2)thin coat of conversion varnish

3)tinted glaze, from the same supplier and a product approved by the supplier as the conversion varnish

4)top coats of conversion varnish

If more friendly hobbyist materials were needed, I would get on the phone with General Finishes, and have them ship me a kit with all the product I needed. I would not use wax, anywhere on the table. It's tough to get that heavy and deep color separation with wax.

Re: Cerused wood

#7

Re: Cerused wood

Elizabeth Avila Tirado

Hmmm Yes I think it's time to test this out on scrap wood. I don't know about conversion varnish. It sounds difficult to use. At this point I may end up just staining the piece.

Re: Cerused wood

#8

You don't need to be afraid

Dick Coers

Conversion varnish is easy. Measure the product, measure the catalyst, mix and spray. It is expensive, and they usually don't sell small quantities. The part of major concern is protecting your body. Very good respirator, very good ventilation. It's a quick, fantastic table finish! Also, water based products are very good, you just need to be careful what you put under them. Adhesion is not one of their strong suits. That's why I recommend calling General Finishes. Buy all the product from one source, use their advise for application, and you get a good result. Buy a bunch of different products from big box stores, hardware stores, and get advice from Youtube, and you better make a bunch of samples to see what can, and will, go wrong.

Re: Cerused wood

#9

Re: You don't need to be afraid

Elizabeth Avila Tirado

Normally I wouldn't be. I love to experiment and believe it or not this solid oak wood table was purchased online for $70!!! I'm not attached to the point where I can't experiment. However, I live in a small apartment. You'll laugh but I do all of the work I do in my tiny living room. I do wear a respirator but I can't spray inside. I was thinking and read a couple of other blogs and what if I just stained the wood then sealed the wood. Then instead of wax I just used a watered down latex paint to fill in the grain. Then I can seal that then top coat it. What do you think? What topcoat would you recommend in this instance?

Re: Cerused wood

#10

Ellis Walentine

A way to do this

Ellis Walentine

Surface preparation.

You say you've sanded to 220-grit. That's good. Now you want to open up the large pores of the wood. Some people use wire brushes for this but that can really gouge the wood. Plus, I don't know how thick the veneers are on your table. You don't want to rip through them. If you have already sanded this wood beginning with 80-grit, the veneers must be pretty thick. A palmyra brush should be fine for this scrubbing step.

Stain.

Stain the wood with whatever color and type of stain suits you. Dye stain sounds fine. The pre-wetting step you heard about is to raise the grain in advance of a water-based dye. Just wet the wood with a soaking wet cloth, let it sit for a few minutes and then wipe off any excess water. Let it dry -- a couple hours is probably adequate time -- and then lightly knock down any raised fuzz with some 400-grit paper. You could use 600 if you like. Then stain the wood and let it dry completely, at least overnight.

Sealer.

A sealer coat is optional for this process, but as long as you don't fill the pores too much, it is a good idea. It will protect your stain coat somewhat and act as a barrier between the stain and whatever else you put on top of it or in the pores. I'd use Bulls Eye Seal Coat -- which is a clear, 2lb unwaxed shellac product -- thinned about 25% with alcohol. Brush it on quickly and carefully and try not to overlap your strokes too much. Shellac will build in those lapped areas and make the surface lumpy. Don't sand after sealing.

Grain coloring.

Historically, they used a lead-pigment compound for this, later a white pigmented wax. I suggest paint, whatever color suits you. Thin out some latex paint about 20% with water and rag it onto the stained, sealed wood, then wipe off the excess thoroughly with clean rags. You'll know right away if you've gotten the effect you wanted. You could use oil-based paint, but it will be messier.

Top coating.

When everything is completely dry, I'd put another barrier coat of the thinned Seal Coat on, and top it off with 2 - 3 coats of clear gloss oil-based varnish. When it's dry, cut the sheen with some 0000 steel wool. I wouldn't bother waxing it. Wax doesn't protect the wood from abrasion or liquids.

I'd seriously consider the advice of an old finishing guru pal of mine: FFF -- finish firewood first. Get some samples of the same wood type and see how your finishing regime works before you commit to the real deal.

Ellis

Re: Cerused wood

#11

Re: Cerused wood

Hank Knight

Elizabeth,

There are several ways to accomplish your objective and you have gotten some good suggestions. Here's another:

I unintentionally got a cerused finish when I built my oak workbench base - because I was too lazy to tint the filler before I applied it. I used Behlen's neutral water based grain filler which is white without any tinting stain. After sanding the filler smooth, I applied a wipe-on polyurethane. I didn't apply any sealer between the filler and the poly. The filler that remained in the pores after sanding was white and accented the oak grain sharply. Here's a photo of the bench base before I applied the poly:

[URL=http://s50.photobucket.com/user/hankknight/media/DSCN0403.jpg.html][/URL]

I wiped on a half dozen coats of gloss polyurethane for the final finish. Here's a photo of the finished bench. Unfortunately, I don't have a good close-up of the finished base, but I think you can get a pretty good idea of the cerused effect.

[URL=http://s50.photobucket.com/user/hankknight/media/IMG_4228small.jpg.html][/URL

One caveat: the water based filler dries very fast. If you don't do a good, quick job of forcing it into the pores with a squeegee or an old plastic credit card and wiping off the excess (with a piece of rough cloth like burlap) you'll have a lot of sanding to do. I left my final finish glossy, but you can dull the gloss with an Abralon pad or OOOO steel wool after it's cured, or you can apply satin poly as the last coat for the same effect. Satin will obscure the grain pattern if you use it for all finish coats, so just use it for the final coat.

This is a pretty easy process and is done completely by hand - no spray equipment or complicated mixing of finishes. The poly will provide a very tough finish suitable for a table top.

Good luck with whatever regemen you choose.

Hank

Re: Cerused wood

#12

Re: Cerused wood

Howard Acheson

Be very careful using steel wool. Steel wool will have little shards of steel become lossened in use and these shards will rust in any sort of water or waterbased finish is applied. These rust marks become imbedded in the finish and continue to spread over time.

You can wet the sanded surface and let dry overnight and then use 400 grit sand paper to flatten the surface.

Also, I don't fully understand the finishing process you plan to use but I noted that there is a step where you want to apply a wax and then apply some other sort of finish on top of the wax. This can be problematic as most finishes will not properly adhere to a waxed surface.

Re: Cerused wood

#13

Re: A way to do this

Elizabeth Avila Tirado

Thank you Sounds Great!! Now I just applied my second coat of dye. It's black dye. It has a blueish hue as it dries. But that should not show once I get the top coats on correct? Because when I rewet it with dye it looks really black.

Should I give it a light sanding before I seal the dye? the surface feels a little gritty. Normally I always finish everything with a matte finish. I like it much better. But after reading in this thread that matte may mask the grain I'm thinking of finishing just the top in gloss. I saw the attached picture and this person used gloss cabot spar finish. What are your thoughts on this? Is it fairly easy to work with? What do you think of the clean up on this surface? (she used 6 coats)


img

Re: Cerused wood

#14

Re: Cerused wood

Elizabeth Avila Tirado

Thank you Hank for your response. I think I'm going to go along the lines with this method and stay away from the wax. Your work bench is Beautiful!!

Re: Cerused wood

#15

Re: Cerused wood

Elizabeth Avila Tirado

Thank you Howard. I've decided against the wax for this reason exactly. About the steel wool. I have heard about this problem with pieces staying behind and rusting. Now I've already used steel wool in the first step. I have many more steps to go. Would you say I'd be ok if I sand with the super fine grit paper before I seal?

Re: Cerused wood

#16

Ellis Walentine

Re: A way to do this

Ellis Walentine

Yes, you can knock down the nibs before sealing, but you might sand through, so take it very easy.

Whenever you're building a clear film finish, you want to use gloss product up until the final coat, when you can change to satin or matte or eggshell if you don't want a shiny finish. Or you can simply knock down the gloss with some 0000 steel wool.

Ellis

Re: Cerused wood

#17

Re: Cerused wood

William Duffield, on the Cohansey

Instead of steel wool, I use Norton or 3M (scotchbrite) synthetic steel wool pads.

When finishing wood with high tannin content (e.g., oak), you can't raise the grain after using regular steel wool, unless you really want the black flyspeck look. To avoid other problems (for example, I have a lot of iron in my water), I always use distilled or deionized water for raising grain.

There is also brass wool and bronze wool that doesn't rust.

Re: Cerused wood

#18

Re: Cerused wood

Howard Acheson

>>>> Would you say I'd be ok if I sand with the super fine grit paper before I seal?

Yes, the 400 grit I suggested in my above response should work fine.

Re: Cerused wood

#19

Re: A way to do this

Elizabeth Avila Tirado

Ok I'm ready to top coat it. I've decided to stay with a gloss finish. Now I've only used Polycrylic in the past. as I mentioned before the blog I was following used cabot gloss spar varnish and her table was beautiful. The guy at Home Depot told me to use Helmsman Spar Urethane since it can take getting wet.

What do you recommend for a shiny durable finish?

Re: Cerused wood

#20

Re: A way to do this

Dick Coers

Did you ask him how many tables he has finished? Asking for finishing advice from Home Depot is going to be problematic at best. I guess you don't want to get a General Finishes product? I've suggested it several times, but you always ask again or don't mention it in any replies. At least go to an Industrial Sherwin Williams dealer. Spar varnish/urethane is formulated to remain flexible after drying. It also is supposed to have UV blockers in an attempt to live with sun exposure and formulated for extreme wood movement. Absolutely not my first choice for a dining table. What else did you put on the table if you are asking for top coat recommendations again?

Re: Cerused wood

#21

Ellis Walentine

Re: A way to do this

Ellis Walentine

They'll all do. Spar varnish stays more flexible, at the expense of abrasion resistance.

Ellis

Re: Cerused wood

#22

Re: A way to do this

Elizabeth Avila Tirado

The Home Depot guy has finished many pieces of furniture but all antiques and only refinishing not completely changing the look. As to the general finishes It's a $70 table I'm not going to order a special product for a $70 kitchen table. I've already finished the top. I ended up using Ellis' advise and with his information I went with the Spar urethane. The table top is beautiful. It came out with a perfectly smooth finish. I managed to get 4 coats on. I love it. Thank for your help though.

Re: Cerused wood

#23

Re: A way to do this

Elizabeth Avila Tirado

Thank you Ellis. I went with all of your advise. The table top looks amazing with 4 coats put on already. You were very helpful using simple to understand instructions. I can't wait to get started on the rest of the table. Thanks again!!!

Re: Cerused wood

#24

Re: Cerused wood

William Duffield

You wouldn't have has the limed oak problem if you had used Behlen's Pore-O-Pac solvent based grain filler. It used BLO as a binder, which coats the silica filler, making it transparent. If you don't intentionally pigment it to change the color (and make it opaque), it transmits the color of the wood underneath it, and even though the surface i smooth, it still looks like open grained wood. If you don't get it off in time, e.g., if your burlap isn't coarse enough, just slap on some more to remobilize it.

Another cheap trick: Instead of the squeegee, I've found that a nonbreakable switch plate or outlet plate works well, and is cheap and readily available, and easier to hold than a credit card.

Re: Cerused wood

#25

Re: Cerused wood

Hank Knight

Hi William,

Thanks for the tips. I'm familiar with Pore-O-Pac and have used it with success. When I built my workbench, I decided at the last minute to use a filler on the oak base. The Behlens was what I had on hand and I wasn't too concerned about the limed look. It's a workbench, after all, and I've not had any second thoughts about the finish on the base. I like the Behlens water based filler because it tints well with TransTint and has done a good job for me on other projects.

Thanks for the switch plate tip. I'll use it. Credit cards are cheap, but a pain in the neck.

Hank